


目录
1. 使用tf.function转化成tensorflow函数
2.使用装饰器将python函数转化为tensorflow中的函数
5.2 使用tf.function中的input_signature对入参类型进行限定
5.3 使用get_concrete_function对入参类型进行限定,并将function转化为带有图定义的concreteFunction
6.1 查看有图定义的concrete function 的图
7. 总结:将python函数转化为tensorflow图函数的意义
在tensorflow库函数中,做了各种各样的优化,比如针对编译器等
通过某种方法将python函数变成tensorflow库函数是不是更好呢?
1. 使用tf.function转化成tensorflow函数
首先,编写python函数
# 编写python函数
def scaled_elu(z, scale=1.0, alpha=1.0):
    # z >= 0 ? scale * z: scale * alpha * tf.nn.elu(z) 三目运算符
    is_positive = tf.greater_equal(z, 0.0)
    # tf.where 表示三目运算符
    return scale * tf.where(is_positive, z, alpha * tf.nn.elu(z))

print(scaled_elu(-3.))
print(scaled_elu([-3., 0., 3]))
使用tf.function转化成tensorflow函数
scaled_elu_tf = tf.function(scaled_elu)
print(scaled_elu_tf(-3.))
print(scaled_elu_tf([-3., 0., 3]))
scaled_elu_tf 和 scaled_elu是什么关系呢?
print(scaled_elu_tf.python_function is scaled_elu)上述的输出为True。即scaled_elu_tf 的 python function 为 scaled_elu
scaled_elu_tf 和 scaled_elu有什么不同,是否想我们之前预言的那样,会有性能的提升呢?
%timeit scaled_elu(tf.random.normal((10000, 10000)))
%timeit scaled_elu_tf(tf.random.normal((10000, 10000)))
输出结果为:
可见 scaled_elu_tf 比 scaled_elu运行的稍快一些。可以看出,tensorflow函数比python函数的时间性能上有所提升。
2.使用装饰器将python函数转化为tensorflow中的函数
@tf.function
def scaled_elu_tf_2(z, scale=1.0, alpha=1.0):
    # z >= 0 ? scale * z: scale * alpha * tf.nn.elu(z) 三目运算符
    is_positive = tf.greater_equal(z, 0.0)
    # tf.where 表示三目运算符
    return scale * tf.where(is_positive, z, alpha * tf.nn.elu(z))

print(scaled_elu_tf_2(-3.))
print(scaled_elu_tf_2([-3., 0., 3]))
测试时间性能的提升
scaled_elu_2 = scaled_elu_tf_2.python_function
%timeit scaled_elu_2(tf.random.normal((10000, 10000)))
%timeit scaled_elu_tf_2(tf.random.normal((10000, 10000)))
3. 展示tensorflow的函数结构
from IPython.display import display, Markdown

def display_tf_code(func):
    code = tf.autograph.to_code(func)
    display(Markdown('```python\n{}\n```'.format(code)))

display_tf_code(scaled_elu)
结构如下所示

4.python函数中有变量的处理方法
note: 变量必须在tf.function的外面进行初始化
var = tf.Variable(0.)

@tf.function
def add_21():
    return var.assign_add(21)

print(add_21())
Q: 如果把variable定义在里面呢?
A:会抛出异常
在定义神经网络的过程中,用的更多的是variable。
故定义神经网络的时候,在转成tensorflow函数之前,需要先对变量进行初始化。
5.对函数的输入类型作限定
# 如下是一个有入参的tensorflow图

@tf.function
def cube(z):
    return tf.pow(z, 3)

print(cube(tf.constant([1., 2., 3.]))) # 输入为float类型
print(cube(tf.constant([1, 2, 3]))) # 输入为int类型
如上所示,若不对函数的输入作限定,不管是传入float类型的数还是int类型的数都是可以的。
5.1 为什么要对函数的入参做类型的限定?
首先,对入参的类型作限定,会让输入的类型更加明确,
其次,由于python中没有类型信息,容易导致传惨错误。若对入参类型加以限定,就会减少传参错误的情况。
5.2 使用tf.function中的input_signature对入参类型进行限定
@tf.function(input_signature=[tf.TensorSpec([None], tf.int32, name='x')])
def cube(z):
    return tf.pow(z, 3)

try:
    print(cube(tf.constant([1., 2., 3.]))) # 输入为float类型
except ValueError as ex:
    print(ex)

print(cube)
print(cube(tf.constant([1, 2, 3]))) # 输入为int类型
如上述代码所示:对函数的入参做了类型限制,为int类型。故传入float类型的数据时,就会触发异常。
5.3 使用get_concrete_function对入参类型进行限定,并将function转化为带有图定义的concreteFunction
函数有了input_signature特性之后,才能使用save_model 保存模型。
在savedModel的过程中,也可以使用get_concrete_function 函数来把一个 tf.function标注的普通python函数转化为带有图定义的函数。
- @tf.function py func ——> tf.graph
- get_concrete_function ——> add input signature ——>savedModel
# @tf.function py func ——> tf.graph
# get_concrete_function ——> add input signature ——>savedModel

@tf.function()
def cube_2(z):
    return tf.pow(z, 3)

cube_2_func_int32 = cube_2.get_concrete_function(
    tf.TensorSpec([None], tf.int32))

print(cube_2_func_int32)
print(cube_2_func_int32(tf.constant([1, 2, 3]))) # 输入为int类型
除了使用类型,也可以使用具体的数值,对入参的类型进行限定。
cube_2_func_int32_2 = cube_2.get_concrete_function(
    tf.TensorSpec([5], tf.int32))

cube_2_func_int32_3 = cube_2.get_concrete_function(
    tf.constant([5]))

cube_2_func_int32_4 = cube_2.get_concrete_function(
    tf.constant([1, 2, 5]))

print(cube_2_func_int32_2)
print(cube_2_func_int32_2(tf.constant([1, 2, 3, 5, 6, 7]))) # 输入为int类型

print(cube_2_func_int32_3)
print(cube_2_func_int32_3(tf.constant([1, 2, 3, 5, 6, 7]))) # 输入为int类型

print(cube_2_func_int32_4)
print(cube_2_func_int32_4(tf.constant(10))) # 输入为int类型
note:这里只是对类型敏感,对shape不敏感
如下所示:


输出为:

定义入参的名字。
tf.function中的 input_signature中同样也是使用tf.TensorSpec,也可以定义入参的名字。
# tf.function中的 input_signature中同样也是使用tf.TensorSpec
cube_2_func_int32_name = cube_2.get_concrete_function(
    tf.TensorSpec([None], tf.int32, name='t'))

print(cube_2_func_int32_name)
6.查看图
note:虽然tf.function 中也可以对函数加input_signature。但是必须通过get_concrete_function才能将tf.function转化成带有图定义的对象。
6.1 查看有图定义的concrete function 的图
cube_2_func_int32_name.graph6.2 查看图的operations
cube_2_func_int32_name.graph.get_operations()
pow_op = cube_2_func_int32_name.graph.get_operations()[2]
print(pow_op) 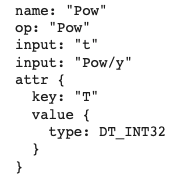
6.2.1 查看某个operation的输入和输出
print(pow_op.inputs)
print(pow_op.outputs)
6.2.2 通过name查看图的某个operation
cube_2_func_int32_name.graph.get_operation_by_name('Identity')6.3 通过name查看tensor
cube_2_func_int32_name.graph.get_tensor_by_name('t:0')
cube_2_func_int32_name.graph.get_tensor_by_name('Pow/y:0')
cube_2_func_int32_name.graph.get_tensor_by_name('Pow:0')
cube_2_func_int32_name.graph.get_tensor_by_name('Identity:0')
6.4 查看图的定义
cube_2_func_int32_name.graph.as_graph_def()7. 总结:将python函数转化为tensorflow图函数的意义
(1) 如何保存一个模型
(2) 保存了模型之后如果把它载入进来?
(3) 在载入模型作inference的时候,如果使用c++或其它语言,经常会用到get_operation_by_name, get_tensor_by_name等这些函数.


 1041
1041


 被折叠的 条评论
为什么被折叠?
被折叠的 条评论
为什么被折叠?
 到【灌水乐园】发言


