


Apache Dubbo Dubbo启动原理
上文讲述了Config层的整理流程,这一篇继续讨论配置加载的细节,那就是今天要探讨的DubboBootstrap。它是Service Provider启动的核心逻辑处理类。
项目版本:
spring boot : 2.2.6.RELEASE
dubbo : 2.7.6
dubbo-spring-boot-starter : 2.7.6
这里使用dubbo和spring boot的自动启动器来自动配置dubbo服务。dubbo和spring整合时主要使用了spring的事件模型,
1 在spring boot应用发出ContextRefreshedEvent事件时,启动dubbo应用
2 在spring boot应用发出ContextClosedEvent事件时,关闭dubbo应用
实现逻辑如下:
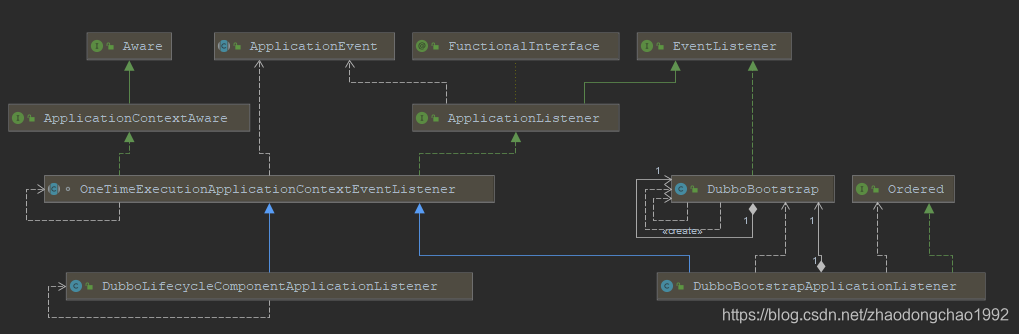
在spring boot中启动一个dubbo provider , 就是通过(DubboAutoConfiguration)向spring boot上下文中注入DubboBootstrapApplicationListener来启动dubbo服务。注入DubboBootstrapApplicationListener来管理dubbo组件的生命周期。这里重点研究DubboBootstrapApplicationListener,在这个监听器里面会使用DubboBootstrap来启动dubbo服务。
/**
 * The {@link ApplicationListener} for {@link DubboBootstrap}'s lifecycle when the {@link ContextRefreshedEvent}
 * and {@link ContextClosedEvent} raised
 *
 * @since 2.7.5
 */
public class DubboBootstrapApplicationListener extends OneTimeExecutionApplicationContextEventListener
        implements Ordered {

    /**
     * The bean name of {@link DubboBootstrapApplicationListener}
     *
     * @since 2.7.6
     */
    public static final String BEAN_NAME = "dubboBootstrapApplicationListener";

    private final DubboBootstrap dubboBootstrap;
    //监听器构造方法中实例化DubboBootstrap实例
    public DubboBootstrapApplicationListener() {
        this.dubboBootstrap = DubboBootstrap.getInstance();
    }

    @Override
    public void onApplicationContextEvent(ApplicationContextEvent event) {
        if (event instanceof ContextRefreshedEvent) {
            //如果是spring容器刷新事件,就启动dubbo服务
            onContextRefreshedEvent((ContextRefreshedEvent) event);
        } else if (event instanceof ContextClosedEvent) {
            //如果是spring容器关闭事件,就停止dubbo服务
            onContextClosedEvent((ContextClosedEvent) event);
        }
    }

    private void onContextRefreshedEvent(ContextRefreshedEvent event) {
        dubboBootstrap.start();
    }

    private void onContextClosedEvent(ContextClosedEvent event) {
        dubboBootstrap.stop();
    }

    @Override
    public int getOrder() {
        return LOWEST_PRECEDENCE;
    }
}
由上可见,dubbo 暴露服务的核心逻辑都在DubboBootstrap#start()中。
当应用做为Service Provider时会自动注入ReferenceAnnotationBeanPostProcessor(RABPP),在RABPP中会注册DubboBootstrapApplicationListener,调用DubboBootstrap的逻辑。
当应用为Service Consumer时会自动注入ServiceAnnotationBeanPostProcessor(ASBPP),应用中没有要暴露的服务时,不会注册RABPP。ASBPP负责扫描@Reference注解标注的属性、实现服务调用的相关逻辑。
DubboBootstrap#start()
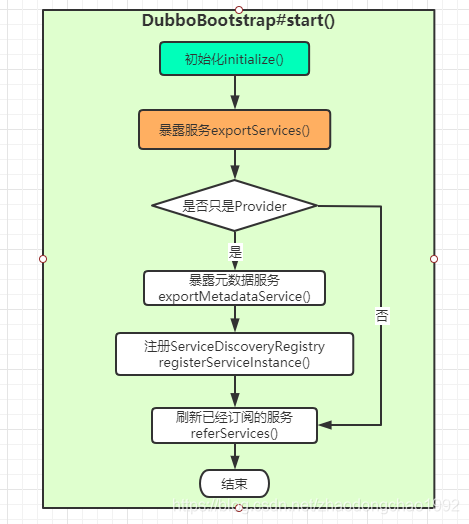
当服务只作为provider角色时,启动时最核心的逻辑都在initialize()和exportServices()方法中。
/*
* 初始化标志,判断initialize()是否正在初始化
*/
private AtomicBoolean initialized = new AtomicBoolean(false);
/*
* dubbo启动标志,判断dubbo服务是否正在启动
*/
private AtomicBoolean started = new AtomicBoolean(false);
/*
* dubbo服务销毁标志,判断dubbo服务是否正在执行销毁操作
*/
private AtomicBoolean destroyed = new AtomicBoolean(false);
/**
 * Start the bootstrap
 * 启动dubbo服务
 */
public DubboBootstrap start() {
    //1. 判断是不是没有启动,如果是就将true设置给started表示,然后执行启动程序
    if (started.compareAndSet(false, true)) {
        //2. 初始化
        initialize();
        //日志打印
        if (logger.isInfoEnabled()) {
            logger.info(NAME + " is starting...");
        }
        //3. 暴露Provider的 Services
        exportServices();

        // Not only provider register
        if (!isOnlyRegisterProvider() || hasExportedServices()) {
            // 4. export MetadataService
            exportMetadataService();
            //5. Register the local ServiceInstance if required
            registerServiceInstance();
        }
        //6 处理Consumer的ReferenceConfig
        referServices();
        //打印启动成功日志
        if (logger.isInfoEnabled()) {
            logger.info(NAME + " has started.");
        }
    }
    return this;
}
也就是说dubbo服务启动主要就是2步:
① dubbo的初始化;
② 服务暴露
1 初始化DubboBootstrap#initialize()
先看初始化方法:
/**
 * Initialize
 */
private void initialize() {
    ...
    //1. 初始化框架的扩展
    ApplicationModel.iniFrameworkExts();
    //2. 初始化配置中心
    startConfigCenter();
    //3. 当注册中心使用zookeeper时,如果配置中心地址没有指定就以注册中心zookeeper作为默认的配置中心
    useRegistryAsConfigCenterIfNecessary();
    //4. 加载远程的配置
    loadRemoteConfigs();
    //5. 检查全局配置
    checkGlobalConfigs();
    //6. 初始化元数据操作接口
    initMetadataService();
    //7. 将本身添加到事件监听器列表中,因为DubboBootstrap本身就是一个事件监听器
    initEventListener();
    ...
}
初始化的第一步,初始化框架扩展中,涉及到了三个重要的重要的业务模型ApplicationModel ProviderModel ConsumerModel 。这整个应用的模型。官方的解释是:
Represent a application which is using Dubbo and store basic metadata info for using during the processing of RPC invoking.
ApplicationModel includes many ProviderModel which is about published services and many Consumer Model which is about subscribed services.
翻译:
ApplicationModel代表一个正在使用Dubbo框架的应用程序。它存储了RPC远程调用基础的元数据信息,并且包含很多ProviderModel(包含了Provider发布的服务接口信息的模型)和ConsumerModel(包含了Consumer订阅的服务的信息的模型) .
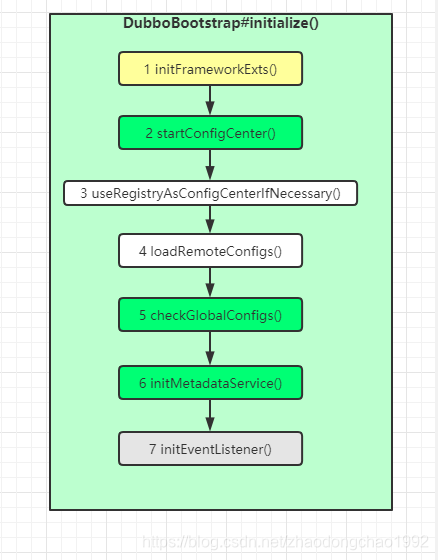
在初始化的过程中,核心逻辑在如上图的1,2,5,6中
1.1 初始化之iniFrameworkExts()
再来看一下ApplicationModel#iniFrameworkExts()的源码:
public static void iniFrameworkExts() {
    Set<FrameworkExt> exts = ExtensionLoader.getExtensionLoader(FrameworkExt.class).getSupportedExtensionInstances();
    for (FrameworkExt ext : exts) {
        ext.initialize();
    }
}
这个实现很简单,就是从系统中获取SPI接口FrameworkExt的所有的扩展实例,然后依次调用initialize方法
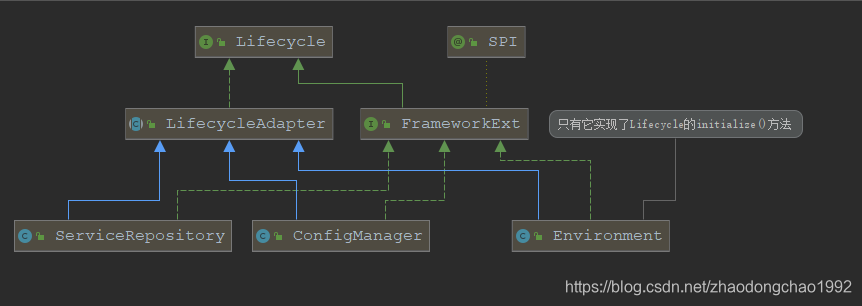
从以上实现关系可以看到,iniFrameworkExts == Environment#initialize()
public class Environment extends LifecycleAdapter implements FrameworkExt {
    public static final String NAME = "environment";
    ...
    private Map<String, String> externalConfigurationMap = new HashMap<>();
    private Map<String, String> appExternalConfigurationMap = new HashMap<>();
    //其实就是将配置中心ConfigCenter的信息存入到本地缓存中
    @Override
    public void initialize() throws IllegalStateException {
        ConfigManager configManager = ApplicationModel.getConfigManager();
        Optional<Collection<ConfigCenterConfig>> defaultConfigs = configManager.getDefaultConfigCenter();
        defaultConfigs.ifPresent(configs -> {
            for (ConfigCenterConfig config : configs) {
                this.setExternalConfigMap(config.getExternalConfiguration());
                this.setAppExternalConfigMap(config.getAppExternalConfiguration());
            }
        });

        this.externalConfiguration.setProperties(externalConfigurationMap);
        this.appExternalConfiguration.setProperties(appExternalConfigurationMap);
    }
     @DisableInject
    public void setExternalConfigMap(Map<String, String> externalConfiguration) {
        if (externalConfiguration != null) {
            this.externalConfigurationMap = externalConfiguration;
        }
    }

    @DisableInject
    public void setAppExternalConfigMap(Map<String, String> appExternalConfiguration) {
        if (appExternalConfiguration != null) {
            this.appExternalConfigurationMap = appExternalConfiguration;
        }
    }
}
1.2 初始化配置中心startConfigCenter()
初始化配置中心,先看源码:
/**
 * 配置管理器,用于管理各层的配置
 */
private final ConfigManager configManager;
/**
 * 唯一的构造函数
 */
private DubboBootstrap() {
    //获取配置管理器ConfigManager 实例对象
    configManager = ApplicationModel.getConfigManager();
    //获取环境变量实例对象
    environment = ApplicationModel.getEnvironment();
    //在关机回调事件中回调DubboBootstrap中的destroy逻辑
    ShutdownHookCallbacks.INSTANCE.addCallback(new ShutdownHookCallback() {
        @Override
        public void callback() throws Throwable {
            DubboBootstrap.this.destroy();
        }
    });
}
private void startConfigCenter() {
    //从ConfigManager实例中获取配置中心的配置
    Collection<ConfigCenterConfig> configCenters = configManager.getConfigCenters();

    if (CollectionUtils.isNotEmpty(configCenters)) {
        CompositeDynamicConfiguration compositeDynamicConfiguration = new CompositeDynamicConfiguration();
        for (ConfigCenterConfig configCenter : configCenters) {
            configCenter.refresh();
            ConfigValidationUtils.validateConfigCenterConfig(configCenter);
            compositeDynamicConfiguration.addConfiguration(prepareEnvironment(configCenter));
        }
        //然后把获取的配置封装之后存入Environment对象实例中
        environment.setDynamicConfiguration(compositeDynamicConfiguration);
    }
    //刷新配置
    configManager.refreshAll();
}
ConfigManager管理着dubbo应用的所有配置类。
下面来看ConfigManager#refreshAll()源码:
public void refreshAll() {
        write(() -> {
            // refresh all configs here,
            getApplication().ifPresent(ApplicationConfig::refresh);
            getMonitor().ifPresent(MonitorConfig::refresh);
            getModule().ifPresent(ModuleConfig::refresh);

            getProtocols().forEach(ProtocolConfig::refresh);
            getRegistries().forEach(RegistryConfig::refresh);
            getProviders().forEach(ProviderConfig::refresh);
            getConsumers().forEach(ConsumerConfig::refresh);
        });

    }
可以看到这一步会刷新这7个核心的配置。
由上可见,startConfigCenter()的作用就是刷新配置,然后设置一些系统的环境变量
1.3 useRegistryAsConfigCenterIfNecessary()
这个方法官方解释:
For compatibility purpose, use registry as the default config center when the registry protocol is zookeeper and there’s no config center specified explicitly.
为了兼容性,当没有指定Config Center 的地址,并且注册中心使用的zookeeper协议时,就使用注册中心的地址作为Config Center的地址
private void useRegistryAsConfigCenterIfNecessary() {
       // we use the loading status of DynamicConfiguration to decide whether ConfigCenter has been initiated.
       //配置了注册中心
       if (environment.getDynamicConfiguration().isPresent()) {
           return;
       }
       //配置中心没有配置,如果有就直接返回
       if (CollectionUtils.isNotEmpty(configManager.getConfigCenters())) {
           return;
       }
       //从configManager中获取注册中心的地址,然后利用注册中心的地址信息构建ConfigCenterConfig
       configManager.getDefaultRegistries().stream()
               .filter(registryConfig -> registryConfig.getUseAsConfigCenter() == null || registryConfig.getUseAsConfigCenter())
               .forEach(registryConfig -> {
                   String protocol = registryConfig.getProtocol();
                   String id = "config-center-" + protocol + "-" + registryConfig.getPort();
                   //新建ConfigCenterConfig
                   ConfigCenterConfig cc = new ConfigCenterConfig();
                   cc.setId(id);
                   if (cc.getParameters() == null) {
                       cc.setParameters(new HashMap<>());
                   }
                   if (registryConfig.getParameters() != null) {
                       cc.getParameters().putAll(registryConfig.getParameters());
                   }
                   cc.getParameters().put(CLIENT_KEY, registryConfig.getClient());
                   cc.setProtocol(registryConfig.getProtocol());
                   cc.setAddress(registryConfig.getAddress());
                   cc.setNamespace(registryConfig.getGroup());
                   cc.setUsername(registryConfig.getUsername());
                   cc.setPassword(registryConfig.getPassword());
                   cc.setHighestPriority(false);
                   //将新建的ConfigCenterConfig添加到ConfigManager对象中
                   configManager.addConfigCenter(cc);
               });
       //刷新dubbo配置
       startConfigCenter();
}
1.4 loadRemoteConfigs() 加载远处配置
源码:
    private void loadRemoteConfigs() {
        // registry ids to registry configs
        List<RegistryConfig> tmpRegistries = new ArrayList<>();
        Set<String> registryIds = configManager.getRegistryIds();
        registryIds.forEach(id -> {
            if (tmpRegistries.stream().noneMatch(reg -> reg.getId().equals(id))) {
                tmpRegistries.add(configManager.getRegistry(id).orElseGet(() -> {
                    RegistryConfig registryConfig = new RegistryConfig();
                    registryConfig.setId(id);
                    registryConfig.refresh();
                    return registryConfig;
                }));
            }
        });

        configManager.addRegistries(tmpRegistries);

        // protocol ids to protocol configs
        List<ProtocolConfig> tmpProtocols = new ArrayList<>();
        Set<String> protocolIds = configManager.getProtocolIds();
        protocolIds.forEach(id -> {
            if (tmpProtocols.stream().noneMatch(prot -> prot.getId().equals(id))) {
                tmpProtocols.add(configManager.getProtocol(id).orElseGet(() -> {
                    ProtocolConfig protocolConfig = new ProtocolConfig();
                    protocolConfig.setId(id);
                    protocolConfig.refresh();
                    return protocolConfig;
                }));
            }
        });

        configManager.addProtocols(tmpProtocols);
    }
这个功能很简单,就是处理了RegistryConfig和ProtocolConfig的id不一致问题
1.5 checkGlobalConfigs()检查全局配置
private void checkGlobalConfigs() {
        // check Application
        ConfigValidationUtils.validateApplicationConfig(getApplication());
        // check Config Center
        Collection<ConfigCenterConfig> configCenters = configManager.getConfigCenters();
        if (CollectionUtils.isNotEmpty(configCenters)) {
            for (ConfigCenterConfig configCenterConfig : configCenters) {
                ConfigValidationUtils.validateConfigCenterConfig(configCenterConfig);
            }
        }
        // check Metadata
        Collection<MetadataReportConfig> metadatas = configManager.getMetadataConfigs();
        for (MetadataReportConfig metadataReportConfig : metadatas) {
            ConfigValidationUtils.validateMetadataConfig(metadataReportConfig);
        }
        // check Monitor
        ConfigValidationUtils.validateMonitorConfig(getMonitor());
        // check Metrics
        ConfigValidationUtils.validateMetricsConfig(getMetrics());
        // check Module
        ConfigValidationUtils.validateModuleConfig(getModule());
        // check Ssl
        ConfigValidationUtils.validateSslConfig(getSsl());
    }
这端代码的主要功能就是检查非空,以及参数的命名规范的检查 。
1.6 initMetadataService()初始化元数据配置中心
/**
 * Initialize {@link MetadataService} from {@link WritableMetadataService}'s extension
 */
private void initMetadataService() {
    startMetadataReport();
    this.metadataService = getExtension(getMetadataType());
    this.metadataServiceExporter = new ConfigurableMetadataServiceExporter(metadataService);
}
private void startMetadataReport() {
        //获取应用配置
        ApplicationConfig applicationConfig = getApplication();
        //获取元数据配置中心类型
        String metadataType = applicationConfig.getMetadataType();
        // FIXME, multiple metadata config support.
        Collection<MetadataReportConfig> metadataReportConfigs = configManager.getMetadataConfigs();
        //如果没有元数据配置信息,并且ApplicationConfig中设置的元数据配置类型为remote ,就抛出异常
        if (CollectionUtils.isEmpty(metadataReportConfigs)) {
            if (REMOTE_METADATA_STORAGE_TYPE.equals(metadataType)) {
                throw new IllegalStateException("No MetadataConfig found, you must specify the remote Metadata Center address when 'metadata=remote' is enabled.");
            }
            return;
        }
        MetadataReportConfig metadataReportConfig = metadataReportConfigs.iterator().next();
        //目前只是非空校验
        ConfigValidationUtils.validateMetadataConfig(metadataReportConfig);
        //Register center address的非空校验
        if (!metadataReportConfig.isValid()) {
            return;
        }
        //MetadataReportInstance是元数据信息的全局实例,存放元数据信息的详细信息,init方法是将配置中心地址写入到这个全局实例
        MetadataReportInstance.init(metadataReportConfig.toUrl());
}
再看 MetadataReportInstance 的实现:
public class MetadataReportInstance {
    /**
     * 元数据初始化标志
     */
    private static AtomicBoolean init = new AtomicBoolean(false);
    /**
     * 元数据信息存储类
     */
    private static MetadataReport metadataReport;

    /**
     * 根据元数据配置的URL对象,将相关的元数据信息写入MetadataReport实例
     */
    public static void init(URL metadataReportURL) {
        if (init.get()) {
            return;
        }
        MetadataReportFactory metadataReportFactory = ExtensionLoader.getExtensionLoader(MetadataReportFactory.class).getAdaptiveExtension();
        if (METADATA_REPORT_KEY.equals(metadataReportURL.getProtocol())) {
            String protocol = metadataReportURL.getParameter(METADATA_REPORT_KEY, DEFAULT_DIRECTORY);
            metadataReportURL = URLBuilder.from(metadataReportURL)
                    .setProtocol(protocol)
                    .removeParameter(METADATA_REPORT_KEY)
                    .build();
        }
        metadataReport = metadataReportFactory.getMetadataReport(metadataReportURL);
        init.set(true);
    }

    public static MetadataReport getMetadataReport() {
        return getMetadataReport(false);
    }

    public static MetadataReport getMetadataReport(boolean checked) {
        if (checked) {
            checkInit();
        }
        return metadataReport;
    }

    private static void checkInit() {
        if (!init.get()) {
            throw new IllegalStateException("the metadata report was not inited.");
        }
    }
}
这里重点是MetadataReport,它是一个接口:
public interface MetadataReport {

    void storeProviderMetadata(MetadataIdentifier providerMetadataIdentifier, ServiceDefinition serviceDefinition);

    void storeConsumerMetadata(MetadataIdentifier consumerMetadataIdentifier, Map<String, String> serviceParameterMap);

    void saveServiceMetadata(ServiceMetadataIdentifier metadataIdentifier, URL url);

    void removeServiceMetadata(ServiceMetadataIdentifier metadataIdentifier);

    List<String> getExportedURLs(ServiceMetadataIdentifier metadataIdentifier);

    void saveSubscribedData(SubscriberMetadataIdentifier subscriberMetadataIdentifier, Set<String> urls);

    List<String> getSubscribedURLs(SubscriberMetadataIdentifier subscriberMetadataIdentifier);

    String getServiceDefinition(MetadataIdentifier metadataIdentifier);
}
从接口可以看出,这个类的实现类主要存储的是 :
- Provider暴露的接口服务的URL信息
- Consumer订阅的接口服务的URL信息
- 接口的定义信息
对于不同的元数据注册中心,会有不同的实现:

这里重点对zookeeper的实现做一下说明,其他的就不再做详细研究了,有兴趣的自己去研究源码。
介绍这个之前再讲一个辅助类:BaseMetadataIdentifier (基本元数据标识符),它是用来区分接口元数据,订阅元数据,方法描述元数据。来看其具体实现:
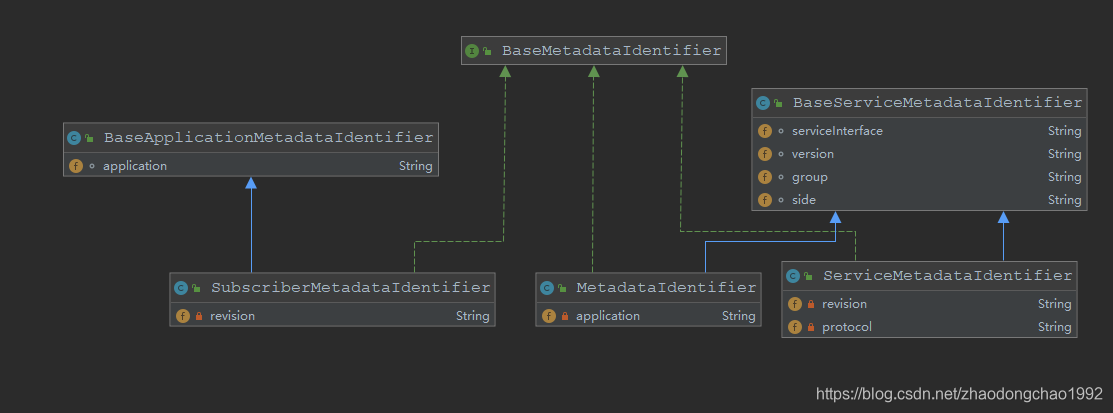
三个主要实现类:
① ServiceMetadataIdentifier 服务接口元数据标识符
The ServiceMetadataIdentifier is used to store the {@link org.apache.dubbo.common.URL}
that are from provider and consumer
ServiceMetadataIdentifier用于存储来自提供商和消费者的{@link org.apache.dubbo.common.URL}
② SubscriberMetadataIdentifier 订阅者元数据标识符
③ MetadataIdentifier 元数据标识符
The MetadataIdentifier is used to store method descriptor.
The name of class is reserved because of it has been used in the previous version.
MetadataIdentifier用储存方法的描述符
由于这个类被用于先前的版本中。所以保留了这个类的名字
其实主要还是使用ServiceMetadataIdentifier来标识 provider and consumer 。然后SubscriberMetadataIdentifier用来标识一些订阅的元数据
接下来再来看详细实现,首先可以看到在具体实现和接口之间还有个抽象层AbstractMetadataReport。它的主要作用就是实现元数据缓存功能,以及一些工具方法。这里就不详细说明了。
直接说ZookeeperMetadataReport的原理:
/**
 * ZookeeperMetadataReport
 *
 * Zookeeper 元数据
 */
public class ZookeeperMetadataReport extends AbstractMetadataReport {

    private final static Logger logger = LoggerFactory.getLogger(ZookeeperMetadataReport.class);
    /**
     * 在zookeeper中的根目录,默认的根目录是dubbo, 可以通过dubbo.register.group=xxx来指定
     */
    private final String root;
    /**
     * zookeeper客户端工具实例
     */
    final ZookeeperClient zkClient;

    public ZookeeperMetadataReport(URL url, ZookeeperTransporter zookeeperTransporter) {
        super(url);
        if (url.isAnyHost()) {
            throw new IllegalStateException("registry address == null");
        }
        //获取URL中的group参数
        String group = url.getParameter(GROUP_KEY, DEFAULT_ROOT);
        if (!group.startsWith(PATH_SEPARATOR)) {
            group = PATH_SEPARATOR + group;
        }
        this.root = group;
        //初始化zookeeper客户端
        zkClient = zookeeperTransporter.connect(url);
    }

    String toRootDir() {
        if (root.equals(PATH_SEPARATOR)) {
            return root;
        }
        return root + PATH_SEPARATOR;
    }

    @Override
    protected void doStoreProviderMetadata(MetadataIdentifier providerMetadataIdentifier, String serviceDefinitions) {
        storeMetadata(providerMetadataIdentifier, serviceDefinitions);
    }

    @Override
    protected void doStoreConsumerMetadata(MetadataIdentifier consumerMetadataIdentifier, String value) {
        storeMetadata(consumerMetadataIdentifier, value);
    }

    @Override
    protected void doSaveMetadata(ServiceMetadataIdentifier metadataIdentifier, URL url) {
        zkClient.create(getNodePath(metadataIdentifier), URL.encode(url.toFullString()), false);
    }

    @Override
    protected void doRemoveMetadata(ServiceMetadataIdentifier metadataIdentifier) {
        zkClient.delete(getNodePath(metadataIdentifier));
    }

    @Override
    protected List<String> doGetExportedURLs(ServiceMetadataIdentifier metadataIdentifier) {
        String content = zkClient.getContent(getNodePath(metadataIdentifier));
        if (StringUtils.isEmpty(content)) {
            return Collections.emptyList();
        }
        return new ArrayList<String>(Arrays.asList(URL.decode(content)));
    }

    @Override
    protected void doSaveSubscriberData(SubscriberMetadataIdentifier subscriberMetadataIdentifier, String urls) {
        zkClient.create(getNodePath(subscriberMetadataIdentifier), urls, false);
    }

    @Override
    protected String doGetSubscribedURLs(SubscriberMetadataIdentifier subscriberMetadataIdentifier) {
        return zkClient.getContent(getNodePath(subscriberMetadataIdentifier));
    }

    @Override
    public String getServiceDefinition(MetadataIdentifier metadataIdentifier) {
        return zkClient.getContent(getNodePath(metadataIdentifier));
    }

    private void storeMetadata(MetadataIdentifier metadataIdentifier, String v) {
        zkClient.create(getNodePath(metadataIdentifier), v, false);
    }

    String getNodePath(BaseMetadataIdentifier metadataIdentifier) {
        return toRootDir() + metadataIdentifier.getUniqueKey(KeyTypeEnum.PATH);
    }

}
可以看到,这个类的核心功能就是初始化zookeeper客户端,根据URL生成不同类型元数据的字符串类型url 。再存储到zookeeper中。
1.7 initEventListener() 将自己作为事件添加到事件发布器中
//事件发布器
private final EventDispatcher eventDispatcher = EventDispatcher.getDefaultExtension();

private void initEventListener() {
    // Add current instance into listeners
    addEventListener(this);
}
 public DubboBootstrap addEventListener(EventListener<?> listener) {
    eventDispatcher.addEventListener(listener);
    return this;
}
2 暴露服务 exportServices()
暴露服务,就是将本地服务信息,注册到注册中心。然后消费者通过订阅注册中心存储的服务的信息,来远程调用服务。
暴露服务到注册中心逻辑如下:
private void exportServices() {
        //从配置管理器中获取到所有的要暴露的服务配置,一个接口类对应一个ServiceConfigBase实例
        configManager.getServices().forEach(sc -> {
            // TODO, compatible with ServiceConfig.export()
            ServiceConfig serviceConfig = (ServiceConfig) sc;
            serviceConfig.setBootstrap(this);
            //判断是否异步暴露接口
            if (exportAsync) {
                //如果是异步暴露接口,就获取一个线程池来异步执行接口暴露逻辑
                ExecutorService executor = executorRepository.getServiceExporterExecutor();
                Future<?> future = executor.submit(() -> {
                    //暴露接口,将接口信息注册到注册中心
                    sc.export();
                });
                asyncExportingFutures.add(future);
            } else {

                sc.export();
                exportedServices.add(sc);
            }
        });
    }
到此dubbo服务的启动逻辑大致理清晰了,详细的注册逻辑,不同的注册中心,实现方式 也不一样。具体的原理下节再详细研讨。


 6419
6419


 被折叠的 条评论
为什么被折叠?
被折叠的 条评论
为什么被折叠?
 到【灌水乐园】发言


