


因现项目需求,需要计算一下给定一个坐标,到某一个地点的之间的距离,任务是存放在MongoDB的对象。由于目前百度文档中都是老版本的,没有可用的样例,老夫只好去官方网站搜寻了,最终实现了这个需求。就立刻记录一下,也帮助一些接触到MongoDB计算坐标的新人。
具体需求是:
给一个坐标,一个地点的ID,地点都存在MongoDB,需要查询这个坐标到给定ID的地点之间的距离。
Spring Boot 官方文档:https://docs.spring.io/spring-boot/docs/2.2.2.RELEASE/reference/html/using-spring-boot.html#using-boot-starter
spring-data-mongodb官方文档:https://docs.spring.io/spring-data/mongodb/docs/2.2.2.RELEASE/reference/html/#mongodb-getting-started
项目准备:
Spring Boot : 2.2.2.RELEASE
spring-data-mongodb : 2.2.3.RELEASE
MongoDB version : 4.2.0
使用IDEA新建一个Spring Boot项目
从Spring Boot的文档中可以看到,spring boot原生就封装了对MongDB的集成,因此只需要在spring boot 项目中将这个starter加进去,就可以直接操作MongDB啦。
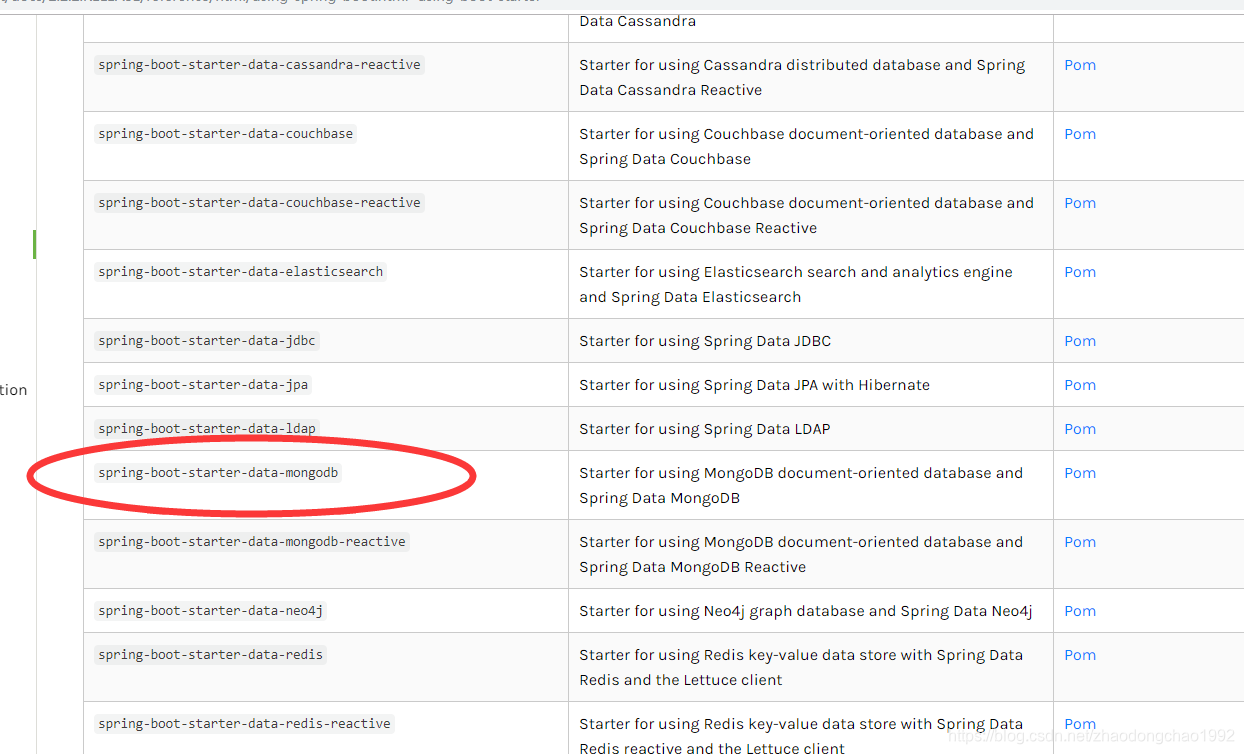
pom文件如下:
<?xml version="1.0" encoding="UTF-8"?>
<project xmlns="http://maven.apache.org/POM/4.0.0" xmlns:xsi="http://www.w3.org/2001/XMLSchema-instance"
         xsi:schemaLocation="http://maven.apache.org/POM/4.0.0 https://maven.apache.org/xsd/maven-4.0.0.xsd">
    <modelVersion>4.0.0</modelVersion>
    <parent>
        <groupId>org.springframework.boot</groupId>
        <artifactId>spring-boot-starter-parent</artifactId>
        <version>2.2.2.RELEASE</version>
        <relativePath/> <!-- lookup parent from repository -->
    </parent>
    <groupId>com.dc</groupId>
    <artifactId>spring-boot-demo</artifactId>
    <version>1.0.0</version>
    <name>spring-boot-demo</name>
    <description>Demo project for Spring Boot</description>

    <properties>
        <java.version>8</java.version>
    </properties>

    <dependencies>
        <dependency>
            <groupId>org.springframework.boot</groupId>
            <artifactId>spring-boot-starter-web</artifactId>
        </dependency>

        <dependency>
            <groupId>org.springframework.boot</groupId>
            <artifactId>spring-boot-configuration-processor</artifactId>
            <optional>true</optional>
        </dependency>
        <dependency>
            <groupId>org.projectlombok</groupId>
            <artifactId>lombok</artifactId>
            <optional>true</optional>
        </dependency>
        <dependency>
            <groupId>org.springframework.boot</groupId>
            <artifactId>spring-boot-starter-test</artifactId>
            <scope>test</scope>
            <exclusions>
                <exclusion>
                    <groupId>org.junit.vintage</groupId>
                    <artifactId>junit-vintage-engine</artifactId>
                </exclusion>
            </exclusions>
        </dependency>

        <dependency>
            <groupId>org.springframework.boot</groupId>
            <artifactId>spring-boot-starter-data-mongodb</artifactId>
        </dependency>
    </dependencies>

    <build>
        <plugins>
            <plugin>
                <groupId>org.springframework.boot</groupId>
                <artifactId>spring-boot-maven-plugin</artifactId>
            </plugin>
        </plugins>
    </build>
</project>
然后从文档中可以查到配置文件的文档如下:
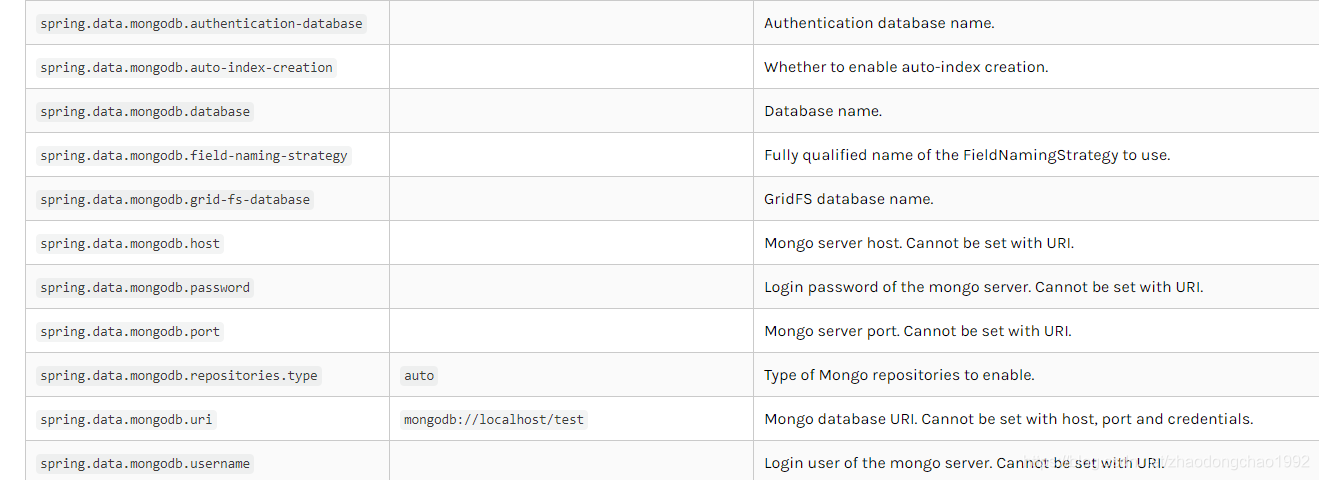 按照文档做如下配置:

这时候就可以在项目中直接使用MongoTemplate来与MongoDB进行数据交互啦
然后定义一个地点的Java对象如下:
/**
 * @author zhaodongchao
 * @date 2020/1/2 20:38
 */
@Data
@Document(collection = "MyPoint")
public class MyPoint implements Serializable {

    private static final long serialVersionUID = -8761214230171616198L;

    private String id;
    private String address;
    @GeoSpatialIndexed(type = GeoSpatialIndexType.GEO_2DSPHERE,useGeneratedName = true)
    private GeoJsonPoint point;
}
这时候再去查看API的使用
参考连接:https://docs.spring.io/spring-data/mongodb/docs/2.2.3.RELEASE/reference/html/#mongo.geo-near
关键部分如下:
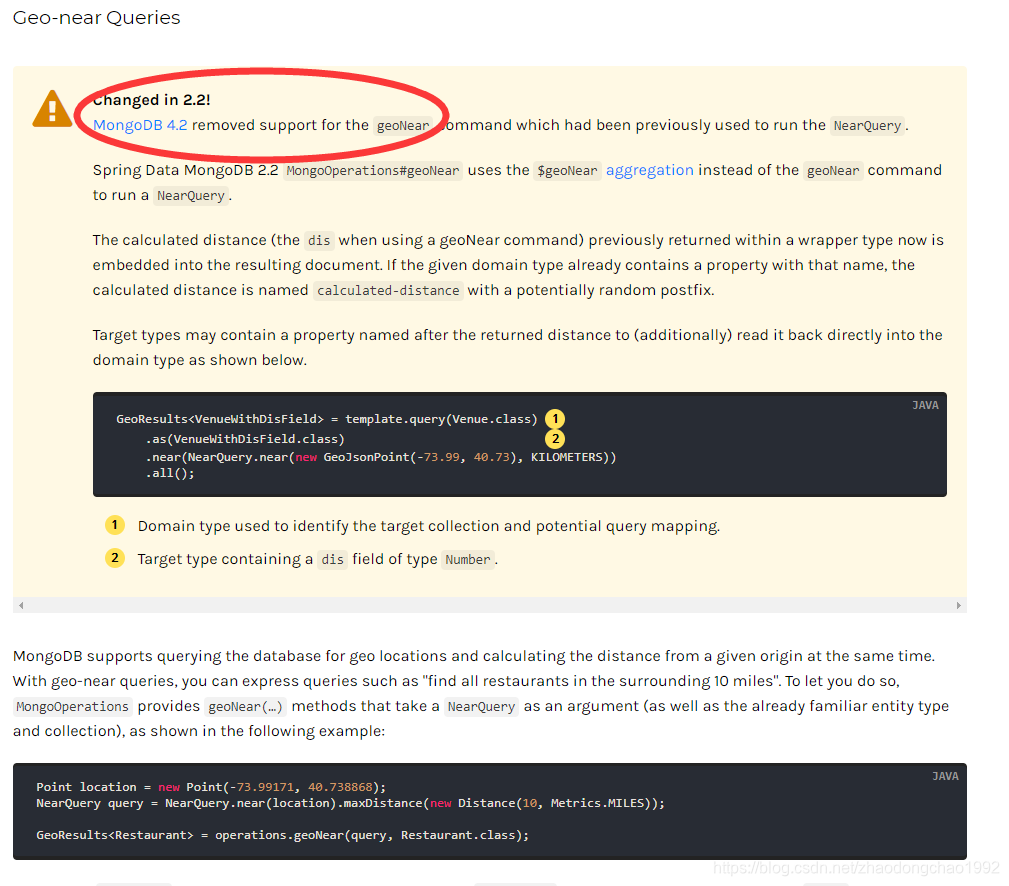 MongoDB4.2.版本需要使用Spring Data MongoDB2.2以上版本
按照文档的说明,可以将查询到的距离值自动存入一个Java对象,但是在实际开发中我们不需要.as()这一步。总结出来的代码如下:
package com.dc.demo.controller;

import com.dc.demo.entity.MyPoint;
import org.springframework.beans.factory.annotation.Autowired;
import org.springframework.data.geo.GeoResult;
import org.springframework.data.geo.GeoResults;
import org.springframework.data.geo.Metrics;
import org.springframework.data.mongodb.core.MongoTemplate;
import org.springframework.data.mongodb.core.geo.GeoJsonPoint;
import org.springframework.data.mongodb.core.query.Criteria;
import org.springframework.data.mongodb.core.query.NearQuery;
import org.springframework.data.mongodb.core.query.Query;
import org.springframework.web.bind.annotation.RequestMapping;
import org.springframework.web.bind.annotation.RestController;

import java.util.UUID;


/**
 * @author zhaodongchao
 * @date 2020/1/2 20:29
 */
@RestController
@RequestMapping("/test")
public class FooHandler {

    @Autowired
    MongoTemplate mongoTemplate ;

    /**
     * 计算给定MongoDB数据库中地点的ID,到一个坐标之间的距离
     */
    @RequestMapping("/cal")
    public String cal(){
        Criteria criteria = Criteria.where("id").is("da097423-17b8-4c5a-917c-0de75b749a2b");
        //构建一个NearQuery实例
        Query query = new Query(criteria);
        NearQuery nearQuery = NearQuery.near(new GeoJsonPoint(-75.99, 40.73), Metrics.MILES).query(query);
        //将NearQuery实例作为参数到数据库中查询
        //写法1
        GeoResults<MyPoint> results1 = mongoTemplate.query(MyPoint.class)
                                                   .near(nearQuery)
                                                   .all();
        //方法2
        GeoResults<MyPoint> results2 = mongoTemplate.geoNear(nearQuery,MyPoint.class);
        //解析查询结果
        for (GeoResult<MyPoint> result : results1) {
            //两点之间的距离
            double distanceValue = result.getDistance().getValue();
            System.out.println("方法1查询结果:"+distanceValue);
            //地点实体数据
            MyPoint p = result.getContent() ;
            System.out.println(p);
        }
        for (GeoResult<MyPoint> result : results2) {
            //两点之间的距离
            double distanceValue = result.getDistance().getValue();
            System.out.println("方法2查询结果:"+distanceValue);
            //地点实体数据
            MyPoint p = result.getContent() ;
            System.out.println(p);
        }

        return "success";
    }

    /**
     * 保存一个地点到MongoDB
     */
    @RequestMapping("/save")
    public String test(){
        MyPoint p1 = new MyPoint();
        p1.setId(UUID.randomUUID().toString());
        p1.setAddress("湖北省武汉市硚口襄阳牛肉面馆");
        p1.setPoint(new GeoJsonPoint(-72.99 ,40.73));
        mongoTemplate.insert(p1);
        return "success";

    }
}
输出结果:
方法1查询结果:157.2423675591047
MyPoint(id=da097423-17b8-4c5a-917c-0de75b749a2b, address=湖北省武汉市硚口襄阳牛肉面馆, point=Point [x=-72.990000, y=40.730000])
方法2查询结果:157.2423675591047
MyPoint(id=da097423-17b8-4c5a-917c-0de75b749a2b, address=湖北省武汉市硚口襄阳牛肉面馆, point=Point [x=-72.990000, y=40.730000])
到此这个功能就实现,详细的使用有兴趣可以深入阅读官方文档。
MongoDB索引文档:https://docs.mongodb.com/manual/indexes/


 2175
2175


 被折叠的 条评论
为什么被折叠?
被折叠的 条评论
为什么被折叠?
 到【灌水乐园】发言


