


Windows_10_System_Programming_2,Objects and Handles
Objects and Handles
Windows is an object-based operating system, exposing various types of objects (usually referred to as kernel Objects), that provide the bulk of the functionality in Windows. Example object types are processes, threads and files. In this chapter we’ll discuss the general theory related to kernel objects without too much details of any specific object type. The following chapters will go into details of many of these types.
Windows 是一个基于对象的操作系统,公开了各种类型的对象(通常称为内核对象),这些对象提供了 Windows 中的大部分功能。示例对象类型是进程、线程和文件。在本章中,我们将讨论与内核对象相关的一般理论,而不会过多讨论任何特定对象类型的细节。以下章节将详细介绍其中的许多类型。
In this chapter:
Kernel Objects
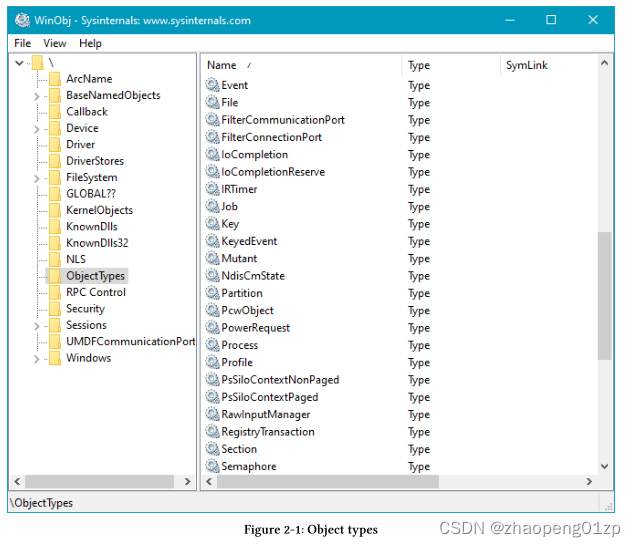
There are quite a few object types supported by the Windows kernel. To get a peek, run the WinObj tool from Sysinternals (elevated) and locate the ObjectTypes directory. Figure 2-1 shows what this looks like. These types can be cataloged based on their visibility and usage:
Windows 内核支持相当多的对象类型。要进行查看,请从 Sysinternals(已提升)运行 WinObj 工具并找到 ObjectTypes 目录。图 2-1 显示了它的样子。这些类型可以根据它们的可见性和用途进行分类:
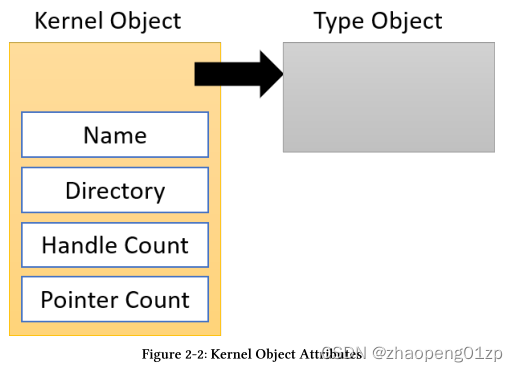
The main attributes of a kernel object are depicted in figure 2-2.
内核对象的主要属性如图 2-2 所示。
Since kernel objects reside in system space, they cannot be accessed directly from user mode.
Applications must use an indirect mechanism to access kernel objects, known as handles.
由于内核对象驻留在系统空间中,因此不能直接从用户模式访问它们。
应用程序必须使用一种间接机制来访问内核对象,称为句柄。
Kernel objects are reference counted. The Object Manager maintains a handle count and a pointer count, the sum of which is the total reference count for an object (direct pointers can be obtained from kernel mode). Once an object used by a user mode client is no longer needed, the client code should close the handle used to access the object by calling CloseHandle. From that point on, the code should consider the handle to be invalid. Trying to access the object through the closed handle will fail, with GetLastError returning ERROR_INVALID_HANDLE (6). The client does not know, in the general case, whether the object has been destroyed or not. The Object Manager will delete the object if its reference drops to zero.
内核对象是引用计数的。对象管理器维护一个句柄计数和一个指针计数,它们的总和就是对象的总引用计数(直接指针可以从内核模式获得)。一旦不再需要用户模式客户端使用的对象,客户端代码应通过调用 CloseHandle 关闭用于访问该对象的句柄。从那时起,代码应将句柄视为无效。尝试通过关闭的句柄访问对象将失败,GetLastError 返回 ERROR_INVALID_HANDLE (6)。在一般情况下,客户不知道对象是否已被销毁。如果对象的引用降为0,对象管理器将删除该对象。
Handle values are multiples of 4, where the first valid handle is 4; Zero is never a valid handle value. This scheme does not change on 64 bit systems.
句柄值是4的倍数,其中第一个有效句柄为4;0永远不是有效的句柄值。这个方案在 64 位系统上不会改变。
A handle is logically an index to an array of entries in a handle table maintained on a process by process basis, that points logically to a kernel object residing in system space. There are various Create* and Open* functions to create/open objects and retrieve back handles to these objects. If the object cannot be created or opened, the returned handle is in most cases NULL (0). One notable exception to this rule is the CreateFile function that returns INVALID_HANDLE_VALUE (-1) if it fails.
句柄在逻辑上是对以进程为基础维护的句柄表中条目数组的索引,逻辑上指向驻留在系统空间中的内核对象。有多种 Create* 和 Open* 函数可用于创建/打开对象并检索这些对象的返回句柄。如果无法创建或打开对象,则返回的句柄在大多数情况下为 NULL (0)。此规则的一个值得注意的例外是 CreateFile 函数,如果它失败则返回 INVALID_HANDLE_VALUE (-1)。
For example, the CreateMutex function allows creating a new mutex or opening a mutex by name (depending whether the mutex with that name exists). If successful, the function returns a handle to the mutex. A return value of zero means an invalid handle (and a function call failure). The OpenMutex function, on the other hand, tries to open a handle to a named mutex. If the mutex with that name does not exist, the function fails.
例如,CreateMutex 函数允许创建一个新的互斥锁或按名称打开一个互斥锁(取决于具有该名称的互斥锁是否存在)。如果成功,该函数将返回互斥体的句柄。返回值为0意味着句柄无效(以及函数调用失败)。另一方面,OpenMutex 函数尝试打开命名互斥体的句柄。如果具有该名称的互斥锁不存在,则函数失败。
If the function succeeds and a name was provided, the returned handle can be to a new mutex or to an existing mutex with that name. The code can check this by calling GetLastError and comparing the result to ERROR_ALREADY_EXISTS. If it is, then it’s not a new object, but rather another handle to an existing object. This is one of those rare cases where GetLastError can be called even if the API in question succeeded.
如果函数成功并且提供了一个名字,则返回的句柄可以是一个新的mutex,也可以是一个有这个名字的现有mutex。代码可以通过调用 GetLastError 并将结果与 ERROR_ALREADY_EXISTS 进行比较来检查这一点。如果是,那么它就不是一个新的对象,而是现有对象的另一个句柄。这是一种罕见的情况,即使有关的API成功了,GetLastError也可以被调用。
Running a Single Instance Process
One fairly well-known usage for the ERROR_ALREADY_EXIST case is limiting an executable to have a single process instance. Normally, if you double-click an executable in Explorer, a new process is spawned based on that executable. If you repeat this operation, another process is created based on the same executable. What if you wanted to prevent the second process from launching, or at least have it shut down if it detects another process instance with the same executable already running.
ERROR_ALREADY_EXIST 情况的一个众所周知的用法是将可执行文件限制为具有单个进程实例。通常,如果您在资源管理器中双击一个可执行文件,则会基于该可执行文件生成一个新进程。如果重复此操作,则会基于同一可执行文件创建另一个进程。如果你想阻止第二个进程启动,或者至少在它检测到另一个具有相同可执行文件的进程实例已经在运行时将其关闭,该怎么办。
The trick is using some named kernel object (a mutex is usually employed, although any named object type can be used instead), where an object with a particular name is created.
If the object already exists, there must be another instance already running, so the process can shut down (possibly notifying its sibling of that fact).
诀窍是使用一些命名的内核对象(通常使用mutex,尽管可以使用任何命名的对象类型),其中一个具有特定名称的对象被创建。 如果该对象已经存在,一定有另一个实例已经运行,所以进程可以关闭(可能通知其兄弟姐妹这一事实)。
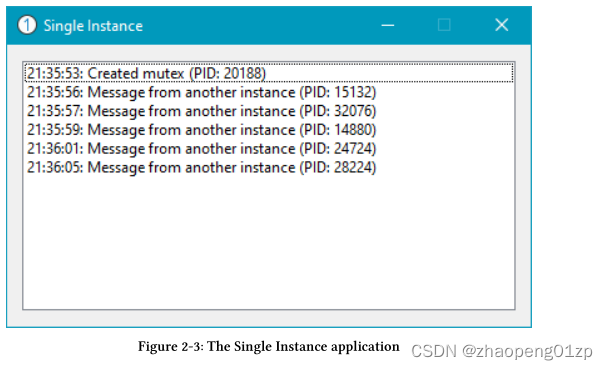
The SingleInstance demo application demonstrates how this can be achieved. It’s a dialogbased application built with WTL. Figure 2-3 shows what this application looks like running.
If you try launching more instances of this application, you’ll find that the first window logs messages coming from the new process instance that then exits.
SingleInstance演示程序展示了如何实现这一目标。它是一个用WTL构建的基于对话框的应用程序。图2-3显示了这个应用程序的运行情况。
如果你尝试启动这个应用程序的更多实例,你会发现第一个窗口会记录来自新进程实例的信息,然后退出。
In the WinMain function, we create the mutex first. If this fails, then something is very wrong and we bail out.
在WinMain函数中,我们首先创建互斥对象。如果这样做失败了,那么就出了很大的问题,我们会采取补救措施。
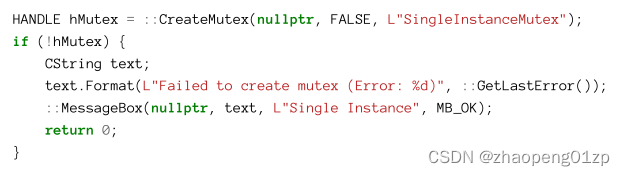
Failure to create the mutex should be extremely rare. The most likely scenario for failure is that another kernel object (which is not a mutex) with that same name already exists.
创建互斥对象失败的情况应该非常罕见。最有可能失败的情况是已经存在另一个同名的内核对象(不是互斥对象)。
Now that we get a proper handle to the mutex, the only question is whether the mutex was actually created or we received another handle to an existing mutex (presumably created by a previous instance of this executable):
现在我们得到了一个正确的互斥体句柄,唯一的问题是互斥体是真的创建的,还是我们收到了现有互斥体的另一个句柄(可能是由该可执行文件的前一个实例创建的):

If the object existed prior to the CreateMutex call, then we call a helper function that sends some message to the existing instances and exits. Here is NotifyOtherInstance:
如果对象在CreateMutex调用之前就存在,那么我们调用一个助手函数,该函数会向现有实例发送一些消息并退出。以下是NotifyOtherInstance:
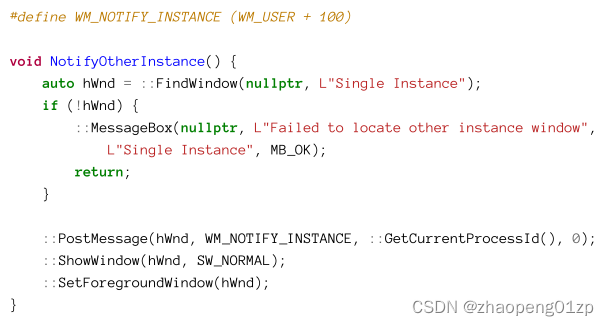
The function searches for the existing window with the FindWindow function and uses the window caption as the search criteria. This is not ideal in the general case, but it’s good enough for this sample.
该函数使用FindWindow函数搜索现有窗口,并使用窗口标题作为搜索条件。这在一般情况下并不理想,但对于这个样本来说已经足够好了。
Once the window is located, we send a custom message to the window with the current process ID as an argument. This shows up in the dialog’s list box.
一旦找到窗口,我们就会向窗口发送一条自定义消息,并将当前进程ID作为参数。这将显示在对话框的列表框中。
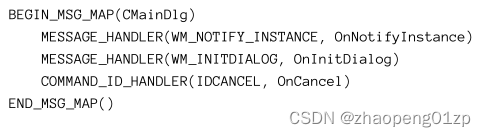
The final piece of the puzzle is handling the WM_NOTIFY_INSTANCE message by the dialog.
In WTL, window messages are mapped to functions using macros. The message map of the dialog class (CMainDlg) in MainDlg.h is repeated here:
难题的最后一部分是通过对话框处理WM_NOTIFY_INSTANCE消息。
在WTL中,窗口消息使用宏映射到函数。MainDlg.h中对话框类(CMainDlg)的消息映射在此重复:
The custom message is mapped to the OnNotifyInstance member function, implemented like so:
自定义消息映射到OnNotifyInstance成员函数,实现方式如下:
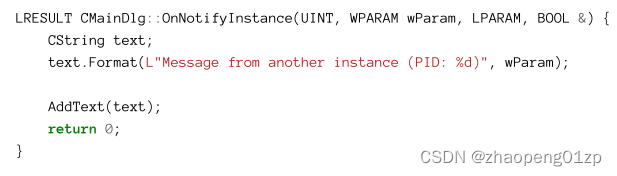
The process ID is extracted from the wParam parameter and some text is added to the list box with the AddText helper function:
进程ID从wParam参数中提取,并使用AddText辅助函数将一些文本添加到列表框中:
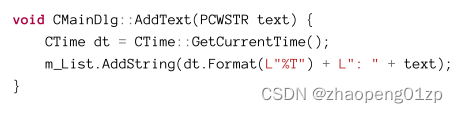
m_List is of type CListBox, a WTL wrapper for a Windows list box control.
m_List的类型是CListBox,它是Windows列表框控件的WTL包装器。
Handles
As mentioned in the previous section, a handle points indirectly to a small data structure in kernel space that holds a few pieces of information for that handle. Figure 2-4 depicts this data structure for 32 bit and 64 bit systems.
如前一节所述,句柄间接指向内核空间中的一个小数据结构,该数据结构包含该句柄的一些信息。图2-4描述了32位和64位系统的数据结构。

On 32 bit systems, this handle entry is 8 bytes in size, and it’s 16 bytes in size on 64 bit systems (technically 12 bytes are enough, but it’s extended to 16 bytes for alignment purposes). Each entry has the following ingredients:
在32位系统上,这个句柄条目的大小是8个字节(如上图所示32位系统的句柄条目,一行是32位,2行共64位,即8字节),在64位系统上是16个字节(从技术上讲,12个字节就足够了,如上图64位系统的句柄条目,但是为了对齐的目的,它被扩展到16个字节)。每个条目都有以下成分:
• Pointer to the actual object. Since the lower bits are used for flags and to improve CPU access times by address alignment, an object’s address is multiple of 8 on 32 bit systems and multiple of 16 on 64 bit systems.
• Access mask, indicating what can be done with this handle. In other words, the access mask is the power of the handle.
• Three flags: Inheritance, Protect from close and Audit on close (discussed shortly).
指向实际对象的指针。由于低位(低3位)用于标志,并通过地址对齐改善CPU的访问时间,一个对象的地址在32位系统中是8的倍数,在64位系统中是16的倍数。
访问掩码,表明可以用这个句柄做什么。换句话说,访问掩码是句柄的权力。
三个标志:继承、关闭时保护和关闭时审计(稍后讨论)。
The access mask is a bitmask, where each “1” bit indicating a certain operation that can be carried using that handle. The access mask is set when the handle is created by creating an object or opening an existing object. If the object is created, then the caller typically has full access to the object. But if the object is opened, the caller needs to specify the required access mask, which it may or may not get.
访问掩码是一个位掩码,其中每个“1”位表示可以使用该句柄进行的特定操作。访问掩码在通过创建一个对象或打开一个现有对象来创建句柄时被设置。如果对象是创建的,那么调用者通常具有对该对象的完全访问权限。但是如果对象被打开,调用者需要指定所需的访问掩码,它可能得到也可能得不到。
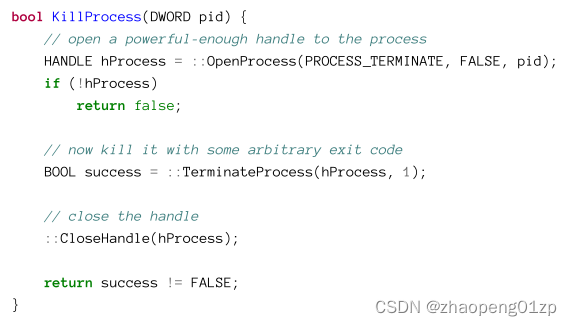
For example, if an application wants to terminate a certain process, it must call the OpenProcess function first, to obtain a handle to the required process with an access mask of (at least) PROCESS_TERMINATE, otherwise there is no way to terminate the process with that handle. If the call succeeds, then the call to TerminateProcess is bound to succeed.
例如,如果一个应用程序想要终止某个进程,它必须首先调用OpenProcess函数,以获得所需进程的句柄,该句柄的访问掩码至少为PROCESS_TERMINATE,否则无法使用该句柄终止进程。如果调用成功,那么对TerminateProcess的调用一定会成功。
Here is an example of terminating a process given its process ID:
下面是一个根据进程ID终止进程的示例:
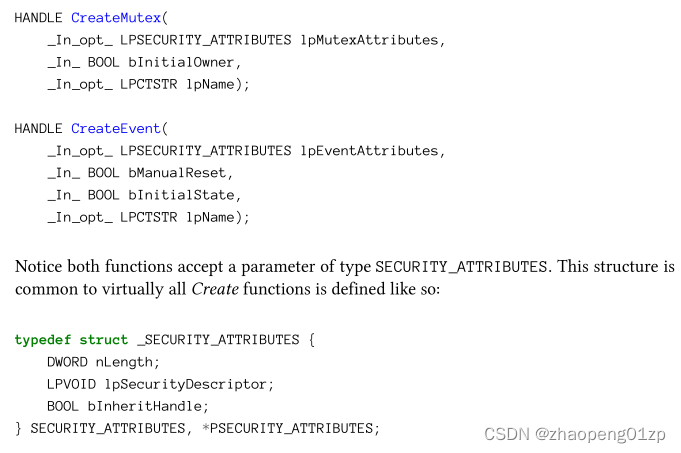
The OpenProcess function has the following prototype:
OpenProcess 函数具有以下原型:
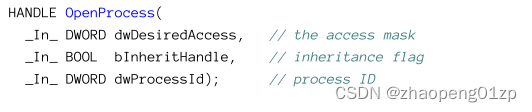
Since this is an Open operation, the object in question already exists, the client needs to specify what access mask it requires to access the object. An access mask has two types of access bits: generic and specific. We’ll discuss these details in chapter 16 (“Security”). One of the specific access bits for a process is PROCESS_TERMINATE used in the above example. Other bits include PROCESS_QUERY_INFORMATION, PROCESS_VM_OPERATION and more. Refer to the documentation of OpenProcess to locate the complete list.
由于这是一个 Open 操作,所讨论的对象已经存在,客户端需要指定访问该对象所需的访问掩码。访问掩码有两种类型的访问位:通用的和特定的。我们将在第 16 章(“安全”)中讨论这些细节。进程的特定访问位之一是上例中使用的 PROCESS_TERMINATE。其他位包括 PROCESS_QUERY_INFORMATION、PROCESS_VM_OPERATION 等。请参阅 OpenProcess 的文档以找到完整列表。
What access mask should be used by client code? Generally, it should reflect the operations the client code intends to perform with the object. Asking for more than needed may fail, and asking less is obviously not good enough.
客户端代码应该使用什么访问掩码?通常,它应该反映客户端代码打算对对象执行的操作。要求超过需要的可能会失败,要求少的显然不够好。
The flags associated with each handle are the following:
与每个句柄相关联的标志如下:
• Inheritance - this flag is used for handle inheritance - a mechanism that allows sharing an object between cooperating processes. We’ll discuss handle inheritance in chapter 3.
• Audit on close - this flag indicates whether an audit entry in the security log should be written when that handle is closed. This flag is rarely used and is off by default.
• 继承——这个标志用于句柄继承——一种允许在协作进程之间共享对象的机制。我们将在第 3 章讨论句柄继承。
• Audit on close——该标志指示当该句柄关闭时是否应在安全日志中写入审计条目。此标志很少使用,默认情况下处于关闭状态。
• Protect from close - setting this flag prevents the handle from being closed. A call to CloseHandle will return FALSE and GetLastError returns ERROR_INVALID_HANLDLE (6). If the process is running under a debugger, an exception is raised with the following message: “0xC0000235: NtClose was called on a handle that was protected from close via NtSetInformationObject”. This flag is rarely useful.
• Protect from close - 设置此标志可防止句柄被关闭。对 CloseHandle 的调用将返回 FALSE,而 GetLastError 将返回 ERROR_INVALID_HANLDLE (6)。如果该进程在调试器下运行,则会引发异常并显示以下消息:“0xC0000235:在通过 NtSetInformationObject 防止关闭的句柄上调用了 NtClose”。这个标志很少有用。
(NtClose被调用在一个通过NtSetInformationObject保护不被关闭的句柄上"。)
Changing the inheritance and protection flags can be done with the SetHandleInformation function defined like so:
可以使用 SetHandleInformation 函数来更改继承和保护标志,如下所示:
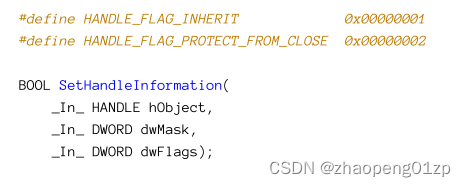
The first parameter is the handle itself. The second parameter is a bit mask indicating which flags to operate on. The last parameter is the actual value for these flags. For example, to set the “protect from close” bit on some handle, the following code could be used:
第一个参数是句柄本身。第二个参数是位掩码,指示对哪些标志进行操作。最后一个参数是这些标志的实际值。例如,要在某个句柄上设置“protect from close”位,可以使用以下代码:

Conversely, the following code snippet removes this same bit:
相反,下面的代码片段删除了这一位:

The opposite function to read back these flags exists as well:
读回这些标志的相反函数也存在:

The handles opened from a particular process can be viewed with the Process Explorer tool from Sysinternals. Navigate to a process you’re interested in, and make sure the lower pane is visible (View menu, Show Lower Pane). The lower pane shows one of two views - switch to Handle view (View menu, Lower Pane View, Handles). Figure 2-5 is a screenshot of the tool showing open handles in an Explorer process. The columns shown by default are Type and Name only. I added the following columns by right-clicking the header area and clicking Select Columns: Handle, Object Address, Access and Decoded Access.
可以使用 Sysinternals 的 Process Explorer 工具查看从特定进程打开的句柄。导航到您感兴趣的进程,并确保下方窗格可见(“视图”菜单,“显示下方窗格”)。下部窗格显示两个视图之一 - 切换到句柄视图(视图菜单、下部窗格视图、句柄)。图 2-5 是该工具的屏幕截图,显示了 Explorer 进程中打开的句柄。默认显示的列只有类型和名称。我通过右键单击标题区域并单击Select Columns来添加以下列:Handle、Object Address、Access和Decoded Access(解码访问)。
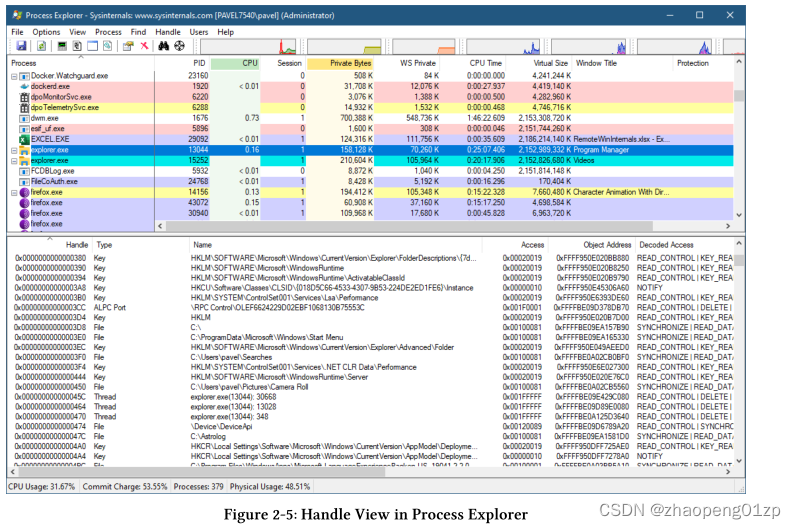
Here is a brief description of the columns:
以下是列的简要说明:
• Handle - this is the handle value itself, relevant to this process only. The same handle value can have a different meaning, i.e. - points to a different object, or maybe even an empty index.
• Type - the object type name. This corresponds to the Object Types directory in WinObj shown in figure 2-1.
• 句柄——这是句柄值本身,只与这个进程相关。同样的句柄值可以有不同的含义,即 - 指向不同的对象,甚至可能是一个空索引。
• 类型——对象类型名称。这对应于图 2-1 中所示的 WinObj 中的 Object Types 目录。
Object Address - this is the kernel address where the real object structure resides.
Notice these addresses end with a zero hex digit on 64 bit (on 32 bit systems, the addresses end with “8” or “0”). There is nothing user mode code with this information,but it can be used for debugging purposes: if you have two handles to an object and you want to know whether they point to the same object you can compare objec addresses; if they are the same, it’s the same object. Otherwise, the handles point to different objects.
对象地址——这是真正的对象结构所在的内核地址。
请注意,这些地址在 64 位上以十六进制数字0结尾(在 32 位系统上,地址以“8”或“0”结尾)。这个信息没有任何用户模式的代码,但它可以用于调试目的:如果你有一个对象的两个句柄,你想知道它们是否指向同一个对象,你可以比较对象地址;如果它们相同,则它是同一个对象。否则,句柄指向不同的对象。
• Access - this is the access mask discussed above. To interpret the bits stored in this hex value, you need to locate the access mask bits in the documentation. To alleviate that, use the Decoded Access column.
• Decoded Access - provides a string representation of the access mask bits for common object types. This makes it easier to interpret the access mask bits without digging into the documentation.
• 访问——这是上面讨论的访问掩码。要解释存储在此十六进制值中的位,您需要在文档中找到访问掩码位。要缓解这种情况(解释该掩码的含义),请使用解码访问列。
• 解码访问——为常见对象类型提供访问掩码位的字符串表示。这使得在不深入研究文档的情况下更容易解释访问掩码位。
Process Explorer’s handle view shows only handles to named objects by default. To view all handles, Enable Show unnamed handles and mappings option from the View menu. Figure 2-6 shows how the view changes when this option is checked.
Process Explorer 的句柄视图默认只显示命名对象的句柄。要查看所有句柄,请从“查看”菜单中启用“显示未命名句柄和映射”选项。图 2-6 显示了选中此选项时视图如何变化。
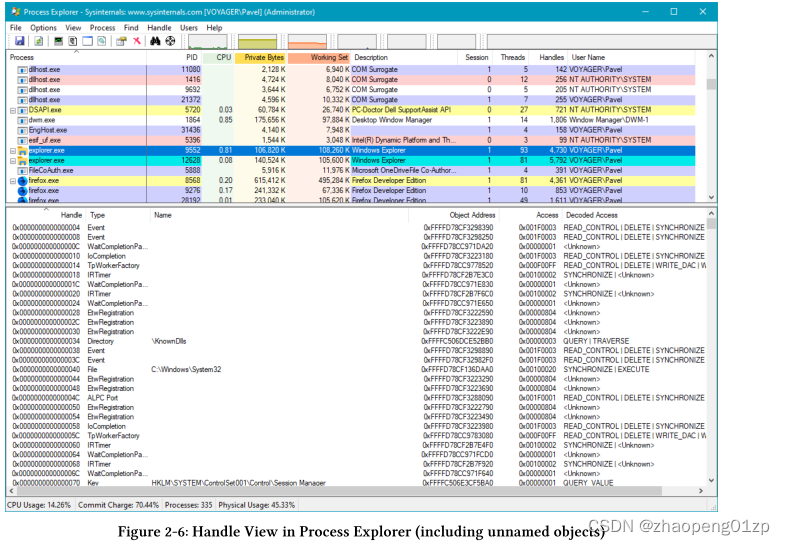
The term “Name” is trickier than it seems. What Process Explorer considers named objects are not necessarily actual names, but in some cases are convenient monikers. For example, process and thread handles are shown in figure 2-5, even though processes and threads cannot have string-based names. There are other object types with a “Name” which is not their name; the most confusing are File and Key. We’ll discuss this “weirdness” in the section “Object Names”, later in this chapter.
“名字”这个术语比看起来要复杂。Process Explorer认为命名的对象不一定是实际的名称,但在某些情况下是方便的称呼。例如,图2-5中显示了进程和线程句柄,尽管进程和线程不能有基于字符串的名字。还有一些对象类型的 "名称 "并不是它们的名字;最令人困惑的是文件和密钥。我们将在本章后面的“对象名”一节中讨论这种“怪现象”。
The total number of handles in a process’ handle table is available as a column in Process Explorer and Task Manager. Figure 2-7 shows this column added to Task Manager.
进程句柄表中的句柄总数在进程资源管理器和任务管理器中显示为一列。图2-7显示了添加到任务管理器中的这个列。
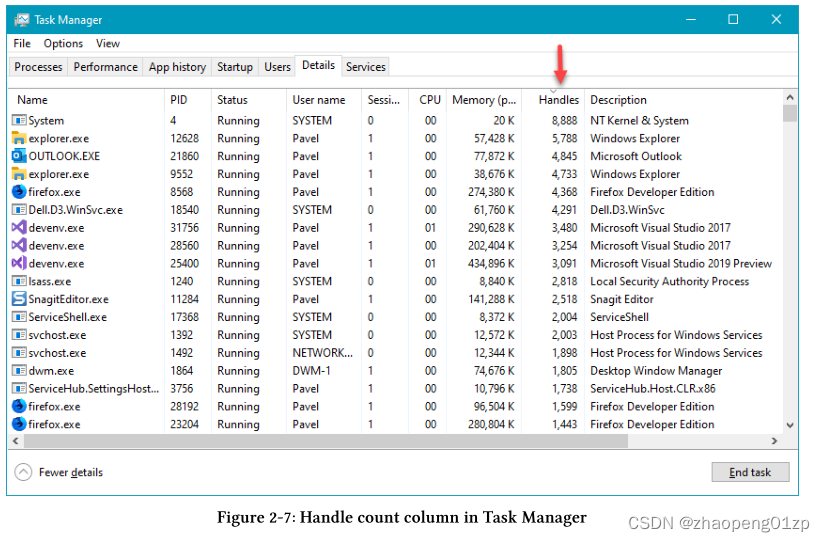
Note that the number shown is the handle count, rather than object count. This is because more than one handle can exist that reference the same object.
请注意,显示的数字是句柄计数,而不是对象计数。这是因为可以存在多个句柄引用同一个对象。
Double-clicking a handle entry in Process Explorer opens a dialog that shows some properties of the object (not the handle). Figure 2-8 is a screenshot of such a dialog.
在Process Explorer中双击一个句柄条目会打开一个对话框,显示该对象(不是句柄)的一些属性。图2-8是这样一个对话框的截图。

The basic object information is repeated from the handle entry (name, type, and address).
This particular object (a mutex) has 3 open handles. The references number is misleading and does not reflect the actual object reference count. For some types of objects (such as mutexes), extra information is shown. In this particular case, it’s whether the mutex is currently held and whether it’s abandoned. (we’ll discuss mutexes in detail in chapter 8).
对象的基本信息从句柄条目中重复出来(名称、类型和地址)。
这个特定的对象(一个mutex)有3个打开的句柄。引用数具有误导性,并不反映实际的对象引用数。对于某些类型的对象(如互斥),会显示额外的信息。在这个特殊的例子中,它是指互斥体当前是否被持有以及是否被放弃。(我们将在第8章详细讨论互斥)。
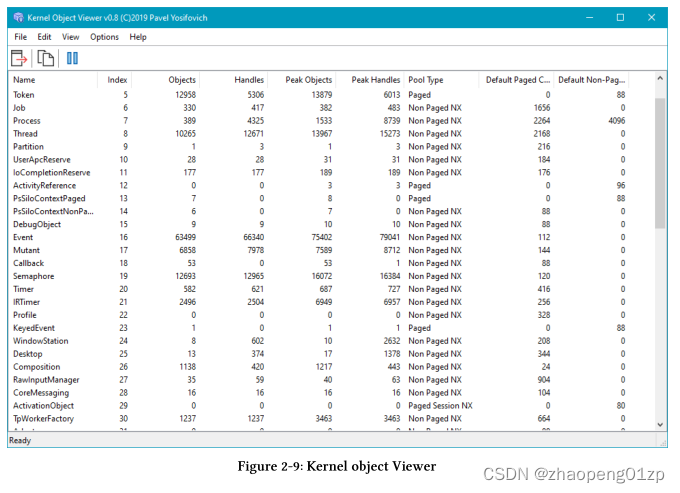
To get a sense of the number of objects and handles in the system at a given moment, you can run the KernelObjectView tool from my Github repository at https://github.com/zodiacon/ AllTools. Figure 2-9 shows a screenshot of the tool. The total number of objects (per object type) is shown along with the total number of handles. You can sort by any column; which object types have the most objects? The most handles?
要了解给定时刻系统中对象和句柄的数量,可以从我在https://github.com/zodiacon/ AllTools的Github库中运行KernelObjectView工具。图2-9显示了该工具的屏幕截图。对象总数(每个对象类型)与句柄总数一起显示。您可以按任何列排序;哪些对象类型拥有最多的对象?最多的句柄?
Pseudo Handles
Some handles have special values and are not closable. These are known as pseudo-handles, although they are used just like any other handle when needed. Calling CloseHandle on pseudo-handles always fails. Here are the functions returning pseudo-handles:
一些句柄具有特殊值并且不可关闭。这些被称为伪句柄,尽管它们在需要时可以像其他句柄一样使用。在伪句柄上调用 CloseHandle 总是失败。以下是返回伪句柄的函数:
• GetCurrentProcess (-1) - return a pseudo-handle to the calling process
• GetCurrentThread (-2) - return a pseudo-handle to the calling thread
• GetCurrentProcessToken (-4) - return a pseudo-handle to the token of the calling process
• GetCurrentThreadToken (-5) - return a pseudo-handle to the token of the calling thread
• GetCurrentThreadEffectiveToken (-6) - return a pseudo-handle to the effective token of the calling thread (if the thread has its own token - it’s used, otherwise its process token is used)
• GetCurrentProcess (-1) - 返回调用进程的伪句柄
• GetCurrentThread (-2) - 返回调用线程的伪句柄
• GetCurrentProcessToken (-4) - 返回一个指向调用进程令牌的伪句柄
• GetCurrentThreadToken (-5) - 返回一个指向调用线程令牌的伪句柄
• GetCurrentThreadEffectiveToken (-6) - 返回一个指向调用线程的有效令牌的伪句柄(如果该线程有自己的令牌,就使用它,否则就使用其进程令牌)。
The last three pseudo handles (token handles) are only supported on Windows 8 and later, and their access mask is TOKEN_QUERY and TOKEN_QUERY_SOURCE only.
最后三个伪句柄(令牌句柄)仅在 Windows 8 及更高版本上受支持,它们的访问掩码仅为 TOKEN_QUERY 和 TOKEN_QUERY_SOURCE。
RAII for Handles
It’s important to close a handle once it’s no longer needed. Applications that fail to do that properly may exhibit “handle leak”, where the number of handles grows uncontrollably if the application opens handles but “forgets” to close them. Obviously, this is bad.
一旦不再需要,关闭句柄很重要。未能正确执行此操作的应用程序可能会出现“句柄泄漏”,如果应用程序打开句柄但“忘记”关闭它们,则句柄数量会不受控制地增加。显然,这是不好的。
One way to help code manage handles without forgetting to close them is to use C++ by implementing a well-known idiom called Resource Acquisition is Initialization (RAII). The name is not that good, but the idiom is. The idea is to use a destructor for a handle wrapped in a type that ensures the handle is closed when that wrapper object is destroyed.
帮助代码管理句柄而不忘记关闭句柄的一种方法是使用 C++,通过实现称为资源获取即初始化 (RAII) 的著名习语。名字不好听,成语好听。这个想法是对包装在一种类型中的句柄使用析构函数,以确保在销毁包装对象时关闭句柄。
Here is a simple RAII wrapper for a handle (implemented inline for convenience):
这是句柄的简单 RAII 包装器(为方便起见,内联实现):
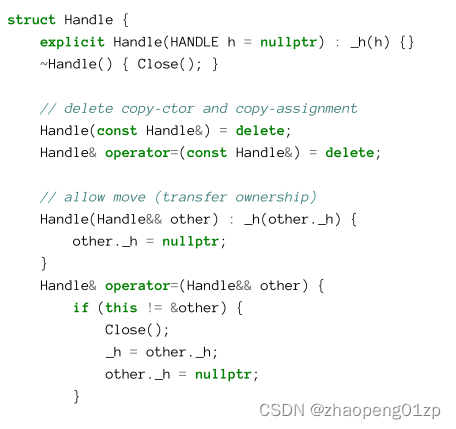
The Handle type provides the basic operations expected from a RAII HANDLE wrapper. The copy constructor and copy assignment operators are removed, as copying a handle that may have multiple owners does not make sense (causing CloseHandle to be called twice for the same handle). It is possible to implement these copy operations by duplicating the handle (see “Sharing Kernel Objects” later in this chapter), but it’s a non-trivial operation best avoided in implicit copy scenarios. A bool operator returns true if the current handle held is valid; it considers zero and INVALID_HANDLE_VALUE (-1) as invalid handles. The Close function closes the handle and is normally called from the destructor. Finally, the Get function returns the underlying handle.
Handle类型提供了RAII HANDLE包装器所期望的基本操作。复制构造函数(copy constructor)和复制赋值操作符(copy assignment operators)被移除,因为复制一个可能有多个所有者的句柄是没有意义的(导致对同一个句柄调用CloseHandle两次)。可以通过复制句柄(duplicating the handle)来实现这些复制操作(these copy operations)(见本章后面的 “共享内核对象”),但这是一个非平凡(非常重要)的操作,最好在隐式复制场景中避免。如果当前持有的句柄是有效的,则bool操作符返回true;它认为0和INVALID_HANDLE_VALUE(-1)是无效的句柄。Close函数关闭句柄,通常由析构函数调用。最后,Get函数返回底层句柄。
It’s possible to add an implicit conversion operator to HANDLE, removing the need to call Get.
可以添加一个隐式转换操作符来处理,而不需要调用Get。
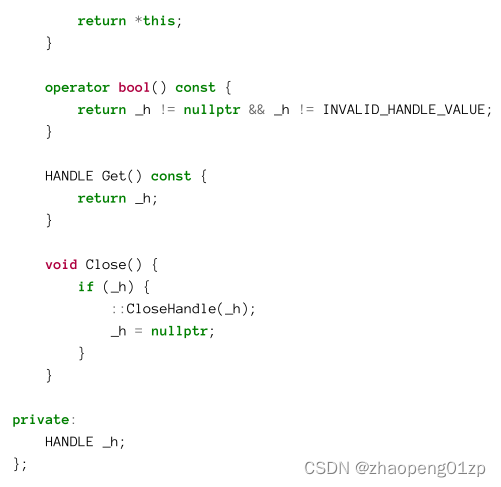
Here is some example code using the above wrapper:
下面是使用上述包装器的一些示例代码:
Although writing such a RAII wrapper is possible, it’s usually best to use an existing library that provides this (and other similar) functionality. For example, although CloseHandle is the most common closing handle function, there are other types of handles that require a different closing function. One such library that is used by Microsoft in Windows code is the Windows Implementation Library (WIL). This library has been released on Github and is available as a Nuget package.
虽然编写这样一个RAII包装器是可能的,但通常最好使用提供这种(和其他类似)功能的现有库。例如,虽然CloseHandle是最常见的关闭句柄函数,但还有其他类型的句柄需要不同的关闭函数。微软在Windows代码中使用的一个这样的库是Windows实现库(WIL)。这个库已经发布在Github上,可以作为一个Nuget包获得。
Using WIL
Adding WIL to a project is done like any other Nuget package. Right-click the References node in a Visual Studio project and select Manage Nuget Packages…. In the Browse tab’s search text box, type “wil” to quickly search for WIL. The full name of the package is “Microsoft.Windows.ImplementationLibrary”, shown in figure 2-10.
将 WIL 添加到项目的方式与任何其他 Nuget 包一样。右键单击 Visual Studio 项目中的引用节点,然后选择"管理 Nuget 包…."在浏览选项卡的搜索文本框中,键入“wil”以快速搜索 WIL。该包的全称是“Microsoft.Windows.ImplementationLibrary”,如图2-10所示。
The RAII handle wrapper(s) are located in the header file.
Here is the same code using WIL:
RAII 句柄包装器位于 <wil\resource.h> 头文件中。
这是使用 WIL 的相同代码:
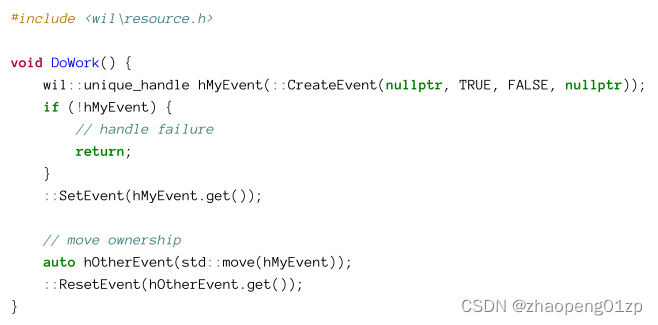
wil::unique_handle is a HANDLE wrapper that calls CloseHandle upon destruction. It’s modeled mostly after the C++ std::unique_ptr<> type. Notice that getting the internal HANDLE is done by calling get(). To replace the value inside a unique_handle (and close the old one) use the reset function; calling reset with no arguments just closes the underlying handle, making the wrapper object an empty shell.
wil::unique_handle 是一个 HANDLE 包装器,它在销毁时调用 CloseHandle。它主要模仿 C++ std::unique_ptr<> 类型。请注意,获取内部 HANDLE 是通过调用 get() 完成的。要替换 unique_handle 中的值(并关闭旧的),请使用 reset 函数;调用不带参数的 reset 只会关闭底层句柄,使包装器对象成为一个空壳。
The code can be somewhat simplified by adding using namespace wil; so that wil:: need not be prepended for every type in WIL. Also, notice auto can be used to simplify code in some cases.
通过添加 using namespace wil 可以稍微简化代码;所以 wil:: 不需要为 WIL 中的每种类型添加前缀。另外,注意在某些情况下,auto可以用来简化代码。
The code samples in this book use WIL in some cases, but not all. From a learning perspective, it’s sometimes better to use the raw types to make things simpler to understand.
本书中的代码示例在某些情况下使用 WIL,但并非全部。从学习的角度来看,有时最好使用原始类型来使事情更容易理解。
Creating Objects
Object Names
The name provided to a Create function is not the final name of the object. In classic (desktop) processes, it’s prepended with \Sessions\x\BaseNamedObjects\ where x is the session ID of the caller. If the session is zero, the name is prepended with \BaseNamedObjects\ only. If the caller happens to be running in an AppContainer (typically a Universal Windows Platform process), then the prepended string is more complex and consists of the unique AppContainer SID: \Sessions\x\AppContainerNamedObjects.
Figure 2-11 shows named objects in session 1 in WinObj.
提供给 Create 函数的名称不是对象的最终名称。在经典(桌面)进程中,它以 \Sessions\x\BaseNamedObjects\ 为前缀,其中 x 是调用者的会话 ID。如果会话为0,则名称仅以 \BaseNamedObjects\ 为前缀。如果调用方恰好在 AppContainer 中运行(通常是通用 Windows 平台进程),则前置字符串会更复杂并且包含唯一的 AppContainer SID:\Sessions\x\AppContainerNamedObjects\。
图2-11显示了WinObj中会话1中的命名对象。
All the above means is that object names are session-relative (and in the case of an AppContainer - package relative). If an object must be shared across sessions it can be created in session 0 by prepending the object name with Global; for example, creating a mutex with the CreateMutex function named Global\MyMutex will create it under \BaseNamedObjects.
Note that AppContainers do not have the power to use session 0 object namespace.
上述所有的意思是,对象的名字是与会话相关的(并且在 AppContainer 的情况下,则是与包相关的)。如果一个对象必须在不同的会话中共享,它可以通过在对象名称前加上 Global\ 在会话 0 中创建;
例如,用CreateMutex函数创建一个名为Global\MyMutex的mutex,将在\BaseNamedObjects下创建它。
请注意,AppContainer 无权使用会话 0 对象命名空间。
The entire Object Manager namespace hierarchy can be viewed with WinObj. This entire structure is held in memory and manipulated by the Object Manager as needed. Note that unnamed objects are not part of this structure, meaning the objects seen in WinObj do not comprise all the existing objects, but rather all the objects that were created with a name.
可以使用 WinObj 查看整个对象管理器命名空间层次结构。这整个结构被保存在内存中,并由对象管理器根据需要进行操作。请注意,未命名的对象不是此结构的一部分,这意味着在 WinObj 中看到的对象并不包括所有现有的对象,而是包含使用名称创建的所有对象。
The “directories” shown in WinObj actually Directory objects, which are just one kind of kernel object which acts as a logical container.
WinObj中显示的“目录”实际上是目录对象,它只是一种充当逻辑容器的内核对象。
Going back to Process Explorer’s Handles view - it shows by default “named” objects.
“Named” here means not just objects that can be named, but also other objects. Objects that can be named are Mutexes (Mutants), Semaphores, Events, Sections, ALPC Ports, Jobs, Timers, and other, less used object types. Yet others are shown with a name that has a different meaning than a true named object:
返回Process Explorer的Handles视图-默认情况下,它显示“命名”对象。
这里的“命名”不仅指可以命名的对象,还指其他对象。可以命名的对象包括互斥(突变)、信号量、事件、Sections、ALPC端口、作业、计时器和其他较少使用的对象类型。还有一些显示的名称与真正命名的对象具有不同的含义:
• Process and Thread objects - the name is shown as their unique ID.
•进程和线程对象-名称显示为其唯一ID。
• For File objects it shows the file name (or device name) pointed to by the file object.
It’s not the same as an object’s name, as there is no way to get a handle to a file object given the file name - only a new file object may be created that accesses the same underlying file or device (assuming sharing settings for the original file object allow it).
•对于文件对象,它显示文件对象指向的文件名(或设备名)。
它与对象的名称不同,因为在给定文件名的情况下,无法获得文件对象的句柄——只能创建一个访问相同底层文件或设备的新文件对象(假设原始文件对象的共享设置允许)。
• (Registry) Key object names are shown with the path to the registry key. This is not a name, for the same reasoning as for file objects.
•(注册表)注册表项对象名称与注册表项的路径一起显示。这不是一个名称,原因与文件对象相同。
• Directory objects show its logical path, rather than being a true object name. A Directory is not a file system object, but rather an object manager directory.
•目录对象显示其逻辑路径,而不是真正的对象名称。目录不是文件系统对象,而是对象管理器目录。
• Token object names are shown with the user name stored in the token.
•令牌对象名称与存储在令牌中的用户名一起显示。
Sharing Kernel Objects
As we’ve seen, handles to kernel objects are private to a process. In some cases, a process may want to share a kernel object with another process. Such a process cannot simply pass somehow the value of the handle to the other process, because in the other process’ handle table that handle value may point to a different object or be empty.
Clearly, some mechanism must be in place to allow such sharing. In fact, there are three:
正如我们所看到的,内核对象的句柄对于进程来说是私有的。在某些情况下,进程可能希望与另一个进程共享内核对象。这样的进程不能简单地将句柄的值以某种方式传递给其他进程,因为在其他进程的句柄表中,句柄值可能指向不同的对象或为空。
显然,必须建立某种机制来允许这种分享。事实上,有三个:
• Sharing by name
• Sharing by handle inheritance
• Sharing by duplicating handles
Sharing by Name
This is the simplest option, if available. “Available” here means that the object in question can have a name, and does have a name. The typical scenario is that the cooperating processes (2 or more) would call the appropriate Create function with the same object name. The first process to make the call would create the object, and subsequent calls from the other processes would open additional handles to the same object.
The sample BasicSharing shows an example of using sharing by name with a Memory Mapped File object. This object can be used to share memory between processes (normally, each process can only see its own address space). Running two instances (or more) of the application (shown in figure 2-13) allows sharing textual data between these processes.
如果可用,这是最简单的选项。这里的“可用”意味着有关对象可以有一个名字,而且确实有一个名字。典型的场景是,协作进程(2个或多个)将使用相同的对象名称调用相应的Create函数。第一个调用的进程将创建该对象,其他进程的后续调用将为同一对象打开额外的句柄。
示例BasicSharing显示了一个使用内存映射文件对象的名称来共享的例子。这个对象可以用于在进程之间共享内存(通常,每个进程只能看到自己的地址空间)。运行应用程序的两个(或多个)实例(如图2-13所示)可以在这些进程之间共享文本数据。
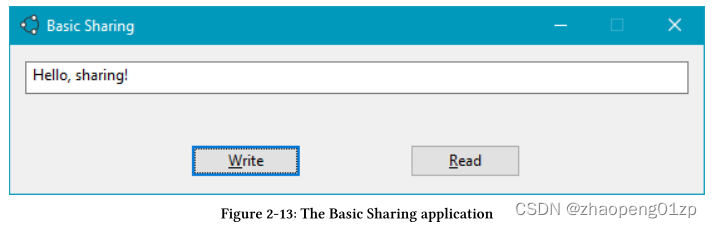
To test it out, type something in the edit box and click Write. Then switch to another instance,and just click Read. The text you entered should appear in the other application’s edit box.
Of course you can swap roles. If you launch another instance, you can click Read and the last text would appear as well. This is because all these processes are reading and writing to the same (shared) memory.
要测试它,请在编辑框中键入内容,然后单击“写入”。然后切换到另一个实例,只需单击“读取”即可。您输入的文本应显示在其他应用程序的编辑框中。
当然,你可以交换角色。如果您启动另一个实例,您可以单击“读取”,最后一个文本也会出现。这是因为所有这些进程都是对同一(共享)内存(即,内存映射文件对象)进行读取和写入。
By the way, these don’t have to be processes based on the same executable - this is just used here for convenience. The determining factor is the object’s name.
顺便说一句,这些不一定是基于同一个可执行文件的进程——这只是为了方便起见。决定因素是对象的名称。
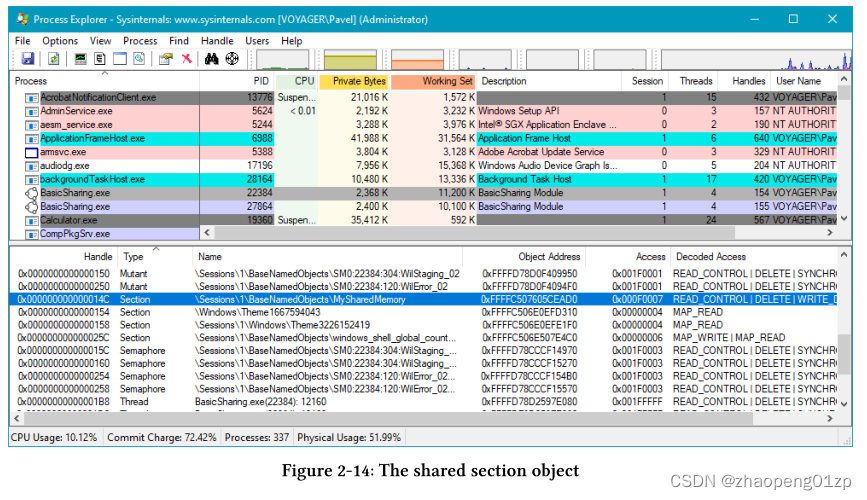
Before we look at the code, let’s see what this looks like in Process Explorer. Run two instances of the executable, open Process Explorer and locate the two processes. Make sure the lower pane shows Handles (and not DLLs). The object type to look for is Section (the kernel name of Memory Mapped File). Find a section called “MySharedMemory” (with the session-based prefix of course), as shown in figure 2-14.
在我们查看代码之前,让我们看看它在Process Explorer中是什么样子的。运行可执行文件的两个实例,打开Process Explorer并找到这两个进程。确保下部窗格显示的是句柄(而不是DLL)。要查找的对象类型是Section(内存映射文件的内核名称)。找到一个名为“MySharedMemory”的部分(当然带有基于会话的前缀),如图2-14所示。
If you double-click the handle, you should see the properties of the section object as shown in figure 2-15.
如果双击句柄,应该会看到section对象的属性,如图2-15所示。
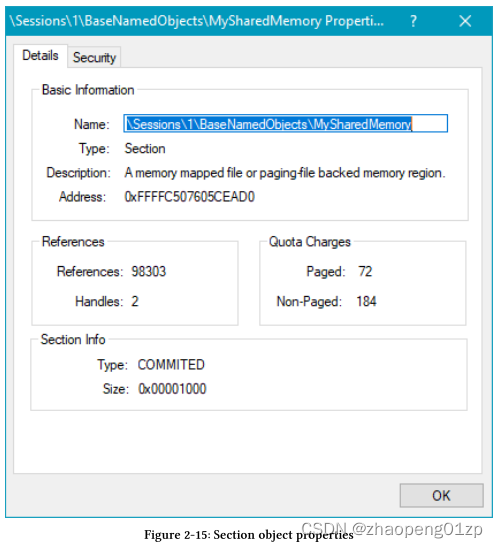
Notice there are two open handles to the object. Presumably, these are coming from the two processes holding handles to that object. Notice the shared memory’s size: 4 KB - we’ll see this reflected in the code.
请注意,该对象有两个打开的句柄。据推测,这些来自持有该对象句柄的两个进程。请注意共享内存的大小:4KB——我们将在代码中看到这一点。
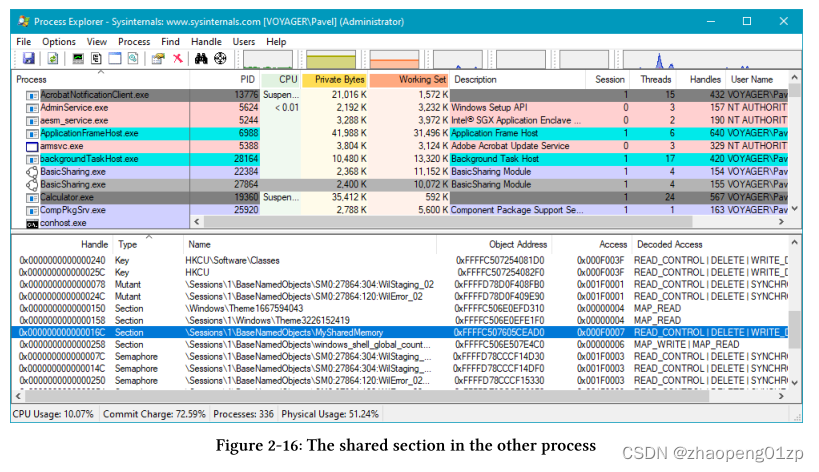
If you locate the second process using this object (see figure 2-16), you should find the same information presented when double-clicking the handle. How can you be sure these are pointing to the same object? Look at the Object Address column. If the address is identical, this is the same object (and vice versa). Notice also that the handle values are not the same (the normal case). In figures 2-14 the handle value is 0x14c (PID 22384) and in figure 2-16 it’s 0x16c (PID 27864). Still - they reference the exact same object.
如果使用该对象定位第二个进程(见图2-16),则双击句柄时应该会发现相同的信息。你怎么能确定这些指向的是同一个物体?查看“对象地址”列。如果地址相同,则这是相同的对象(反之亦然)。还要注意,句柄值不相同(正常情况下)。在图2-14中,句柄值为0x14c(PID 22384),在图2-16中为0x16c(PID 27864)。尽管如此,它们引用了完全相同的对象。
If you were to close one of the instances, what would happen? One handle would close, but the object remains alive. This means that launching a completely new instance and clicking Read will show the most recent text. What would happen if we close all cooperating applications and then launch one instance again. What would we see if we click Read? Try and explain to yourself why this is the case.
如果您关闭其中一个实例,会发生什么情况?一个控制柄将关闭,但对象仍处于活动状态。这意味着启动一个全新的实例并单击“读取”将显示最新的文本。如果我们关闭所有合作的应用程序,然后再次启动一个实例,会发生什么。如果单击“Read”,我们会看到什么?试着向自己解释为什么会出现这种情况。
Now let’s turn our attention to the code.
现在让我们把注意力转向代码。
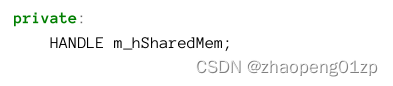
BasicApplication is a WTL dialog-based project. The dialog box class (CMainDlg) holds a single member of interest, which is the handle to the memory-mapped file:
BasicApplication是一个基于WTL对话框的项目。对话框类(CMainDlg)包含一个感兴趣的成员,该成员是内存映射文件的句柄:
When the dialog is created, in the WM_INITDIALOG message handler, we create the file mapping object and giving it a name:
创建对话框时,在WM_INITDIALOG消息处理程序中,我们创建文件映射对象并为其命名:
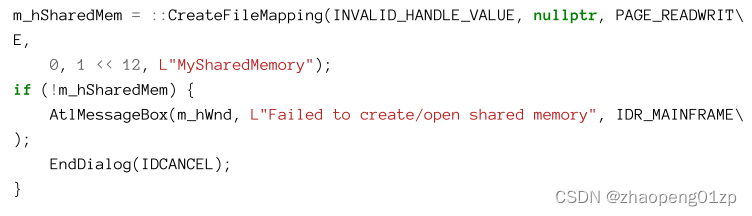
CreateFileMapping is used to create (or open) a file mapping object. The exact details of the parameters are discussed in chapter 14 (in part 2). Here we care about one parameter in particular (the last) - the object’s name. This is the name we’ve seen in Process Explorer (with the standard session-related prefix). If this is the first process to attempt creating the object - it’s created. Subsequent calls result in additional handles to the same object (calling GetLastError would return ERROR_ALREADY_EXISTS). In this case, we don’t care whether this call is the first or not - we just want a handle to the same kernel object so that its “function” is available from multiple processes.
CreateFileMapping用于创建(或打开)文件映射对象。第14章(第2部分)讨论了参数的确切细节。这里我们特别关心一个参数(最后一个)——对象的名称。这是我们在Process Explorer中看到的名称(带有标准的会话相关前缀)。如果这是第一个尝试创建对象的过程,那么它就是创建的。随后的调用会导致对同一对象的额外句柄(调用GetLastError将返回ERROR_ALREADY_EXISTS)。在这种情况下,我们不在乎这个调用是否是第一个——我们只想要同一内核对象的句柄,这样它的“函数”就可以从多个进程中使用。
The second to last argument pair (0 and 1 << 12) determine the size of the shared memory as a 64-bit value. In this case it’s set to 4 KB (1 << 12). If the call fails for any reason we just print a simple message and close the dialog, causing the process itself to exit.
倒数第二个参数对(0和1<<12)将共享内存的大小确定为64位值(这两个参数告诉系统内存映射文件的最大大小)(由于Windows支持的最大文件大小可以用64位整数表示,因此这里必须使用两个32位值)。在这种情况下,它被设置为4 KB(1<<12)(即2的12次方)。如果调用由于任何原因失败,我们只需打印一条简单的消息并关闭对话框,导致进程本身退出。
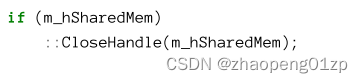
When the dialog is closed, it’s a good idea to close the handle. Strictly speaking, it’s not necessary to do that in this particular case, because once the dialog is closed, the process exits, and the kernel ensures that all handles from a terminated process are properly closed.
Still, it’s a good habit to have (unless some RAII wrapper for the handle does that for you).
For completeness, here is the call to close handle when handling the WM_DESTROY message for the dialog:
当对话框被关闭时,关闭句柄是个好主意。严格来说,在这种特殊情况下没有必要这样做,因为一旦对话框被关闭,进程就会退出,内核会确保所有来自终止进程的句柄都被正确关闭。 尽管如此,这还是一个很好的习惯(除非一些句柄的RAII包装器为你这样做)。
为了完整起见,以下是在处理对话框的WM_DESTROY消息时关闭句柄的调用:
Now for the write and read parts. Accessing the shared memory is done by calling MapViewOfFile, resulting in a pointer to the shared memory (again, the exact details are in chapter 12). Then it’s just a matter of copying the text to that mapped memory:
现在是写和读部分。访问共享内存是通过调用MapViewOfFile来完成的,从而产生一个指向共享内存的指针(同样,具体细节见第12章)。然后,只需将文本复制到映射的内存中即可:
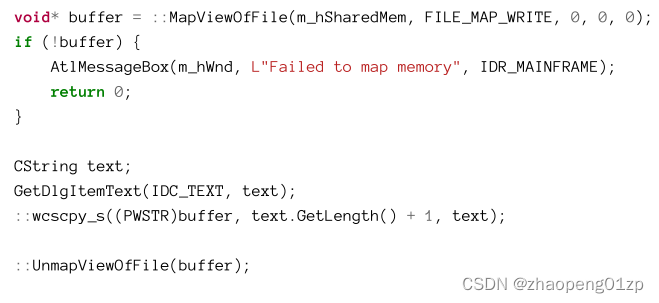
The copying is done with wcscpy_s to the mapped memory. Then the memory is unmapped with UnmapViewOfFile.
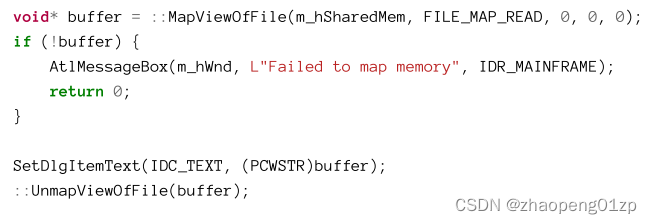
Reading data is very similar. The access mask is changed to FILE_MAP_READ rather than FILE_MAP_WRITE, and memory is copied in the other direction, directly to the edit box:
将wcscpy_s复制到映射的内存中。然后使用UnmapViewOfFile取消映射内存。
读取数据非常相似。访问掩码将更改为FILE_MAP_READ,而不是FILE_MAP_WRITE,内存将从另一个方向直接复制到编辑框中:
Sharing by Handle Duplication
Sharing kernel objects by name is certainly simple. What about objects that don’t (or can’t have a name)? Handle duplication may be the answer. Handle duplication has no inherent restrictions (except security) - it can work on almost any kernel object, named or unnamed and it works at any point in time (in chapter 3 we’ll see that handle inheritance is only available when a process creates a child process). There is a dent, however; this is the most difficult way of sharing in practice, as we shall soon see.
按名称共享内核对象当然很简单。那么,那些没有(或不能有名字的)的对象怎么办?处理复制(Handle duplication)可能就是答案。句柄复制没有固有的限制(除了安全性)-它几乎可以在任何内核对象上工作,不管是有名字的还是没有名字的,而且它在任何时间点上都可以工作(在第3章中,我们将看到句柄继承仅在进程创建子进程时可用)。然而,有一个凹痕(缺陷);这是实践中最困难的分享方式,我们很快就会看到。
A Duplicated I/O completion port handle does not work in the target process.
重复的I/O完成端口句柄在目标进程中不起作用。
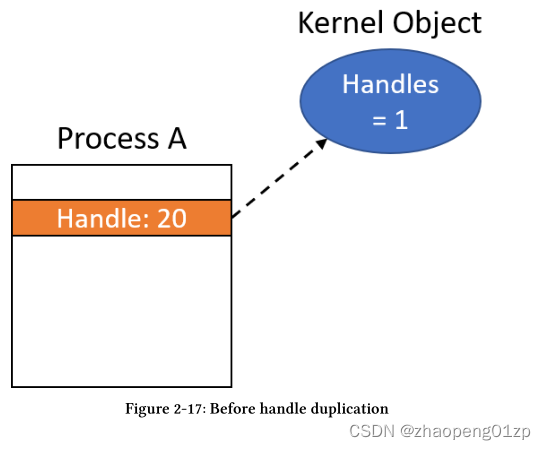
Duplicating a handle requires a source process, source handle and a target process. If successful, a new handle entry is written to the target process handle table, pointing to the same object as the source handle. The “before” and “after” duplication are depicted in figures 2-17 and 2-18, respectively.
复制句柄需要源进程、源句柄和目标进程。如果成功,将向目标进程句柄表写入一个新的句柄条目,指向与源句柄相同的对象。“之前”和“之后”的复制分别如图2-17和2-18所示。

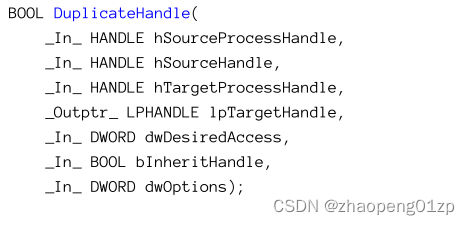
Technically, DuplicateHandle can work on any two processes for which proper handles can be obtained, but the typical scenario is duplication one of the caller’s handles into another process’ handle table. Also, the source and target processes may be the same. Let’s go over the parameters of DuplicateHandle in details:
从技术上讲,DuplicateHandle可以在任何两个可以获得适当句柄的进程上工作,但典型的情况是将调用方的一个句柄复制到另一个进程的句柄表中。此外,源进程和目标进程可以是相同的。让我们详细了解DuplicateHandle的参数:
• hSourceProcessHandle - this is a handle to the source process. This handle must have the PROCESS_DUP_HANDLE access mask. If the source is the caller’s process than passing GetCurrentProcess will do the trick (and it always has full access).
• hSourceHandle - the source handle to duplicate. This handle must be valid in the context of the source process.
• hTargetProcessHandle - the target process handle. Typically some call to OpenProcess must be used to gain such a handle. As with the source process, the PROCESS_DUP_HANDLE access mask is required.
• lpTargetHandle - this is the resulting handle, valid from the target process perspective. In figure 2-18, the resulting handle returned to the caller was 72. This value is with respect to Process B (the caller is assumed to be process A).
• dwDesiredAccess - the desired access mask for the duplicated handle. If the dwOptions parameter has the flag DUPLICATE_SAME_ACCESS, then this access mask is ignored. Otherwise, this is the access mask to request for the new handle.
•hSourceProcessHandle—这是源进程的句柄。此句柄必须具有PROCESS_DUP_handle访问掩码。如果源是调用方的进程,那么传递GetCurrentProcess就可以了(而且它总是具有完全访问权限)。
•hSourceHandle—要复制的源句柄。此句柄在源进程的上下文中必须有效。
•hTargetProcessHandle—目标进程句柄。通常,必须使用对OpenProcess的某些调用来获得这样的句柄。与源进程一样,process_DUP_HANDLE访问掩码也是必需的。
•lpTargetHandle-这是结果句柄,从目标进程的角度来看是有效的。在图2-18中,返回给调用者的结果句柄是72。这个值是关于进程B的(假定调用者是进程A)。
•dwDesiredAccess—复制句柄所需的访问掩码。如果dwOptions参数具有标志DUPLICATE_SAME_ACCESS,则会忽略此访问掩码。否则,这就是访问掩码。
Here is a simple example of creating a job object and duplicating a handle to it in the same process while reducing the access mask (error handling omitted):
以下是一个简单的示例,用于在同一进程中创建作业对象并复制其句柄,同时减少访问掩码(省略错误处理):

The source and target process are the current process. Running this piece of code and looking at the handles in Process Explorer shows the differences (figure 2-19).
源进程和目标进程是当前进程。运行这段代码并查看Process Explorer中的句柄可以看出差异(图2-19)。
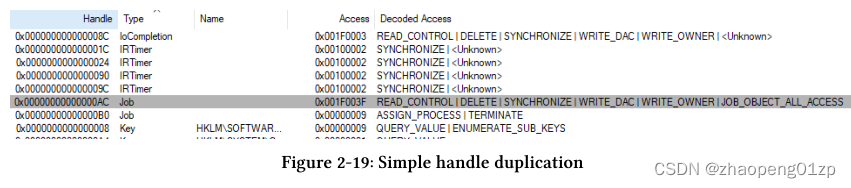
One handle (0xac) has full access to the job object, while the other (duplicated) handle (0xb0) has just the specified desired access mask.
一个句柄(0xac)具有对作业对象的完全访问权限,而另一个(重复的)句柄(0xb0)仅具有指定的所需访问掩码。
In the more common case, a handle from the current process is duplicated to a target cooperating process. The following function will duplicate a source handle from the current process to a target process:
在更常见的情况下,当前进程的句柄被复制到目标协作进程。以下函数将把源句柄从当前进程复制到目标进程:
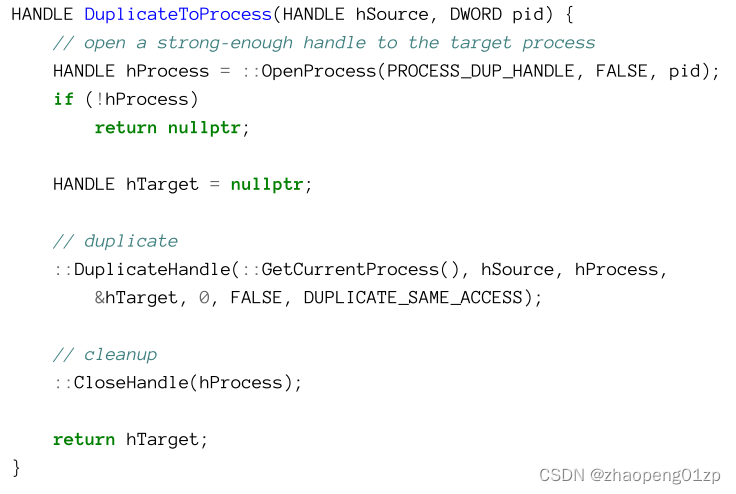
This is the case where handle duplication becomes non-trivial. It’s not the act of duplication itself - that’s rather simple - a single function call. The problem is how to convey the information to the target process. Two pieces of information must be conveyed to the target process:
在这种情况下,句柄的重复变得非同小可。问题不在于重复行为本身–那是相当简单的–一个单一的函数调用。问题在于如何将信息传达给目标进程(因为目标进程不知道它现在能访问一个新的内核对象了,我们必须使用窗口消息或者其他进程间通信IPC机制;继承内核对象句柄的时候也有这样的问题)。必须向目标进程传递两条信息:
• When the handle has been duplicated.
•当句柄被复制时。
• What is the duplicated handle value?
•重复句柄的值是多少?
Remember, that the caller knows the created handle value, but the target process does not.
There must be some other form of inter-process communication that allows the caller process to pass the required information to the target process (since they are part of the same system and need to cooperate by sharing the kernel object in question).
请记住,调用者知道创建的句柄值,但目标进程不知道。
必须有某种其他形式的进程间通信,允许调用者进程将所需的信息传递给目标进程(因为它们是同一系统的一部分,需要通过共享有关的内核对象来合作)。
Private Object Namespaces
We’ve seen that some types of kernel objects can have string-based names. We’ve also seen that this is one (convenient) way of sharing such objects between processes. However, there are a few downsides of having named objects:
我们已经看到,某些类型的内核对象可以具有基于字符串的名称。我们还看到,这是在进程之间共享此类对象的一种(方便的)方式。然而,命名对象也有一些缺点:
• Some other, unrelated process, may create an object with the same name, that can cause failure when creating the object later (if the object types differ), or worse, the creation “succeeds” because it’s the same object type and the code gets back a handle to an existing object. The result is a mess, where processes use the same object that they don’t expect.
•其他一些不相关的过程可能会创建具有相同名称的对象,这可能会导致以后创建对象时失败(如果对象类型不同),或者更糟的是,创建“成功”,因为它是相同的对象类型,并且代码会返回现有对象的句柄。结果是一团糟,进程使用了他们意想不到的相同对象。
• This is a special case of the above bullet, for emphasis. Since the name is visible (in tools, but can also be obtained programmatically), another process can “hijack” the object or otherwise interfere with object usage. From a security standpoint, the object in question is too visible. Unnamed objects are much stealthier, as there is no good way to guess what a particular object is used for.
•为了强调,这是上述项目符号的一个特例。由于名称是可见的(在工具中,但也可以通过编程获得),另一个进程可能会“劫持”对象或以其他方式干扰对象的使用。从安全角度来看,有问题的对象太显眼了。未命名的对象要隐蔽得多,因为没有好的方法来猜测特定对象的用途。
Is there a way for processes to share named objects (since it’s easy) but not be visible to other processes? Starting with Windows Vista, there is a way to create a private object namespace that only the cooperating processes know about. Using tools or APIs will not reveal its full name.
The PrivateSharing sample application is an enhanced version of BasicSharing, where the memory-mapped file object’s name is now under a private object namespace and is not visible to all. Looking at this object with Process Explorer shows a partial name only (figure 2-20).
有没有一种方法可以让进程共享命名对象(因为这很容易),但对其他进程不可见?从WindowsVista开始,有一种方法可以创建一个只有协作进程才知道的私有对象命名空间。使用工具或API不会显示其全名。
PrivateSharing示例应用程序是BasicSharing的增强版本,其中内存映射文件对象的名称现在位于私有对象命名空间下,并且对所有人都不可见。使用Process Explorer查看此对象时,仅显示部分名称(图2-20)。
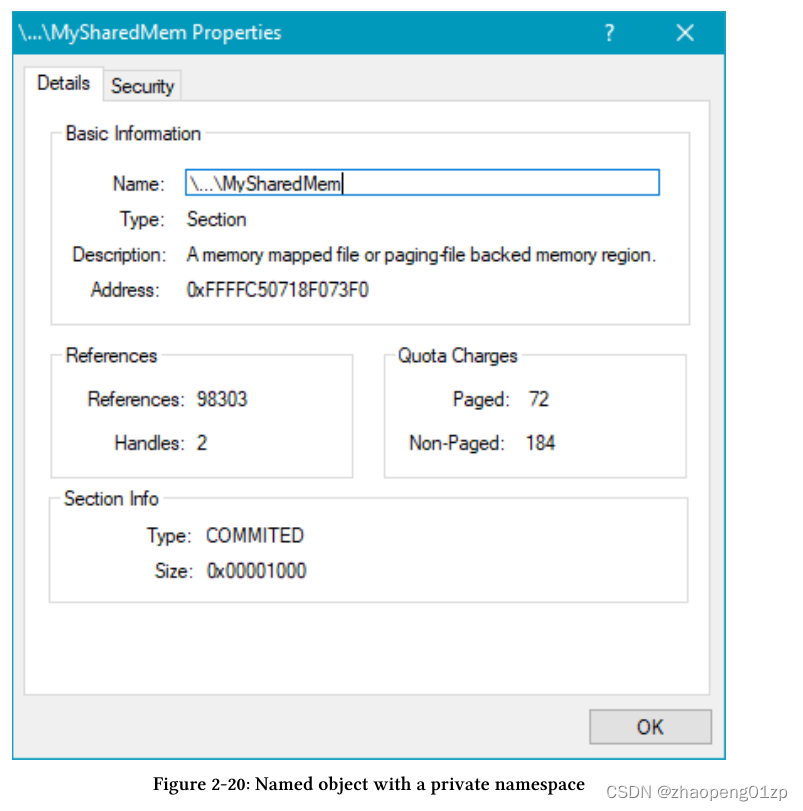
If some random code tries to locate an object named “MySharedMem”, it would fail to do so, since this not the object’s true name.
如果一些随机代码试图定位名为“MySharedMem”的对象,它将无法定位,因为这不是对象的真实名称。
Creating a private namespace is a two-step process. First, a helper object called a Boundary Descriptor must be created. This descriptor allows adding certain Security IDs (SIDs) that would be able to use private namespaces created based on that boundary descriptor. This can help tighten security on the private namespace(s). To create a boundary descriptor, use CreateBoundaryDescriptor:
创建私有命名空间需要两个步骤。首先,必须创建一个名为边界描述符的辅助对象。该描述符允许添加某些安全ID(SID),这些ID将能够使用基于该边界描述符创建的私有命名空间。这有助于加强私有命名空间的安全性。要创建边界描述符,请使用CreateBoundaryDescriptor:

Once a boundary descriptor exists, two functions can be used to restrict access to any private namespace created through that descriptor: AddSIDToBoundaryDescriptor and AddIntegrityLabelToBoundaryDescriptor (the latter available starting from Windows 7):
一旦存在边界描述符,就可以使用两个函数来限制对通过该描述符创建的任何私有命名空间的访问:AddSIDToBoundaryDescriptor和AddIntegrityLabelToBoundary descriptor(后者从Windows 7开始可用):
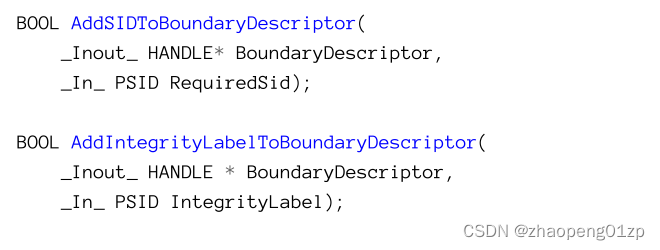
Both accept the address of the boundary descriptor’s handle and a SID. With AddSIDToBoundaryDescriptor, the SID is typically a group’s SID, allowing all users in that group access to the private namespaces. AddIntegrityLabelToBoundaryDescriptor allows setting a minimum integrity level for processes that wish to open objects in private namespace managed by this boundary descriptor.
两者都接受边界描述符句柄的地址和SID。使用AddSIDToBoundaryDescriptor,SID通常是组的SID,允许该组中的所有用户访问专用命名空间。AddIntegrityLabelToBoundaryDescriptor允许为希望在由该边界描述符管理的私有命名空间中打开对象的进程设置最低完整性级别。
SIDs and integrity levels are discussed in chapter 16.
SID和完整性级别在第16章中进行了讨论。
Once the boundary descriptor is set, the next step is creating the actual private namespace with CreatePrivateNamespace:
一旦设置了边界描述符,下一步就是使用CreatePrivateNamespace创建实际的私有命名空间:

Confusingly, the boundary descriptor type is void* rather than HANDLE. This is a slip in the API, but since HANDLE is defined as void*, this works fine. This mishap also hints that a boundary descriptor is not a kernel object, even though it returns a HANDLE; it has its own close function - DeleteBoundaryDescriptor.
An object namespace is also not a true kernel object. If the namespace already exists, the function fails and OpenPrivateNamespace must be used instead. It also has its own close function (ClosePrivateNamespace):
令人困惑的是,边界描述符类型是void*,而不是HANDLE。这是API中的一个错误,但由于HANDLE被定义为void*,所以这很好。这个错误还暗示边界描述符不是内核对象,即使它返回HANDLE;它有自己的关闭函数——DeleteBoundaryDescriptor。
对象名称空间也不是真正的内核对象。如果命名空间已经存在,则函数将失败,必须改用OpenPrivateNamespace。它还有自己的关闭功能(ClosePrivateNamespace):
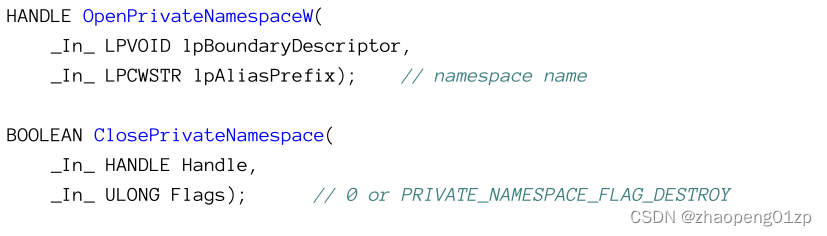
Another slip is the function ClosePrivateNamespace returning BOOLEAN (typedefed as BYTE) instead of the standard BOOL.
另一个失误是函数ClosePrivateNamespace返回BOOLEAN(类型定义为BYTE),而不是标准的BOOL。
Once the namespace is created or opened, named objects can be created normally with the name in the form alias\name where “alias” is the lpAliasPrefix parameter from creating or opening the namespace.
一旦创建或打开了命名空间,命名对象就可以正常创建,名称格式为alias\name,其中“alias”是创建或打开命名空间时的lpAliasPrefix参数。
Let’s look at the concrete code in the PrivateSharing application.
The dialog class now has three members:
让我们看看PrivateSharing应用程序中的具体代码。
对话框类现在有三个成员:

The code uses the WIL unique_handle RAII wrapper for the memory-mapped file’s handle, but the boundary descriptor and the namespace are managed as raw handles.
该代码使用WIL unique_handle RAII包装作为内存映射文件的句柄,但边界描述符和命名空间作为原始句柄进行管理。
When the dialog box is created, the same memory-mapped file is created as in BasicSharing, but this time under a private namespace (error handling omitted for clarity):
创建对话框时,会创建与BasicSharing中相同的内存映射文件,但这次是在专用命名空间下(为清晰起见,省略了错误处理):
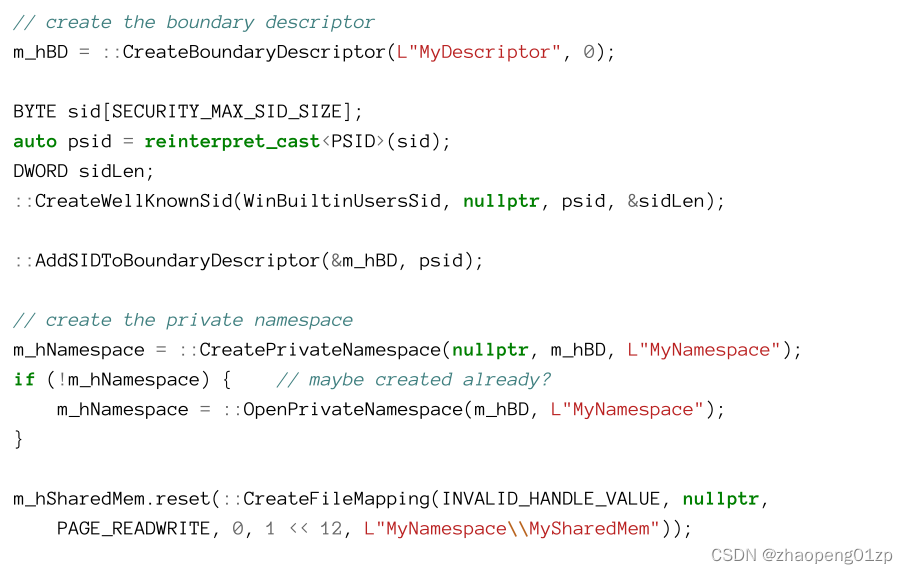
In this example, a single SID was added to the boundary descriptor. This SID is for all standard users. It’s possible to add something more strict, such as the Administrators group, so that processes running under standard user rights would not be able to tap into this boundary descriptor. The SID is created based on a well-known SID for the users group by calling CreateWellKnownSid. Then AddSIDToBoundaryDescriptor is called to attach the SID to the boundary descriptor.
在本例中,将一个SID添加到边界描述符中。此SID适用于所有标准用户。可以添加一些更严格的内容,例如Administrators组,这样在标准用户权限下运行的进程就无法使用此边界描述符。SID是基于用户组的已知SID通过调用CreateWellKnownSid创建的。然后调用AddSIDToBoundaryDescriptor将SID附加到边界描述符。
Don’t worry about these SIDs and other security terms. They are described in detail in chapter 16.
不要担心这些SID和其他安全条款。第16章对它们进行了详细描述。
Once the boundary descriptor is set, CreatePrivateNamespace or OpenPrivateNamespace is called with the alias “MyNamespace”. This is used as the prefix for the memory-mapped file object created with CreateFileMapping.
一旦设置了边界描述符,就会使用别名“MyNamespace”调用CreatePrivateNamespace或OpenPrivateNamespace。这被用作使用CreateFileMapping创建的内存映射文件对象的前缀。
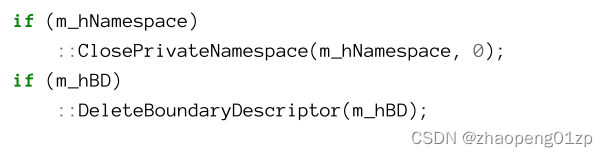
Finally, the WM_DESTROY message handler for the dialog deletes the namespace and boundary descriptor:
最后,对话框的WM_DESTROY消息处理程序删除名称空间和边界描述符:
Bonus: WIL Wrappers for Private Namespaces
The WIL library has many wrappers for various types of handles and pointers. Unfortunately, it doesn’t have a boundary descriptor and private namespace wrappers. Fortunately, it’s not too difficult to create ones. Here is one way to do it:
WIL库有许多用于各种类型的句柄和指针的包装器。不幸的是,它没有边界描述符和私有命名空间包装器。幸运的是,创建一个并不太难。以下是一种方法:
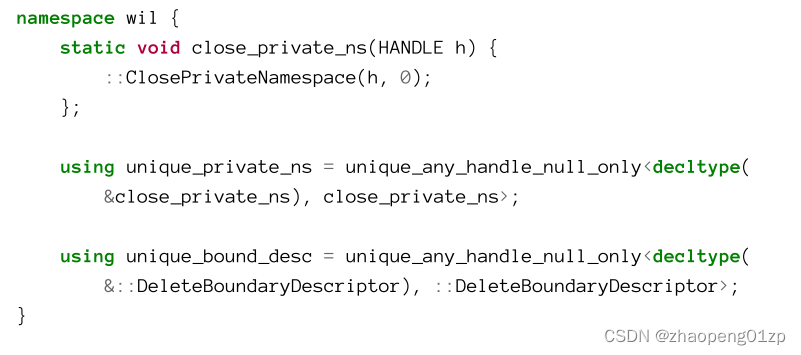
I will not go over the details of the above declarations, since they do require good acquaintance with C++ 11 decltype, using and templates.
我不会详细介绍上述声明,因为它们确实需要熟悉C++11 decltype、using和templates。
The PrivateSharing2 project is the same as PrivateSharing but uses WIL wrappers (with the above additions) to manage all handles and even the pointer returned from MapViewOfFile.
PrivateSharing2项目与PrivateSharing相同,但使用WIL包装器(添加了上述内容)来管理所有句柄,甚至是从MapViewOfFile返回的指针。
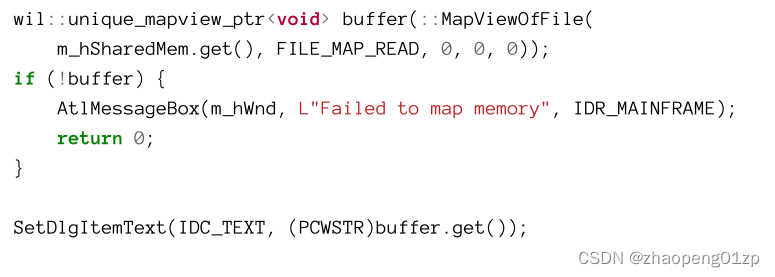
Here is the Read function for example:
以下是读取功能的示例:
Other Objects and Handles
Kernel objects are interesting in the context of system programming, and are the focus of this book. There are other common objects used in Windows, namely user objects and GDI objects. The following is a brief description of these objects and handles to such objects.
内核对象在系统编程的上下文中很有趣,也是本书的重点。Windows中还使用其他常见对象,即用户对象和GDI对象。以下是对这些对象和这些对象的句柄的简要描述。
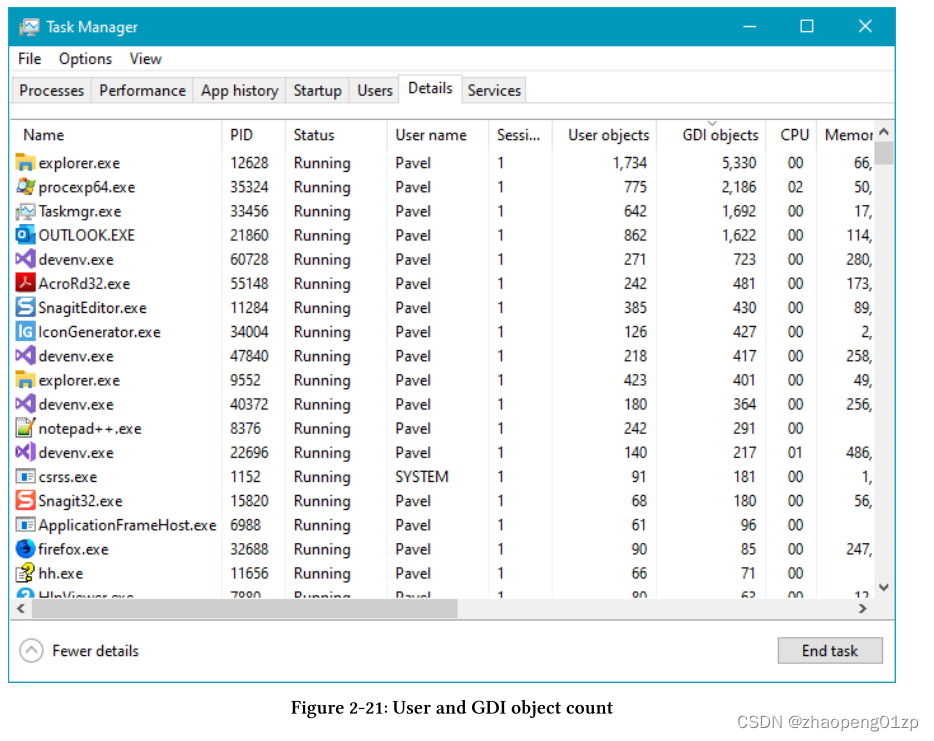
Task Manager can show the number of such objects for each process by adding the User Objects and GDI Objects columns, as shown in figure 2-21.
任务管理器可以通过添加用户对象和GDI对象列来显示每个进程的此类对象的数量,如图2-21所示。
User Objects
User objects are Windows (HWND), Menus (HMENU) and hooks (HHOOK). Handles to these objects have the following attributes:
用户对象是Windows(HWND)、Menus(HMENU)和hook(HHOOK)。这些对象的句柄具有以下属性:
• No reference counting. The first caller that destroys a user object - it’s gone.
•无引用计数。破坏用户对象的第一个调用程序——它已经不存在了。
• Handle values are scoped under a Window Station. A Window Station contains a clipboard, desktops and atom table. This means handles to these objects can be passed freely among all applications sharing a desktop, for instance.
•句柄值的范围在Window Station(Window工作站)下。Window Station包含剪贴板、桌面和原子表。例如,这意味着这些对象的句柄可以在共享桌面的所有应用程序之间自由传递。
GDI Objects
The Graphics Device Interface (GDI) is the original graphics API in Windows and is still used today, even though there are richer and better APIs (Direct2D for example). Example GDI objects: device context (HDC), pen (HPEN), brush (HBRUSH), bitmap (HBITMAP) and others.
图形设备接口(GDI)是Windows中的原始图形API,现在仍在使用,尽管有更丰富更好的API(例如Direct2D)。GDI对象的例子有:设备上下文(HDC)、笔(HPEN)、画刷(HBRUSH)、位图(HBITMAP)等。
Here are their attributes:
以下是它们的特性:
• No reference counting.
•无引用计数。
• Handles are valid only in the process in which they are created.
•句柄仅在创建它们的过程中有效。
• Cannot be shared between processes.
•无法在进程之间共享。


 2211
2211


 被折叠的 条评论
为什么被折叠?
被折叠的 条评论
为什么被折叠?
 到【灌水乐园】发言


