


一、props
props是实现父组件向子组件传递信息,props的数据是只读的。
父组件:通过动态传值的方式给子组件传递数据。
<script setup lang="ts">
// 导入子组件
import Child from './ChildView.vue'
import { ref } from 'vue';

const money = ref();
const onMoney = () => {
    money.value = 9999;
}
</script>

<template>
    <div class="box">
        <h1>我是父组件</h1>
        <button @click="onMoney">给儿子钱</button>
        <hr />
        <Child :money="money"></Child>
    </div>
</template>

<style scoped>
.box {
    background-color: brown;
}
</style>子组件:需要使用到defineProps方法去接受父组件传递过来的数据。
<script setup lang="ts">
//defineProps是Vue3提供方法,可以不需要引入直接使用
const { money } = defineProps(['money']);
</script>
<template>
<div class="box">
<h2>我是子组件</h2>
<p>父亲给我的钱:{{ money ? money : 0 }}元</p>
</div>
</template>
<style scoped>
.box {
color: #fff;
}
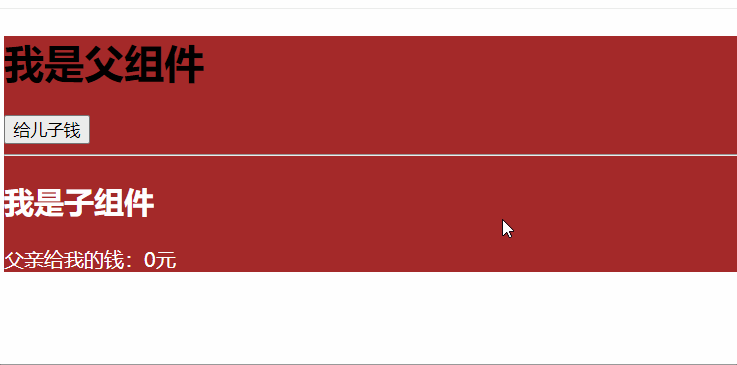
</style>效果:
二、emit
emit方式是Vue3中最常见的组件通信方式,该方式用于子组件向父组件传递信息。(子组件触发事件,父组件监听该事件并更新数据)
子组件:
<script setup lang="ts">
const emits = defineEmits(['enter']);
// 点击事件
const handleBtn = () => {
  // 第一个参数:子组件要传递的事件名称
  // 第二个参数:子组件要传递的数据
  emits('enter', '哈哈哈哈,我是子组件参数');
}
</script>

<template>
  <div class="box">
    <h2>我是子组件</h2>
    <button @click="handleBtn">点击我</button>
  </div>
</template>

<style scoped lang="scss">
.box {
  color: #fff;

  >button {
    cursor: pointer;
  }
}
</style>
父组件:
<script setup lang="ts">
// 导入子组件
import Child from './ChildView.vue'
import { ref } from 'vue';

const message = ref("");
const handleEnter= (item: string) => {
    message.value = item;
};
</script>

<template>
    <div class="box">
        <h1>我是父组件</h1>
        <p style="color:#fff;">{{ message }}</p>
        <hr />
        <!-- enter 是子组件要传递的事件名称,handleEnter 是监听到之后执行的事件 -->
        <Child @enter="handleEnter"></Child>
    </div>
</template>

<style scoped>
.box {
    background-color: brown;
}
</style>
效果: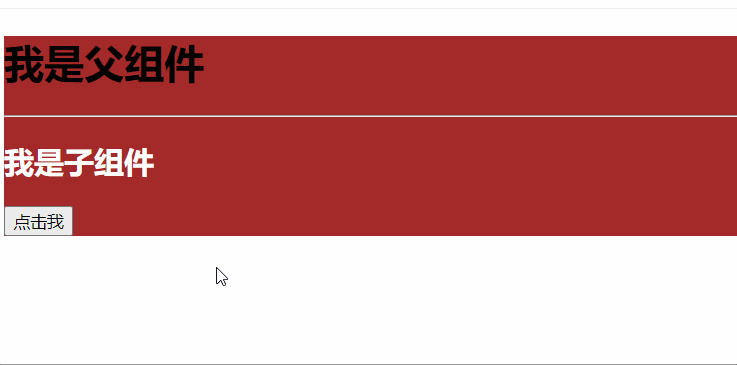
三、provide/inject
provide和inject是Vue中提供的一对API(provide和inject是成对出现的),该API可以实现隔辈组件通信(父传子或者祖孙传值),无论层级有多深,都可以通过这对API实现。
provide:在顶层组件中可以通过 provide 提供需要向后代组件传送的信息。
inject:从顶层组件到该组件无论嵌套多少层都可以直接用 inject 拿到顶层组件传送的信息。
顶层组件:
<script setup lang="ts">
// 导入后代组件
import Child from './ChildView.vue'
import { ref, provide } from 'vue'

const list = ref(['JavaScript', 'HTML', 'CSS']);
// 向后代组件提供数据
provide('list', list.value)
</script>

<template>
    <div class="box">
        <h1>我是顶层组件</h1>
        <hr />
        <!-- 后代组件 -->
        <Child></Child>
    </div>
</template>

<style scoped>
.box {
    background-color: brown;
}
</style>
后代组件:
<script setup lang="ts">
import { inject } from 'vue'
// 接受顶层组件提供的数据
const list = inject('list');
</script>

<template>
  <div class="box">
    <h2>我是后代组件</h2>
    <ul>
      <p>这是顶层组件传过来的数据</p>
      <li v-for="i in list" :key="i">{{ i }}</li>
    </ul>
  </div>
</template>

<style scoped lang="scss">
.box {
  color: #fff;
}
</style>
效果: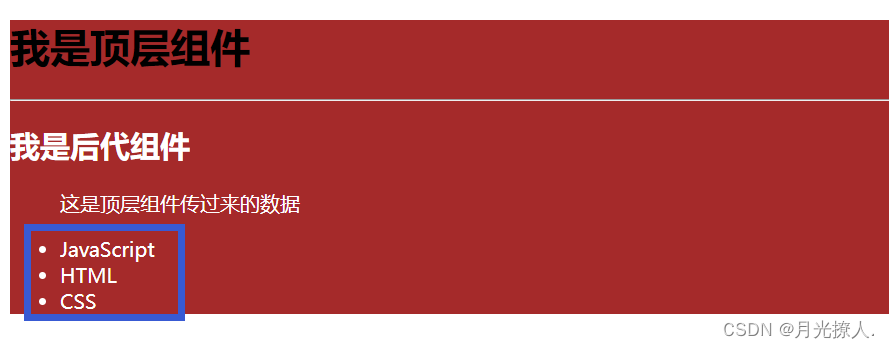
四、Refs
Refs提供了一个简单的方法可以获取真实的DOM节点,也可以获取子组件实例的VC,以便在Vue组件中进行操作和处理。
父组件:
<script setup lang="ts">
// 导入子组件
import Child from './ChildView.vue'
import { ref } from 'vue'

const childRefs = ref(null);
</script>

<template>
    <!-- 父组件 -->
    <div class="box">
        <h2>我是父组件</h2>
        <!-- 父组件中可以在通过refName?.属性名的方式使用子组件中数据 -->
        <div>
            {{ childRefs?.list }}
        </div>
        <hr>
        <!-- 子组件 -->
        <!-- ref的值与标签中的值保持一致 -->
        <Child ref="childRefs"></Child>
    </div>
</template>

<style scoped lang="scss">
.box {
    background-color: hotpink;

    >div {
        margin: 40px 20px;
    }
}
</style>
子组件:
<script setup lang="ts">
import { ref, defineExpose } from 'vue'
const list = ref(['张三', '李四', '王五', '赵六']);

// 向父组件暴露数据
defineExpose({ list });
</script>

<template>
  <div class="box">
    <h2>我是子组件</h2>
  </div>
</template>

<style scoped lang="scss">
.box {
  color: #fff;
}
</style>
但是需要注意,如果想让父组件获取子组件的数据或者方法需要通过
defineExpose对外暴露,因为Vue3中组件内部的数据对外“关闭的”,外部不能访问。
效果: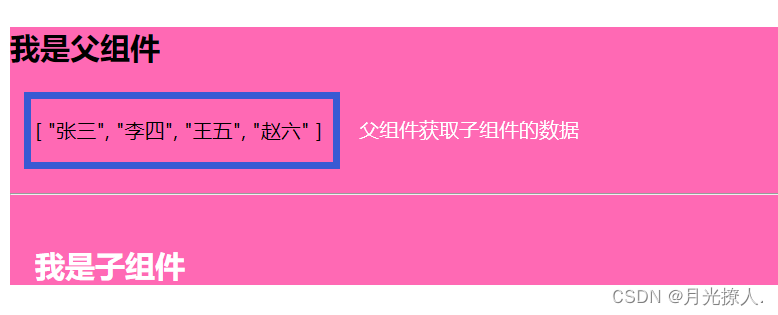
五、pinia
Pinia 是一个专门为Vue.js设计的状态管理库,它提供了一种简单和直观的方式来管理应用程序的状态。在使用Pinia时,可以轻松地创建定义状态的存储,然后将其与Vue组件绑定,使它们能够使用该状态。(与Vuex相比,Pinia 更加简单易用,体积更小,同时具有更好的 TypeScript 支持和插件系统。)
1.安装Pinia如下:
npm install pinia
# 或者使用 yarn
yarn add pinia
2.在安装完Pinia包之后,需要在main.ts文件中导入createPinia函数并将Pinia与Vue应用程序绑定,如下所示:
import { createApp } from 'vue';
// 导入createPinia函数
import { createPinia } from 'pinia';
import App from './App.vue';

const app = createApp(App);
// 将Pinia与Vue应用程序绑定
const pinia = createPinia();
app.use(pinia);

app.mount('#app');
到此,我们就可以使用Pinia来管理Vue应用程序的状态了。
3.然后,在src目录下创建stores文件夹,在stores文件夹下创建counter.ts文件,里面配置如下:
import { defineStore } from 'pinia'

// store 的名字,最好是同时以 `use` 开头且以 `Store` 结尾。(比如 `useUserStore`,`useCartStore`,`useProductStore`)
// defineStore() 的第一个参数要求是一个独一无二的名字,也是 Store 的唯一 ID。
// defineStore() 的第二个参数可接受两类值:Setup 函数或 Option 对象。
export const useProductStore = defineStore('storeId', {
  state: () => {
    return {
      count: 100,
      message:"我是谁???",
    }
  },
  // Getter 完全等同于 store 的 state 的计算值。可以通过 defineStore() 中的 getters 属性来定义它们。推荐使用箭头函数,并且它将接收 state 作为第一个参数。
  getters: {
    double: (state) => state.count * 6 + 66,
  },
  // Action 相当于组件中的 method。它们可以通过 defineStore() 中的 actions 属性来定义,并且它们也是定义业务逻辑的完美选择。
  actions: {
         inMessage(val: string) {
            this.message = val;
        },
    },
});
4.再想调用Pinia的页面里,导入stores文件夹,就可以直接使用state和getters,例如:
<script setup lang="ts">
// 导入pinia
import { useProductStore } from '../stores/counter';
// 默认情况下,可以通过 store 实例访问 state,直接对其进行读写。
const store = useProductStore();
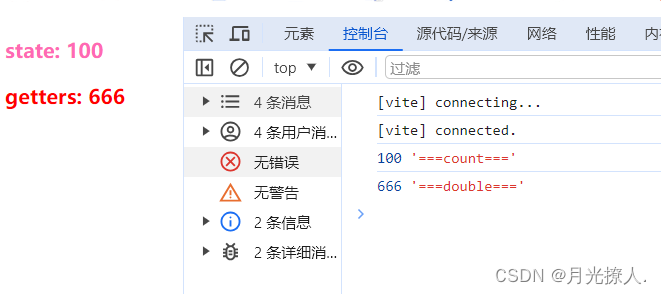
console.log(store.count, '===count===');
console.log(store.double, '===double===');
</script>
<template>
<p> state: {{ store.count }}</p>
<p> getters: {{ store.double }}</p>
</template>
<style scoped>
p:nth-child(1) {
color: hotpink;
font-weight: bold;
}
p:nth-child(2) {
color: red;
font-weight: bold;
}
</style>效果:
5.actions 就不一样了,它相当于组件中的方法(也是一种将异步操作封装在 store 中的方式,它是一个可以被调用的函数,也可以接收参数并修改 store 中的状态。)例如:
<script setup lang="ts">
// 导入pinia
import { useProductStore } from '../stores/counter';
// 默认情况下,可以通过 store 实例访问 state,直接对其进行读写。
const store = useProductStore();

const handleClick = () => {
  store.inMessage('你是pinia');
}
</script>

<template>
  <p>{{ store.message }}</p>
  <button @click="handleClick">回答问题</button>
</template>

<style scoped>
button {
  color: hotpink;
  font-weight: bold;
  cursor: pointer;
}
</style>
效果: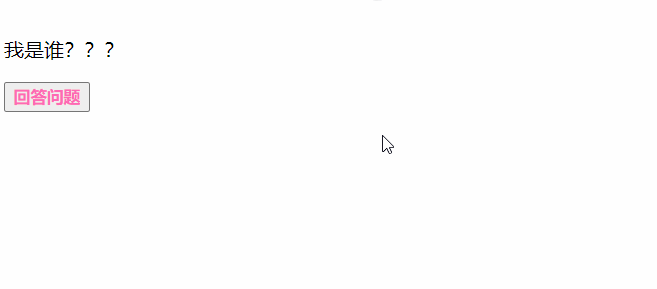


 1656
1656


 被折叠的 条评论
为什么被折叠?
被折叠的 条评论
为什么被折叠?
 到【灌水乐园】发言


