


前言
经常看到有一些App,在做一个耗时任务的时候都会做一个表盘或是手游赛车类游戏显示汽车速度,今天展示一个表盘的绘画。
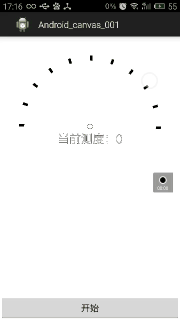
还是先看效果图

如果不了解Android绘图的相关知识,建议先看一下我前面写的两篇博客《绘图(一,基础知识)》和《绘图(二,跟随路径变化的Text)》。
今天主要使用到一个API当然还是drawTextOnPath()介个方法,我在《绘图(二,跟随路径变化的Text)》。这篇文章中详细介绍过,当然如果觉得我做的效果不太好看也完全没有必要使用drawTextOnPath,直接使用DrawArc介个方法就好了。
还是看一下这个方法的介绍吧
public void drawTextOnPath (String text, Path path, float hOffset, float vOffset, Paint paint)
Draw the text, with origin at (x,y), using the specified paint, along the specified path. The paint’s Align setting determins where along the path to start the text.
Parameters
| params | describe |
|---|---|
| text | String: The text to be drawn 将要被绘制的文本 |
| path | Path: The path the text should follow for its baseline 被绘制的文本跟随路劲基线 |
| hOffset | float: The distance along the path to add to the text’s starting position hOffset这个沿着路线的距离加到文本开始的位置 |
| vOffset | float: The distance above(-) or below(+) the path to position the text vOffset这个沿着路线的距离加到文本的上方或着是下方 |
| paint | Paint: The paint used for the text (e.g. color, size, style)画笔 |
对于Path的话,就不用多说了,就是预先将N个点链接成一条线,或是直接将一个几何图形通过AddXxx方法添加到path中形成一条path.
由于代码写得稍微复杂了一点,不过看懂了之后就会发现其实很简单,这里我将我的思路通过流程图想大家介绍清楚。
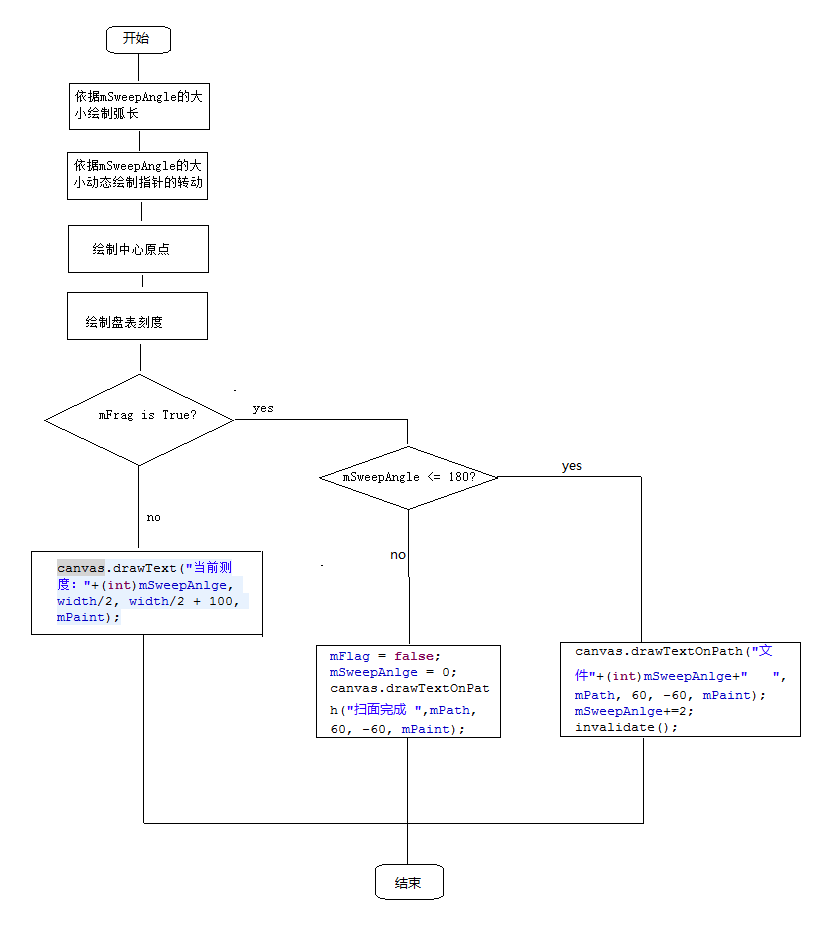
先大致讲解一下流程图,在这个绘画中把我两个关键即可,一是那个部分是“动态”的,二是那个部分是“静态”的。将动态和静态部分确定好就行了。
从流程图大致可以看出开始一下的几个操作部分基本上都是静态的(除了指针的转动),不需要跟随用户动作是直接绘制的。在判断(mFrag is true?)一下的基本上都是依据角度的变更或用户时间响应动作“动态”绘制的。
所有的“动态”绘制部分都是依据一个参数的变更执行的
mSweepAnlge+=2;
如果对这个地方比较陌生的话,可以看一下我的上一篇文章《绘图(二,跟随路径变化的Text)》。你就明白了。
先看一下初始化操作吧
public BiaoPanView(Context context, AttributeSet attrs) {
    super(context, attrs);
    WindowManager wm = (WindowManager) context.getSystemService(Context.WINDOW_SERVICE);
    DisplayMetrics displayMetrics = new DisplayMetrics();
    wm.getDefaultDisplay().getMetrics(displayMetrics);
    width = displayMetrics.widthPixels; //获取屏幕宽度
    r = (width - mMargin * 2-100)/2;
    mRectF = new RectF(mMargin, mMargin, width - mMargin , width - mMargin);
    mRectFPanBiao = new RectF(mMargin+strokeWidth, mMargin+strokeWidth,
            width - mMargin-strokeWidth , width - mMargin-strokeWidth);

    mPaint = new Paint();
    mPaint.setAntiAlias(true);
    mPaint.setColor(Color.RED);
    mPaint.setStrokeWidth(strokeWidth);

    mPath = new Path();
    mPathBiaoPan = new Path();
}
这里要解释两个参数
/**
 * 描边宽度
 */
private float  strokeWidth = 30.0f;

/**
 * 组件的外边距
 */
private float mMargin = 100;
动态变化的弧形部分的大小是依据mRectF的创建
mRectF = new RectF(mMargin, mMargin, width - mMargin , width - mMargin);这就需要你了解一下手机2D屏幕坐标了,画一张图就明白了
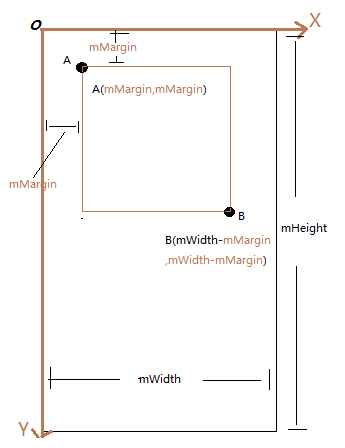
可以看出mWidth就是手机的屏幕的真实宽度。
明白之后你就会对这句话也应该明白了。
mRectFPanBiao = new RectF(mMargin+strokeWidth, mMargin+strokeWidth,
        width - mMargin-strokeWidth , width - mMargin-strokeWidth);
/**
* 绘制盘表
*/
private RectF mRectFPanBiao; 知道为什么要减去strokeWidth了吗?因为绘制最外面一圈的弧形宽度就是由strokeWidth这个参数控制的,而刻度盘在它的下面,所以要减去strokeWidth。
所以我们来看看怎么绘制表盘刻度的
for (int i = 0; i <= 180; ) {
mPathBiaoPan.addArc(mRectFPanBiao, 180+i, 2);
canvas.drawPath(mPathBiaoPan, mPaint);
i+=18;
}了解上面所说的就很容易面白下面的代码了
//绘制中心的小圆点
mPaint.setColor(Color.BLACK);
canvas.drawCircle(width / 2,
width / 2, 15, mPaint);最难的可能就是要绘制指针了,先看看代码吧
float stopX = (float)((width/2) - r* Math.cos(mSweepAnlge*Math.PI / 180) );
float stopY = (float)((width/2) - r * Math.sin(mSweepAnlge*Math.PI / 180) );
//绘制指针
mPaint.setColor(Color.RED);
canvas.drawLine(width / 2, width / 2, stopX, stopY, mPaint);还是画一张图吧,这样比较容易理解。
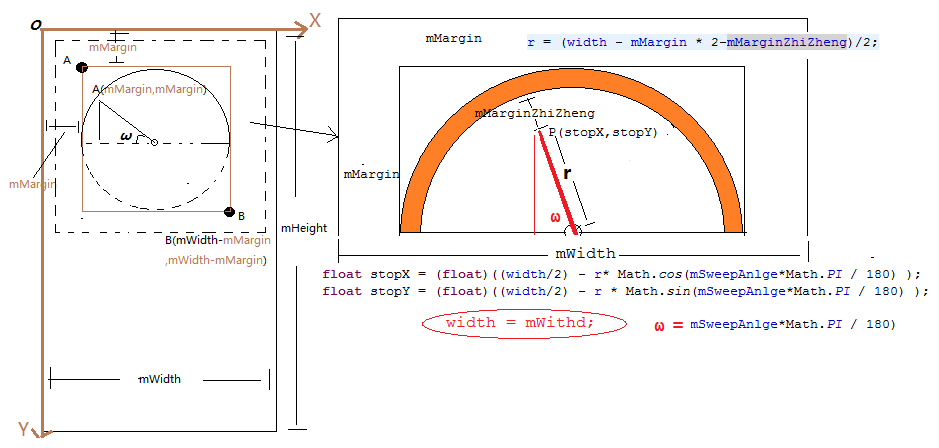
这张在清晰不过了,要是觉得好的吧,转载请标明出处,谢谢~画张图不容易。
最后就是绘制跟随path移动的文本了
//如果扫描角度小于180度,将会发生重绘
if(mSweepAnlge <= 180){
canvas.drawTextOnPath("文件"+(int)mSweepAnlge+" ", mPath, 60, -60, mPaint);
mSweepAnlge+=2;
invalidate();
}else{ //否则绘画完成,停止绘画
mFlag = false;
mSweepAnlge = 0;
canvas.drawTextOnPath("扫面完成 ", mPath, 60, -60, mPaint);
}最后源码如下
public class BiaoPanView extends View {
/**
* 控制view的绘制
*/
private boolean mFlag = false;
/***
* 画笔
*/
private Paint mPaint;
/**
* 绘制弧长
*/
private RectF mRectF;
/**
* 绘制盘表
*/
private RectF mRectFPanBiao;
/**
* 扫描角度变换范围
*/
private float mSweepAnlge;
/**
* 开始绘图
*/
public void startDraw() {
mFlag = true;
}
/**
* 停止绘图
*/
public void stopDraw() {
mFlag = false;
}
/**
* 判断目前是否正在绘制
*
* @return
*/
public boolean isStart() {
return mFlag;
}
/**
* 绘图路径
*/
private Path mPath;
/**
* 绘图表盘路径
*/
private Path mPathBiaoPan;
/**
* 弧长半径
*/
private float r = 0;
/**
* 屏幕宽度
*/
private int width;
/**
* 描边宽度
*/
private float strokeWidth = 30.0f;
/**
* 组件的外边距
*/
private float mMargin = 100;
/**
* 获取当前测度
*
* @return
*/
public float getCurrentSweepAnlge() {
return this.mSweepAnlge;
}
private float mMarginZhiZheng = 100.0f;
public BiaoPanView(Context context, AttributeSet attrs) {
super(context, attrs);
WindowManager wm = (WindowManager) context
.getSystemService(Context.WINDOW_SERVICE);
DisplayMetrics displayMetrics = new DisplayMetrics();
wm.getDefaultDisplay().getMetrics(displayMetrics);
width = displayMetrics.widthPixels; // 获取屏幕宽度
r = (width - mMargin * 2 - mMarginZhiZheng) / 2;
mRectF = new RectF(mMargin, mMargin, width - mMargin, width - mMargin);
mRectFPanBiao = new RectF(mMargin + strokeWidth, mMargin + strokeWidth,
width - mMargin - strokeWidth, width - mMargin - strokeWidth);
mPaint = new Paint();
mPaint.setAntiAlias(true);
mPaint.setColor(Color.RED);
mPaint.setStrokeWidth(strokeWidth);
mPath = new Path();
mPathBiaoPan = new Path();
}
@Override
protected void onDraw(Canvas canvas) {
// TODO Auto-generated method stub
super.onDraw(canvas);
canvas.drawColor(Color.WHITE);
mPaint.setColor(Color.RED);
mPaint.setStyle(Paint.Style.STROKE);
mPaint.setStrokeWidth(30);
// 从path中清除掉之前的绘制路径,一定要执行这句话,要不然
// canvas.drawTextOnPath("文件"+(int)mSweepAnlge+" ", mPath, 60, -60,
// mPaint);
// text文本将不会跟随路径一起移动
mPath.reset();
mPath.addArc(mRectF, 180, mSweepAnlge);
canvas.drawPath(mPath, mPaint);
mPaint.setTextSize(50);
mPaint.setStrokeWidth(2);
// 绘制中心的小圆点
mPaint.setColor(Color.BLACK);
canvas.drawCircle(width / 2, width / 2, 15, mPaint);
mPaint.setStyle(Paint.Style.STROKE);
mPaint.setColor(Color.BLACK);
mPaint.setStrokeWidth(strokeWidth);
mPathBiaoPan.reset(); // 注意使用之前,先将其重置,
// 不然每次执行onDraw方法的时候都会一直addArc,
// 内存将不断的被消耗,可以自行测试
for (int i = 0; i <= 180;) {
    mPathBiaoPan.addArc(mRectFPanBiao, 180 + i, 2);
    canvas.drawPath(mPathBiaoPan, mPaint);
    i += 18;
}
float stopX = (float) ((width / 2) - r
* Math.cos(mSweepAnlge * Math.PI / 180));
float stopY = (float) ((width / 2) - r
* Math.sin(mSweepAnlge * Math.PI / 180));
mPaint.setStrokeWidth(2);
// 绘制指针
mPaint.setColor(Color.RED);
canvas.drawLine(width / 2, width / 2, stopX, stopY, mPaint);
mPaint.setTextSize(50);
mPaint.setTextAlign(Align.RIGHT);
mPaint.setStyle(Paint.Style.FILL);
if (mFlag) {
// 如果扫描角度小于180度,将会发生重绘
if (mSweepAnlge <= 180) {
canvas.drawTextOnPath("文件" + (int) mSweepAnlge + " ", mPath,
60, -60, mPaint);
mSweepAnlge += 2;
invalidate();
} else { // 否则绘画完成,停止绘画
mFlag = false;
mSweepAnlge = 0;
canvas.drawTextOnPath("扫面完成 ", mPath, 60, -60, mPaint);
}
} else {
mPaint.setTextSize(70);
mPaint.setStrokeWidth(1);
mPaint.setTextAlign(Align.CENTER);
mPaint.setStyle(Paint.Style.STROKE);
canvas.drawText("当前测度:" + (int) mSweepAnlge, width / 2,
width / 2 + 100, mPaint);
}
}
}
如果要实现表盘和刻度一起变化的话只需将如下代码进行修改即可
for (int i = 0; i <= 180;) {
mPathBiaoPan.addArc(mRectFPanBiao, 180 + i, 2);
canvas.drawPath(mPathBiaoPan, mPaint);
i += 18;
}修改成
for (int i = 0; i <= mSweepAnlge;) {
    mPathBiaoPan.addArc(mRectFPanBiao, 180 + i, 2);
    canvas.drawPath(mPathBiaoPan, mPaint);
    i += 18;
}
activity_main.xml
<RelativeLayout xmlns:android="http://schemas.android.com/apk/res/android"
    xmlns:tools="http://schemas.android.com/tools"
    android:layout_width="match_parent"
    android:layout_height="match_parent"
    tools:context=".MainActivity" >

    <FrameLayout
        android:layout_width="match_parent"
        android:layout_height="match_parent" >

        <com.example.android_canvas_001.BiaoPanView
            android:id="@+id/myview"
            android:layout_width="match_parent"
            android:layout_height="match_parent" />
    </FrameLayout>

    <Button
        android:layout_alignParentBottom="true"
        android:id="@+id/btn"
        android:layout_width="match_parent"
        android:layout_height="wrap_content"
        android:text="开始"/>

</RelativeLayout>
MainActivity.java
public class MainActivity extends Activity {

    private Button btn;
    private BiaoPanView myView4;

    @Override
    protected void onCreate(Bundle savedInstanceState) {
        super.onCreate(savedInstanceState);
        setContentView(R.layout.activity_main);
//      setContentView(new TextView(this));
        btn = (Button) findViewById(R.id.btn);
        myView4 = (BiaoPanView) findViewById(R.id.myview);
        btn.setOnClickListener(new OnClickListener() {

            public void onClick(View v) {
                if (!myView4.isStart()) {
                    myView4.startDraw();
                    myView4.invalidate();
                    btn.setText("停止");
                } else {
                    myView4.stopDraw();
                    btn.setText("开始");
                }
            }
        });
    }
}


 1154
1154


 被折叠的 条评论
为什么被折叠?
被折叠的 条评论
为什么被折叠?
 到【灌水乐园】发言


