


vue3+ts 基于内置组件picker-view + 扩展组件 Popup 实现自定义日期选择及单列选择
vue3+ts+uniapp小程序端自定义日期选择器
自我记录
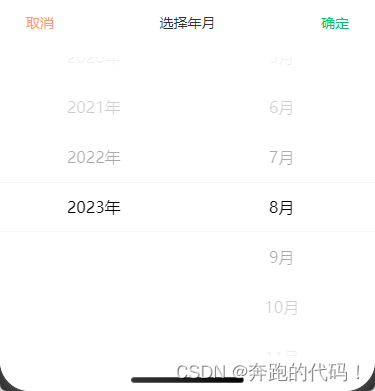
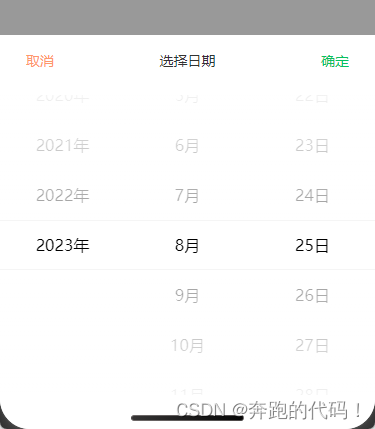
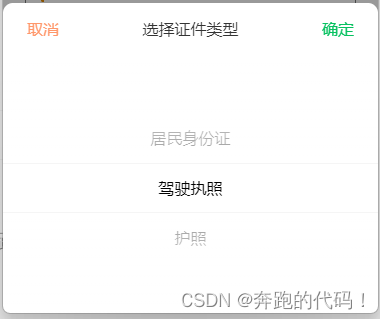
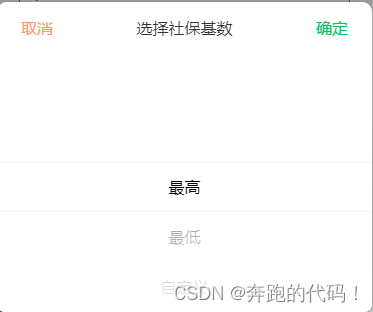
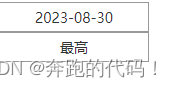
1.先上效果图

直接上代码
2.代码展示
2.1 组件
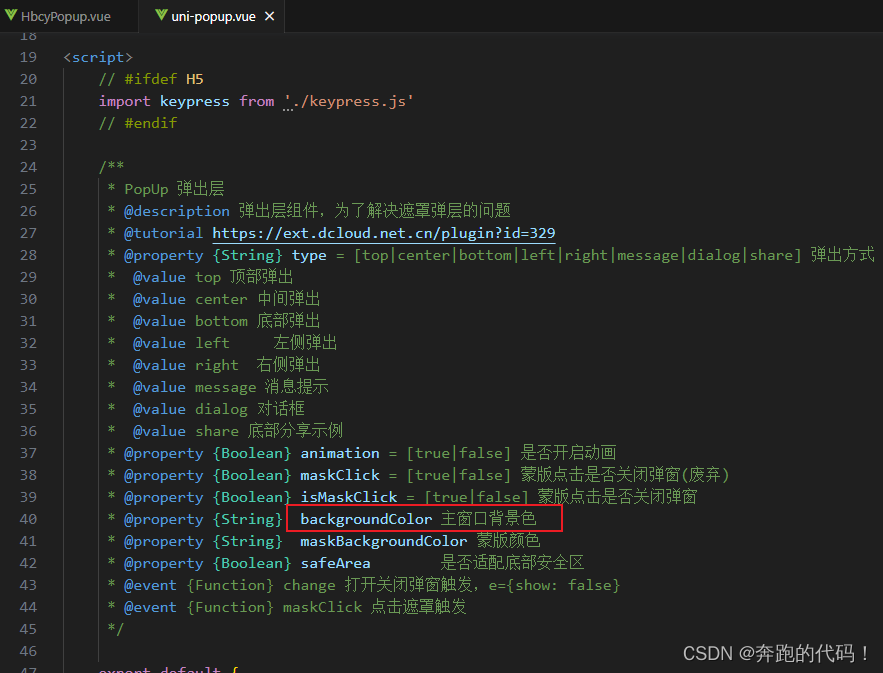
src\components\hbcy-popup.vue
<script setup lang="ts">
import type { Item, PopupType } from '@/types/addInfo'
import { formatDate, parseDate } from '@/utils'
import { onMounted } from 'vue'
import { ref } from 'vue'

const props = defineProps<{
  popupTitle: string
  type: PopupType
  data?: Item[] // 展示数据List
  selectData: string | number // 默认显示 '2023-8-24' || 0
}>()
const emit = defineEmits<{
  (e: 'confirm-popup', params: string | number): void
  (e: 'close-popup'): void
}>()

// 创建选择区间 参考uni文档
const date = new Date()
// 年月日
const TYPEYY_MM_DD = props.type === 'year' || props.type === 'month' || props.type === 'day'
// 月日
const TYPEMM_DD = props.type === 'month' || props.type === 'day'
const TYPEYY = props.type === 'year'
const TYPEMM = props.type === 'month'
const TYPEDD = props.type === 'day'
const TYPESingle = props.type === 'single'
const years = TYPEYY_MM_DD
  ? Array.from({ length: date.getFullYear() - 1989 }, (_, index) => 1990 + index)
  : []
const months = TYPEMM_DD ? Array.from({ length: 12 }, (_, index) => index + 1) : []
const days = TYPEDD ? Array.from({ length: 31 }, (_, index) => index + 1) : []
// 处理默认展示的时间
const defaultDate = TYPEYY_MM_DD ? parseDate(props.selectData as string, props.type) : []
// 单列数据
const singleList = ref(TYPESingle ? props.data : [])
const singleSelect = ref<number>((props.selectData as number) || 0)
// 确保默认时间
const year = ref<number>(defaultDate[0])
const month = ref<number | undefined>(defaultDate[1])
const day = ref<number | undefined>(defaultDate[2])
// 区分日期展示
let showValueList: number[] = []
// 展示日期的选中时间
if (TYPEDD) {
  showValueList = [
    years.indexOf(defaultDate[0]),
    months.indexOf(defaultDate[1]!),
    days.indexOf(defaultDate[2]!),
  ]
} else if (TYPEMM) {
  showValueList = [years.indexOf(defaultDate[0]), months.indexOf(defaultDate[1]!)]
} else if (TYPEYY) {
  showValueList = [years.indexOf(defaultDate[0])]
} else if (TYPESingle) {
  showValueList = [singleSelect.value]
}
const valueList = ref<number[]>()
onMounted(() => {
  // 确保回显的value 在 页面渲染之后
  valueList.value = showValueList
})

// 切换事件
const bindChange: UniHelper.PickerViewOnChange = (e) => {
  const val = e.detail.value

  if (TYPEYY_MM_DD) {
    year.value = years[val[0]]
    month.value = months[val[1]]
    day.value = days[val[2]]
  } else {
    // 单列
    singleSelect.value = val[0]
  }
}
// 确定按钮
const onClickConfirmPopup = (): void => {
  if (TYPEYY_MM_DD) {
    emit('confirm-popup', formatDate(year.value, month.value, day.value))
  } else {
    // 单列
    emit('confirm-popup', singleSelect.value)
  }
  onClosePopup()
}
// 关闭弹出层
const onClosePopup = (): void => {
  emit('close-popup')
}
const { safeAreaInsets } = uni.getSystemInfoSync()
</script>

<template>
  <view class="selectBox">
    <view class="selectTitle">
      <text class="cancel" @click="onClosePopup">取消</text>
      <text class="title">{{ '选择' + popupTitle }}</text>
      <text class="cancel ok" @click="onClickConfirmPopup">确定</text>
    </view>
    <block v-if="TYPEYY_MM_DD">
      <picker-view
        :immediate-change="true"
        indicator-class="indicatorClass"
        :value="valueList"
        @change="bindChange"
        class="picker-view"
      >
        <picker-view-column>
          <view class="item" v-for="(item, index) in years" :key="index">{{ item }}年</view>
        </picker-view-column>
        <picker-view-column v-if="TYPEMM_DD">
          <view class="item" v-for="(item, index) in months" :key="index">{{ item }}月</view>
        </picker-view-column>
        <picker-view-column v-if="TYPEDD">
          <view class="item" v-for="(item, index) in days" :key="index">{{ item }}日</view>
        </picker-view-column>
      </picker-view>
    </block>
    <!-- TODO -->
    <block v-else>
      <picker-view
        :immediate-change="true"
        indicator-class="indicatorClass"
        :value="valueList"
        @change="bindChange"
        class="picker-view"
      >
        <picker-view-column>
          <view class="item" v-for="item in singleList" :key="item.key">{{ item.value }}</view>
        </picker-view-column>
      </picker-view>
    </block>
    <!-- 修复启用:safeArea="true" 时 圆角不好实现问题,现在是自己做的适配-->
    <view :style="{ height: safeAreaInsets?.bottom + 'px' }" style="width: 100%" />
  </view>
</template>
<style lang="scss" scoped>
::v-deep.indicatorClass {
  height: 100rpx;
}
.picker-view {
  width: 750rpx;
  height: 500rpx;
  margin-top: 20rpx;
}
.item {
  line-height: 100rpx;
  text-align: center;
}
.selectBox {
  width: 100%;
  height: fit-content;
  background-color: #fff;
  border-radius: 20rpx 20rpx 0 0;
  .selectTitle {
    display: flex;
    justify-content: space-between;
    align-items: center;
    height: 100rpx;
    font-size: 32rpx;
    .title {
      font-size: 32rpx;
    }
    .cancel {
      width: 160rpx;
      text-align: center;
      color: #ff976a;
      font-size: 32rpx;
    }
    .ok {
      font-size: 32rpx;
      color: #07c160;
    }
  }
}
</style>
2.2 公共方法处理日期
src\utils\index.ts
// 将 yyyy-mm-dd 的字符串 2023-08-24 => [2023,8,24] || [2023,8] || [2023]
export function parseDate(dateString: string, type: string): [number, number?, number?] {
  const date = dateString ? new Date(dateString) : new Date()
  const year = date.getFullYear()
  const month = type === 'day' || type === 'month' ? date.getMonth() + 1 : undefined
  const day = type === 'day' ? date.getDate() : undefined
  return [year, month, day]
}

// 将数字格式的年、月、日转换成格式为 yyyy-mm-dd 的字符串 || yyyy-mm || yyyy
export function formatDate(year: number, month?: number, day?: number): string {
  const formattedMonth = month !== undefined ? (month < 10 ? `0${month}` : `${month}`) : ''
  const formattedDay = day !== undefined ? (day < 10 ? `0${day}` : `${day}`) : ''
  return `${year}${formattedMonth ? `-${formattedMonth}` : ''}${
    formattedDay ? `-${formattedDay}` : ''
  }`
}
// 获取当前年月日并返回yyyy-mm-dd格式
export function getCurrentDate(): string {
  const currentDate = new Date()
  const year = currentDate.getFullYear()
  const month = (currentDate.getMonth() + 1).toString().padStart(2, '0')
  const day = currentDate.getDate().toString().padStart(2, '0')
  return `${year}-${month}-${day}`
}
2.3 使用组件(全局自动导入的情况)
全局自动导入看(https://blog.csdn.net/zhgweb/article/details/132499886?spm=1001.2014.3001.5502 第11标题
没有配置全局自动导入的需要自己手动引入!
src\pages\test\index.vue
<script setup lang="ts">
import type { Ref } from 'vue'
import { ref } from 'vue'
import { getCurrentDate } from '@/utils'
type Item = {
  key: number | string
  value: string
}

// 日期相关
const isShowPopop = ref(false)
// 弹出层实例
const refSelectDialog: Ref<UniHelper.UniPopup | null> = ref(null)
const dateTime = ref(getCurrentDate()) // 默认显示当前时间
// 单列相关
let list = [
  { key: 1, value: '最高' },
  { key: 2, value: '最低' },
  { key: 3, value: '自定义' },
]
const singleList = ref<Item[]>(list)
const singleSelect = ref(0)
const isShowSingPopop = ref(false)
const selectItem = ref<Item>(singleList.value[singleSelect.value]) // 默认选中

// 打开日期弹窗 or 单列
const onClickPopup = (type?: string) => {
  refSelectDialog.value!.open()
  if (type === 'single') {
    isShowSingPopop.value = true
  } else {
    isShowPopop.value = true
  }
}
// 关闭弹窗
const onClosePopup = () => {
  refSelectDialog.value!.close()
  isShowPopop.value = false
  isShowSingPopop.value = false
}
// 确定日期弹窗
const onConfirmPopup = (val: string | number, type: string) => {
  if (type === 'single') {
    singleSelect.value = val as number
    selectItem.value = singleList.value[singleSelect.value]
    console.log(selectItem.value, 'singleSelect')
  } else {
    dateTime.value = val as string
    console.log(dateTime.value, 'dateTime.value')
  }
}
</script>

<template>
  <view class="test-page">
    <!-- 使用组件 -->
    <uni-popup
      ref="refSelectDialog"
      type="bottom"
      :maskClick="false"
      :isMaskClick="false"
      :safeArea="false"
      :close="onClosePopup"
    >
      <hbcy-popup
        v-if="isShowPopop"
        popup-title="日期"
        type="day"
        :select-data="dateTime"
        @confirm-popup="onConfirmPopup($event, 'dateTime')"
        @close-popup="onClosePopup"
      />
      <hbcy-popup
        v-if="isShowSingPopop"
        popup-title="社保基数"
        type="single"
        :data="singleList"
        :select-data="singleSelect"
        @confirm-popup="onConfirmPopup($event, 'single')"
        @close-popup="onClosePopup"
      />
    </uni-popup>
  </view>
</template>
<style lang="scss" scoped>
.test-page {
  .item-date {
    width: 300rpx;
    height: 60rpx;
    line-height: 60rpx;
    text-align: center;
    border: 1rpx solid #999;
    font-size: 28rpx;

    &-placeholder {
      color: #999;
    }

    &-txt {
      color: #333;
    }
  }
}
</style>
3.注意事项
3.1refSelectDialog
// 弹出层实例
const refSelectDialog: Ref<UniHelper.UniPopup | null> = ref(null)
- ts类型有一些问题,找了好久不知道该给什么类型!!! 新手TS,有大佬的话请指出,感谢!
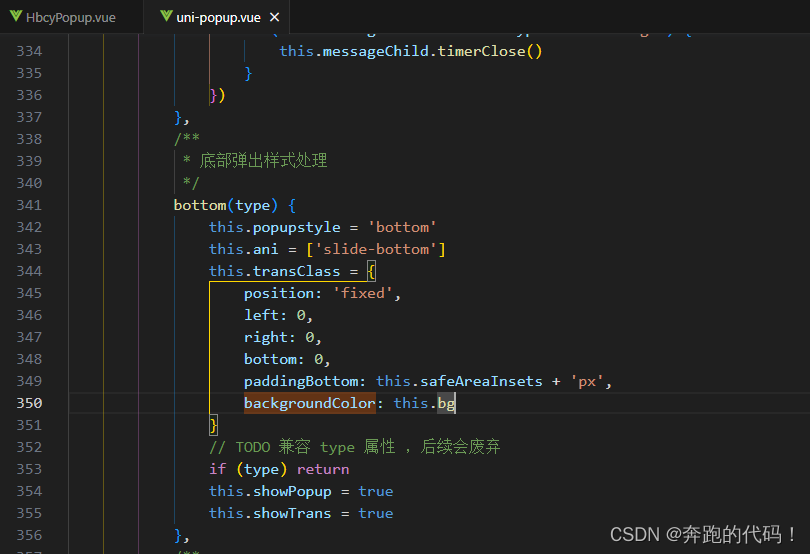
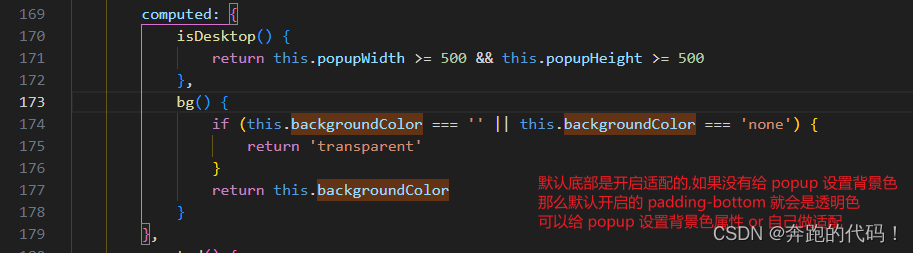
3.1 backgroundColor="#fff" 圆角问题 (已优化)
<uni-popup backgroundColor="#fff" /> // 可以不加了
- 因为默认是开启适配的,需要加上背景色,否则就是透明的底部区域
- 示例如下:

- 源码查看
整理不易,如有转载请备注原文地址!


 2671
2671


 被折叠的 条评论
为什么被折叠?
被折叠的 条评论
为什么被折叠?
 到【灌水乐园】发言


