


文章目录
1、Postman中关于post的几种请求
对于post请求而言,将数据放在body中进行传输,因此,url中不会暴露请求的参数。同时,也不会对发送请求的数据格式进行限制,理论上你可以发任意数据,但是服务器能不能处理就是另一回事了。服务器收到数据后,如何解析数据呢?
服务端会以请求头中的Content-Type设置的内容来进行数据解析。 确定好Content-Type的格式之后,请求主体的数据格式也就确定下来了。
Post请求中常见的Content-Type格式有四种:分别是application/x-www-form-urlencoded(这也是默认格式)、application/json、text/xml以及multipart/form-data格式。
1、 form-data
即multipart/form-data,它将表单的数据组织成Key-Value形式,用分隔符boundary(boundary可任意设置)处理成一条消息。
由于有boundary隔离,所以既可以上传文件,也可以上传参数。
2、x-www-form-urlencoded
即application/x-www-from-urlencoded,是post请求最常见也是默认的数据提交格式。它要求数据名称(name)和数据值(value)之间以等号相连,与另一组name/value值之间用&相连。例如:parameter1=12345&meter2=23456。
3、raw
可以上传任意格式的【文本】,可以上传text、json、xml、html等。
4、binary
即Content-Type:application/octet-stream,只可以上传二进制数据,通常用来上传文件。由于没有键值,所以一次只能上传一个文件。
区别:
- form-data:既可以上传文件等二进制数据,也可以上传表单键值对。
- x-www-form-urlencoded:只能上传键值对,不能用于文件上传。
说明:x-www-form-urlencoded的功能,form-data也能实现,但是后台数据解析方式不一样(Content-Type不同),所以还是要跟服务端保持一致。
2、form-data
说明:需要上传附件时才使用这种类型。
参考:Retrofit2 使用@Multipart上传文件
2.1、对应的Retrofit注解和写法:
1、使用@Multipart 和 @PartMap上传文件:
public RequestBody toRequestBody(String value) {
    RequestBody requestBody = RequestBody.create(MediaType.parse("text/plain"), value);
    return requestBody;
}
@Multipart
@POST("kits-jcz-server/app/inspect/createGoods")
fun addGoods(@PartMap files: MutableMap<String, RequestBody>): Call<HttpBaseResult<Any>>

// 方法调用:
 val map: MutableMap<String, RequestBody> = mutableMapOf()
 val base64 = "data:image/png;base64,iVB"
 map["carRecordId"] = toRequestBody(id.toString())
 map["name"] = toRequestBody("caowj$id")
 map["idNum"] = toRequestBody("320321167567876546")
 map["idImageData"] = toRequestBody(base64)
 map["dpsType"] = toRequestBody("dpsType")
 map["dpsLevel"] = toRequestBody("dpsLevel")
 map["matchedResult"] = toRequestBody("1")
 map["sim"] = toRequestBody("86%")
 map["faceImageData"] = toRequestBody(base64)

 HttpServicesFactory.getCheckpointApi().savePersonInfoByID(map)...
2、使用@Multipart 和 MultipartBody.Part上传文件:
@Multipart
@POST("kstp-cache/attachment/upload/withOrigin")
Call<HttpBaseResult<Object>> uploadLog(
        @Part("originalFileName") RequestBody originalFileName,
        @Part("platform") RequestBody platform,
        @Part() MultipartBody.Part file

//方法调用:
File file1 = new File(file.path);
RequestBody requestBody = RequestBody.create(MediaType.parse("image/png"), file1);
MultipartBody.Part part = MultipartBody.Part.createFormData("file", URLEncoder.encode(file1.getName(), "UTF-8"), requestBody);
RequestBody body1= RequestBody.create(MediaType.parse("multipart/form-data"),"单位名称");
RequestBody body2= RequestBody.create(MediaType.parse("multipart/form-data"),"平台名称");

HttpServicesFactory.getCheckpointApi().uploadLog(body1,body2,part)...
3、使用@Body和RequestBody(MultipartBody)上传文件。(很少使用这种写法)
@POST("kits-jcz-server/app/dispose/handover/confirm")
fun uploadTransferInfo(@Body body: RequestBody): Call<HttpBaseResult<ObjectBean>>;

// 方法调用:
MultipartBody.Builder builder = new MultipartBody.Builder().setType(MultipartBody.FORM);
builder.addFormDataPart("file",file.getName(),RequestBody.create(MediaType.parse("multipart/form-data"),file));
builder.addFormDataPart("name","caowj");
builder.addFormDataPart("age","12");

HttpServicesFactory.getCheckpointApi().uploadTransferInfo(builder.build())...
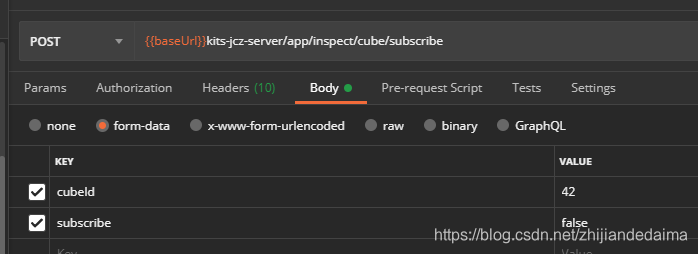
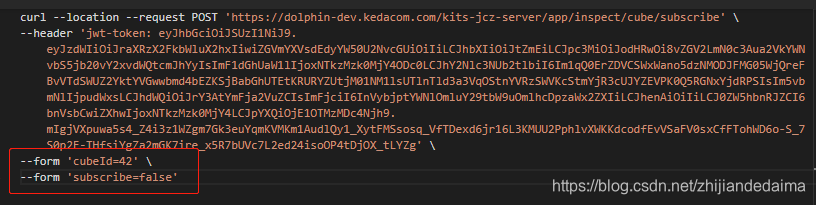
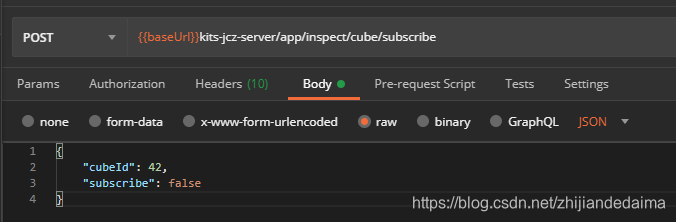
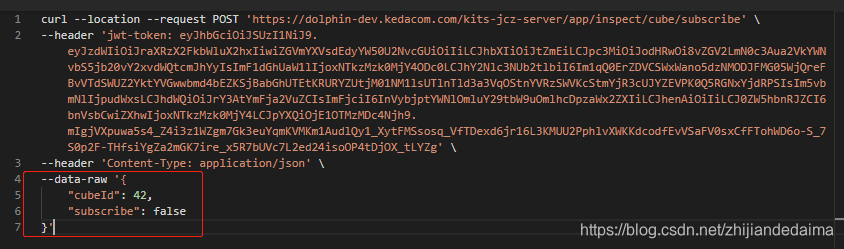
3、x-www-form-urlencoded
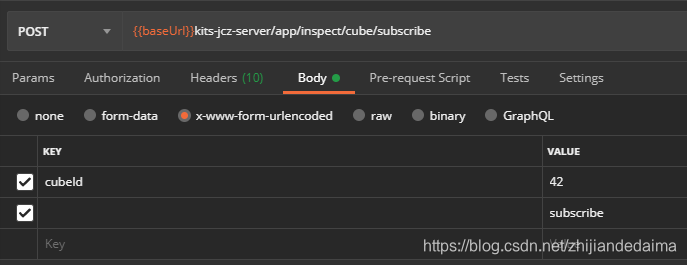
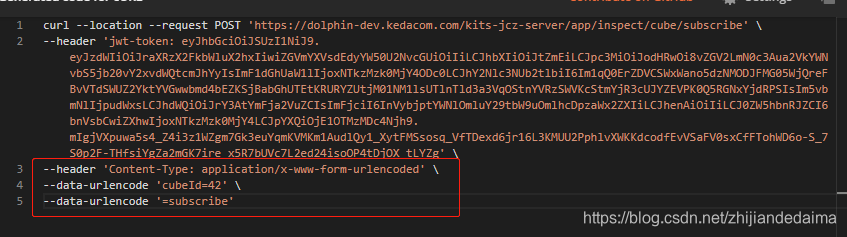
3.1、对应的Retrofit注解和写法:
 @FormUrlEncoded
 @POST("kits-jcz-server/app/inspect/cube/subscribe")
 fun subscribeChannel(@Field("cubeId") channelId: Int, @Field("subscribe") subscribe: Boolean): Call<HttpBaseResult<Any>>

HttpServicesFactory.getCheckpointApi().subscribeChannel(1, false)...
4、raw- ->application/json
4.1、对应的Retrofit注解和写法:
注意:需要指明Content-Type:application/json。
1、参数少用@Field
@Field 需要与 @FormUrlEncoded 组合使用;
// 慎用!会报错:@Field parameters can only be used with form encoding.

@POST("cloud-rbac/user/password")
@Headers({"Content-Type: application/json", "Content-SHA-256: true"})
Call<HttpBaseResult<String>> changePassword(@Field("oldPassword") String oldPassword, @Field("password") String password);
2、使用@Body,传一个RequestBody对象
@CancelDuplicate
@POST("ty-eapp-back/appUserConfidentialityAgreementStatus/save")
Call<HttpBaseResult<Object>> agreeUpload(@Body RequestBody body);
JSONObject jsonObject = new JSONObject();
try {
    jsonObject.put("userId", ENetSP.getUserId());
    jsonObject.put("status", 1);

    String data = jsonObject.toString();
    RequestBody body = RequestBody.create(MediaType.parse("application/json;charset=UTF-8"),data);
    HttpServicesFactory.getHttpServiceApi().agreeUpload(body).enqueue();
}catch (JSONException e){
    e.printStackTrace();
}
3、使用@Body,传递一个实体类
@Headers({"Content-Type:application/json;charset=UTF-8"})
@POST("ga-police-sydwjc/sydw/jbxx/defence")
Call<HttpBaseResult<Object>> updateDefence(@Body JfInfo jfInfo);
// 方法调用:
JfInfo info = mJf.getValue();
info.setYwjfxt(_jfxtStr);//有无技防系统
info.setSfsljws(_jwsStr);//是否设立警务室

HttpServicesFactory.getHttpServiceApi().updateDefence(info).enqueue();
4、使用@Body,传递一个Map集合
@Headers({"Content-Type:application/json;charset=UTF-8"})
@POST("ga-police-sydwjc/sydw/jbxx/tax")
Call<HttpBaseResult<Object>> updateTax(@Body Map<String, String> map);
// 调用方法:
Map<String, String> map = new HashMap<>();
map.put("tyxydm", mTyxydm.getValue());
map.put("yyzzPhotoUrl", photoUrl);
map.put("fzrq", mFzrq.getValue());

HttpServicesFactory.getHttpServiceApi().updateTax(map).enqueue(new HttpRequestCallback<Object>() {
    @Override
    public void onSuccess(Object result) {
        super.onSuccess(result);
    }
});
5、binary
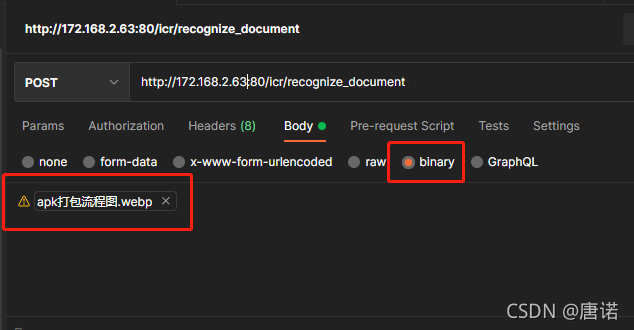
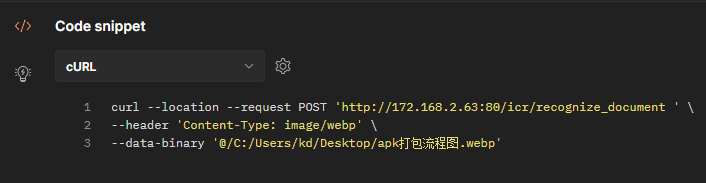
5.1、对应的Retrofit注解和写法:
1、接口定义:
    @POST("icr/recognize_document")
    fun test(@Body body: RequestBody): Call<Any>
2、接口调用:
    fun test(filePath: String) {
        val requestBody = RequestBody.create(
            MediaType.parse("application/octet"),
            getBytesByFile(filePath)
        )
        HttpServicesFactory.httpServiceApi.test(requestBody)
            .enqueue(object : retrofit2.Callback<Any> {
                override fun onResponse(call: Call<Any>, response: Response<Any>) {
                }
                override fun onFailure(call: Call<Any>, t: Throwable) {
                }
            })
    }

    private fun getBytesByFile(pathStr: String?): ByteArray? {
        val file = File(pathStr)
        try {
            val fis = FileInputStream(file)
            val bos = ByteArrayOutputStream(1000)
            val b = ByteArray(1000)
            var n: Int
            while (fis.read(b).also { n = it } != -1) {
                bos.write(b, 0, n)
            }
            fis.close()
            val data = bos.toByteArray()
            bos.close()
            return data
        } catch (e: Exception) {
            e.printStackTrace()
        }
        return null
    }
6、类似get传参
本应该是get请求,后台写成了post请求。
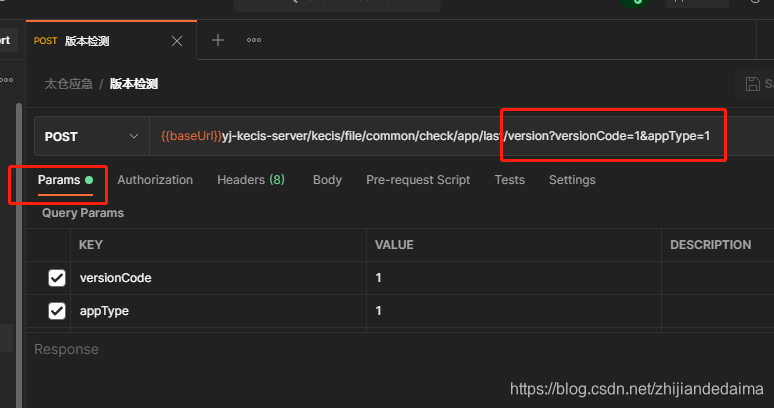
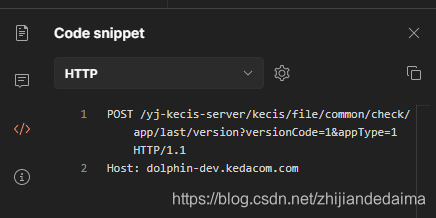
6.1、对应的Retrofit注解和写法:
使用@Query注解:
@POST("yj-kecis-server/kecis/file/common/check/app/last/version")
suspend fun versionCheck(@Query("versionCode")versionCode:Int,@Query("appType")appType:Int): HttpBaseResult<Any>
参考链接:


 7731
7731

 被折叠的 条评论
为什么被折叠?
被折叠的 条评论
为什么被折叠?
 到【灌水乐园】发言


