


上一章已经介绍了UIScrollView,现在使用 UIPageControl结合UIScrollView实现分页效果。话不多说,马上看看!!!
一: UIPageControl属性和方法
   //一共有多少页
    @property(nonatomic) NSInteger numberOfPages;

    //当前显示的页码
    @property(nonatomic) NSInteger currentPage;

    //只有一页时,是否需要隐藏页码指示器
    @property(nonatomic) BOOL hidesForSinglePage;

    //这个属性如果设置为YES,点击时并不会改变控制器显示的当前页码点,必须手动调用 - (void)updateCurrentPageDisplay;
    //这个方法,才会更新。
    @property(nonatomic) BOOL defersCurrentPageDisplay;

    //除当前页码外其他页码指示器的颜色
    @property(nullable, nonatomic,strong) UIColor *pageIndicatorTintColor

    //当前页码指示器的颜色
    @property(nullable, nonatomic,strong) UIColor *currentPageIndicatorTintColor

    //更新控制器当前页码
    - (void)updateCurrentPageDisplay;

    //用于页数会变化的情况下进行大小动态处理
    - (CGSize)sizeForNumberOfPages:(NSInteger)pageCount;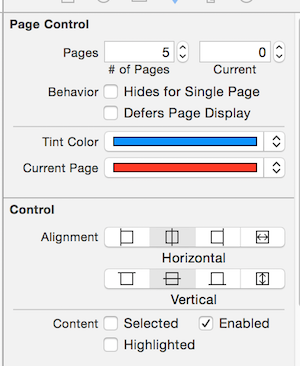
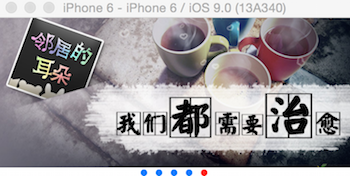
二、图片轮播例子
1.导入图片,storyboard布局UIPageControl结合UIScrollView(略)
2.设置UIScrollVIew的内容,尺寸,设置可分页。设置UIPageControl的总页数
@property (weak, nonatomic) IBOutlet UIScrollView *scrollView;
@property (weak, nonatomic) IBOutlet UIPageControl *pageControl;


- (void)viewDidLoad {
    [super viewDidLoad];


    CGFloat imgY = 0;
    CGFloat width = self.scrollView.frame.size.width;
    CGFloat height = self.scrollView.frame.size.height;
    // 1.添加5张图片到scrollView中    ZXHImageCount图片个数
    for (int i = 0; i<ZXHImageCount; i++) {
        UIImageView *imageView = [[UIImageView alloc]init];
        NSString *name = [NSString stringWithFormat:@"img_0%d",i+1];
        // 设置图片
        imageView.image = [UIImage imageNamed:name];
        // 设置frame
        CGFloat imgX = width * i;
        imageView.frame = CGRectMake(imgX, imgY, width, height);

        [self.scrollView  addSubview:imageView];
    }

    // 2.设置内容尺寸
    CGFloat contentW = width * ZXHImageCount;
    self.scrollView.contentSize = CGSizeMake(contentW, 0);

    // 3.隐藏水平滚动条
    self.scrollView.showsHorizontalScrollIndicator = NO;

    // 4.分页
    self.scrollView.pagingEnabled = YES;

    //成为代理,控制器也连线方式实现,代码不必设置
    //self.scrollView.delegate = self;

    // 5.设置pageControl的总页数
    self.pageControl.numberOfPages = ZXHImageCount;

    // 6.添加定时器(每隔2秒调用一次self 的nextImage方法)
    [self addTimer];
}
3.定义定时器
/**
 *  定时器
 */
@property(strong,nonatomic) NSTimer *timer;


/**
 *  定时器
 */
-(void)addTimer{
    self.timer = [NSTimer scheduledTimerWithTimeInterval:2.0 target:self selector:@selector(nextImage) userInfo:nil repeats:YES];
}

/**
 *  停止定时器
 */
-(void)stopTimer{
    [self.timer invalidate];
    self.timer = nil;
}
4.定时器调用显示下一张图片
-(void)nextImage{
    // 1.增加pageControl的页码
    int page = 0;
    if (self.pageControl.currentPage != ZXHImageCount - 1) {
        page = (int)self.pageControl.currentPage + 1;
    }

    // 2.计算scrollView滚动的位置
    CGFloat offSetX = page * self.scrollView.frame.size.width;
    CGPoint point =  CGPointMake(offSetX,0);
    //self.scrollView.contentOffset = point;
    [self.scrollView setContentOffset:point animated:YES];
    //线程
    [[NSRunLoop currentRunLoop] addTimer:self.timer forMode:NSRunLoopCommonModes];
}
5.手动拖拽停止定时器自动翻页,拖拽停止时开始自动翻页。
#pragma mark 代理方法
/**
 *  当scrollView正在滚动就会调用
 *
 *  @param scrollView
 */
-(void)scrollViewDidScroll:(UIScrollView *)scrollView{
    // 根据scrollView的滚动位置决定pageControl显示第几页
    CGFloat imageWidth = self.scrollView.frame.size.width;
    int page = (self.scrollView.contentOffset.x + imageWidth * 0.5)/imageWidth;
    self.pageControl.currentPage = page;
}


/**
 *  开始拖拽的时候调用
 */
-(void)scrollViewWillBeginDragging:(UIScrollView *)scrollView{
    //停止定时器
    [self stopTimer];
}

/**
 *  停止拖拽的时候调用
 */
-(void)scrollViewDidEndDragging:(UIScrollView *)scrollView willDecelerate:(BOOL)decelerate{
    //开启定时器
    [self addTimer];
}
效果如下:
---------------文章至此!! 待续!!!!


 2577
2577

 被折叠的 条评论
为什么被折叠?
被折叠的 条评论
为什么被折叠?
 到【灌水乐园】发言


