


数据适配器是Android中比较重用的功能,最常用的是ArrayAdapter和SimpleAdapter。
先来看一下ArrayAdapter的简单实现
ManActivity中的代码:
public class MainActivity extends Activity {
	private ListView lv;
	private String[] names={"功能1","功能2","功能3","功能4","功能5"};

	@Override
	protected void onCreate(Bundle savedInstanceState) {
		super.onCreate(savedInstanceState);
		setContentView(R.layout.activity_main);
		lv=(ListView) findViewById(R.id.lv);
		lv.setAdapter(new ArrayAdapter<String>(this, R.layout.list_item, R.id.tv, names));
}activity_main.xml
<LinearLayout xmlns:android="http://schemas.android.com/apk/res/android"
    xmlns:tools="http://schemas.android.com/tools"
    android:layout_width="match_parent"
    android:layout_height="match_parent"
    tools:context=".MainActivity" >

    <ListView
        android:id="@+id/lv"
        android:layout_width="match_parent"
        android:layout_height="match_parent" >
    </ListView>

</LinearLayout>
list_item.xml
<?xml version="1.0" encoding="utf-8"?>
<LinearLayout xmlns:android="http://schemas.android.com/apk/res/android"
    android:layout_width="match_parent"
    android:layout_height="match_parent"
    android:orientation="horizontal" >


    <TextView
        android:id="@+id/tv"
        android:layout_width="match_parent"
        android:layout_height="wrap_content" />

</LinearLayout>
下面是运行效果

可以看出这种方式只能实现一些简单的数据绑定,比如给每条数据前面添加不同图片,通过ArrayAdapter就无法实现了,这时候SimpleAdapter就粉墨登场了。
接下来再看一下SimpleAdapter的实现
MainActivity
protected void onCreate(Bundle savedInstanceState) {
super.onCreate(savedInstanceState);
setContentView(R.layout.activity_main);
ListView lv=(ListView) findViewById(R.id.lv);
List<Map<String, Object>> data=new ArrayList<Map<String,Object>>();
Map<String, Object> map1=new HashMap<String, Object>();
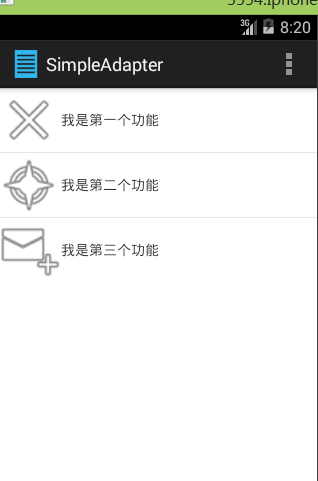
map1.put("nametext", "我是第一个功能");
map1.put("icon", R.drawable.ic_menu_close_clear_cancel);
Map<String, Object> map2=new HashMap<String, Object>();
map2.put("nametext", "我是第二个功能");
map2.put("icon", R.drawable.ic_menu_compass);
Map<String, Object> map3=new HashMap<String, Object>();
map3.put("nametext", "我是第三个功能");
map3.put("icon", R.drawable.ic_menu_compose);
data.add(map1);
data.add(map2);
data.add(map3);
//data 绑定的数据,list集合
// R.layout.list_item数据显示对应的布局
//要让数据跟view对象建立映射关系,
//from [] map集合里数据的key
//to[]布局文件里数据的id
lv.setAdapter(new SimpleAdapter(this,data, R.layout.list_item, new String[]{"nametext","icon"}, new int[]{R.id.iv,R.id.tv}));
}xml
activity_main.xml
<RelativeLayout xmlns:android="http://schemas.android.com/apk/res/android"
    xmlns:tools="http://schemas.android.com/tools"
    android:layout_width="match_parent"
    android:layout_height="match_parent"
    tools:context=".MainActivity" >

    <ListView
        android:id="@+id/lv"
        android:layout_width="match_parent"
        android:layout_height="wrap_content" />

</RelativeLayout><?xml version="1.0" encoding="utf-8"?>
<LinearLayout xmlns:android="http://schemas.android.com/apk/res/android"
android:layout_width="match_parent"
android:layout_height="match_parent"
android:gravity="center_vertical"
android:orientation="horizontal" >
<ImageView
android:id="@+id/iv"
android:layout_width="wrap_content"
android:layout_height="wrap_content" />
<TextView
android:id="@+id/tv"
android:layout_width="wrap_content"
android:layout_height="wrap_content" />
</LinearLayout>运行效果:
当然这两个例子都写的有点简单,所以看起来不是太好看,如果是在项目中用的话,还需要再优化一下。


 1162
1162

 被折叠的 条评论
为什么被折叠?
被折叠的 条评论
为什么被折叠?
 到【灌水乐园】发言


