


在Linux操作系统下,有时候需要在不重新编译程序的情况下,运行时动态地加载库,这时可以通过Linux操作系统提供的API可以实现,涉及到的API主要有dlopen、dlsym和dlclose。使用时,需要加上头文件#include <dlfcn.h> 。
dlopen介绍:打开一个动态链接库 ,函数定义如下:
void * dlopen( const char * pathname, int mode );
函数功能描述:在dlopen的()函数以指定模式打开指定的动态连接库文件,并返回一个句柄给调用进程。
参数说明:
pathname:动态库的名称,需要带上路径。
mode:分为这几种
RTLD_LAZY 暂缓决定,等有需要时再解出符号
RTLD_NOW 立即决定,返回前解除所有未决定的符号。
RTLD_LOCAL
RTLD_GLOBAL 允许导出符号
RTLD_GROUP
RTLD_WORLD
返回值说明:
打开错误返回空指针NULL ,若成功,返回库引用
dlsym介绍:
该函数根据动态链接库操作句柄与符号,返回符号对应的地址。
函数定义如下:
void*dlsym(void* handle,const char* symbol);
函数说明:
dlsym根据动态链接库操作句柄和符号,返回符号对应的地址。使用这个函数不但可以获取函数地址,也可以获取变量地址。
参数说明:
handle:打开库文件之后的句柄。
symbol:需要从库文件查找的符号。
dlclose
dlclose用于关闭指定句柄的动态链接库,只有当此动态链接库的使用计数为0时,才会真正被系统卸载。
实验一 获取函数地址
在linux下创建一个test的工程目录。
- 工程目录下创建一个名为lib1.c的文件,写入如下内容:
#include<stdio.h> #include<stdlib.h> #include <stdarg.h> void LOG(const char *format, ...) { va_list argptr; char buffer[2048]; va_start(argptr,format); vsprintf(buffer,format,argptr); va_end(argptr); printf("%s\n", buffer); } void lib_function_1(void) { LOG("call %s!!!", __func__); } void lib_function_2(void) { LOG("call %s!!!", __func__); } - 创建一个main.c文件,内容如下所示:
#include<stdio.h> #include<stdlib.h> #include <dlfcn.h> void dynamic_lib_test() { void (*fun)(); void *hander = NULL; hander = dlopen("./libshare.so", RTLD_NOW); if(hander == NULL) { printf("can not find dlib\n"); return; } fun = (void(*)())dlsym(hander, "lib_function_1"); if(fun==NULL) { printf("can't find function\n"); } fun(); fun = (void(*)())dlsym(hander, "lib_function_2"); if(fun==NULL) { printf("can't find function\n"); } fun(); dlclose(hander); } int main(int argc, char *argv[]) { dynamic_lib_test(); return 0; } - 创建一个Makefile,生成一个动态库以及可执行文件,内容如下所示:
CPROG = test BIN = $(CPROG) CC= gcc OBJS=main.o lib1.o LDFLAGS += -ldl all: $(BIN) clean: rm -f $(OBJS) $(BIN) $(BIN): $(OBJS) $(CC) -g -fPIC -shared lib1.c -o libshare.so $(CC) -o $(BIN) $(OBJS) $(CFLAGS) $(LDFLAGS) $(CFLAGS_EXTRA) - 编译该工程的代码
执行命令:make clean;make
最终会在该工程生成一个libshare.so动态库文件以及test的可执行文件。
- 测试验证在该工程下执行./test,便可以观察到最终结果,如下图所示:

实验二 获取全局变量地址
- 在当前目录下新增lib2.c,写入如下内容:
#include<stdio.h> #include<stdlib.h> #include<string.h> #include<stdarg.h> //声明一个结构体 typedef struct test_s { char *test_name; void (*test_func)(); void (*test_set_buf)(char *val); char *(*test_get_buf)(); }test_t; char testbuf[128]="123456"; void Log(const char *format, ...) { va_list argptr; char buffer[2048]; va_start(argptr,format); vsprintf(buffer,format,argptr); va_end(argptr); printf("%s\n", buffer); } void test_function() { Log("function %s call!!!", __func__); } void test_set_buf(char *val) { strcpy(testbuf, val); } char *test_get_buf() { return testbuf; } //定义一个全局变量 test_t test = { .test_name = "TestName", .test_func = test_function, .test_get_buf = test_get_buf, .test_set_buf = test_set_buf, }; - 编辑main.c,内容如下:
#include <string.h> void dynamic_lib_test_1() { void (*fun)(); void *hander = NULL; hander = dlopen("./libshare.so", RTLD_NOW); if(hander == NULL) { printf("can not find dlib\n"); return; } fun = (void(*)())dlsym(hander, "lib_function_1"); if(fun==NULL) { printf("can't find function\n"); } fun(); fun = (void(*)())dlsym(hander, "lib_function_2"); if(fun==NULL) { printf("can't find function\n"); } fun(); dlclose(hander); } typedef struct test_s { char *test_name; void (*test_func)(); void (*test_set_buf)(char *val); char *(*test_get_buf)(); }test_t; void dynamic_lib_test_2() { void *hander = NULL; hander = dlopen("./libshare.so", RTLD_NOW); if(hander == NULL) { printf("can not find dlib\n"); return; } test_t *t = (test_t *)dlsym(hander, "test"); if(t==NULL) { printf("can't find function\n"); return; } printf("name:%s, buf:%s\n", t->test_name, t->test_get_buf()); t->test_func(); t->test_set_buf("hello world!!!"); printf("name:%s, buf:%s\n", t->test_name, t->test_get_buf()); dlclose(hander); } int main(int argc, char *argv[]) { dynamic_lib_test_1(); dynamic_lib_test_2(); return 0; } - 编辑Makefile,主要是添加lib2.c的编译
CPROG	= test
BIN     = $(CPROG)
CC= gcc
OBJS=main.o lib1.o
LDFLAGS += -ldl

all: $(BIN)
clean:
	rm -f $(OBJS) $(BIN)
$(BIN): $(OBJS)
	$(CC) -g -fPIC -shared lib1.c lib2.c -o libshare.so
	$(CC)  -o $(BIN) $(OBJS)   $(CFLAGS) $(LDFLAGS) $(CFLAGS_EXTRA)
4.执行make clean;make重新编译这个工程
5.测试验证
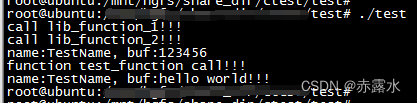
dlsym找到全局结构体test后,可以直接用这个全局结构体指针来使用库里面的函数了。
总结:
通过dlopen打开动态库的方式,允许在运行时动态地加载库,这可以让你在不重新编译程序的情况下,添加或修改库中的函数,同时也为程序提供了更大的灵活性。dlsym允许程序在运行时查找库中的符号(通常是函数或变量的名称)。这使得程序可以在运行时决定调用哪个版本的函数,或者根据需要选择不同的实现。由于只有当程序实际需要时才加载库,因此可以节省内存。如果多个程序共享同一个库,那么这个库只需要在内存中加载一次。使用动态链接,你可以更容易地控制库的版本。


 983
983


 被折叠的 条评论
为什么被折叠?
被折叠的 条评论
为什么被折叠?
 到【灌水乐园】发言


