


使用工具:VS2013
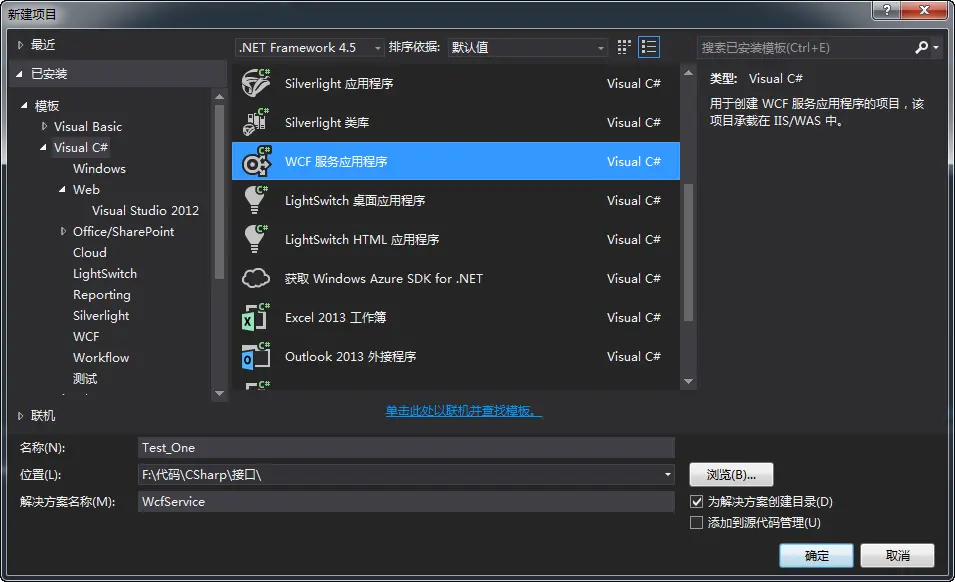
第一步:创建一个WCF的工程
第二步:新建一个User.cs
using System;
using System.Collections.Generic;
using System.Linq;
using System.Runtime.Serialization;
using System.Web;

namespace Test_One
{
    [DataContract]
    public class User
    {
        [DataMember]
        public string Name { get; set; }
        [DataMember]
        public string Password { get; set; }
        [DataMember]
        public string Email { get; set; }
    }
}
第三步:创建接口(IUserService.cs)
using System;
using System.Collections.Generic;
using System.Linq;
using System.Runtime.Serialization;
using System.ServiceModel;
using System.ServiceModel.Web;
using System.Text;

namespace Test_One
{
    [ServiceContract]
    public interface IUser
    {
        [OperationContract]
        [WebInvoke(Method = "GET", UriTemplate = "getuser/{name}", RequestFormat = WebMessageFormat.Json, ResponseFormat = WebMessageFormat.Json)]
        User GetUserData(string name);

        [OperationContract]
        [WebInvoke(Method = "POST", UriTemplate = "checkuser", RequestFormat = WebMessageFormat.Json, ResponseFormat = WebMessageFormat.Json)]
        User CheckUserData(User user);
    }
}
第四步:实现接口(UserService.svc.cs)
using System;
using System.Collections.Generic;
using System.Linq;
using System.Runtime.Serialization;
using System.ServiceModel;
using System.ServiceModel.Web;
using System.Text;

namespace Test_One
{
    // NOTE: You can use the "Rename" command on the "Refactor" menu to change the class name "Service1" in code, svc and config file together.
    // NOTE: In order to launch WCF Test Client for testing this service, please select Service1.svc or Service1.svc.cs at the Solution Explorer and start debugging.
    public class UserService : IUserService
    {
        public User GetUserData(string name)
        {
            User user = new User();
            user.Name = name;
            user.Email = "test@123.com";
            return user;
        }

        public User CheckUserData(User user)
        {
            user.Name += "-test";
            return user;
        }
    }
}
第四步 修改配置文件
<?xml version="1.0"?>
<configuration>

  <appSettings>
    <add key="aspnet:UseTaskFriendlySynchronizationContext" value="true" />
  </appSettings>
  <system.web>
    <compilation debug="true" targetFramework="4.5" />
    <httpRuntime targetFramework="4.5"/>
  </system.web>
  <system.serviceModel>
    <services>
      <service name="Test_One.UserService" behaviorConfiguration="RESTBehaviour">
        <endpoint address=""
                  binding="webHttpBinding"
                  contract="Test_One.IUserService"
                  behaviorConfiguration="ESEndPointBehavior"/>
      </service>
    </services>
    <behaviors>
      <serviceBehaviors>
        <behavior name="RESTBehaviour">
          <serviceMetadata httpGetEnabled="true"/>
          <serviceDebug includeExceptionDetailInFaults="true"/>
        </behavior>

        <behavior>
          <!-- To avoid disclosing metadata information, set the values below to false before deployment -->
          <serviceMetadata httpGetEnabled="true" httpsGetEnabled="true"/>
          <!-- To receive exception details in faults for debugging purposes, set the value below to true.  Set to false before deployment to avoid disclosing exception information -->
          <serviceDebug includeExceptionDetailInFaults="false"/>
        </behavior>
      </serviceBehaviors>
      <endpointBehaviors>
        <behavior name="ESEndPointBehavior">
          <webHttp/>
        </behavior>
      </endpointBehaviors>
    </behaviors>
    <protocolMapping>
      <add binding="basicHttpsBinding" scheme="https" />
    </protocolMapping>
    <serviceHostingEnvironment aspNetCompatibilityEnabled="true" multipleSiteBindingsEnabled="true" />
  </system.serviceModel>
  <system.webServer>
    <!--
      To browse web app root directory during debugging, set the value below to true.
      Set to false before deployment to avoid disclosing web app folder information.
    -->
    <directoryBrowse enabled="true"/>
    <!--<modules runAllManagedModulesForAllRequests="true"/>-->
    <modules runAllManagedModulesForAllRequests="true">
      <remove name="WebDAVModule" />
    </modules>
    <handlers>
      <remove name="WebDAV" />
    </handlers>
  </system.webServer>

</configuration>
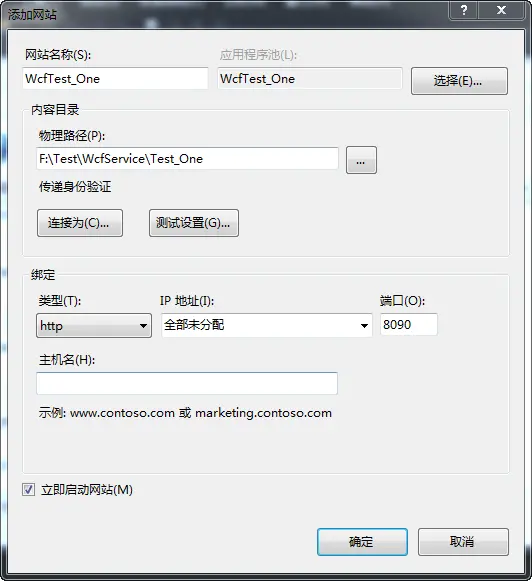
第五步:部署(应用程序池中给为4.0)
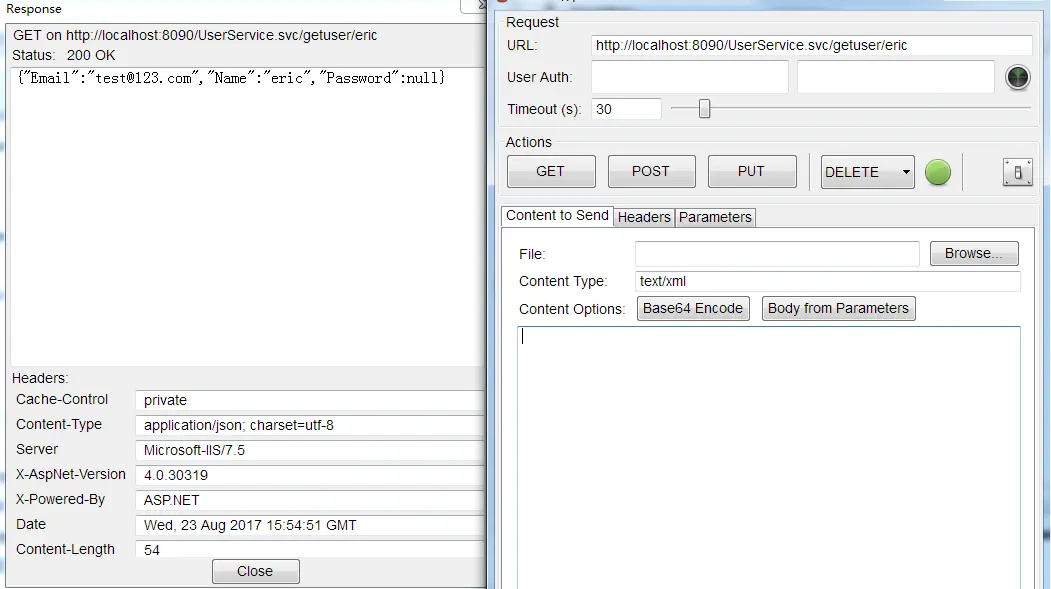
第六步:测试接口
学习网址: http://www.cnblogs.com/mingmingruyuedlut/p/4223116.html

公众号.png


 181
181

 被折叠的 条评论
为什么被折叠?
被折叠的 条评论
为什么被折叠?
 到【灌水乐园】发言


