


文章目录
一、SpringCloud 微服务基础介绍
二、SpringCloud 微服务项目构建
三、SpringCloud 微服务之Eureka 服务注册与发现
四、SpringCloud 微服务之 Zookeeper 服务注册与发现
五、SpringCloud 微服务之Consul 服务注册与发现
六、SpringCloud 微服务之 Ribbon 负载均衡服务调用
七、SpringCloud 微服务之 OpenFeign 服务接口调用
八、SpringCloud 微服务之 Hystrix 断路器
九、Spring Cloud 微服务之 Gateway
十、SpringCloud 微服务之SpringCloud Config 分布式配置中心
十一、SpringCloud 微服务之SpringCloud Bus 消息总线
十二、SpringCloud 微服务之SpringCloud Stream 消息驱动
十三、Spring Cloud 微服务之 SpringCloud Sleuth 分布式请求链路跟踪
十四、SpringCloud Alibaba Nacos 服务注册和配置中心
十五、SpringCloud Alibaba Sentinel 实现熔断与限流
十六、SpringCloud Alibaba Seata 处理分布式事务
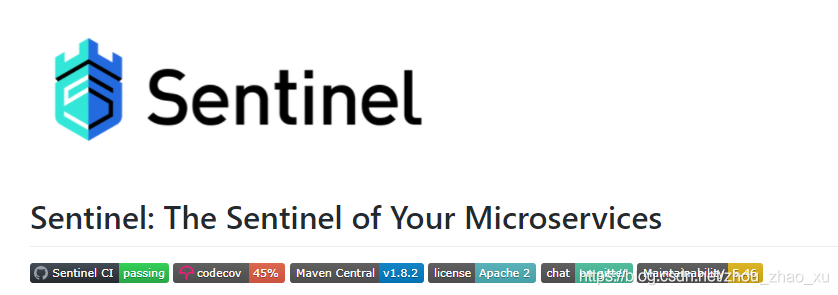
1. Sentinel 简介
1.1 官网:
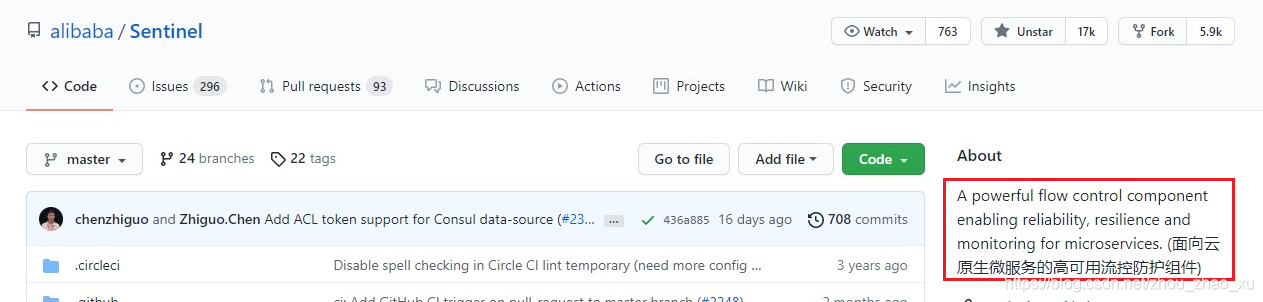
https://github.com/alibaba/Sentinel
https://github.com/alibaba/Sentinel/wiki/%E4%BB%8B%E7%BB%8D
1.2 比较
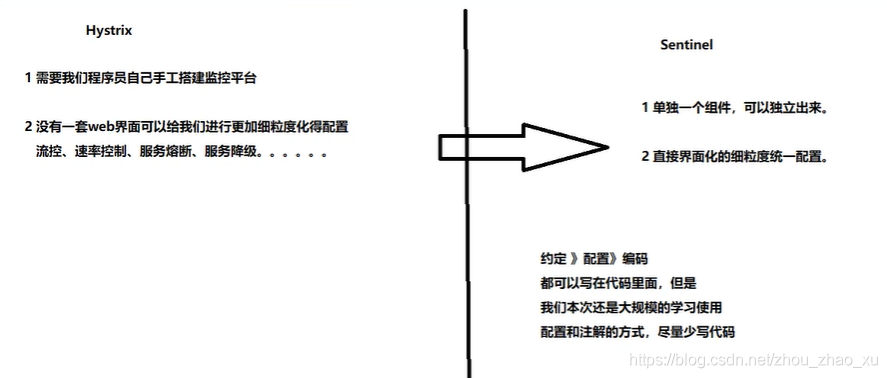
1.3 是什么
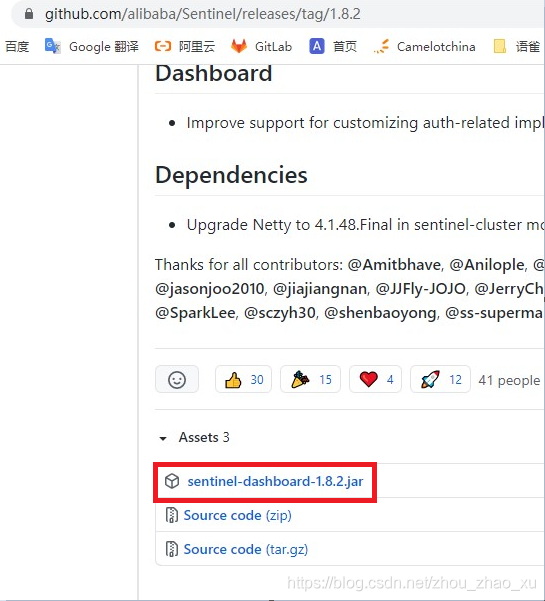
1.4 下载地址
1.5 能干嘛
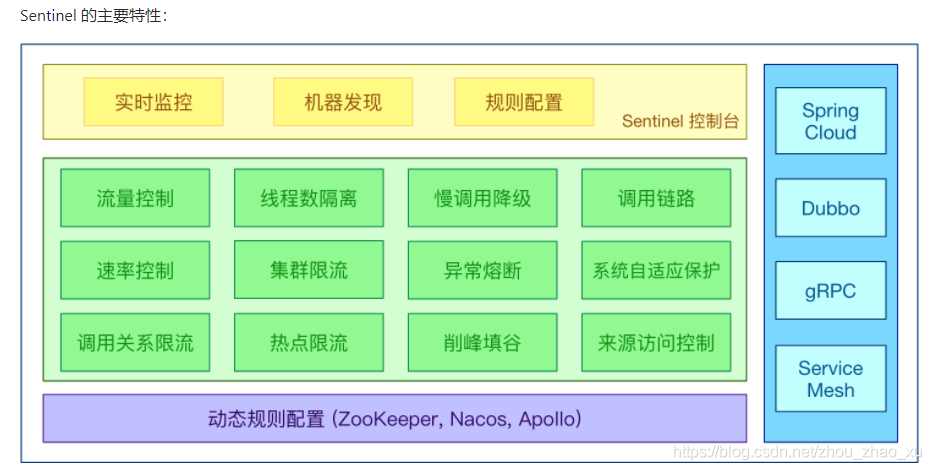
1.6 怎么用:解决哪些问题
- 服务雪崩
- 服务降级
- 服务熔断
- 服务限流
2. 安装Sentinel控制台
2.1 sentinel组件有两部分构成
- 核心库(Java客户端)不依赖任何框架/库,能够运行于所有Java运行时环境,同时对Dubbo/Spring Cloud等框架也有较好的支持。
- 控制台(Dashboard)基于SpringBoot开发,打包后可以直接运行,不需要额外的Tomcat等应用容器。
2.2 安装步骤
- 下载
https://github.com/alibaba/Sentinel/releases- 运行
前提:Java8环境、8080端口没被占用
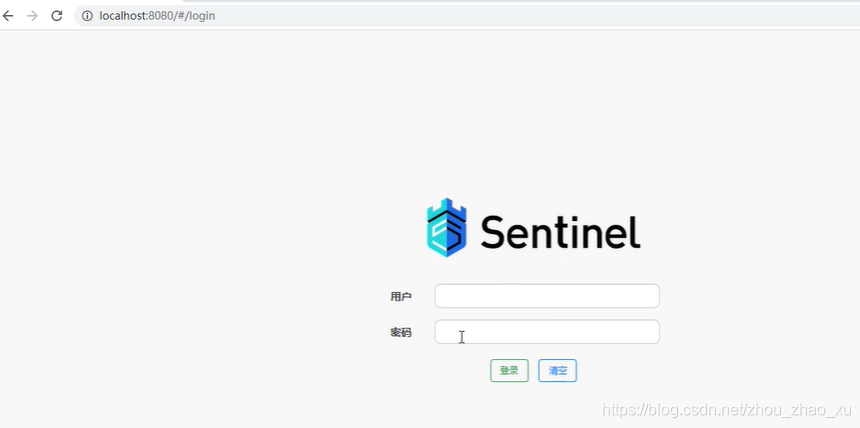
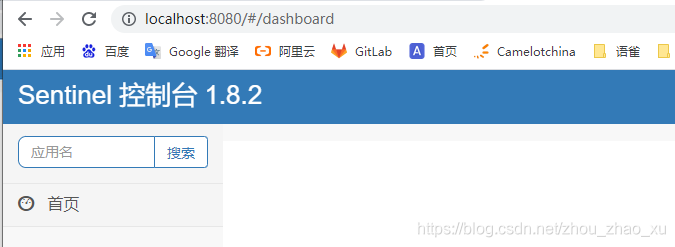
命令:java -jar xxx.jar- 访问sentinel管理界面
http://ip:8080
登录账号密码均为sentinel
3. 初始化演示工程
3.1 在父项目中创建 cloud-alibaba-sentinel-service8401 服务module
1. 修改pom
<?xml version="1.0" encoding="UTF-8"?>
<project xmlns="http://maven.apache.org/POM/4.0.0"
         xmlns:xsi="http://www.w3.org/2001/XMLSchema-instance"
         xsi:schemaLocation="http://maven.apache.org/POM/4.0.0 http://maven.apache.org/xsd/maven-4.0.0.xsd">
    <parent>
        <artifactId>springcloud</artifactId>
        <groupId>com.zzx</groupId>
        <version>1.0-SNAPSHOT</version>
    </parent>
    <modelVersion>4.0.0</modelVersion>

    <artifactId>cloud-alibaba-sentinel-service8401</artifactId>

    <properties>
        <maven.compiler.source>8</maven.compiler.source>
        <maven.compiler.target>8</maven.compiler.target>
    </properties>

    <dependencies>
        <!-- SpringCloud alibaba Nacos discovery -->
        <dependency>
            <groupId>com.alibaba.cloud</groupId>
            <artifactId>spring-cloud-starter-alibaba-nacos-discovery</artifactId>
        </dependency>

        <!-- SpringCloud alibaba sentinel -->
        <dependency>
            <groupId>com.alibaba.cloud</groupId>
            <artifactId>spring-cloud-starter-alibaba-sentinel</artifactId>
        </dependency>

        <!-- openfeign -->
        <dependency>
            <groupId>org.springframework.cloud</groupId>
            <artifactId>spring-cloud-starter-openfeign</artifactId>
        </dependency>

        <!-- SpringBoot 整合web组件 -->
        <dependency>
            <groupId>org.springframework.boot</groupId>
            <artifactId>spring-boot-starter-web</artifactId>
        </dependency>
        <dependency>
            <groupId>org.springframework.boot</groupId>
            <artifactId>spring-boot-starter-actuator</artifactId>
        </dependency>
        <dependency>
            <groupId>org.projectlombok</groupId>
            <artifactId>lombok</artifactId>
        </dependency>
        <dependency>
            <groupId>org.springframework.boot</groupId>
            <artifactId>spring-boot-devtools</artifactId>
            <scope>runtime</scope>
        </dependency>
        <dependency>
            <groupId>org.springframework.boot</groupId>
            <artifactId>spring-boot-starter-test</artifactId>
        </dependency>
    </dependencies>

</project>
2. 编写 yaml
server:
  port: 8401

spring:
  application:
    name: cloud-alibaba-sentinel-service
  cloud:
    nacos:
      discovery:
        # Nacos 服务注册中心地址
        server-addr: 47.107.124.79:8848
    sentinel:
      transport:
        # 配置 sentinel dashboard地址
        dashboard: 47.107.124.79:8080
        # 默认8719端口,假如端口被占用会自动从8719开始一次+1扫描,直到找到未被占用的端口
        port: 8719
        # 当sentinel和微服务不在同一台机器上时,需配置微服务启动机器的ip
        client-ip: 微服务ip

management:
  endpoints:
    web:
      exposure:
        include: '*'
4. 编写主启动类和业务类
主启动类
@SpringBootApplication
@EnableDiscoveryClient
public class MainSentinel8401 {

    public static void main(String[] args){

        SpringApplication.run(MainSentinel8401.class,args);
    }
}
业务类 FlowLimitController
@RestController
public class FlowLimitController {
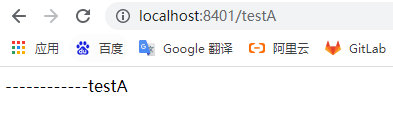
@GetMapping("/testA")
public String testA(){
return "------------testA";
}
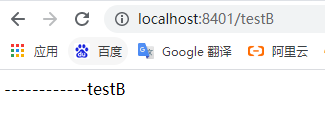
@GetMapping("/testB")
public String testB(){
return "------------testB";
}
}
5. 启动测试
- 启动 nacos、Sentinel
- 启动微服务 8401
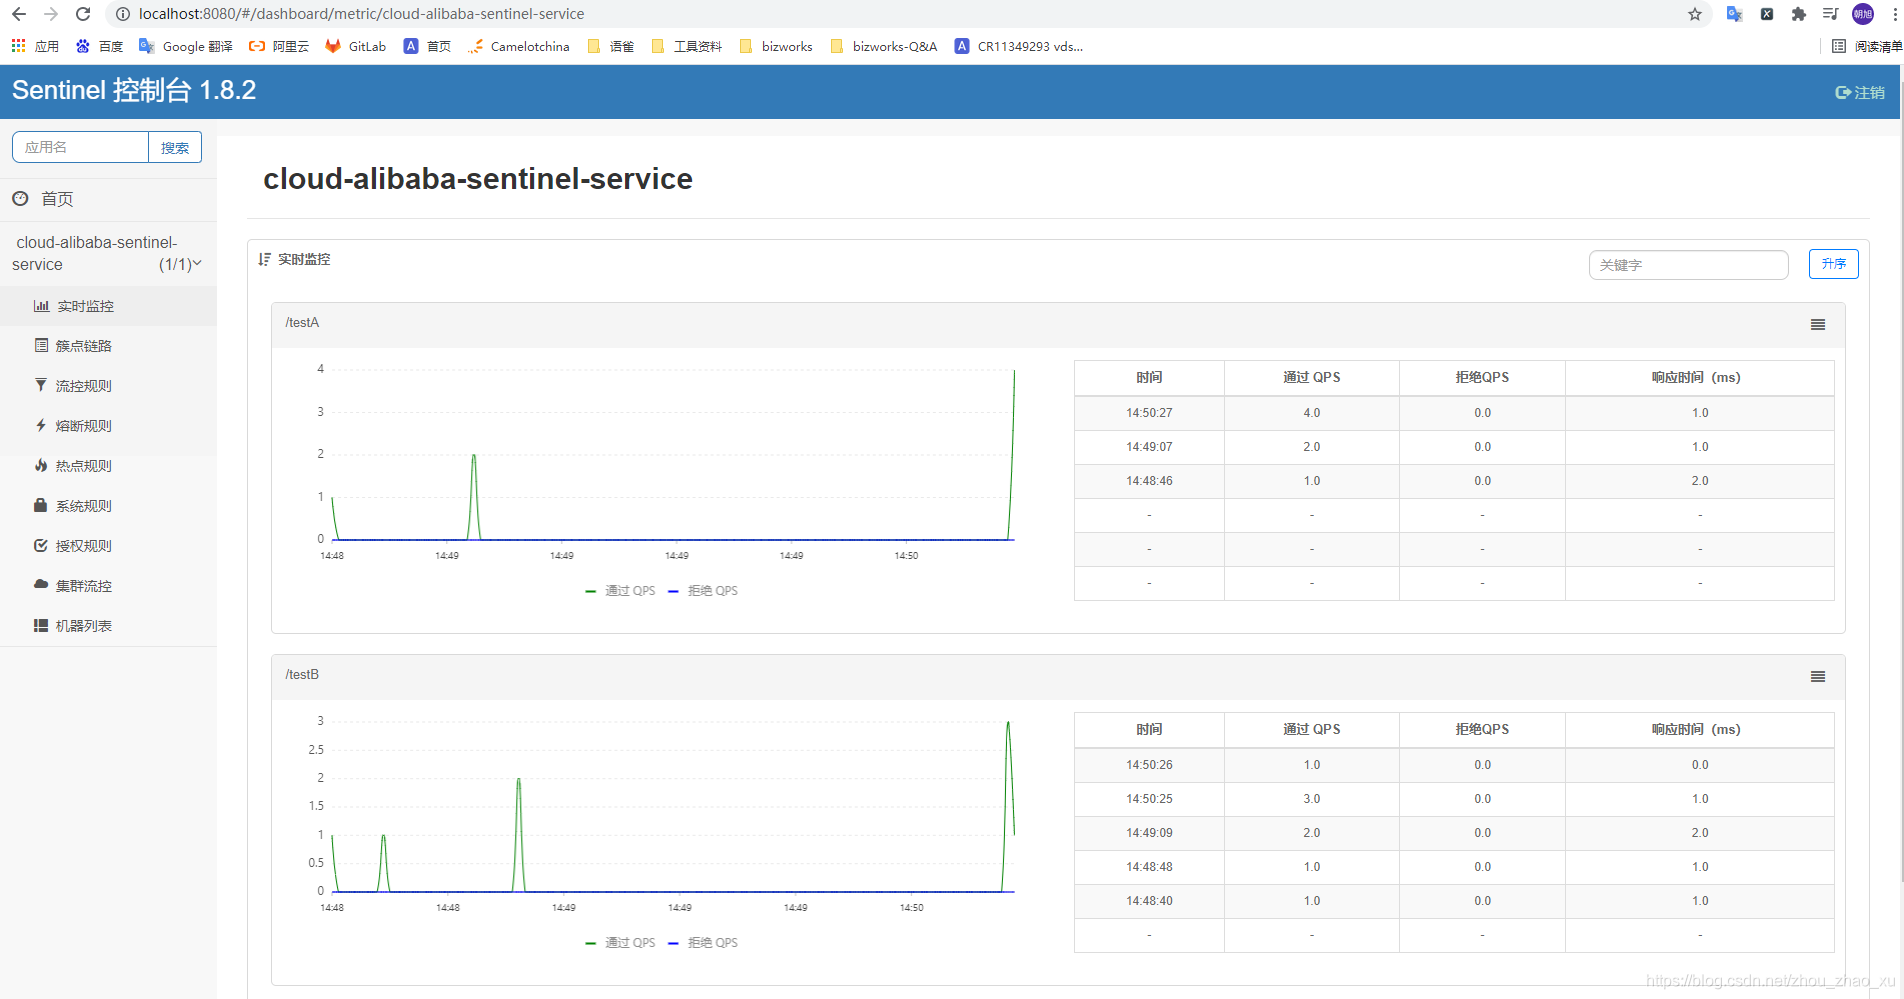
- 启动微服务后查看sentinel控制台
发现什么也没有,sentinel采用的是懒加载
执行一次访问即可
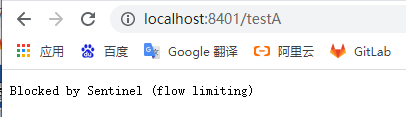
效果:多次访问testA和testB接口,出现下图所示
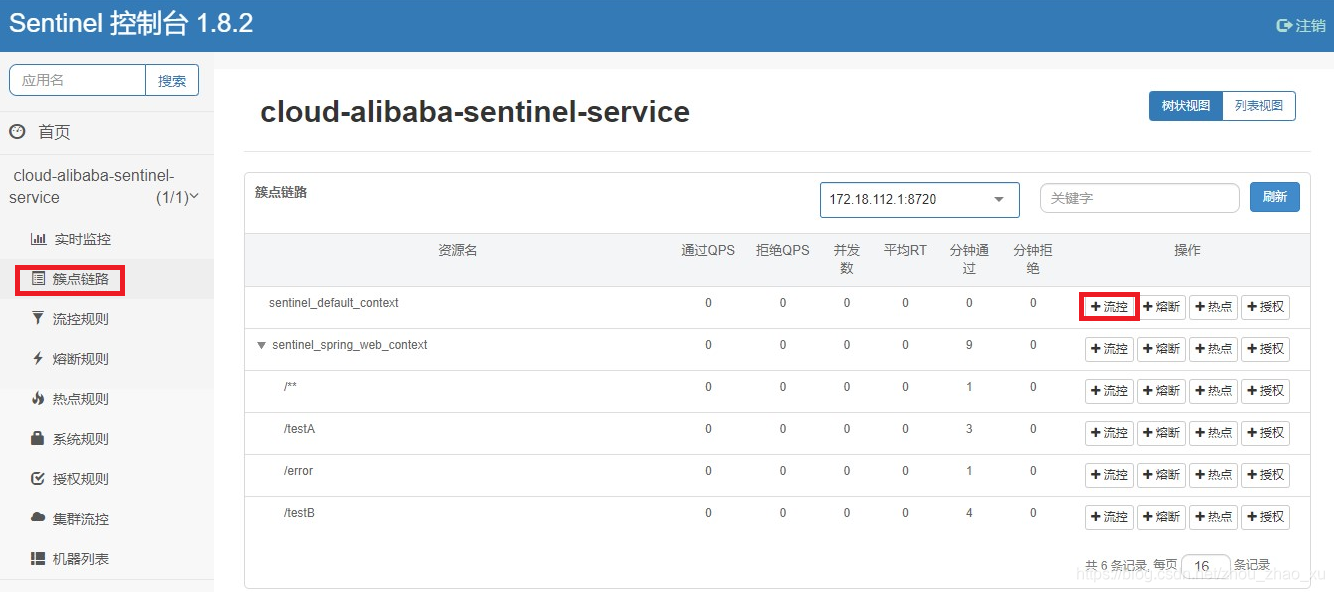
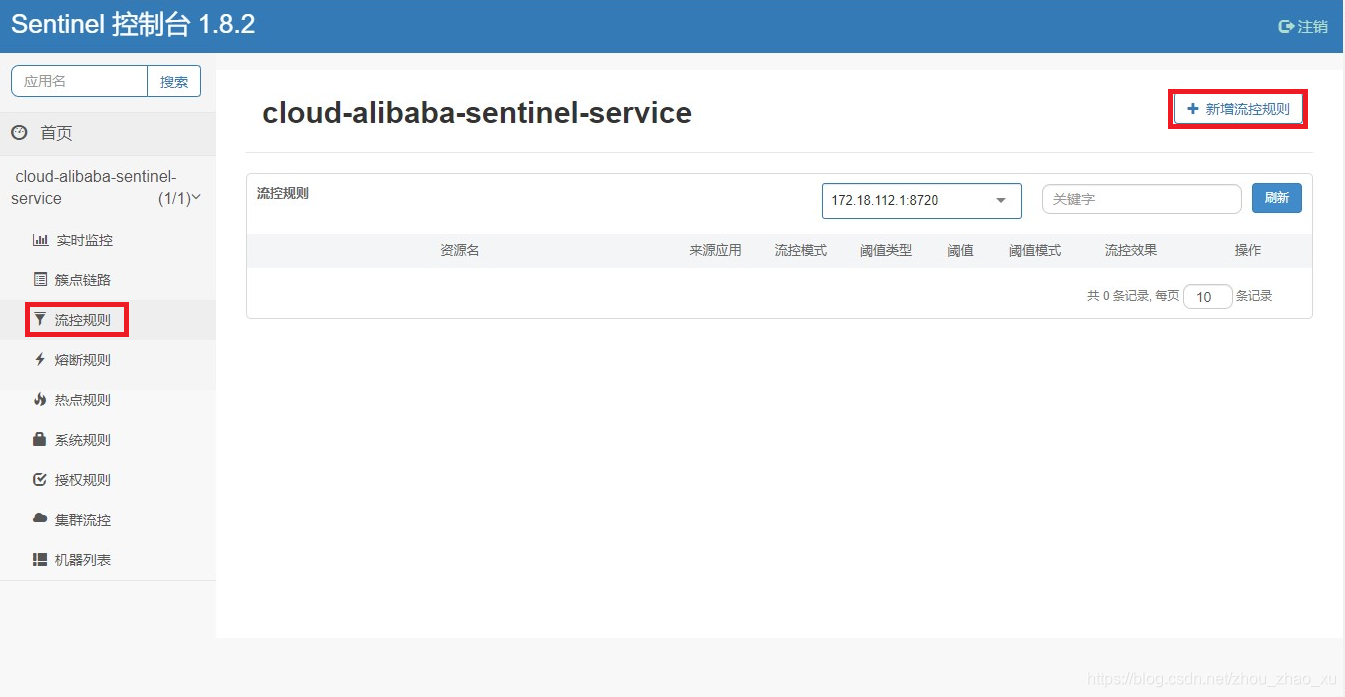
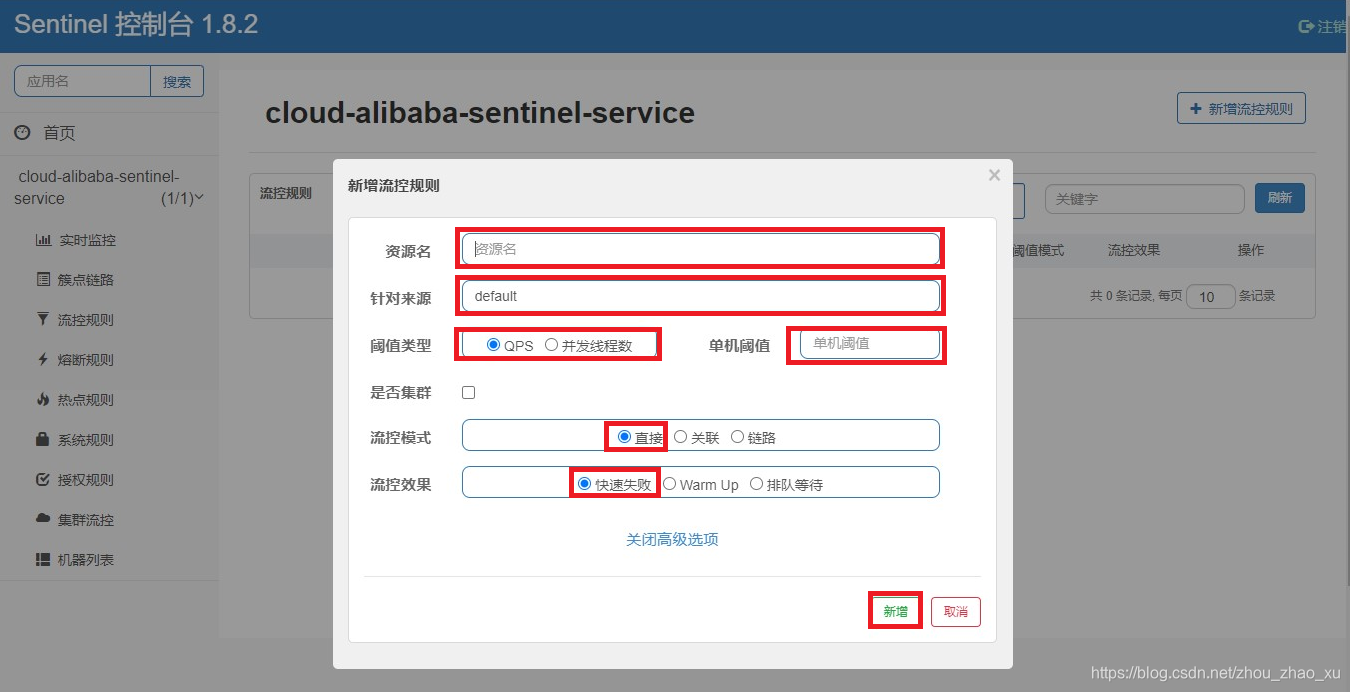
4. 流控规则
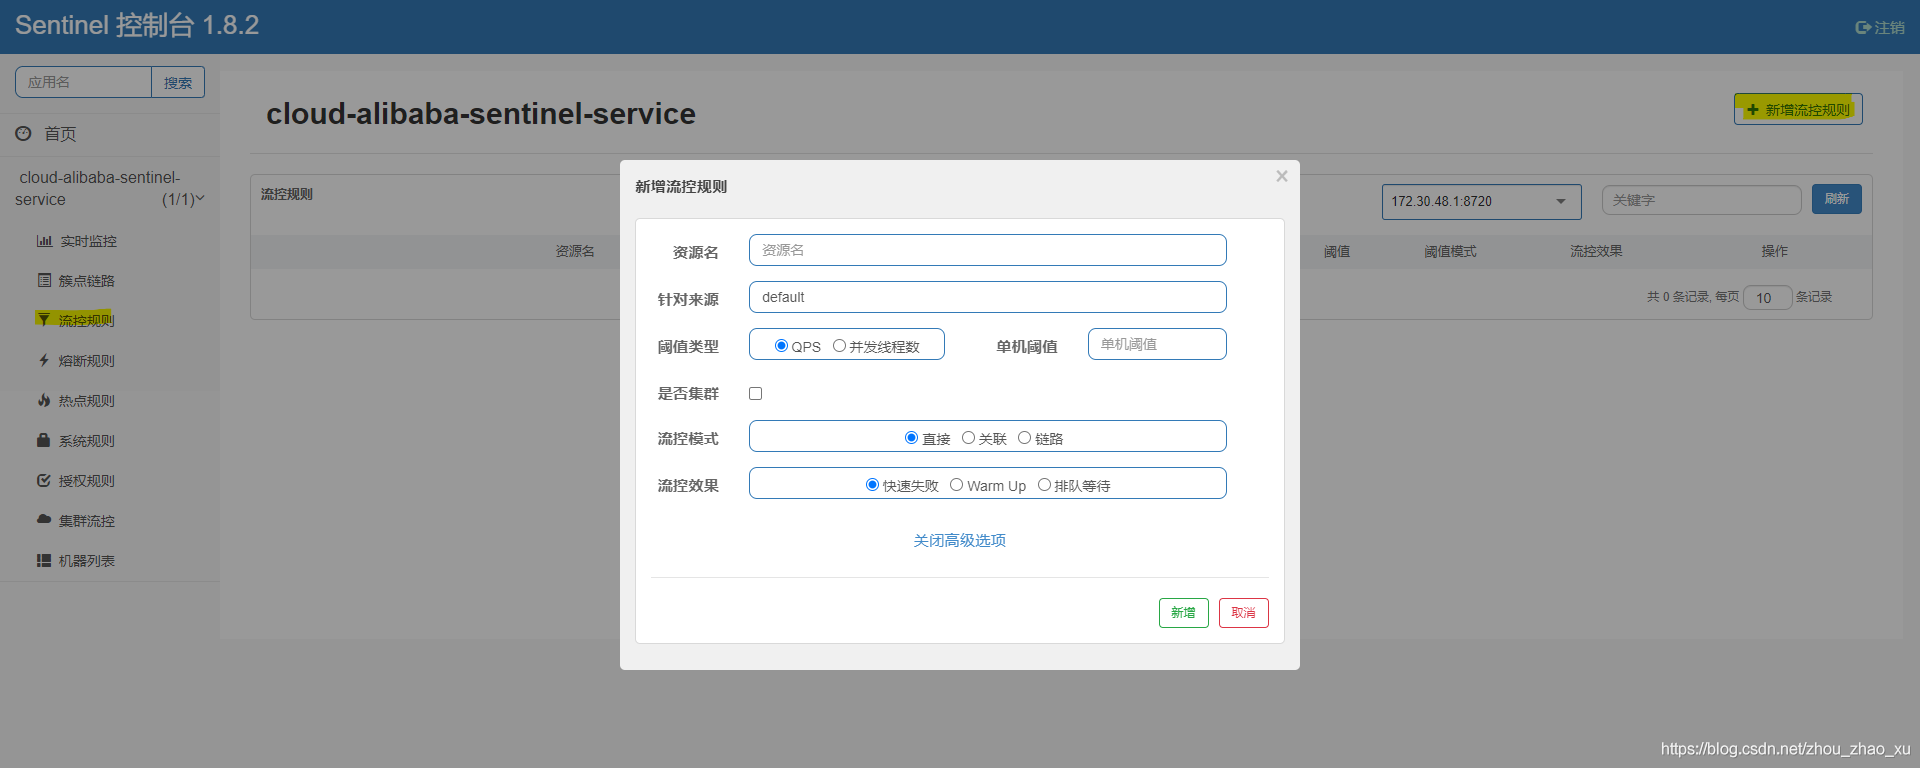
4.1 基本介绍
进一步解释说明:
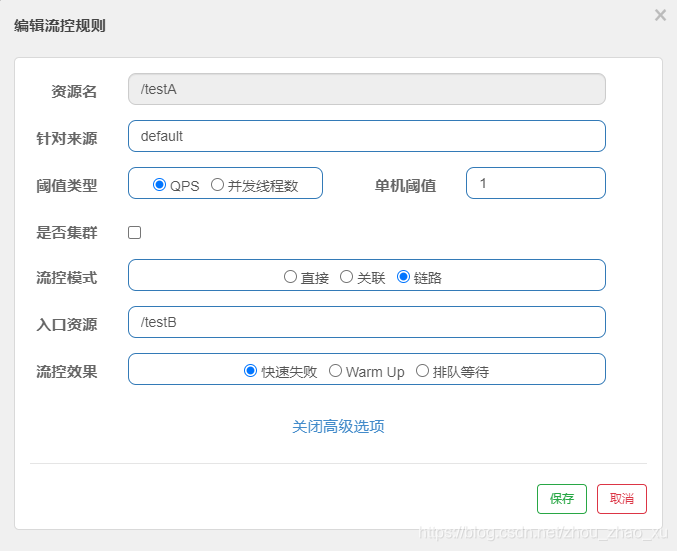
- 资源名;唯一名称,默认请求路径
- 针对来源:Sentinel 可以针对调用者进行限流,填写微服务名,默认default(不区分来源)
- 阈值类型/单机阈值:
- QPS(每秒钟的请求数量):当调用改api的QPS达到阈值的时候,进行限流
- 线程数:当调用该api的线程数达到阈值的时候,进行限流
- 是否集群:不需要集群
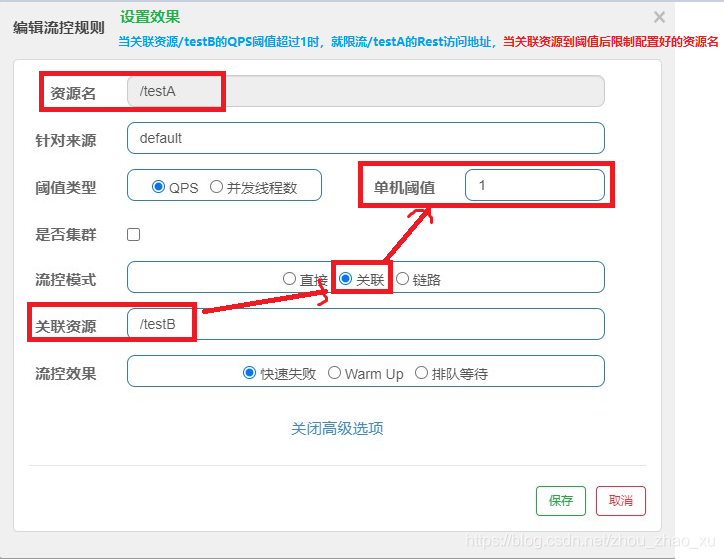
- 流控模式:
- 直接:api达到限流条件时就直接限流
- 关联:当关联的资源达到阈值时,就限流自己
- 链路:只记录指定链路上的流量(指定资源从入口资源进来的流量,如果达到阈值,就进行限流)[api级别的针对来源]
- 流控效果:
- 快速失败:直接失败,抛异常
- Warm Up:根据codeFactor(冷加载因子,默认3)的值,从阈值/codeFactor,经过预热时长,才达到设置的QPS阈值
- 排队等待:匀速排队,让请求以匀速的速度通过,阈值类型必须设置为QPS,否则无效。
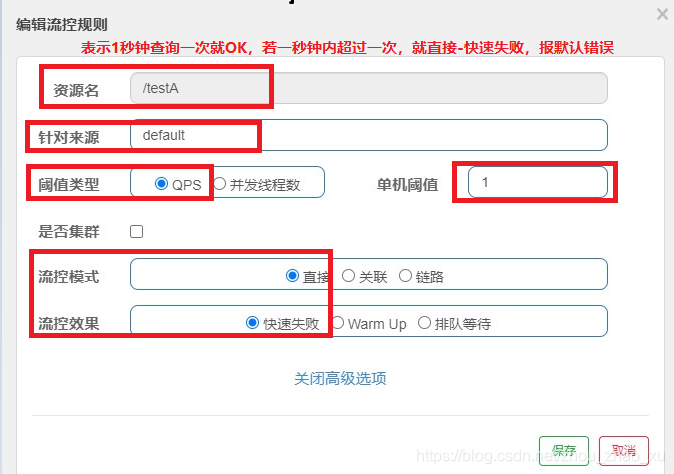
4.2 流控模式
1. 默认直接
直接 -> 快速失败
QPS方式:
- 添加流控规则
- 方式一:
- 方式二:
- 配置说明
- 测试
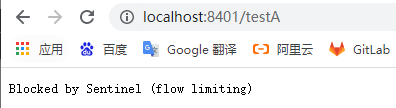
点击快速访问 http://localhost:8401/testA
结果:

线程数方式:
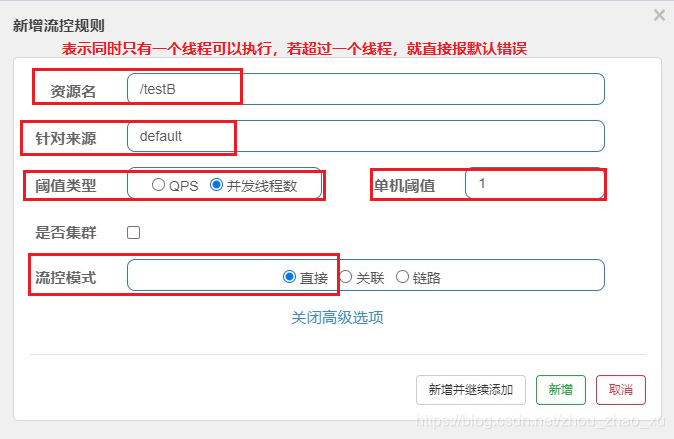
2. 关联
- 是什么
- 当关联的资源达到阈值就限流自己
- 当与A关联的资源B达到阙值后,就限流A自己
- B惹事,A挂了
- 配置testA
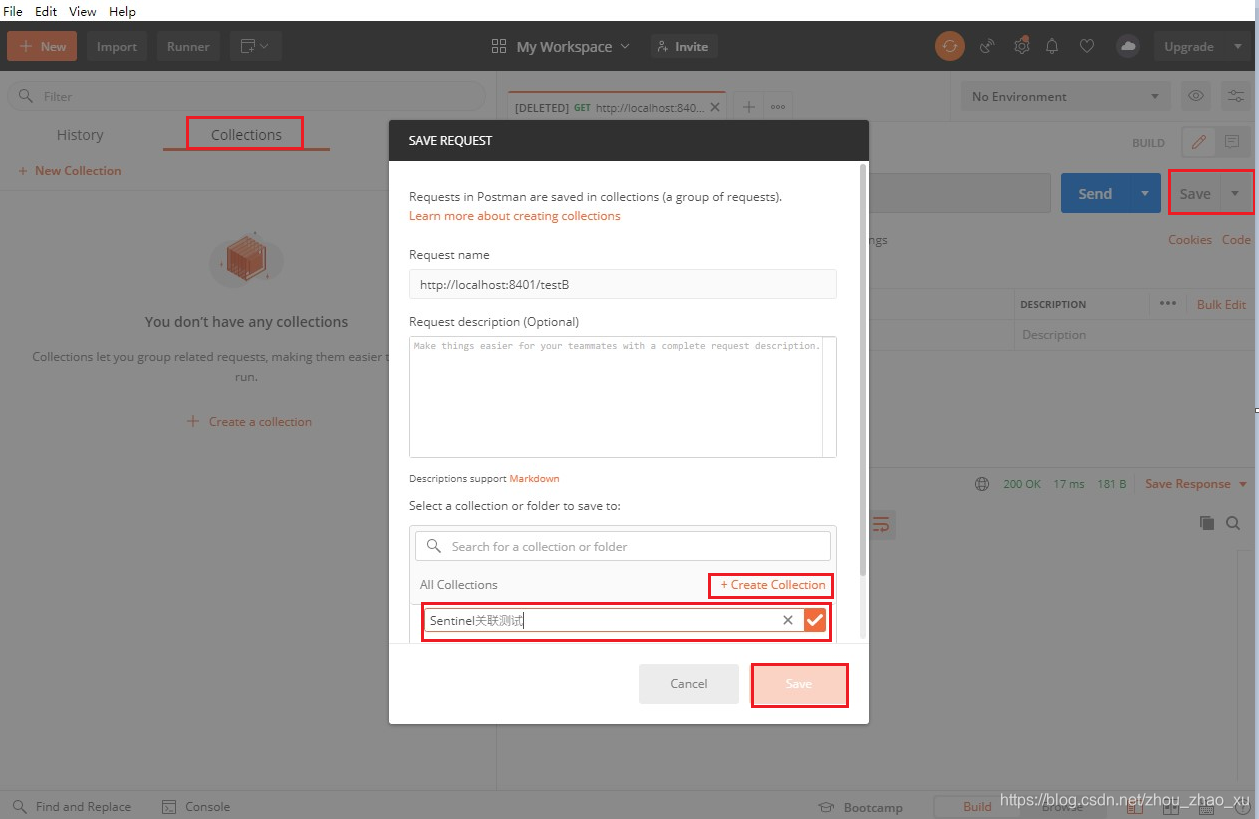
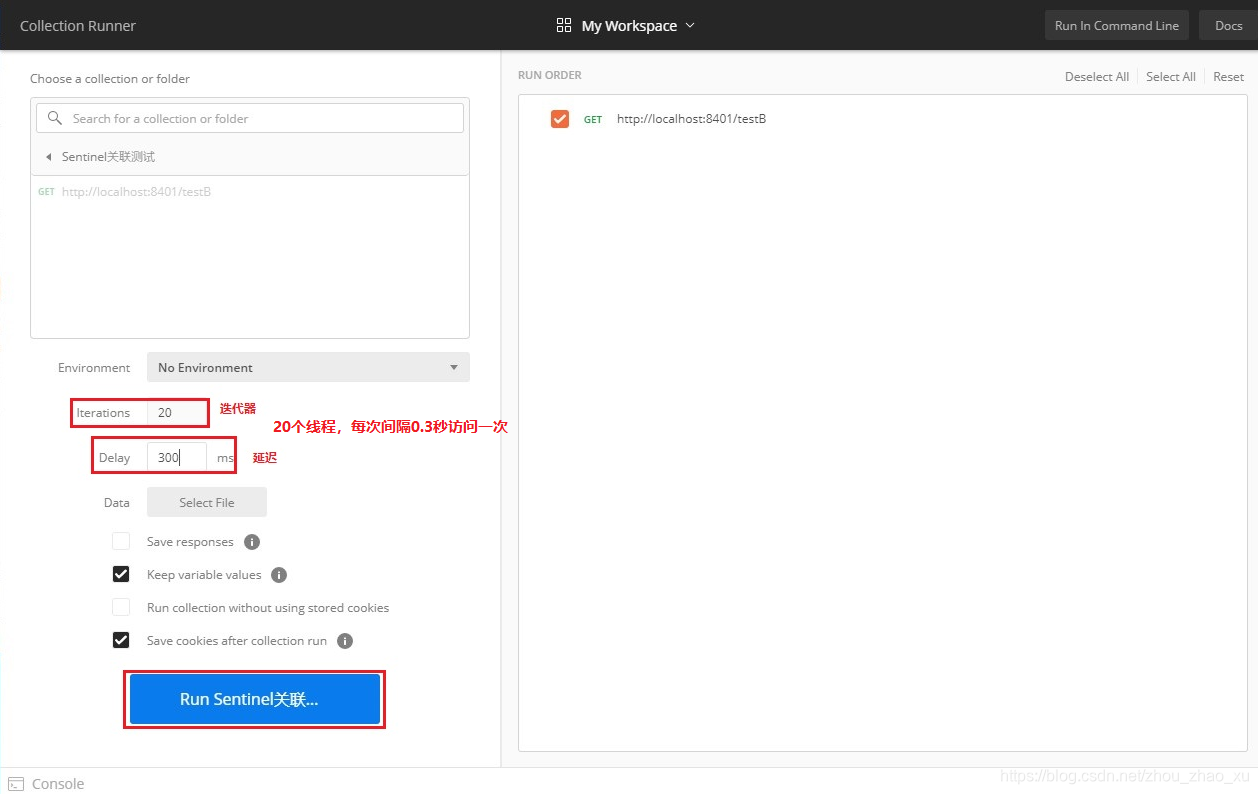
- postman模拟并发密集访问testB
创建 Collections 测试
- 测试
先在postman测试testB可以正常访问,然后Run Sentinel关联测试的Collections集合,然后访问testA
测试结果:
大批量线程高并发访问B,导致A失效了

3. 链路
-配置 testA
4.3 流控效果
1. 直接-快速失败
- 直接-快速失败(默认的流控处理)
直接拒绝(RuleConstant.CONTROL_BEHAVIOR_DEFAULT)方式是默认的流量控制方式,当QPS超过任意规则的阈值后,新的请求就会被立即拒绝,拒绝方式为抛出FlowException。这种方式适用于对系统处理能力确切已知的情况下,比如通过压测确定了系统的准确水位时。
2. Warm Up (预热)
官网参考:https://github.com/alibaba/Sentinel/wiki/%E9%99%90%E6%B5%81—%E5%86%B7%E5%90%AF%E5%8A%A8
默认coldFactor为3,即请求QPS从threshold/3开始,经过预热时长逐渐升至设定的QPS阙值。
- 应用场景
eg:秒杀系统在开启的瞬间会有很多流量上来,很有可能把系统打死,预热方式就是为了保护系统,可以慢慢的把流量放进来,慢慢的把阈值增长到设置的阈值。


3. 排队等待
- 注意:匀速排队只允许阈值为QPS模式

5. 服务降级
官网参考:https://github.com/alibaba/Sentinel/wiki/%E7%86%94%E6%96%AD%E9%99%8D%E7%BA%A7
5.1 基本介绍


1. 说明
Sentinel 熔断降级会在调用链路中某个资源出现不稳定时(例如调用超时或异常比例升高),对这个资源的调用进行限制,让请求快速失败,避免影响到其它的资源而导致级联错误。
挡子源被降级后,在接下来的降级时间窗口之内,对该资源的调用都将自动熔断(默认行为是抛出 DegradeException)
2. Sentinel 断路器
Sentinel的断路器是没有半开状态的
半开的状态系统自动去检测是否请求有异常,没有日常就关闭断路器恢复使用,有异常则继续打开断路器不可用。具体可以参考hystrix
在Sentinel 1.8.0及其以上,引入了半开状态,详情可参考官网
https://github.com/alibaba/Sentinel/wiki/%E7%86%94%E6%96%AD%E9%99%8D%E7%BA%A7
5.2 降级策略应用
1. 慢调用比例
是什么
测试 controller 新增 testD方法
  	@GetMapping("/testD")
  	public String testD() {

      	// 将线程暂停几秒钟
      	try {

          	TimeUnit.SECONDS.sleep(1);
      	} catch (InterruptedException e) {

          	e.printStackTrace();
      	}
      	log.info("-------testD,测试 慢调用比例");
      	return "-------testD";
  	}
配置熔断规则
注意:测试时统计时长尽量设置小一点;eg 100ms


 最低0.47元/天 解锁文章


 2283
2283


 被折叠的 条评论
为什么被折叠?
被折叠的 条评论
为什么被折叠?
 到【灌水乐园】发言


