


简述
目前有一个功能需要将自己创建的登录注册功能的httpserver使用GitLab来登录自己的系统,而不需要每次登录HttpServer系统都要重新注册一个用户。(注意:是GitLab而不是GitHub哦)
Oauth2原理部分
原理部分,我在找文档的时候发现一篇挺好,讲解清楚,在此粘贴:
https://www.cnblogs.com/wudimanong/p/10821215.html
Nodejs代码实现部分
废话不说,直接上代码
在server.js代码中使用了路由,所以你会发现连接多了user的路径
const express = require('express');
const http = require('http');
const app = express();
const bodyPaser = require('body-parser');
var path = require("path");
var session = require('express-session');
var interceptMw=require('./middlewares/interceptMw');
var serverHostConfig=require('./config/serverHost.json');

app.use(session({
    secret: 'sessiontest',//与cookieParser一致
    resave: true,
    saveUninitialized: true
}))

app.use(bodyPaser.urlencoded({ extended: false }))
app.use(bodyPaser.json())

//允许跨域
app.all('*', function (req, res, next) {
    //console.log(req.ip);
    res.header("Access-Control-Allow-Origin", "*");
    res.header("Access-Control-Allow-Headers", "Content-Type,Content-Length, Authorization, Accept,X-Requested-With");
    res.header("Access-Control-Allow-Methods", "PUT,POST,GET,DELETE,OPTIONS");
    res.header("X-Powered-By", ' 3.2.1')
    if (req.method == "OPTIONS") res.send(200);/*让options请求快速返回*/
    else next();
});

//使用中间件,将其余的请求直接通过
app.use(interceptMw)

//将user用户的路由引入
let userRouter = require('./router/userRouter');

app.use('/user', userRouter, function (req, res) {

})

app.listen(8081, () => {
    console.log('server start.....'+serverHostConfig.global_host);
    //设置全局的启动IP和端口,这样同一个局域网可以正常访问
    global.host = serverHostConfig.global_host;

})
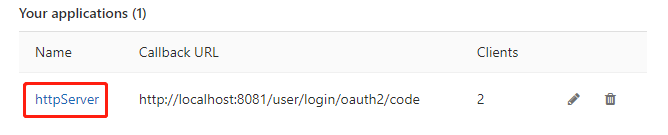
1.GitLab用户的配置-在这里只是进行设置,后续代码中会需要本次设置产生的Application ID和Secret


本图中回调地址必须是代码中真正的回调地址路径,api的那个一定要勾选,否则你在回调方法调用的时候根据拿不到token,会报401错误,是因为你没有权限去获取gitlab的用户信息
- 登录页面
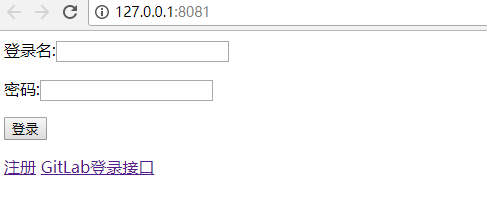
上图为登录页面,使用最原始的HTML代码实现,其中,代码如下:(其中global.host是自己设置的全局IP和端口)。在此项目中我设置的是:http://localhost:8081/
<a href="${global.host}user/login/gitHubLogin">GitLab登录接口</a>
- 调用GitLab代码实现
此处就需要使用到第一步设置后产生的两个值了,获取方式如下:还是在setting–Application下的设置

我将Application ID和Secret写在了配置文件:
gitLabConfig.json–此处的git_clientId就是Application ID,git_clientSecret就是Secret,git_redirect_url就是回调地址的后半部分,全部路径是:http://localhost:8081/user/login/oauth2/code
config/gitLabConfig.json
{"git_clientId":"70f8c0e295c4224f49a2c7e27535e2f5ea498963d52b5b967b211697b5f819de",
    "git_clientSecret":"60528541f35cfcbf5b6da8fd765502ad7f7bae8f068d39756603aa78b25515d0",
    "git_redirect_url":"user/login/oauth2/code"}
config/serverHost.json
{"global_host":"http://localhost:8081/"}
那么下面就是主要代码实现:
router/userRouter.js
var express = require('express');
const bodyParser = require('body-parser');
//创建编码解析
var urlencodedParser = bodyParser.urlencoded({ extended: false })
//获取路由实例
var router = express.Router();
var gitLabConfig=require('../config/gitLabConfig.json');
var serverConfig=require('../config/serverHost.json');
var git_clientId = gitLabConfig.git_clientId;
var git_clientSecret = gitLabConfig.git_clientSecret;
var git_redirect_url = serverConfig.global_host+gitLabConfig.git_redirect_url;
router.get('/login/gitHubLogin', function (req, res) {
    //1、GitHub认证服务器地址,是公司搭建的内部Git_Lab地址,你根据你实际的地址改写
    var git_url = 'http://202.12.11.201/oauth/authorize';
    //var git_url = 'https://github.com/login/oauth/authorize';这个是gitHub的
    //生成并保存,此处用定值
    var git_state = '921921';
    //传递参数response_type、client_id、state、redirect_uri
    var git_param = 'response_type=code&' + 'client_id=' + git_clientId + '&state=' + git_state + '&redirect_uri=' + git_redirect_url;
    //使用重定向发送get请求
    res.redirect(git_url + '?' + git_param);
})
4.回调代码方法实现-此方法跟上述代码在同一个js中,其中这个方法的url必须是你在GitLab中设置的回调地址
router/userRouter.js
router.get('/login/oauth2/code', function (req, res) {
    let resData = req.query
    //1.验证state,如果不一致,又可能被CSRF攻击
    if (resData["state"] != '921921') {
        res.send('State验证失败');
    }
    //2、向GitHub认证服务器申请令牌,注意此处为POST请求
    //https://github.com/login/oauth/access_token-GitHub的
    request({
        url: 'http://202.11.11.201/oauth/token',
        method: 'POST',
        form: {
            "grant_type":"authorization_code",
            "code": resData["code"],
            "client_id": git_clientId,
            "client_secret": git_clientSecret,
            "redirect_uri": git_redirect_url,
            "state":'921921'
        }
    }, function (error, response, body1) {
        if (!error && response.statusCode == 200) {
            var tokenBody=JSON.parse(body1);
            //拿到了access_token,向资源服务器请求用户信息,携带access_token和tokenType
            //var  userUrl="https://api.github.com/user?access_token=" + accessToken + "&token_type=" + tokenType;
            var params="access_token=" + tokenBody.access_token + "&token_type=" + tokenBody.token_type;
            var userUrl = "http://202.11.11.201/api/v3/user?" + params;
            //申请用户资源
            request({
                url: userUrl,
                method:'GET'
                //下面的headers在跟GitHub中会用到,否则无法调用到获取用户信息
                // headers: {
                //     'User_Agent': 'zhoudadozhou'
                // }
            }, function (error, response, resbody) {
                if (!error && response.statusCode == 200) {
                    var userBody=JSON.parse(resbody)
                    req.session.user=userBody.name
                    //获取用户信息成功
                    res.send(htmlData.indexHtml(userBody.name+"通过第三方登录成功,他的邮箱是:"+userBody.email));
                } else {
                    res.send("获取用户信息失败:" + response.statusCode+":"+response.statusMessage);
                }
            })
        } else {
            res.send("获取token失败:"+response.statusCode+":"+response.statusMessage)
        }
    })
})
上述代码只是GitLab的主要实现代码,具体的包登录注册的包我会上传到博客,需要下载的可以下载使用。地址为:https://download.csdn.net/download/zhoudado921/12320154


 3298
3298


 被折叠的 条评论
为什么被折叠?
被折叠的 条评论
为什么被折叠?
 到【灌水乐园】发言


