


一、说在前面的话
本文是CI篇的上文,因为上一篇已经作了总体设计,就不再赘述,有需要的请看前文。
我们将演示,使用CI工具–jenkins,怎么和CD工具–argocd串联,重点是在Jenkins该怎么做。准备工作和argocd等相关事项,在前文已铺垫ok。
Jenkins,我们是使用k8s来部署的一个master-slave结构的集群。
在开发环境,Jenkins和argocd都是部署在同一个k8s集群。
接下来,我们的java应用服务,也都将部署在该K8S里。
二、关键技术
- jenkinsfile
- global pipeline library
依赖的jenkins插件:
- Workspace Cleanup
三、流水线步骤

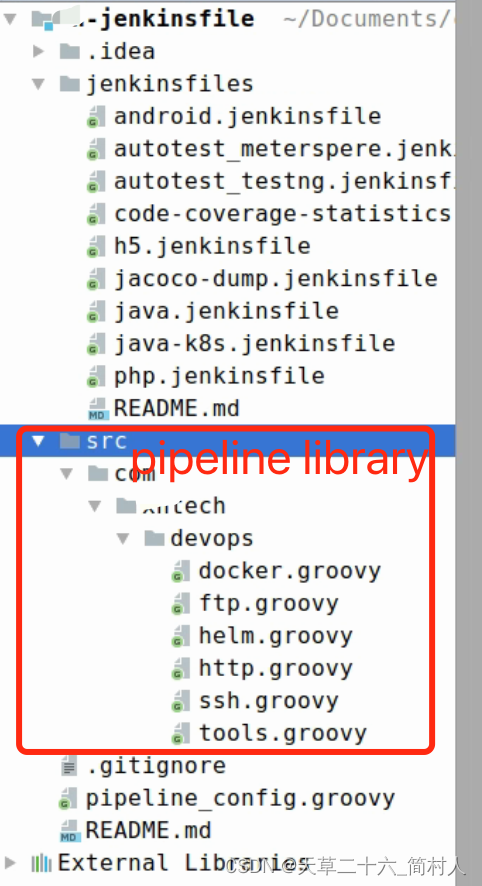
流水线的各个步骤是有jenkinsfile来拼装,每个流水,特别是构建Docker镜像、修改helm yaml、发送IM消息,都需要封装到pipeline library里。
在详细描述每个步骤前,我们需要预定服务发版的依据,程序版本号,最好是每次打包都升级。但是,在开发环境,有时候我们会偷懒,所以就采用版本号+时间戳的方式。允许同一个版本号,提交多次代码,均触发部署。
四、详细实现
4.1、配置pipeline libraray
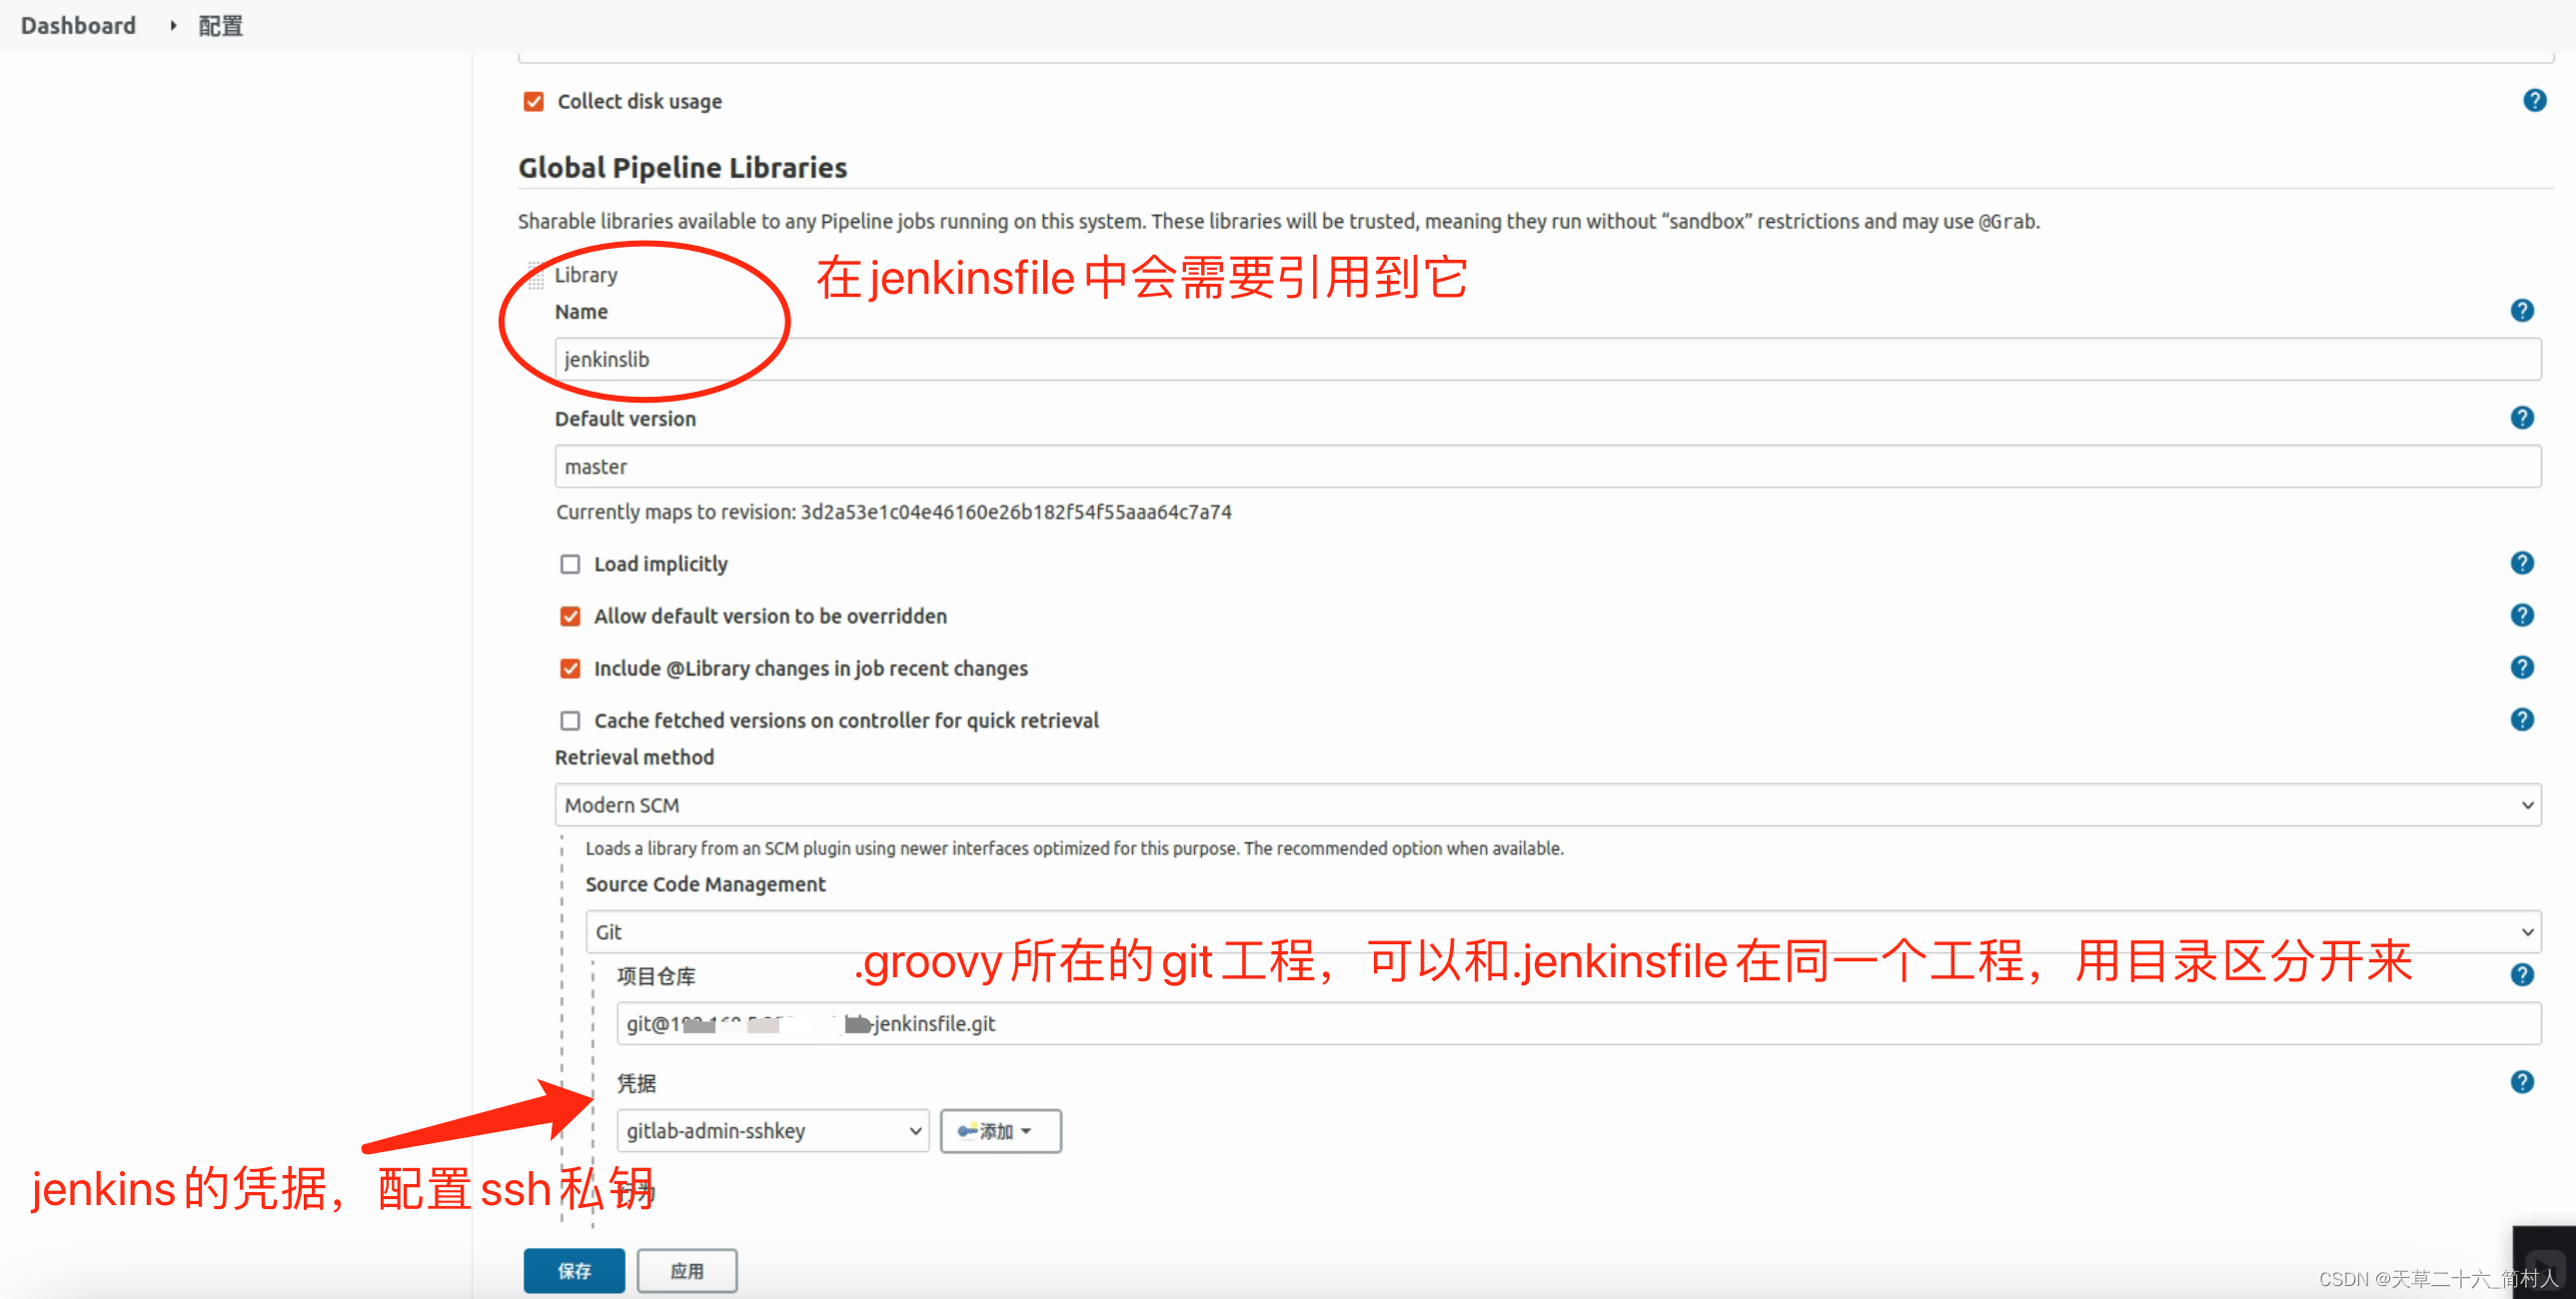
本次k8s容器化部署,增加了一个java-k8s.jenkinsfile文件,让程序的部署可以同时支持两种部署方式。
下面详细说一说这几个pipeline libraray.
4.1.1、tools.groovy – 读取java程序的版本号
读取程序的版本号,读取mvn package后的target目录下的classes/git.properties文件里的版本号git.build.version。
// 读取java应用的版本号
def getAppVersion(packagePath) {
    def appVersion = sh returnStdout: true,
            script: """
                    grep 'git.build.version' ${packagePath}/classes/git.properties | cut -d'=' -f2 | sed 's/\\r//'
                    """
    // trim()
    return appVersion.trim()
}
那么git.properties是依赖哪个mvn插件呢?
     <plugin>
		<groupId>pl.project13.maven</groupId>
		<artifactId>git-commit-id-plugin</artifactId>
		<version>4.0.0</version>
		<executions>
			<execution>
				<goals>
					<goal>revision</goal>
				</goals>
			</execution>
		</executions>
		<configuration>
			<verbose>true</verbose>
			<dateFormat>yyyy-MM-dd'T'HH:mm:ssZ</dateFormat>
			<generateGitPropertiesFile>true</generateGitPropertiesFile>
			<generateGitPropertiesFilename>${project.build.outputDirectory}/git.properties</generateGitPropertiesFilename>
			<includeOnlyProperties>
				<includeOnlyProperty>^git.build.(time|version)$</includeOnlyProperty>
				<includeOnlyProperty>^git.commit.id.(abbrev|full)$</includeOnlyProperty>
			</includeOnlyProperties>
			<commitIdGenerationMode>full</commitIdGenerationMode>
			<failOnNoGitDirectory>false</failOnNoGitDirectory>
		</configuration>
	</plugin>
考虑到java工程可以是多模块的,那就不是简单的target,而应该是${moduleName}/target了。
在mvn package后,见下图:
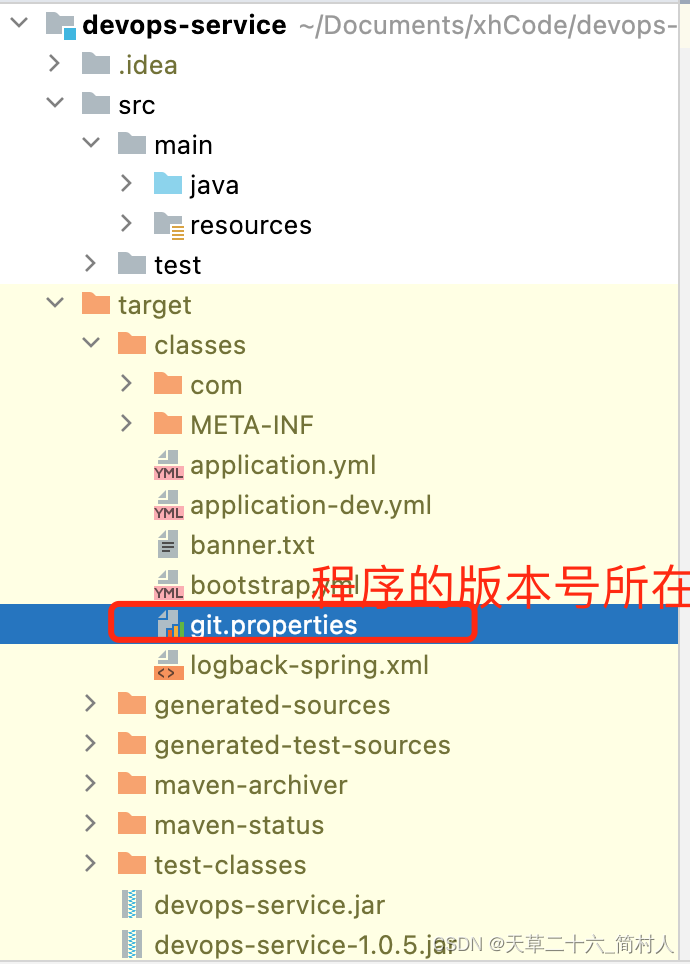
git.properties内容详情参考:
#Generated by Git-Commit-Id-Plugin
#Wed May 17 11:20:13 CST 2023
git.build.time=2023-05-17T11\:20\:13+0800
git.build.version=1.0.7
git.commit.id.abbrev=3dab776
git.commit.id.full=3dab7764afac0e8222a2bef3d78dc8b3175f8caa
4.1.2、docker.groovy – 构建镜像并推送
封装docker的几个命令,考虑到变量比较多,如果你不是很明白,对比着示例来看,具体见前文。
package com.xxtech.devops

// 保证jenkins slave节点上安装了docker
// 第一个参数是服务名称,第二个参数是端口号,第四个是xxx.jar所在的目录,都是在docker build的时候需要
// 第三个参数是docker image的版本号(一般是程序的版本号),第五个参数是dockerfile所在的位置
//
def buildAndPushImage(appName, port, version, packagePath, dockerfileName, repoDomain = "192.168.5.6:8086") {
    def repoProject = "xxx"

    // 1、构建
    sh """
        docker build --build-arg APPNAME="${appName}" --build-arg PORT="${port}" --build-arg PACKAGE_PATH="${packagePath}" -f ${dockerfileName} -t ${repoProject}/${appName}:${version} .
       """

    // 2、登录、打标签、推送
    // 这里需要配置jenkins凭证,用户名和密码方式。具体配置,在jenkins系列文章另说。
    // 只有这样,在jenkins job控制台,才不会输出了密码字段的内容。
    withCredentials([usernamePassword(passwordVariable: 'DOCKER_PASSWORD', usernameVariable: 'DOCKER_USERNAME', credentialsId: "e4681123-7da2-4bd5-9bc2-7dd68375c406",)]) {
        sh """
            docker login ${repoDomain} -u ${DOCKER_USERNAME} -p ${DOCKER_PASSWORD}

            docker tag ${repoProject}/${appName}:${version} ${repoDomain}/${repoProject}/${appName}:${version}

            docker push ${repoDomain}/${repoProject}/${appName}:${version}
           """
    }

    // 3、删除本地镜像
    sh """
        docker rmi -f ${repoProject}/${appName}:${version}
        docker rmi -f ${repoDomain}/${repoProject}/${appName}:${version}
       """
}
4.1.3、helm.groovy – 触发helm部署
有两种方式,
- 一种是调用helm命令,helm install至k8s。-- 不是很建议,缺乏界面,而且各应用的配置不相同,维护成本高。
- 另外一种是修改git代码并提交,利用gitops思想,去触发argocd部署。-- 本文是采用这种方式,也是本系列的设计思路。(让CI的归jenkins,让CD的归argocd,jenkins这里只是一个触发动作,当然你是手动的话,你也可以略过本步骤。但是多少有点不完美)
package com.xxtech.devops
// helm yaml所在的git工程是  http://192.168.8.28:9980/root/argocd-helm-yaml.git
// 第一个参数是git代码下的一个目录,第二个参数的image的tag值
def updateYaml(appName, imageTag, repoUrl = "192.168.8.28:9980/root/argocd-helm-yaml.git") {
    // jenkins凭证
    def gitlabCredentialsId = "12116269-430c-4921-b63b-18a490f7531c"

    // 拉取git代码
    checkout([$class           : 'GitSCM',
              branches         : [[name: '*/master']],
              extensions       : [],
              userRemoteConfigs: [[
                                          credentialsId: "${gitlabCredentialsId}",
                                          url          : "http://${repoUrl}"
                                  ]]]
    )

    // 修改values.yaml中的image.tag
    withCredentials([usernamePassword(credentialsId: "${gitlabCredentialsId}", passwordVariable: 'GIT_PASSWORD', usernameVariable: 'GIT_USERNAME')]) {
        sh """
            // 替换image.tag的值,必须和上一次的不一样,否则后面的git提交会报错
            sed -i 's/tag:.*/tag: ${imageTag}/g' ${appName}/values.yaml
            git add ${appName}/values.yaml

            // 在git commit前,进行全局配置
            git config --global user.name "admin"
            git config --global user.email "admin@example.com"

            git commit -m "modify image tag to ${imageTag}"
            // git push的时候不会让你再次输入用户名和密码
            git push http://$GIT_USERNAME:$GIT_PASSWORD@${repoUrl} HEAD:master
           """
    }
}
4.1.4、http.groovy – 发送Im消息
我们需要把jenkins job的结果告知工程的相关人员。这就属于im的范畴了,实现就是调用一个http请求,能发送http请求即可,具体处理是交由消息接收服务去发送。
有人要问,为什么不直接在jenkinsfile里发,还要多引入一个服务呢?
这里,主要的原因是,我们的需求不是简单的通过rebot机器人,把发送消息至企业微信群里。
而是会给应用打标签,根据所属标签,而企业微信会维护标签下有哪些人。
package com.xxtech.devops

def request(reqType, reqUrl, reqBody, reqFile = '', contentType = "APPLICATION_JSON_UTF8") {
    def response = httpRequest httpMode: reqType,
            contentType: contentType,
            consoleLogResponseBody: true,
            ignoreSslErrors: true,
            uploadFile: reqFile,
            requestBody: reqBody,
            url: "${reqUrl}",
            timeout: 600
    //quiet: true

    return response
}


def imNotify(projectName, result, buildEnv, message, branch, buildBy, robotKey = '') {
    def reqBody = """   {"projectName": "${projectName}",
                    "buildResult": "${result}",
                    "branch": "${branch}",
                    "buildBy": "${buildBy}",
                    "env": "${buildEnv}",
                    "reason": "${message}",
                    "robotKey": "${robotKey}",
                    "buildUrl": "${env.BUILD_URL}" } """

    def url = "http://192.168.10.47/devops/api/jenkins/notify"

    request("POST", url, reqBody)
}
4.2、docker in docker 容器的配置
docker image的构建和推送,要求你有docker环境,而不幸的是,我们无论是jnlp还是已安装的容器都不具备。
所以,我额外引入了一个容器docker:dind
这里,着重说明下我在使用过程中,遇到的几个问题。
4.2.1、未分配伪终端
报错信息是Container docker was terminated (Exit Code: 0, Reason: Completed),导致Jenkins job直接没跑起来。

4.2.2、未配置volumes
// dind运行,必须配置volumes如下。
volumes: [
    hostPathVolume(hostPath: '/var/run/docker.sock', mountPath: '/var/run/docker.sock')
 ]
4.2.3、dind运行不起来
dind没有/bin/bash, 且必须增加参数–privileged
docker run -d --privileged docker:dind

docker exec -it {容器ID} sh
而jenkins containerTemplate中的容器,默认值: --privileged: true,要不然就用不了docker:dind
五、未完待续
我们把CI篇分为两篇,本文是先介绍了pipeline library,是Jenkinsfile的一个基础。
下一篇,我们将详细说明java-k8s.jenkinsfile要怎么写。


 1386
1386


 被折叠的 条评论
为什么被折叠?
被折叠的 条评论
为什么被折叠?
 到【灌水乐园】发言


