延时任务通知服务的设计及实现(四)-- webhook执行任务

一、本文内容

本文将简单梳理下,延迟任务通知服务的webhook模块实现。

这里的回调接口,请求方式约定为post,参数通过body传递参数。

实现比较简单,先梳理其流程图,再是简单的代码实现。
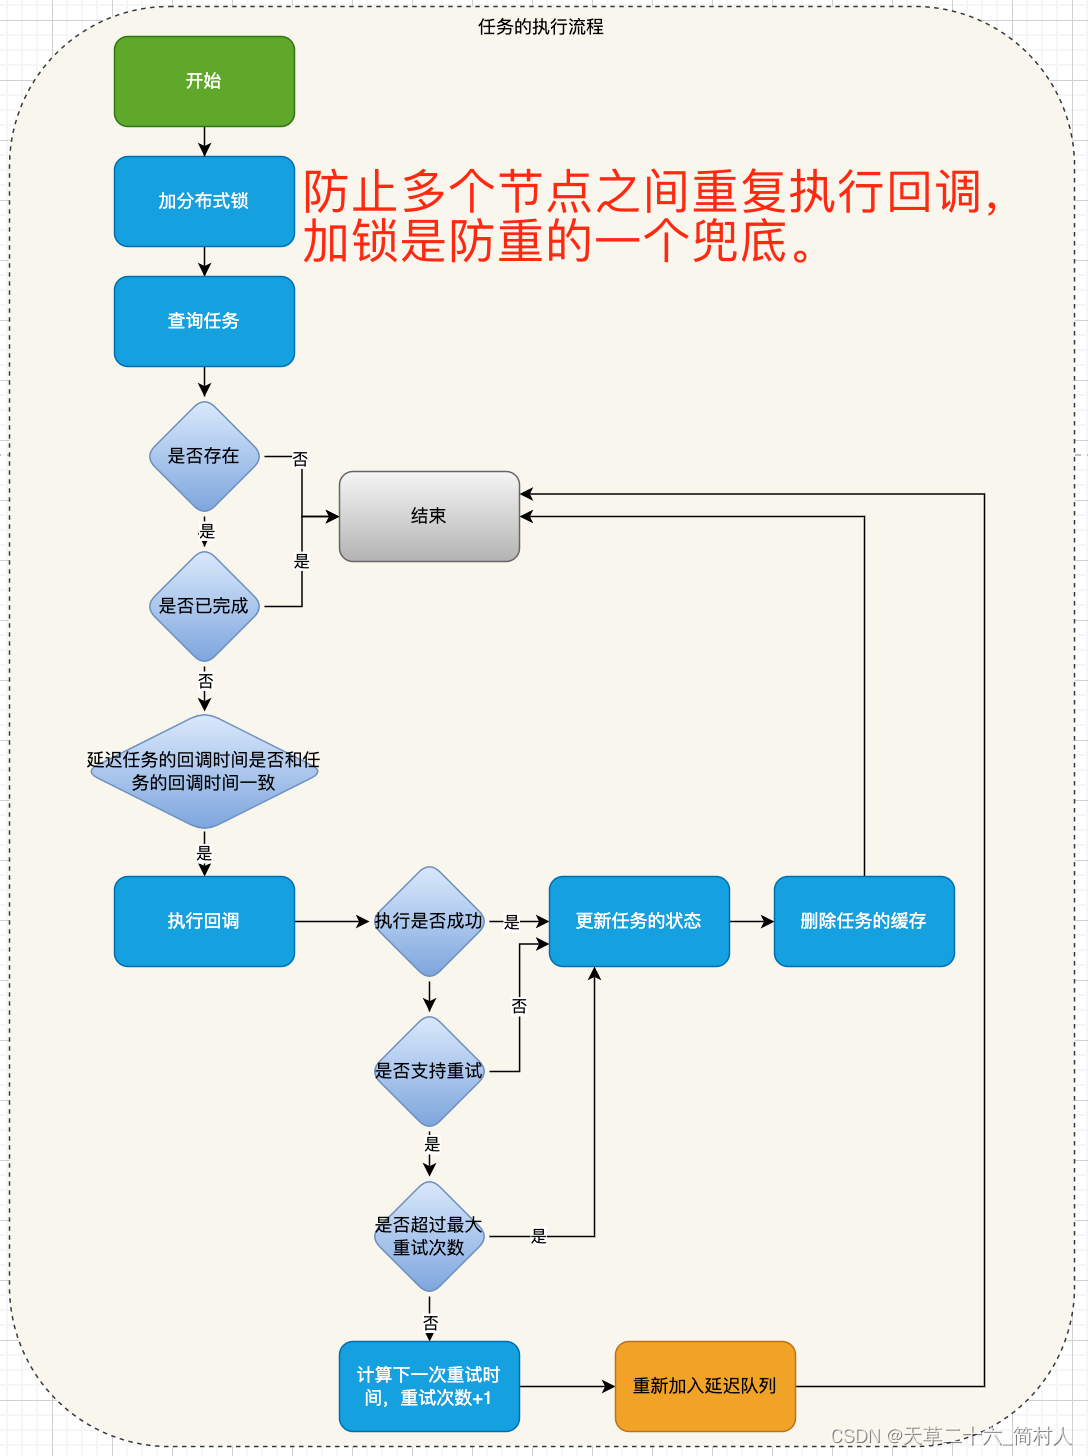
二、流程图

在这里插入图片描述

三、异步执行任务

对线程池进行自定义其配置。


import org.springframework.context.annotation.Bean;
import org.springframework.context.annotation.Configuration;
import org.springframework.core.task.AsyncTaskExecutor;
import org.springframework.scheduling.annotation.EnableAsync;
import org.springframework.scheduling.concurrent.ThreadPoolTaskExecutor;

import java.util.concurrent.ThreadPoolExecutor;

/**
 * Async注解的配置.
 *
 * @author xxx
 */
@Configuration
@EnableAsync
public class AsyncConfig {

    @Bean(name = "taskExecutor")
    public AsyncTaskExecutor taskExecutor() {
        ThreadPoolTaskExecutor executor = new ThreadPoolTaskExecutor();
        // 核心线程数
        executor.setCorePoolSize(10);
        // 最大线程数
        executor.setMaxPoolSize(50);
        // 队列容量
        executor.setQueueCapacity(2000);
        // 线程名称前缀
        executor.setThreadNamePrefix("DelayTask-");

        // 其他配置
        executor.setKeepAliveSeconds(60);
        executor.setRejectedExecutionHandler(new ThreadPoolExecutor.CallerRunsPolicy());
        executor.initialize();
        return executor;
    }
}

四、任务通知的代码实现

@Async("taskExecutor")
    public void handleTask(String transNo, Date notifyDate) {
        // 分布式锁
        if (!stringRedisTemplate.opsForValue().setIfAbsent(String.format(LOCK_KEY_TASK_EXECUTE, transNo),
                "1", 10, TimeUnit.SECONDS)) {
            log.warn("任务正在执行中, transNo={},notifyDate={}", transNo, notifyDate);
            return;
        }

        // 任务执行前,判断任务的状态
        NotifyTask notifyTask = this.getNotifyTask(transNo);
        if (null == notifyTask) {
            log.warn("任务不存在, transNo={},notifyDate={}", transNo, notifyDate);
            return;
        }

        if (notifyTask.getIsFinished()) {
            log.warn("任务已执行, transNo={},notifyUrl={},notifyParams={},notifyDate={}",
                    transNo, notifyTask.getNotifyUrl(), notifyTask.getNotifyParams(), notifyDate);
            return;
        }

        // 判断任务的执行时间是否与期望执行时间一致
        if (null != notifyDate && !DateUtil.isSameTime(notifyDate, notifyTask.getNotifyDate())) {
            log.warn("任务的执行时间与期望执行时间不一致, transNo={},notifyUrl={},notifyParams={},notifyDate={},expectDate={}",
                    transNo, notifyTask.getNotifyUrl(), notifyTask.getNotifyParams(), notifyDate, notifyTask.getNotifyDate());
            return;
        }

        boolean success = this.callback(notifyTask.getNotifyUrl(), notifyTask.getNotifyParams());
        if (!success) {
            // 判断任务是否支持重试
            if (notifyTask.getIsRetry() && notifyTask.getRetryTimes() < commonConfig.getMaxRetryTimes()) {
                notifyTask.retry();
                this.saveOrUpdateNotifyTask(notifyTask);
            } else {
                this.removeTaskFromRedis(transNo);
            }
        } else {
            // 更新任务的状态及完成时间
            notifyTask.finish();
            this.saveOrUpdateNotifyTask(notifyTask);
        }
    }

    private boolean callback(String notifyUrl, String notifyParams) {
        if (log.isInfoEnabled()) {
            log.info("回调接口, notifyUrl={}, notifyParams={}", notifyUrl, notifyParams);
        }
        HttpResponse httpResponse = HttpUtil.createPost(notifyUrl)
                .body(notifyParams)
                .setConnectionTimeout(3000)
                .setReadTimeout(5000)
                .execute();

        return httpResponse.isOk();
    }

五、总结

webhook模块,它跟使用什么延迟队列无关,主要步骤包括:

  • 对任务的交易流水号进行加分布式锁,防止不同节点的重复回调。(虽然我们要求业务方的回调接口是要满足幂等性的)
  • 判断任务是否存在,任务是否已完成
  • 任务可能修改了回调时间,作为任务的版本,当延迟队列中的任务和最新的版本不一样时,给与拒绝回调。
  • 回调失败,如果支持重试,则更新任务的回调时间;反之删除任务,不再执行。
  • 回调成功,更新任务的执行状态和完成时间。

附:相关系列文章链接

延时任务通知服务的设计及实现(一)-- 设计方案

延时任务通知服务的设计及实现(二)-- redisson的延迟队列RDelayedQueue

延时任务通知服务的设计及实现(三)-- JDK的延迟队列DelayQueue

延时任务通知服务的设计及实现(四)-- webhook执行任务

延时任务通知服务的设计及实现(五)-- Netty时间轮HashedWheelTimer

  • 4
    点赞
  • 5
    收藏
    觉得还不错? 一键收藏
  • 0
    评论
要在基于@shopify/shopify-app-express的应用程序中注册Shopify Webhook,可以使用该框架提供的webhook路由。下面是一个示例代码来注册一个Webhook: ```javascript const { default: createShopifyAuth } = require('@shopify/koa-shopify-auth'); const { default: Shopify, ApiVersion } = require('@shopify/shopify-api'); const { verifyRequest } = require('@shopify/koa-shopify-auth'); const Koa = require('koa'); const Router = require('koa-router'); const bodyParser = require('koa-bodyparser'); const app = new Koa(); const router = new Router(); const webhook = { topic: 'products/create', address: 'https://your-app.com/webhooks/products/create', format: 'json', }; app.use(bodyParser()); const shopifyAuth = createShopifyAuth({ // Your Shopify app API key and secret apiKey: process.env.SHOPIFY_API_KEY, secret: process.env.SHOPIFY_API_SECRET, // Your app URL appUrl: process.env.APP_URL, // Scopes to request on the merchant's behalf scopes: ['read_products', 'write_products', 'read_script_tags', 'write_script_tags'], // After authentication, redirect to the shop's home page afterAuth(ctx) { const { shop } = ctx.state.shopify; ctx.redirect(`https://${shop}/admin/apps/${process.env.SHOPIFY_API_KEY}`); }, }); // Register webhook router.post('/webhooks/products/create', verifyRequest({ returnHeader: true }), (ctx) => { console.log('New product created:', ctx.request.body); ctx.status = 200; }); (async function() { // Create an instance of Shopify const shopify = new Shopify({ apiKey: process.env.SHOPIFY_API_KEY, apiSecretKey: process.env.SHOPIFY_API_SECRET, shopName: ctx.session.shop, accessToken: accessToken, apiVersion: ApiVersion.October20, autoLimit: { calls: 2, interval: 1000, bucketSize: 35 }, }); // Register webhook await shopify.webhook.create(webhook); // Use the shopifyAuth middleware app.use(shopifyAuth); app.use(router.allowedMethods()); app.use(router.routes()); app.listen(process.env.PORT, () => { console.log(`Server listening on port ${process.env.PORT}`); }); })(); ``` 在上面的代码中,我们首先创建一个Shopify实例,并使用它来注册Webhook。然后,我们使用@shopify/shopify-app-express框架创建一个HTTP服务器,并为Webhook的URL路径创建一个POST路由。在路由处理程序中,我们可以处理接收到的Webhook数据。最后,我们使用Shopify API将Webhook注册到商店中。 注意,我们在Webhook地址中使用了公共URL,这意味着您需要在您的应用程序中设置公共URL,并将其用作Webhook地址。此外,您需要在Shopify后台中配置相应的Webhook主题,以便将Webhook发送到正确的URL地址。

“相关推荐”对你有帮助么?

  • 非常没帮助
  • 没帮助
  • 一般
  • 有帮助
  • 非常有帮助
提交
评论
添加红包

请填写红包祝福语或标题

红包个数最小为10个

红包金额最低5元

当前余额3.43前往充值 >
需支付:10.00
成就一亿技术人!
领取后你会自动成为博主和红包主的粉丝 规则
hope_wisdom
发出的红包
实付
使用余额支付
点击重新获取
扫码支付
钱包余额 0

抵扣说明:

1.余额是钱包充值的虚拟货币,按照1:1的比例进行支付金额的抵扣。
2.余额无法直接购买下载,可以购买VIP、付费专栏及课程。

余额充值