


前言:
最近在写一些 Flutter 的跨端应用,发现在同一个 Column 中使用2个TextFiled 后,动态删除其中一个 TextFiled 后,发现里面填写的内容错乱了。 然后我使用搜索大法,发现是我没有为这2个 TextFiled 设置不同的 Key。秉着知其然,知其所以然的态度,我看了一些博客的分析,大部分都是很早之前的内容,且没有对照源码进行分析,有些博客的分析甚至是错误的,所以我对着源码来和Demo去一步步分析。
Demo 代码:
class KeyDemo extends StatefulWidget {
State<StatefulWidget> createState() {
return _KeyDemoState();
}
}
_KeyDemoState 的代码:
class _KeyDemoState extends State<KeyDemo> {
List<Widget> widgets = [
MyStateFullItemWidget(color: Colors.blue),
MyStateFullItemWidget(color: Colors.yellow),
];
Widget build(BuildContext context) {
return MaterialApp(
home: Scaffold(
body: Container(
child: Center(
child: Row(
mainAxisAlignment: MainAxisAlignment.center,
crossAxisAlignment: CrossAxisAlignment.center,
children: widgets,
),
),
),
floatingActionButton: FloatingActionButton(
child: Icon(Icons.delete),
onPressed: () {
setState(() {
/// 最后一个 widget 插入到 Row 的最前面,即交换2个 widget 位置
widgets.insert(0, widgets.removeAt(widgets.length - 1));
});
},
),
),
);
}
}
MyStateFullItemWidget 的代码:
class MyStateFullItemWidget extends StatefulWidget {
final Color color; // color 是定义在 Widget 中的
const MyStateFullItemWidget({super.key, required this.color});
State<StatefulWidget> createState() {
return _MyItemState();
}
}
_MyItemState 代码:
class _MyItemState extends State<MyStateFullItemWidget> {
int _cnt = 0; // 数字是定义在 State 中的,而 State 是由 Element 中持有的
Widget build(BuildContext context) {
return Container(
width: 100,
height: 100,
color: widget.color,
child: Center(
child: InkWell(
child: Text(
"数字:$_cnt",
style: TextStyle(color: Colors.white, fontWeight: FontWeight.bold),
),
onTap: () {
setState(() {
_cnt++;
});
},
),
),
);
}
}
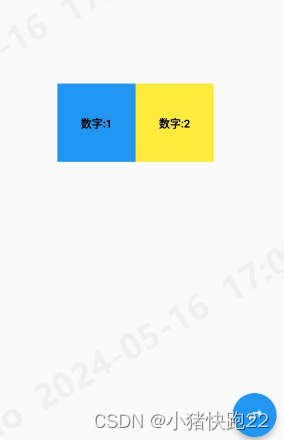
开始的时候会显示2个颜色快,左边底色是蓝色,右边的是黄色,开始数字都是 0 。我们让左边蓝色的方块数字变成1,右边黄色方块的数字变成2,如下图:
这个时候,如果你点击右下角的交换按钮会发生什么呢?
数字:1 和 数字:2会交换吗?
答案是不会发生互换,为什么呢?
首先,颜色是肯定会互换的,因为 color 是定义在 MyStateFullItemWidget 中的,Widget 互换后,那么颜色肯定会互换,下面通过源码解析下为什么数字 不会互换。
首先要知道Flutter中有三棵树,分别是 Widget Tree、Element Tree 和 RenderObject Tree。
Widget: Element 的配置信息。与Element的关系可以是一对一的关系。
Element:Widget 的实例化,内部持有Widget和RenderObject。
RenderObject:负责渲染绘制。
我们重点看一下Element的updateChild方法:
Element? updateChild(Element? child, Widget? newWidget, Object? newSlot) {
    if (newWidget == null) {
      if (child != null) {
        deactivateChild(child);
      }
      return null;
    }
    final Element newChild;
    if (child != null) {
      bool hasSameSuperclass = true;
      /// 如果 新的 widget 和之前的 element 中的 widget 是同一个(hashCode是相等的),那么直接返回 这个 element (即这里的 child)
      if (hasSameSuperclass && child.widget == newWidget) {
        if (child.slot != newSlot) {
          updateSlotForChild(child, newSlot);
        }
        newChild = child;
      } else if (hasSameSuperclass && Widget.canUpdate(child.widget, newWidget)) {
        if (child.slot != newSlot) {
          updateSlotForChild(child, newSlot);
        }
        /// 更新之前 element 的配置为 newWidget  ,比如之前的 element 配置的widget 颜色为红色,而 newWidget 的颜色为黑色,
        /// 那么 update 方法执行后 element(即这里的 child)的 widget 颜色为黑色,
        /// 注意这里只更新了配置(即 Widget),没有更新 State
        child.update(newWidget);
        newChild = child;
      } else {
        deactivateChild(child);
        /// 如果无法更新复用,那么创建一个新的Element并返回。
        newChild = inflateWidget(newWidget, newSlot);
      }
    } else {
    /// 如果无法更新复用,那么创建一个新的Element并返回。
      newChild = inflateWidget(newWidget, newSlot);
    }
    return newChild;
  }
Widget 的 canUpdate 代码如下:
 static bool canUpdate(Widget oldWidget, Widget newWidget) {
    return oldWidget.runtimeType == newWidget.runtimeType
        && oldWidget.key == newWidget.key;
  }
类型一致且key相等就返回 ture.
主要的功能点上面的代码都做了注释。
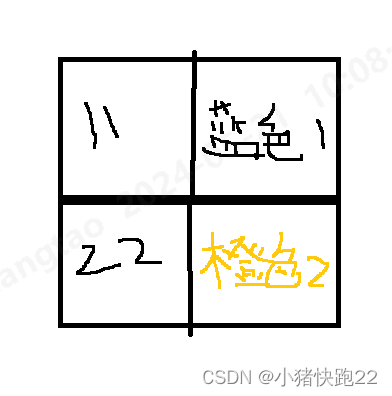
交换后的 Widget 树 和 Element 树 如下图:

点击交换按钮后的真是效果如下:
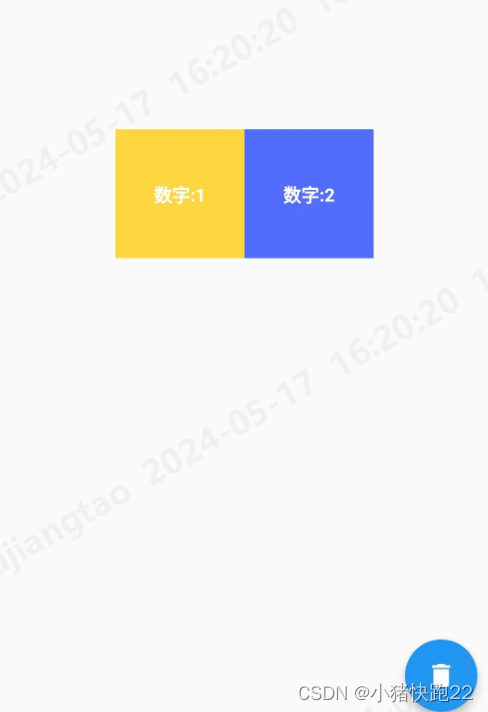
可以发现,2个Widget的颜色确实发生改变了,但是数值没变。
为什么呢?
Widget 的 canUpdate 可知,canUpdate方法的作用是判断newWidget 是否可以替代 oldWidget 作为 Element 的配置。 一开始也提到了,Element 会持有W idget。
该方法判断的依据就是runtimeType和key是否相等。在我们上面的例子中,不管是StatelessWidget还是StatefulWidget的方块,显然canUpdate都会返回 true。因此执行**child.update(newWidget)**方法,就是将持有的Widget更新了,所以颜色会改变了。
Element 的 update 方法如下:
void update(covariant Widget newWidget) {
_widget = newWidget;
}
可以看到只更新了配置即(widget),并没有更新 State ,而我们的数字 _cnt 是定义在 _MyItemState 中的,所以没有更新!而 color 是定义在 MyStateFullItemWidget 中的,所以更新了。
解决办法,就是加上 Key
修改 _KeyDemoState 中定义的2个 widget 如下:
List<Widget> widgets = [
    MyStateFullItemWidget(color: Colors.blue, key: ValueKey("11")),
    MyStateFullItemWidget(color: Colors.yellow, key: ValueKey("22")),
  ];
但是这里要注意的是:,这里添加key以后,在canUpdate方法返回false,那么最后执行 inflateWidget(newWidget, newSlot)方法创建新的 Element。那么此时由于是创建新的 Element ,那么数字显示的肯定是初始值 0,而我们这里确实不是0,说明,走的不是这段逻辑。(很多相关文章对于此处的说明都有误区… 我一开始也被误了而陷入了一段不能自拔的求证历程…)。
本例是方块的外层是Row(MultiChildRenderObjectElement),是对比两个List(List<Element> oldChildren, List<Widget> newWidgets),存在不同。关键在于 update 时调用的RenderObjectElement.updateChildren方法:
List<Element> updateChildren(List<Element> oldChildren, List<Widget> newWidgets, { Set<Element>? forgottenChildren, List<Object?>? slots }) {

    Element? replaceWithNullIfForgotten(Element child) {
      return forgottenChildren != null && forgottenChildren.contains(child) ? null : child;
    }

    Object? slotFor(int newChildIndex, Element? previousChild) {
      return slots != null
        ? slots[newChildIndex]
        : IndexedSlot<Element?>(newChildIndex, previousChild);
    }

    int newChildrenTop = 0;
    int oldChildrenTop = 0;
    int newChildrenBottom = newWidgets.length - 1;
    int oldChildrenBottom = oldChildren.length - 1;

    final List<Element> newChildren = oldChildren.length == newWidgets.length ?
        oldChildren : List<Element>.filled(newWidgets.length, _NullElement.instance);

    Element? previousChild;

    // Update the top of the list.
    /// 从前往后依次对比,相同的更新Element,记录位置,直到不相等时跳出循环。
    while ((oldChildrenTop <= oldChildrenBottom) && (newChildrenTop <= newChildrenBottom)) {
      final Element? oldChild = replaceWithNullIfForgotten(oldChildren[oldChildrenTop]);
      final Widget newWidget = newWidgets[newChildrenTop];
      // 注意这里的canUpdate,本例中在没有添加key时返回true。
      // 因此直接执行 updateChild,就是之前分析的 Element 中的 updateChild (如果2个widget 相同,返回老的widget ,如果不相同,那么执行的是 老的 element 更新配置为 newWidget)。
      // 一旦添加key,这里返回false,逻辑就不一样了。
      final Element newChild = updateChild(oldChild, newWidget, slotFor(newChildrenTop, previousChild))!;

      newChildren[newChildrenTop] = newChild;
      previousChild = newChild;
      newChildrenTop += 1;
      oldChildrenTop += 1;
    }

    // Scan the bottom of the list.
    // 从后往前依次对比,记录位置,直到不相等时跳出循环
    while ((oldChildrenTop <= oldChildrenBottom) && (newChildrenTop <= newChildrenBottom)) {
      final Element? oldChild = replaceWithNullIfForgotten(oldChildren[oldChildrenBottom]);
      final Widget newWidget = newWidgets[newChildrenBottom];
      if (oldChild == null || !Widget.canUpdate(oldChild.widget, newWidget)) {
        break;
      }
      oldChildrenBottom -= 1;
      newChildrenBottom -= 1;
    }

    // Scan the old children in the middle of the list.
    final bool haveOldChildren = oldChildrenTop <= oldChildrenBottom;
    Map<Key, Element>? oldKeyedChildren;
    if (haveOldChildren) {
      oldKeyedChildren = <Key, Element>{};
      while (oldChildrenTop <= oldChildrenBottom) {
        final Element? oldChild = replaceWithNullIfForgotten(oldChildren[oldChildrenTop]);
        if (oldChild != null) {
          if (oldChild.widget.key != null) {
            oldKeyedChildren[oldChild.widget.key!] = oldChild;
          } else {
            deactivateChild(oldChild);
          }
        }
        oldChildrenTop += 1;
      }
    }

    // Update the middle of the list.
    while (newChildrenTop <= newChildrenBottom) {
      Element? oldChild;
      final Widget newWidget = newWidgets[newChildrenTop];
      if (haveOldChildren) {
        final Key? key = newWidget.key;
        if (key != null) {
          oldChild = oldKeyedChildren![key];
          if (oldChild != null) {
            if (Widget.canUpdate(oldChild.widget, newWidget)) {
              // we found a match!
              // remove it from oldKeyedChildren so we don't unsync it later
              oldKeyedChildren.remove(key);
            } else {
              // Not a match, let's pretend we didn't see it for now.
              oldChild = null;
            }
          }
        }
      }
      final Element newChild = updateChild(oldChild, newWidget, slotFor(newChildrenTop, previousChild))!;
      newChildren[newChildrenTop] = newChild;
      previousChild = newChild;
      newChildrenTop += 1;
    }

    // We've scanned the whole list.
    newChildrenBottom = newWidgets.length - 1;
    oldChildrenBottom = oldChildren.length - 1;

    // Update the bottom of the list.
    while ((oldChildrenTop <= oldChildrenBottom) && (newChildrenTop <= newChildrenBottom)) {
      final Element oldChild = oldChildren[oldChildrenTop];
      final Widget newWidget = newWidgets[newChildrenTop];
      final Element newChild = updateChild(oldChild, newWidget, slotFor(newChildrenTop, previousChild))!;

    // Clean up any of the remaining middle nodes from the old list.
    if (haveOldChildren && oldKeyedChildren!.isNotEmpty) {
      for (final Element oldChild in oldKeyedChildren.values) {
        if (forgottenChildren == null || !forgottenChildren.contains(oldChild)) {
          deactivateChild(oldChild);
        }
      }
    }

    return newChildren;
  }
上面的代码看着很多,其实也不复杂,我们就以本例来说明,为什么加了 Key 之后就可以更新数字了。
把上面的图再贴出来:

- 交换后的 widget 如图中的 widget tree,对应 updateChildren 方法参数中的
List<Widget> newWidgets。 - 交换之前的 widget 对应图中的 Element tree ,对应 updateChildren 方法参数中的
List<Element> oldChildren。
接下来通过源码分析下为什么添加 Key 后,数字和颜色都能交换。
    int newChildrenTop = 0;
    int oldChildrenTop = 0;
    int newChildrenBottom = newWidgets.length - 1; // 这里的 newWidgets.length = 2
    int oldChildrenBottom = oldChildren.length - 1; // oldChildren.length = 2
    /// 由于2个list长度相同,所以就把 oldChildren  赋值给 newChildren(最后的返回结果)
    final List<Element> newChildren = oldChildren.length == newWidgets.length ?
        oldChildren : List<Element>.filled(newWidgets.length, _NullElement.instance);
接下来看:
    while ((oldChildrenTop <= oldChildrenBottom) && (newChildrenTop <= newChildrenBottom)) {
      final Element? oldChild = replaceWithNullIfForgotten(oldChildren[oldChildrenTop]);
      final Widget newWidget = newWidgets[newChildrenTop];
      if (oldChild == null || !Widget.canUpdate(oldChild.widget, newWidget)) {
        break;
      }
      final Element newChild = updateChild(oldChild, newWidget, slotFor(newChildrenTop, previousChild))!;
      newChildren[newChildrenTop] = newChild;
      previousChild = newChild;
      newChildrenTop += 1;
      oldChildrenTop += 1;
    }
此时,oldChildrenTop 和 newChildrenTop 都是 0,oldChildrenBottom 和 newChildrenBottom 都等于1,while 循环条件成立,进入循环体。
Element? oldChild = replaceWithNullIfForgotten(oldChildren[oldChildrenTop]); 得到的是上图Element tree中蓝色数字1的 Element 。
Widget newWidget = newWidgets[newChildrenTop] 得到的是 上图中 交换后的 Widget tree 中的 橙色数字2的 Widget。
接下来是 if 语句 :
if (oldChild == null || !Widget.canUpdate(oldChild.widget, newWidget)) {
        break;
      }
由于 oldChild.widget 的 key 是 11, 而 newWidget 的 key 是 22,所以 canUpdate 返回 false,条件满足,跳出 while 循环,接着走下面的逻辑:
    while ((oldChildrenTop <= oldChildrenBottom) && (newChildrenTop <= newChildrenBottom)) {
      final Element? oldChild = replaceWithNullIfForgotten(oldChildren[oldChildrenBottom]);
      final Widget newWidget = newWidgets[newChildrenBottom];
      if (oldChild == null || !Widget.canUpdate(oldChild.widget, newWidget)) {
        break;
      }
      oldChildrenBottom -= 1;
      newChildrenBottom -= 1;
    }
这个跟上面的逻辑差不多,就是从后面往前面开始比较。
此时:
oldChild 对应的是 element tree 中的 橙色数字2 ,key 是 22 ;
newWidget 对应的是 widget tree 中的 蓝色数字1, key 是 11;
所以里面的 if (oldChild == null || !Widget.canUpdate(oldChild.widget, newWidget)) 条件也不成立,跳出 while 循环,接着下面的逻辑:
    final bool haveOldChildren = oldChildrenTop <= oldChildrenBottom;
    Map<Key, Element>? oldKeyedChildren;
    if (haveOldChildren) {
      oldKeyedChildren = <Key, Element>{};
      while (oldChildrenTop <= oldChildrenBottom) {
        final Element? oldChild = replaceWithNullIfForgotten(oldChildren[oldChildrenTop]);
        if (oldChild != null) {
          if (oldChild.widget.key != null) {
            oldKeyedChildren[oldChild.widget.key!] = oldChild;
          } else {
            deactivateChild(oldChild);
          }
        }
        oldChildrenTop += 1;
      }
    }
由于 此时的 oldChildrenTop = 0 且 oldChildrenBottom = 1,所以 haveOldChildren = true,所以 if (haveOldChildren) 成立,后面的逻辑很简单,就是把 oldChildren 中的 element 存放到一个 Map (oldKeyedChildren)中,Map 的 key 对应 widget 的key,value 就是 oldChildren 中的 element。如下图:
接着执行如下代码:
    while (newChildrenTop <= newChildrenBottom) {
      Element? oldChild;
      final Widget newWidget = newWidgets[newChildrenTop];
      if (haveOldChildren) {
        final Key? key = newWidget.key;
        if (key != null) {
          oldChild = oldKeyedChildren![key];
          if (oldChild != null) {
            if (Widget.canUpdate(oldChild.widget, newWidget)) {
              oldKeyedChildren.remove(key);
            } else {
              oldChild = null;
            }
          }
        }
      }
      final Element newChild = updateChild(oldChild, newWidget, slotFor(newChildrenTop, previousChild))!;
      newChildren[newChildrenTop] = newChild;
      previousChild = newChild;
      newChildrenTop += 1;
    }
此时:
newChildrenTop = 0 且 newChildrenBottom = 1,while 中的条件成立,执行循环体:
Widget newWidget = newWidgets[newChildrenTop] 即 newWidget 对应的是 widget tree 中的第一个(橙色数字2)。
if (haveOldChildren) 条件的 haveOldChildren 在上面的分析中是 true,所以条件成立,执行里面的代码:
Key? key = newWidget.key; 此时,key 的值是22,然后从上面存储 element 的 Map 中通过 key 取出 Element ,即 oldChild = oldKeyedChildren![key],那么 oldChild 对应的就是 Element tree 中的 橙色数字2。
如此 if (Widget.canUpdate(oldChild.widget, newWidget)) 条件成立,把 橙色数字2对应的 Element 从 oldKeyedChildren 这个 Map 中删除。
接着执行 Element newChild = updateChild(oldChild, newWidget, slotFor(newChildrenTop, previousChild))!;
此时由于 oldChild 中的 Widget 和 newWidget 就是同一个 Widget ,所以执行的是 updateChild 中的
     if (hasSameSuperclass && child.widget == newWidget) {
        if (child.slot != newSlot) {
          updateSlotForChild(child, newSlot);
        }
        newChild = child;
      }
      return newChild ;
返回的就是之前的 Element 。
返回到之前的代码:
 newChildren[newChildrenTop] = newChild; // newChildren[0] = 橙色数字2 对应的element
 newChildrenTop += 1; // 那么 newChildrenTop = 1
此时 newChildrenTop = 1,继续执行 while 循环逻辑是一样的
最终:oldKeyedChildren map 中数据全部删除了;
newChildren[0] = 橙色数字2 对应的element;
newChildren[1] = 蓝色数字1 对应的element;
此时 newChildrenTop = 2 了,接着往下走:
 newChildrenBottom = newWidgets.length - 1; // 重新赋值 等于1
 oldChildrenBottom = oldChildren.length - 1; // 重新赋值 等于1
此时由于 newChildrenTop = 2 了,所以下面的 while ((oldChildrenTop <= oldChildrenBottom) && (newChildrenTop <= newChildrenBottom)) 条件不成立。
下面的 if (haveOldChildren && oldKeyedChildren!.isNotEmpty) 由于 oldKeyedChildren 这个 Map 数据都清空了,所以条件不成立。
最后直接返回 return newChildren;
通过以上代码的分析,相信我们可以很好的理解了 Key 的作用,以及 Key怎么起的作用!


 6320
6320

 被折叠的 条评论
为什么被折叠?
被折叠的 条评论
为什么被折叠?
 到【灌水乐园】发言


