


在这个数字化时代,手写数字识别已经成为了一个既经典又充满挑战的任务。而MNIST数据集,作为手写数字识别的“入门级”数据集,更是被广大学者和工程师们视为探索神经网络奥秘的“敲门砖”。在这篇文章中有完整的可运行的代码,让我们一起踏上这段充满挑战和乐趣的学习之旅吧!
一、安装conda
在安装 Jupyter Notebook 时,通常我们会用到 conda 这个包管理工具,因为它可以方便地管理 Python 包及其依赖关系。如果没有安装conda包管理工具,请参考这篇文章安装
AI开发利器:miniforge3无感平替Anaconda3
Conda配置镜像源。例如,使用清华大学或中科大的镜像源:
conda config --add channels https://mirrors.tuna.tsinghua.edu.cn/anaconda/pkgs/main/
conda config --set show_channel_urls yes
二、使用conda安装Jupyter Notebook
1. conda创建环境
打开命令行,如果你还没有创建环境,可以使用下面的命令来创建一个新的环境(例如,名为 myenv 的环境,并安装 Python 3.12):
conda create -n myenv python=3.12
然后激活这个环境:
conda activate myenv
2. 安装 Jupyter Notebook
在激活的环境中,使用以下命令安装 Jupyter Notebook:
conda install notebook
3. 安装pytorch依赖:
conda install pytorch torchvision torchaudio cpuonly -c pytorch
conda install matplotlib
4. 启动 Jupyter Notebook
安装完成后,你可以通过以下命令启动 Jupyter Notebook:
jupyter notebook
这将会在默认的 web 浏览器中打开 Jupyter Notebook 的界面。
5. 创建nodebook
- file->New->Nodebook
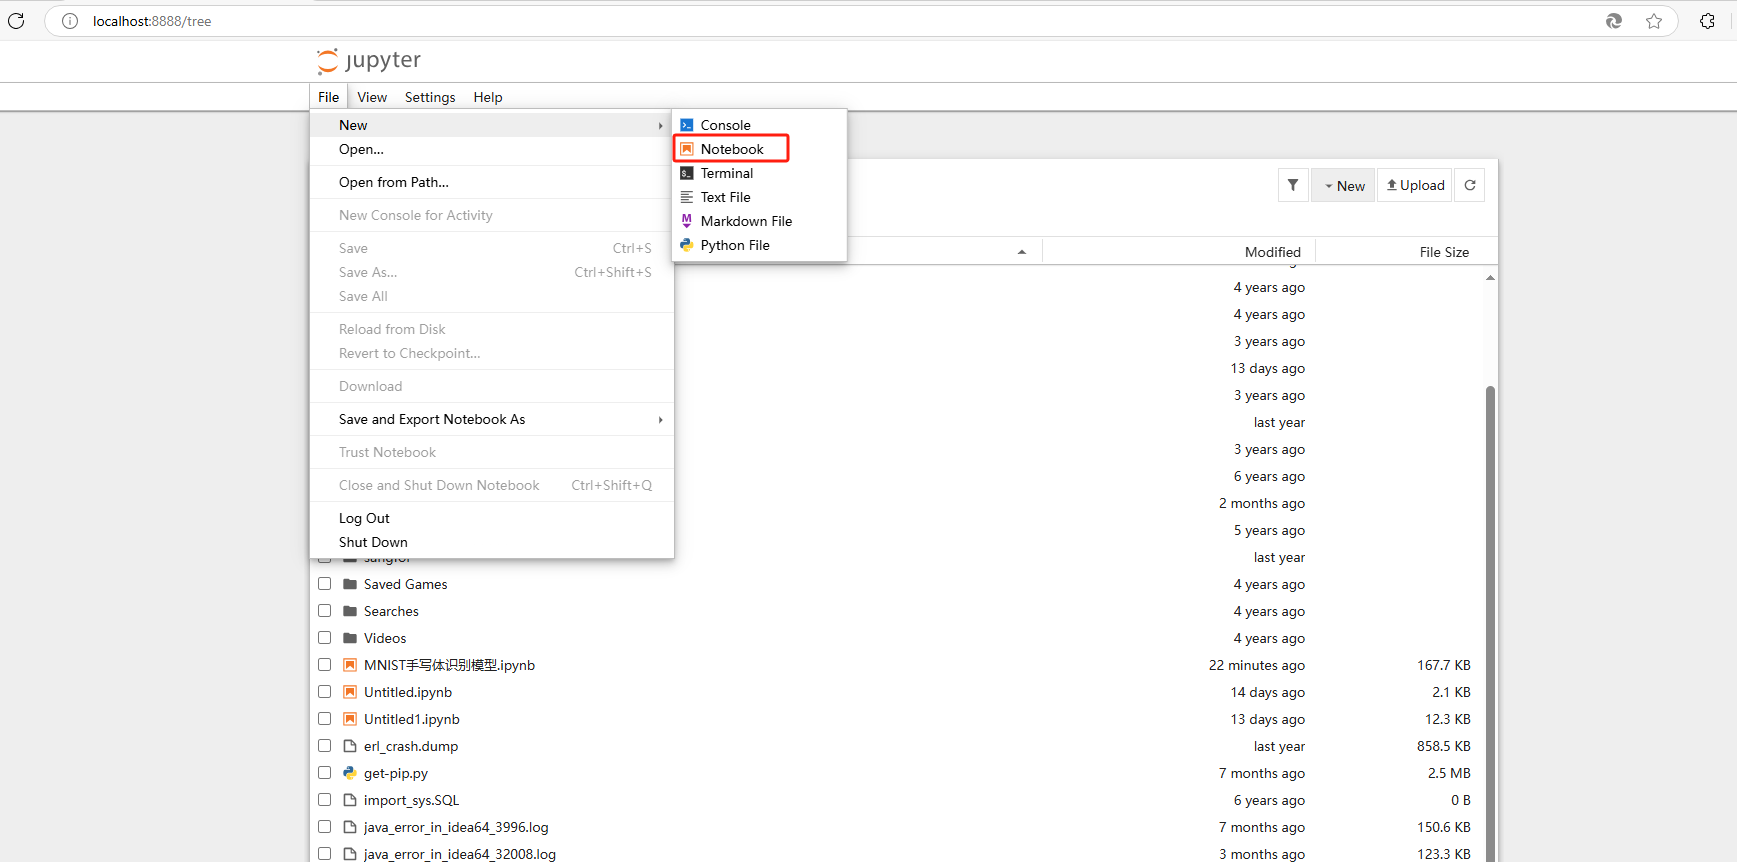
- 点击select

三、可运行代码
下面是神经网络,在MNIST数据集训练用于识别手写体数字的模型,运行完main()函数后会生成MNIST_model_params.pt模型保存到用户目录下。接下来注释掉main()函数,打开并运行predict()函数,进行预测应用。
import torch
from torch.utils.data import DataLoader
from torchvision import transforms
from torchvision.datasets import MNIST
import matplotlib.pyplot as plt
class Net(torch.nn.Module): # 定义一个Net类,神经网络的主体
def __init__(self): # 全连接层,四个
super().__init__()
self.fc1 = torch.nn.Linear(28*28, 64) # 输入层输入28*28,输出64
self.fc2 = torch.nn.Linear(64, 64) # 中间层,输入64,输出64
self.fc3 = torch.nn.Linear(64, 64)
self.fc4 = torch.nn.Linear(64, 10) # 中间层(隐藏层)的最后一层,输出10个特征值
def forward(self, x): # 前向传播过程
# self.fc1(x)全连接线性计算,再套上一个激活函数torch.nn.functional.relu()
x = torch.nn.functional.relu(self.fc1(x))
x = torch.nn.functional.relu(self.fc2(x))
x = torch.nn.functional.relu(self.fc3(x))
# 最后一层进行softmax归一化,log_softmax是为了提高计算稳定性,在softmax后面套上了一个对数运算
x = torch.nn.functional.log_softmax(self.fc4(x), dim=1)
return x
def get_data_loader(is_train):
to_tensor = transforms.Compose([transforms.ToTensor()]) # 定义数据转换类型tensor,多维数组(张量)
"""下载MNIST数据集,
"":当前位置
is_train:判断是训练集还是测试集;
batch_size:一个批次包含15张图片;
shuffle:数据随机打乱的
"""
data_set = MNIST("", is_train, transform=to_tensor, download=True)
return DataLoader(data_set, batch_size=15, shuffle=True) # 数据加载器
def evaluate(test_data, net): # 用来评估神经网络
n_correct = 0
n_total = 0
with torch.no_grad():
for (x, y) in test_data:
outputs = net.forward(x.view(-1, 28*28)) # 计算神经网络的预测值
for i, output in enumerate(outputs): # 对每个批次的预测值进行比较,累加正确预测的数量
if torch.argmax(output) == y[i]:
n_correct += 1
n_total += 1
return n_correct / n_total # 返回正确率
def main():
# 导入训练集和测试集
train_data = get_data_loader(is_train=True)
test_data = get_data_loader(is_train=False)
net = Net() # 初始化神经网络
# 打印初始网络的正确率,应当是10%附近。手写数字有十种结果,随机猜的正确率就是1/10
print("initial accuracy:", evaluate(test_data, net))
"""训练神经网络
pytorch的固定写法
"""
optimizer = torch.optim.Adam(net.parameters(), lr=0.001)
for epoch in range(3): # 需要在一个数据集上反复训练神经网络,epoch网络轮次,提高数据集的利用率
for (x, y) in train_data:
net.zero_grad() # 初始化
output = net.forward(x.view(-1, 28*28)) # 正向传播
# 计算差值,nll_loss对数损失函数,为了匹配log_softmax的log运算
loss = torch.nn.functional.nll_loss(output, y)
loss.backward() # 反向误差传播
optimizer.step() # 优化网络参数
print("epoch", epoch, "accuracy:", evaluate(test_data, net)) # 打印当前网络的正确率
torch.save(net.state_dict() , 'MNIST_model_params.pt') # 只保存网络中的参数 (速度快, 占内存少)
"""测试神经网络
训练完成后,随机抽取3张图片进行测试
"""
for (n, (x, _)) in enumerate(test_data):
if n > 3:
break
predict = torch.argmax(net.forward(x[0].view(-1, 28*28))) # 测试结果
plt.figure(n) # 画出图像
plt.imshow(x[0].view(28, 28)) # 像素大小28*28
plt.title("prediction: " + str(int(predict))) # figure的标题
plt.show()
main()
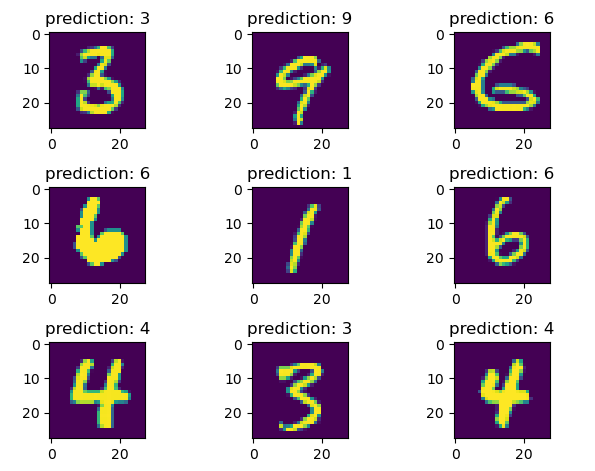
def predict():
net = Net() # 初始化神经网络
net.load_state_dict(torch.load('MNIST_model_params.pt',weights_only=True))
test_data = get_data_loader(is_train=False)
for (n, (x, _)) in enumerate(test_data):
if n > 8:
break
predict = torch.argmax(net.forward(x[0].view(-1, 28*28))) # 测试结果
# plt.figure(n) # 画出图像
plt.subplot(3, 3, n+1) # 创建3*3显示布局
plt.imshow(x[0].view(28, 28)) # 像素大小28*28
plt.title("prediction: " + str(int(predict))) # figure的标题
plt.show()
# predict()


 4210
4210

 被折叠的 条评论
为什么被折叠?
被折叠的 条评论
为什么被折叠?
 到【灌水乐园】发言


