


准备工作
1.新建一个工程,然后删除mainwindow的ui,头文件和源文件。
2.新建一个主窗口,布局如下:
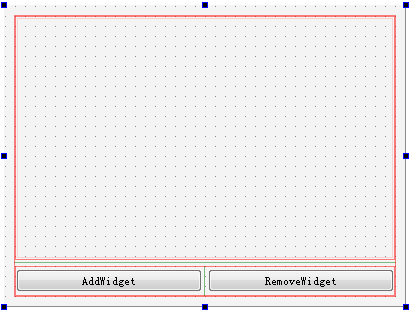
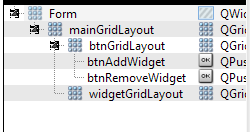
3.新建一个窗口作为子窗口,用于动态加入到widgetGridLayout布局中。
代码实现
实现AddWidget按钮槽函数
void Form::on_btnAddWidget_clicked()
{
    childWidget *widget = new childWidget;
    ui->widgetGridLayout->addWidget(widget,0,0,Qt::AlignCenter);
}
实现RemoveWidget按钮槽函数
void Form::on_btnRemoveWidget_clicked()
{
    clearLayout(ui->widgetGridLayout);

    qDebug()<<"QGridLayout Rows: "<<ui->widgetGridLayout->rowCount();

    if(ui->widgetGridLayout->isEmpty()){
        qDebug()<<"widgetGridLayout is Empty!";
        ui->widgetGridLayout->update();
    }else{
        qDebug()<<"widgetGridLayout is not Empty!";
    }
}
其中clearLayout()函数的实现如下:
void Form::clearLayout(QLayout *layout)
{
    QLayoutItem *item;
    while((item = layout->takeAt(0)) != 0){
        //删除widget
        if(item->widget()){
            delete item->widget();
            //item->widget()->deleteLater();
        }
        //删除子布局
        QLayout *childLayout = item->layout();
        if(childLayout){
            clearLayout(childLayout);
        }
        delete item;
    }
}
然后运行程序,反复操作addWidget和removeWidget,我们看到的输出信息如下:
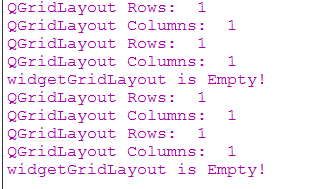
表明已成功删除QGridLayout中的Widget。
后续
如果我们把addWidget槽函数中的addWidget改为如下:
ui->widgetGridLayout->addWidget(widget);
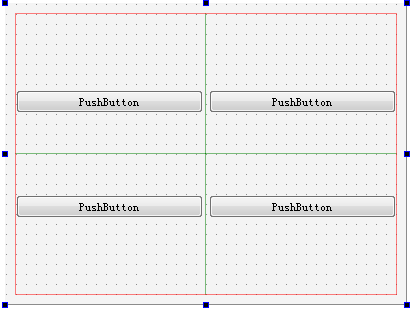
//ui->widgetGridLayout->addWidget(widget,0,0,Qt::AlignCenter);然后运行,我们发现结果变化了
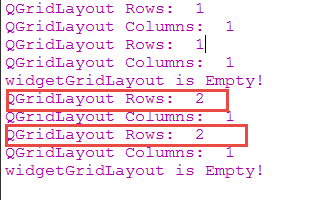
子窗口中的QGridLayout会随着增加次数而增加。
这就有个问题了,为什么QGridLayout都已经为空了,它的行数却还不断增加呢?
看下QGridLayout源代码找下原因。因为addWidget(Widget*),它直接使用QGridLayout.h中的
inline void addWidget(QWidget *w) { QLayout::addWidget(w); }QLayout.cpp中关于addWidget的实现:
void QLayout::addWidget(QWidget *w)
{
    addChildWidget(w);
    addItem(QLayoutPrivate::createWidgetItem(this, w));
}
其中addChildWidget的作用是把w作为布局的管理部件;addItem在QLayout中定义为虚类,所以它的功能需要返回到QGridLayout中查看addItem的实现,它的功能就是将在QGridLayout中指定行,列来放置包含w的项。
void QGridLayout::addItem(QLayoutItem *item)
{
    Q_D(QGridLayout);
    int r, c;
    d->getNextPos(r, c);
    addItem(item, r, c);
}
inline void getNextPos(int &row, int &col) { row = nextR; col = nextC; }addItem带三个参数的函数
void QGridLayout::addItem(QLayoutItem *item, int row, int column, int rowSpan, int columnSpan, Qt::Alignment alignment)
{
    Q_D(QGridLayout);
    QGridBox *b = new QGridBox(item);
    b->setAlignment(alignment);
    d->add(b, row, (rowSpan < 0) ? -1 : row + rowSpan - 1, column, (columnSpan < 0) ? -1 : column + columnSpan - 1);
    invalidate();
}
add函数的实现
void QGridLayoutPrivate::add(QGridBox *box, int row, int col)
{
    expand(row + 1, col + 1);
    box->row = box->torow = row;
    box->col = box->tocol = col;
    things.append(box);
    setDirty();
    setNextPosAfter(row, col);
}
在来看看setNextPosAfter(row, col)函数:
void QGridLayoutPrivate::setNextPosAfter(int row, int col)
{
    if (addVertical) {
        if (col > nextC || (col == nextC && row >= nextR)) {
            nextR = row + 1;
            nextC = col;
            if (nextR >= rr) {
                nextR = 0;
                nextC++;
            }
        }
    } else {
        if (row > nextR || (row == nextR && col >= nextC)) {
            nextR = row;
            nextC = col + 1;
            if (nextC >= cc) {
                nextC = 0;
                nextR++;
            }
        }
    }
}
至此,就基本差不多了,我们知道如果不指定行和列的话,每次调用addWidget都会执行到add函数中的
expand(row + 1, col + 1);根据setNextPosAfter函数可知,我们每次增加行会自增1,但列保持不动,这和实际的输出结果也吻合。


 759
759

 被折叠的 条评论
为什么被折叠?
被折叠的 条评论
为什么被折叠?
 到【灌水乐园】发言


