


RadioButton
![]()


![]()
![]()

![]()

![]()

![]()
![]()

![]()


![]()

![]()
我们都知道RadioButton是Android里的单选按钮,但是如果我们只是单独的摆放几个RadioButton的话,我们会发现RadioButton竟然可以多选,所以这几个RadioButton只有在外面套上RadioGroup的话,才是真正的单选按钮,这表示我们需要这一组内单选按钮。RadioGroup继承线性布局,所以可以使用线性布局的方向和权重的属性,而RadioButton继承Button,所以可以使用Button的选择器效果,但是RadioButton有三种状态:android:state_pressed、android:state_checked和没有选中和单击的状态
RadioButton的点击事件比较特殊:
RadioGroup rg=(RadioGroup) findViewById(R.id.rg);
//单选按钮的的单击事件不是onClickListener
rg.setOnCheckedChangeListener(new OnCheckedChangeListener() {
@Override
public void onCheckedChanged(RadioGroup group, int checkedId) {
// TODO Auto-generated method stub
//checkedId与单选按钮的id如果一致,则表示哪一个单选按钮被选中
if(checkedId==R.id.rb1)
tv.setText("男");
else
tv.setText("女");
}
});
CheckBox
CheckBox是多选按钮,其单击事件和RadioGroup差不多:
//cb是某一个多选按钮的对象
cb.setOnCheckedChangeListener(new OnCheckedChangeListener() {
@Override
public void onCheckedChanged(CompoundButton buttonView, boolean isChecked) {
// TODO Auto-generated method stub
//checkedId与单选按钮的id如果一致,则表示哪一个单选按钮被选中
if(isChecked)
//当选中的操作
else
//当取消选中的操作
}
});
Toast
Toast,即吐司的意思,在Android中的意思是提示框
Toast toast;
//1.在那个Activity中被使用 2.提示的内容 3.显示的时间(LENGTH_LONG,LENGTH_SHORT)
toastToast.makeText(MainActivity.this, "选择了苹果", Toast.LENGTH_LONG);
//toast如果显示的一定不能忘记toast.show()方法
toast.show();
//可以自己来设置Toast的显示位置 ,默认是在屏幕的下方的
//1.表示这个Toast在屏幕中的位置 2.X轴的偏移 3.Y轴的偏移
//toast.setGravity(Gravity.CENTER, 0, 0);
ProgressBar
ProgressBar是显示缓冲的控件,默认是一个圆形的,如果想变成缓冲歌曲的那种长条形的,可以在xml代码中ProgressBar中加入这样一句代码:
style="?android:attr/progressBarStyleHorizontal
ProgressBar还可以进行自定义,代码如下:
android:indeterminateDrawable="@drawable/a"(a是一张图片)
//设置ProgressBar消失,并清除窗体
pb.setVisibility(View.GONE)
//设置ProgressBar消失,窗体依然存在
pb.setVisibility(View.INVISIBLE)
SeekBar
SeekBar是拖动条控件,可以自己定义拖动条控件的滑块样子
android:thrumb="@drawble/b"(自定义滑块的样子为一张图片)
拖动条的监听事件:
seekbar.setOnSeekBarChangeListener(new OnSeekBarChangeListener() {
//当停止点击滑块
@Override
public void onStopTrackingTouch(SeekBar seekBar) {
// TODO Auto-generated method stub
//事件处理
}
//当开始点击滑块
@Override
public void onStartTrackingTouch(SeekBar seekBar) {
// TODO Auto-generated method stub
//事件处理
}
//当滑块移动的时候
@Override
public void onProgressChanged(SeekBar seekBar, int progress,
boolean fromUser) {
// TODO Auto-generated method stub
//事件处理
}
});
AlterDialog
提示对话框,先看一下提示对话框的属性:
setTitle---设置标题
setMessage---设置内容
setIcon---设置图标
setView---设置自定义视图
setNegativeButton---设置左边Button
setNeutralButton---设置中间Button
setPostiveButton---设置左边Button
setItems---设置条目选择
setMultiChoiceItems---设置多项选择
setSingleChoiceItems---设置单项选择
show---显示对话框,必须最后结尾调用show()方法
public void showMyAlertDialog(){
//1.初始化对象--》提示框的建造者对象
Builder builder=new Builder(this);
//2.建造具体的提示框
//--设置内容
//builder.setMessage("蓝鸥3gAndroid学习...");
//--设置标题
builder.setTitle("蓝鸥Android");
//--》设置图标
builder.setIcon(R.drawable.ic_launcher);
//--添加按钮
//1.按钮显示的内容 2.按钮的点击事件监听(必须使用DialogInterface的监听)
builder.setNegativeButton("你好", new DialogInterface.OnClickListener() {
@Override
public void onClick(DialogInterface dialog, int which) {
// TODO Auto-generated method stub
Toast toast=Toast.makeText(DialogActivity.this, "点击了你好", 1);
toast.show();
}
});
builder.setPositiveButton("你bu好", new DialogInterface.OnClickListener() {
@Override
public void onClick(DialogInterface dialog, int which) {
// TODO Auto-generated method stub
Toast toast=Toast.makeText(DialogActivity.this, "点击了你bu好", 1);
toast.show();
}
});
builder.setNeutralButton("你不好", new DialogInterface.OnClickListener() {
@Override
public void onClick(DialogInterface dialog, int which) {
// TODO Auto-generated method stub
Toast toast=Toast.makeText(DialogActivity.this, "点击了你不好", 1);
toast.show();
}
});
//--想要使用这个方法,则不能使用setMessage()方法
//1.字符串数组,用于填充每一个item 2.点击监听,其中which表示点击第几个,从0开始
// builder.setItems(new String[]{"1.张三","2.李四","3.王五"}, new DialogInterface.OnClickListener() {
//
// @Override
// public void onClick(DialogInterface dialog, int which) {
// // TODO Auto-generated method stub
// Toast toast=Toast.makeText(DialogActivity.this, "我点击了"+(which+1), 1);
// toast.show();
// }
// });
// builder.setSingleChoiceItems(new String[]{"1.张三","2.李四","3.王五"}, 2, new DialogInterface.OnClickListener() {
//
// @Override
// public void onClick(DialogInterface dialog, int which) {
// // TODO Auto-generated method stub
//
// }
// });
builder.setMultiChoiceItems(new String[]{"1.张三","2.李四","3.王五","4.赵六"}, new boolean[]{true,false,true,false}, new OnMultiChoiceClickListener() {
@Override
public void onClick(DialogInterface dialog, int which, boolean isChecked) {
// TODO Auto-generated method stub
}
});
//3.显示
builder.show();
}
ProgressDialog
进度条对话框
//进度条对话框方法
public void showProgressDialog(){
//1.构建对象
ProgressDialog pd=new ProgressDialog(DialogActivity.this);
//2.调用属性方法
pd.setMessage("正在加载中...");
//把progress进度条改成长条形的
pd.setProgressStyle(ProgressDialog.STYLE_HORIZONTAL);
pd.setMax(100);
pd.setProgress(50);
//pd.setSecondaryProgress(80);
//3.显示
pd.show();
//消失
//pd.dismiss();
}
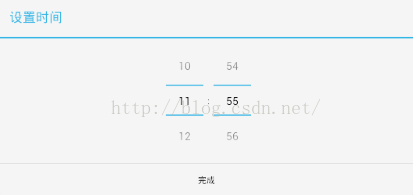
DatePickerDialog与TimePickerDialog
DatePicker
//程序中月份是0开始计算,11结束的,所以0代表一月,以此类推
public void showdate(){
DatePickerDialog date=new DatePickerDialog(this, new OnDateSetListener() {
@Override
public void onDateSet(DatePicker view, int year, int monthOfYear,
int dayOfMonth) {
// TODO Auto-generated method stub
Toast.makeText(DialogActivity.this, year+"年"+monthOfYear+"月"+dayOfMonth+"日", 1).show();
}
}, 2015, 8, 30);
date.show();
}
TimePickerDialog
//true这个参数表示这个时间显示是以24小时制的
public void showtime(){
TimePickerDialog time=new TimePickerDialog(DialogActivity.this, new OnTimeSetListener() {
@Override
public void onTimeSet(TimePicker view, int hourOfDay, int minute) {
// TODO Auto-generated method stub
}
}, 11, 55, true);
time.show();
}
Popwindow
弹出视图,常用属性:
setBackgroundDrawable---设置背景
setFocusable---设置是否可以获取焦点
setTouchable---设置是否可以被触摸
setOutsideTouchable---设置非PopupWindow区域可触
showAsDropDown---设置显示位置
public void showPopup(View anchor){
//1.实例化PopupWindow的对象
PopupWindow popup=new PopupWindow(this);
//2.利用注入器把布局文件引入到java代码中,并设置popupwindow的内容视图
View v=LayoutInflater.from(this).inflate(R.layout.popup, null);
popup.setContentView(v);
//3.设置这个popupWindow的宽和高--》没有宽和高的属性是没有办法显示的
popup.setWidth(LayoutParams.WRAP_CONTENT);
popup.setHeight(LayoutParams.WRAP_CONTENT);
//----其他常用属性
//设置其他位置可触摸--》触摸其他位置可以使popupWindow消失
popup.setOutsideTouchable(true);
//设置背景颜色
//Drawable drawable=getResources().getDrawable(R.drawable.ic_launcher);
ColorDrawable drawable2=new ColorDrawable(Color.GREEN);
popup.setBackgroundDrawable(drawable2);
//4.设置popupWindow的显示位置
//设置popupWindow在哪个控件的位置
//popup.showAsDropDown(anchor);
//设置popupWindow在屏幕中的所在位置
popup.showAtLocation(findViewById(R.id.ll), Gravity.CENTER, 0, 0);
}
ScrollView
ScrollView:滑动视图--》当屏幕中的控件过多,导致屏幕装不下这么多的控件,是屏幕获得滑动效果
分类:ScrollView:竖线的滑动视图 HorizontalScrollView:横向的滑动视图
一个ScrollView只能有一个直接子类布局
ScrollView是继承FrameLayout的,所以ScrollView也可以看做一个布局
Menu
Menu的分类:OptionsMenu点击Menu按键弹出,ContextMenu长点击View弹出,SubMenu用于管理添加以上两种Menu
OptionsMenu和SubMenu
OptionsMenu的属性:
setTitleCondensed---设置标题
setIcon---设置菜单图标
setItent---设置跳转事件
setVisible---设置是否可见
当菜单数量超过6个了,会自动生成更多按钮
public boolean onCreateOptionsMenu(Menu menu) {
// Inflate the menu; this adds items to the action bar if it is present.
//1.OptionMenu的两种使用方式--》菜单导入器,
//getMenuInflater().inflate(R.menu.main, menu);
//2.通过代码实现
//组别--ID点击事件的时候使用--顺序--Menu的名字
//MenuItem item=menu.add(groupId, itemId, order, title);
MenuItem item1=menu.add(0, 0, 3, "Menu1");
MenuItem item2=menu.add(0, 1, 2, "Menu2");
// MenuItem item3=menu.add(1, 2, 1, "Menu3");
// MenuItem item4=menu.add(1, 3, 0, "Menu4");
SubMenu submenu=menu.addSubMenu(0, 2, 1, "submenu");
submenu.add(0, 3, 0, "子菜单1");
submenu.add(0, 4, 0, "子菜单2");
return true;
}
单击submenu后就会出现下面的图片
ContextMenu
//上下文菜单,用于View的长按点击
@Override
public void onCreateContextMenu(ContextMenu menu, View v,
ContextMenuInfo menuInfo) {
// TODO Auto-generated method stub
//重写两个父类的方法--onCreateContextMenu创建上下文菜单
//onContextItemSelected,获取上下文菜单的点击事件
//添加menu--设置每个menu对应的点击事件
//绑定给某一个View
menu.add(0, 0, 1, "123");
menu.add(0, 0, 2, "456");
menu.add(0, 0, 3, "789");
super.onCreateContextMenu(menu, v, menuInfo);
}
然后需要在Activity的onCreate方法里注册一下ContextMenu菜单:registerForContextMenu(View控件对象)
Notification用法
public void sendNotification(){
//1.新建NotificationManager的对象
NotificationManager manager=(NotificationManager) this.getSystemService(Service.NOTIFICATION_SERVICE);
//2.新建Notification对象
Notification notification=new Notification();
//3.给notification附加一些信息
//图片
notification.icon=R.drawable.ic_launcher;
//标题
notification.tickerText="这是我的notification标题";
//notification.when=System.currentTimeMillis();
//告诉用户,信息来了,当用户看到信息后,音乐自动停止
//路径指得是手机中的路径
//notification.sound=Uri.fromFile(new File(""));
//调到自己项目的音乐
//notification.sound=Uri.parse("android.resource://com.lanou3g.android07/"+R.raw.apple);
//可以设置提示信息在点击之后,是否消失
//点击提示信息消失FLAG_AUTO_CANCEL
//只有点击清楚按钮时消失,点击提示信息时不消失,默认的 FLAG_AUTO_CLEAR
//点击清除按钮不会清除消息通知,可以用来标识正在运行 FLAG_ONGOING_EVENT
//一直进行,比如音乐一直播放,直到用户响应 FLAG_INSISTENT
notification.flags=Notification.FLAG_AUTO_CANCEL;
//手机震动
notification.defaults=Notification.DEFAULT_VIBRATE;
//手机闪光灯会闪
notification.defaults|=Notification.DEFAULT_LIGHTS;
//4.设置要跳转的界面
Intent intent=new Intent(NotificationActivity.this,MenuActivity.class);
PendingIntent pending=PendingIntent.getActivity(this, 0, intent, Intent.FLAG_ACTIVITY_NEW_TASK);
//显示在打开后的内容
notification.setLatestEventInfo(this, "1", "2", pending);
//5.发送notification
//id控制notification到底有几个,id改变,则可以重复发送消息
manager.notify(0, notification);
}
调用这个方法后会在Android手机通知栏
TabHost
tab=(TabHost) findViewById(android.R.id.tabhost);
TabSpec s1=tab.newTabSpec("tab1").setIndicator("你好1").setContent(R.id.lin1);
TabSpec s2=tab.newTabSpec("tab2").setIndicator("你好2").setContent(R.id.lin2);
TabSpec s3=tab.newTabSpec("tab3").setIndicator("你好3").setContent(R.id.lin3);
tab.addTab(s1);
tab.addTab(s2);
tab.addTab(s3);
TabHost的布局文件:
<TabHost xmlns:android="
http://schemas.android.com/apk/res/android"
android:layout_width="match_parent"
android:layout_height="match_parent"
android:id="@android:id/tabhost" >
<LinearLayout
android:layout_width="fill_parent"
android:layout_height="fill_parent"
android:orientation="vertical">
<FrameLayout
android:id="@android:id/tabcontent"
android:layout_width="fill_parent"
android:layout_height="0dp"
android:layout_weight="5"
>
<LinearLayout
android:id="@+id/lin1"
android:layout_width="fill_parent"
android:layout_height="fill_parent"
android:orientation="vertical"></LinearLayout>
<LinearLayout
android:id="@+id/lin2"
android:layout_width="fill_parent"
android:layout_height="fill_parent"
android:orientation="vertical"></LinearLayout>
<LinearLayout
android:id="@+id/lin3"
android:layout_width="fill_parent"
android:layout_height="fill_parent"
android:orientation="vertical"></LinearLayout>
</FrameLayout>
<TabWidget
android:id="@android:id/tabs"
android:layout_width="fill_parent"
android:layout_height="0dp"
android:layout_weight="1"></TabWidget>
</LinearLayout>
</TabHost>
ActivityGroup
1.新建类需要继承ActivityGroup并注册
2.新建需要的Activity并注册
3.选择一个LinearLayout作为activity的容器
4.新建方法,并把Activity添加到此布局中
5.在对应的Button点击事件中调用此方法
//新建的launchActivity方法,把新建的Activity类添加到布局中
public void launchActivity(Class<?> activity){
//1.移除容器中的所有view对象
ll.removeAllViews();
//2.把Activity对象转化成View对象
Intent intent=new Intent(this,activity);
intent.addFlags(Intent.FLAG_ACTIVITY_SINGLE_TOP);
//
View v=getLocalActivityManager().startActivity("0", intent).getDecorView();
//3.把View对象添加到容器布局中
ll.addView(v);
}
//相应的Button点击事件调用此方法,Activity01和Activity02都需要有自己相对应的布局文件
btn1.setOnClickListener(new OnClickListener() {
@Override
public void onClick(View v) {
// TODO Auto-generated method stub
lanchActivity(Activity01.class);
}
});
btn2.setOnClickListener(new OnClickListener() {
@Override
public void onClick(View v) {
// TODO Auto-generated method stub
lanchActivity(Activity02.class);
}
});


 251
251


 被折叠的 条评论
为什么被折叠?
被折叠的 条评论
为什么被折叠?
 到【灌水乐园】发言


