


1 说明
使用zuul对所有的服务进行统一的调用
2 功能
- 统一的入口
- 统一的权限校验
- 集成Ribbon
- 集成Hystrix
2.1 统一的入口
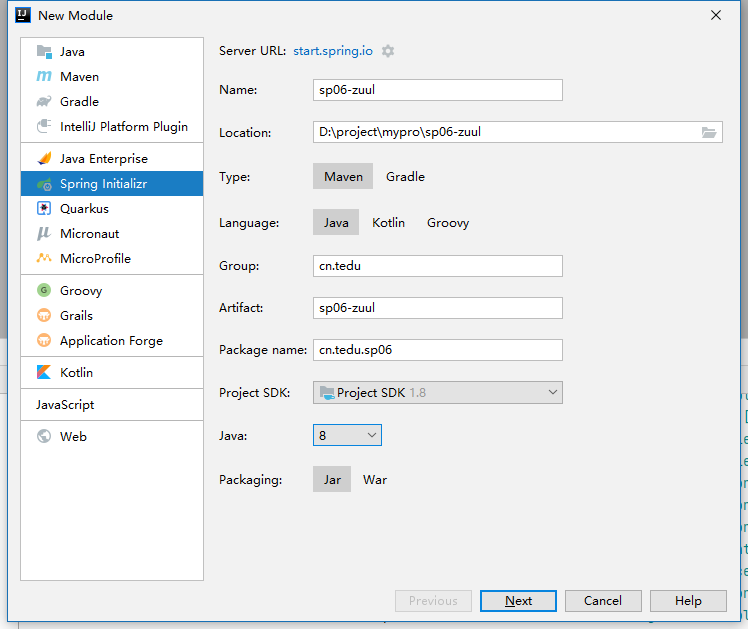
2.1.1 新建sp06-zuul
2.1.2 添加依赖
<?xml version="1.0" encoding="UTF-8"?>
<project xmlns="http://maven.apache.org/POM/4.0.0" xmlns:xsi="http://www.w3.org/2001/XMLSchema-instance"
         xsi:schemaLocation="http://maven.apache.org/POM/4.0.0 https://maven.apache.org/xsd/maven-4.0.0.xsd">
    <parent>
        <artifactId>springcloud1</artifactId>
        <groupId>cn.tedu</groupId>
        <version>0.0.1-SNAPSHOT</version>
    </parent>
    <modelVersion>4.0.0</modelVersion>

    <artifactId>sp06-zuul</artifactId>
    <version>0.0.1-SNAPSHOT</version>
    <name>sp06-zuul</name>
    <description>Demo project for Spring Boot</description>
    <properties>
        <java.version>1.8</java.version>
    </properties>
    <dependencies>
        <dependency>
            <groupId>org.springframework.cloud</groupId>
            <artifactId>spring-cloud-starter-netflix-eureka-client</artifactId>
        </dependency>
        <dependency>
            <groupId>org.springframework.cloud</groupId>
            <artifactId>spring-cloud-starter-netflix-zuul</artifactId>
        </dependency>
        <dependency>
            <groupId>cn.tedu</groupId>
            <artifactId>sp01-commons</artifactId>
            <version>1.0-SNAPSHOT</version>
        </dependency>
    </dependencies>
</project>
2.1.3 修改yml配置文件
修改路由转发规则
spring:
  application:
    name: zuul
# 2001, 3001, 4001, 5001, 6001
server:
  port: 3001
eureka:
  client:
    service-url:
      defaultZone: http://172.18.6.173:2001/eureka, http://172.18.6.173:2002/eureka

# 路由转发规则
# 以下默认配置,网关会根据从eureka处获得的注册表来生成以下内容
# 所以如果没有其他的特殊规则时,下面这些可以不配
# 仍建议手动配置,以防止注册表不全
zuul:
  routes:
    item-service: /item-service/** # **指包含深层子路径,*则只包含当前一层路径
    user-service: /user-service/**
    order-service: /order-service/**
2.1.4 启动类添加注解 @EnableZuulProxy
package cn.tedu.sp06;

import org.springframework.boot.SpringApplication;
import org.springframework.boot.autoconfigure.SpringBootApplication;
import org.springframework.cloud.netflix.zuul.EnableZuulProxy;

@EnableZuulProxy
@SpringBootApplication
public class Sp06ZuulApplication {

    public static void main(String[] args) {
        SpringApplication.run(Sp06ZuulApplication.class, args);
    }
}
2.1.5 启动测试
启动主启动类后,把之前的item-service、user-service、order-service的服务的请求测试全部复制一遍,把端口全部换成网关的端口3001,并添加对应的路由地址后重新发起请求测试返回结果是否与之前一致
- 根据订单号获得对应商品列表
GET http://localhost:3001/item-service/1
- 减少指定商品列表中所有商品的库存
POST http://localhost:3001/item-service/decreaseNumber
Content-Type: application/json

[
  {
    "id": 0,
    "name": "商品0",
    "count": 0
  },
  {
    "id": 1,
    "name": "商品1",
    "count": 1
  },
  {
    "id": 2,
    "name": "商品2",
    "count": 2
  },
  {
    "id": 3,
    "name": "商品3",
    "count": 3
  },
  {
    "id": 4,
    "name": "商品4",
    "count": 4
  },
  {
    "id": 5,
    "name": "商品5",
    "count": 5
  },
  {
    "id": 6,
    "name": "商品6",
    "count": 6
  },
  {
    "id": 7,
    "name": "商品7",
    "count": 7
  },
  {
    "id": 8,
    "name": "商品8",
    "count": 8
  },
  {
    "id": 9,
    "name": "商品9",
    "count": 9
  }
]
- 根据用户id查询用户
GET http://localhost:3001/user-service/8
得到如下结果
{
  "code": 200,
  "msg": null,
  "data": {
    "id": 8,
    "username": "def",
    "password": "456"
  }
}
- 给指定用户增加积分
POST http://localhost:3001/user-service/7/score?score=10
后台打印:用户:7 增加了 10 积分
- 根据id查询订单
GET http://localhost:3001/order-service/1
返回如下结果
{
  "code": 200,
  "msg": null,
  "data": {
    "id": "1",
    "user": {
      "id": 1,
      "username": "新用户1",
      "password": "新用户的密码:1"
    },
    "items": [
      {
       "id": 0,
        "name": "商品0",
        "count": 0
      },
      {
        "id": 1,
        "name": "商品1",
        "count": 1
      },
      {
        "id": 2,
        "name": "商品2",
        "count": 2
      },
      {
        "id": 3,
        "name": "商品3",
        "count": 3
      },
      {
        "id": 4,
        "name": "商品4",
        "count": 4
      },
      {
        "id": 5,
        "name": "商品5",
        "count": 5
      },
      {
        "id": 6,
        "name": "商品6",
        "count": 6
      },
      {
        "id": 7,
        "name": "商品7",
        "count": 7
      },
      {
        "id": 8,
        "name": "商品8",
        "count": 8
      },
      {
        "id": 9,
        "name": "商品9",
        "count": 9
      }
    ]
  }
}
- 添加订单
POST http://localhost:3001/order-service/
控制台会打印
保存订单:Order(id=123, user=User(id=1, username=新订单用户, password=123321), items=[Item(id=1, name=手机, count=1), Item(id=2, name=电脑, count=2), Item(id=3, name=显示器, count=3), Item(id=4, name=投影仪, count=4), Item(id=5, name=音箱, count=5)])
2.2 统一的权限检查
2.2.1 过滤器
参考这篇文件:Zuul-过滤器详解:https://blog.csdn.net/u010277958/article/details/94217623
2.2.2 添加过滤器
Zuul的自动配置类会自动注册过滤器,我们通过使用zuul的过滤器来实现统一的权限认证
package cn.tedu.sp06.filter;

import cn.tedu.web.util.JsonResult;
import com.netflix.zuul.ZuulFilter;
import com.netflix.zuul.context.RequestContext;
import com.netflix.zuul.exception.ZuulException;
import lombok.extern.slf4j.Slf4j;
import org.apache.commons.lang.StringUtils;
import org.springframework.cloud.netflix.zuul.filters.support.FilterConstants;
import org.springframework.stereotype.Component;

import javax.servlet.http.HttpServletRequest;

@Component
@Slf4j
public class AccessFilter extends ZuulFilter {

    @Override
    public String filterType() {
        return FilterConstants.PRE_TYPE;

    }

    @Override
    public int filterOrder() {
        // 第5个过滤器会向RequestContext添加serviceId数据
        // 下面的过滤代码中需要根据这个serviceId来区分访问的服务
        return 6;
    }

    /**
     * 针对当前请求是否执行过滤代码
     *
     * @return true则执行下面的run();
     * false不执行本类定义的过滤方法,直接向后传递
     */
    @Override
    public boolean shouldFilter() {
        RequestContext currentContext = RequestContext.getCurrentContext();
//        System.out.println(JSONObject.toJSON(currentContext));
        final String serviceId = (String) currentContext.get("serviceId");

        return "item-service".equalsIgnoreCase(serviceId);
    }

    /**
     * 过滤代码
     *
     * @return
     * @throws ZuulException
     */
    @Override
    public Object run() throws ZuulException {
        RequestContext ctx = RequestContext.getCurrentContext();
        final HttpServletRequest request = ctx.getRequest();
        String token = request.getParameter("token");
        if (StringUtils.isBlank(token)) {
            // 阻止继续向后调用
            ctx.setSendZuulResponse(false);
            String json = JsonResult.build().code(JsonResult.NOT_LOGIN).msg("未能在请求中发现token,请先登陆").toString();
            ctx.addZuulResponseHeader("Content-Type", "application/json;charset=UTF-8");
            ctx.setResponseBody(json);
        }
        // 当前zuul版本中这个返回值不起任何作用
        return null;
    }
}
2.2.3 请求测试
通过网关调用order-service的服务时,如果请求头中不包含token参数
# 根据id查询订单
GET http://localhost:3001/order-service/1
返回结果如下
{
  "code": 400,
  "msg": "未能在请求中发现token,请先登陆"
}
添加上token请求头后
GET http://localhost:3001/order-service/1
token: 1
这样就可以看到正确的结果了
{
  "code": 200,
  "msg": null,
  "data": {
    "id": "1",
    "user": {
      "id": 1,
      "username": "新用户1",
      "password": "新用户的密码:1"
    },
    "items": [
      {
        "id": 0,
        "name": "商品0",
        "count": 0
      },
      {
        "id": 1,
        "name": "商品1",
        "count": 1
      },
      {
        "id": 2,
        "name": "商品2",
        "count": 2
      },
      {
        "id": 3,
        "name": "商品3",
        "count": 3
      },
      {
        "id": 4,
        "name": "商品4",
        "count": 4
      },
      {
        "id": 5,
        "name": "商品5",
        "count": 5
      },
      {
        "id": 6,
        "name": "商品6",
        "count": 6
      },
      {
        "id": 7,
        "name": "商品7",
        "count": 7
      },
      {
        "id": 8,
        "name": "商品8",
        "count": 8
      },
      {
        "id": 9,
        "name": "商品9",
        "count": 9
      }
    ]
  }
}
3 Zuul集成Ribbon
3.1 默认启用了负载均衡
3.2 默认不启用重试
以防止末属的高压服务器压力翻倍,所以一般不会在网关添加重试功能
如果要添加的话
- 添加retry依赖
<dependency>
	<groupId>org.springframework.retry</groupId>
	<artifactId>spring-retry</artifactId>
</dependency>
- 修改
application.yml文件
zuul:
  retryable: true
4 Hystrix
4.1 容错: 降级
即出错后,自动调用降级类里面的方法来处理请求
4.1.1 创建降级类
package cn.tedu.sp06.filter;

import com.netflix.zuul.ZuulFilter;
import com.netflix.zuul.context.RequestContext;
import com.netflix.zuul.exception.ZuulException;
import org.apache.commons.lang.StringUtils;
import org.springframework.cloud.netflix.zuul.filters.support.FilterConstants;
import org.springframework.stereotype.Component;
import org.springframework.web.context.request.RequestContextHolder;
import web.util.JsonResult;

import javax.servlet.http.HttpServletRequest;

@Component
public class AccessFilter extends ZuulFilter {

    @Override
    public String filterType() {
        return FilterConstants.PRE_TYPE;
    }

    @Override
    public int filterOrder() {
        return 6;
    }

    @Override
    public boolean shouldFilter() {
        RequestContext currentContext = RequestContext.getCurrentContext();
        String serviceId = (String) currentContext.get("serviceId");
        if("order-service".equals(serviceId)){
            return true;
        }
        return false;
    }

    @Override
    public Object run() throws ZuulException {
        RequestContext currentContext = RequestContext.getCurrentContext();
        HttpServletRequest request = currentContext.getRequest();
        String token = request.getHeader("token");
        if (StringUtils.isEmpty(token)) {
            currentContext.setSendZuulResponse(false);
            String jsonString = JsonResult.build().code(JsonResult.NOT_LOGIN).msg("未能在请求中发现token,请先登陆").toString();
            currentContext.addZuulResponseHeader("Content-Type","application/json;charset=utf-8");
            currentContext.setResponseBody(jsonString);
        }
        return null;
    }
}
重启zuul,然后访问item-service的请求,当请求出现了如超时等的错误时,就会返回如下结果
{
  "code": 401,
  "msg": "降级提示:后台服务调用失败"
}
4.2 限流: 熔断
当流量过大,出现故障,可以熔断,断开链路,减轻后台服务的压力
- 熔断触发的条件
- 10秒20次请求(必须先满足此条件),如果条件不满足,则后面的直接都不会判断
- 50%请求出错
- 断路器打开后一段时间,会进入“半开状态”
- 半开状态下会尝试发送一次客户端调用
- 调用成功,关闭断路器,恢复正常
- 调用失败,断续保持断路状态
5 使用Actuator暴露Hystrix监控日志
Hystrix利用Actuator来暴露自己的监控日志
Actuator是Springboot提供的一个项目指标工具
- 健康状态
- Spring容器中所有的对象
- SpringMvc 映射的所有路径
5.1 使用步骤
5.1.1 添加actuator依赖
<dependency>
	<groupId>org.springframework.boot</groupId>
	<artifactId>spring-boot-starter-actuator</artifactId>
</dependency>
5.1.2 暴露监控日志
配置项
m.e.w.e.i="*" 暴露所有监控日志
m.e.w.e.i=health,beans,mappings 只暴露这几项
m.e.w.e.i=hystrix.stream
修改application.yml文件
management:
  endpoints:
    web:
      exposure:
        include: hystrix.stream
5.1.3 访问测试
打开http://localhost:3001/actuator
可以得到如下结果
{
  "_links": {
    "self": {
      "href": "http://localhost:3001/actuator",
      "templated": false
    },
    "hystrix.stream": {
      "href": "http://localhost:3001/actuator/hystrix.stream",
      "templated": false
    }
  }
}
5.1.4 hystrix.stream信息
打开http://localhost:3001/actuator/hystrix.stream
可以看到一个未断流的不断输出内容的网页
ping:

ping:

ping:

ping:

ping:
当我们通过网关访问了任意一个API后
ping:

data: {"type":"HystrixCommand","name":"order-service","group":"RibbonCommand","currentTime":1642839454401,"isCircuitBreakerOpen":false,"errorPercentage":0,"errorCount":0,"requestCount":0,"rollingCountBadRequests":0,"rollingCountCollapsedRequests":0,"rollingCountEmit":0,"rollingCountExceptionsThrown":0,"rollingCountFailure":0,"rollingCountFallbackEmit":0,"rollingCountFallbackFailure":0,"rollingCountFallbackMissing":0,"rollingCountFallbackRejection":0,"rollingCountFallbackSuccess":0,"rollingCountResponsesFromCache":0,"rollingCountSemaphoreRejected":0,"rollingCountShortCircuited":0,"rollingCountSuccess":0,"rollingCountThreadPoolRejected":0,"rollingCountTimeout":0,"currentConcurrentExecutionCount":0,"rollingMaxConcurrentExecutionCount":0,"latencyExecute_mean":0,"latencyExecute":{"0":0,"25":0,"50":0,"75":0,"90":0,"95":0,"99":0,"99.5":0,"100":0},"latencyTotal_mean":0,"latencyTotal":{"0":0,"25":0,"50":0,"75":0,"90":0,"95":0,"99":0,"99.5":0,"100":0},"propertyValue_circuitBreakerRequestVolumeThreshold":20,"propertyValue_circuitBreakerSleepWindowInMilliseconds":5000,"propertyValue_circuitBreakerErrorThresholdPercentage":50,"propertyValue_circuitBreakerForceOpen":false,"propertyValue_circuitBreakerForceClosed":false,"propertyValue_circuitBreakerEnabled":true,"propertyValue_executionIsolationStrategy":"SEMAPHORE","propertyValue_executionIsolationThreadTimeoutInMilliseconds":4000,"propertyValue_executionTimeoutInMilliseconds":4000,"propertyValue_executionIsolationThreadInterruptOnTimeout":true,"propertyValue_executionIsolationThreadPoolKeyOverride":null,"propertyValue_executionIsolationSemaphoreMaxConcurrentRequests":100,"propertyValue_fallbackIsolationSemaphoreMaxConcurrentRequests":10,"propertyValue_metricsRollingStatisticalWindowInMilliseconds":10000,"propertyValue_requestCacheEnabled":true,"propertyValue_requestLogEnabled":true,"reportingHosts":1,"threadPool":"RibbonCommand"}

ping:

data: {"type":"HystrixCommand","name":"order-service","group":"RibbonCommand","currentTime":1642839454899,"isCircuitBreakerOpen":false,"errorPercentage":0,"errorCount":0,"requestCount":0,"rollingCountBadRequests":0,"rollingCountCollapsedRequests":0,"rollingCountEmit":0,"rollingCountExceptionsThrown":0,"rollingCountFailure":0,"rollingCountFallbackEmit":0,"rollingCountFallbackFailure":0,"rollingCountFallbackMissing":0,"rollingCountFallbackRejection":0,"rollingCountFallbackSuccess":0,"rollingCountResponsesFromCache":0,"rollingCountSemaphoreRejected":0,"rollingCountShortCircuited":0,"rollingCountSuccess":0,"rollingCountThreadPoolRejected":0,"rollingCountTimeout":0,"currentConcurrentExecutionCount":0,"rollingMaxConcurrentExecutionCount":0,"latencyExecute_mean":0,"latencyExecute":{"0":0,"25":0,"50":0,"75":0,"90":0,"95":0,"99":0,"99.5":0,"100":0},"latencyTotal_mean":0,"latencyTotal":{"0":0,"25":0,"50":0,"75":0,"90":0,"95":0,"99":0,"99.5":0,"100":0},"propertyValue_circuitBreakerRequestVolumeThreshold":20,"propertyValue_circuitBreakerSleepWindowInMilliseconds":5000,"propertyValue_circuitBreakerErrorThresholdPercentage":50,"propertyValue_circuitBreakerForceOpen":false,"propertyValue_circuitBreakerForceClosed":false,"propertyValue_circuitBreakerEnabled":true,"propertyValue_executionIsolationStrategy":"SEMAPHORE","propertyValue_executionIsolationThreadTimeoutInMilliseconds":4000,"propertyValue_executionTimeoutInMilliseconds":4000,"propertyValue_executionIsolationThreadInterruptOnTimeout":true,"propertyValue_executionIsolationThreadPoolKeyOverride":null,"propertyValue_executionIsolationSemaphoreMaxConcurrentRequests":100,"propertyValue_fallbackIsolationSemaphoreMaxConcurrentRequests":10,"propertyValue_metricsRollingStatisticalWindowInMilliseconds":10000,"propertyValue_requestCacheEnabled":true,"propertyValue_requestLogEnabled":true,"reportingHosts":1,"threadPool":"RibbonCommand"}

data: {"type":"HystrixCommand","name":"order-service","group":"RibbonCommand","currentTime":1642839455397,"isCircuitBreakerOpen":false,"errorPercentage":0,"errorCount":0,"requestCount":0,"rollingCountBadRequests":0,"rollingCountCollapsedRequests":0,"rollingCountEmit":0,"rollingCountExceptionsThrown":0,"rollingCountFailure":0,"rollingCountFallbackEmit":0,"rollingCountFallbackFailure":0,"rollingCountFallbackMissing":0,"rollingCountFallbackRejection":0,"rollingCountFallbackSuccess":0,"rollingCountResponsesFromCache":0,"rollingCountSemaphoreRejected":0,"rollingCountShortCircuited":0,"rollingCountSuccess":0,"rollingCountThreadPoolRejected":0,"rollingCountTimeout":0,"currentConcurrentExecutionCount":0,"rollingMaxConcurrentExecutionCount":0,"latencyExecute_mean":0,"latencyExecute":{"0":0,"25":0,"50":0,"75":0,"90":0,"95":0,"99":0,"99.5":0,"100":0},"latencyTotal_mean":0,"latencyTotal":{"0":0,"25":0,"50":0,"75":0,"90":0,"95":0,"99":0,"99.5":0,"100":0},"propertyValue_circuitBreakerRequestVolumeThreshold":20,"propertyValue_circuitBreakerSleepWindowInMilliseconds":5000,"propertyValue_circuitBreakerErrorThresholdPercentage":50,"propertyValue_circuitBreakerForceOpen":false,"propertyValue_circuitBreakerForceClosed":false,"propertyValue_circuitBreakerEnabled":true,"propertyValue_executionIsolationStrategy":"SEMAPHORE","propertyValue_executionIsolationThreadTimeoutInMilliseconds":4000,"propertyValue_executionTimeoutInMilliseconds":4000,"propertyValue_executionIsolationThreadInterruptOnTimeout":true,"propertyValue_executionIsolationThreadPoolKeyOverride":null,"propertyValue_executionIsolationSemaphoreMaxConcurrentRequests":100,"propertyValue_fallbackIsolationSemaphoreMaxConcurrentRequests":10,"propertyValue_metricsRollingStatisticalWindowInMilliseconds":10000,"propertyValue_requestCacheEnabled":true,"propertyValue_requestLogEnabled":true,"reportingHosts":1,"threadPool":"RibbonCommand"}

ping:
至此即通过actuator把hystrix的日志给暴露出来了,我们需要使用下面的工具来图形化的展示这些日志
6 Hystrix数据监控-HystrixDashBoard
6.1 使用步骤
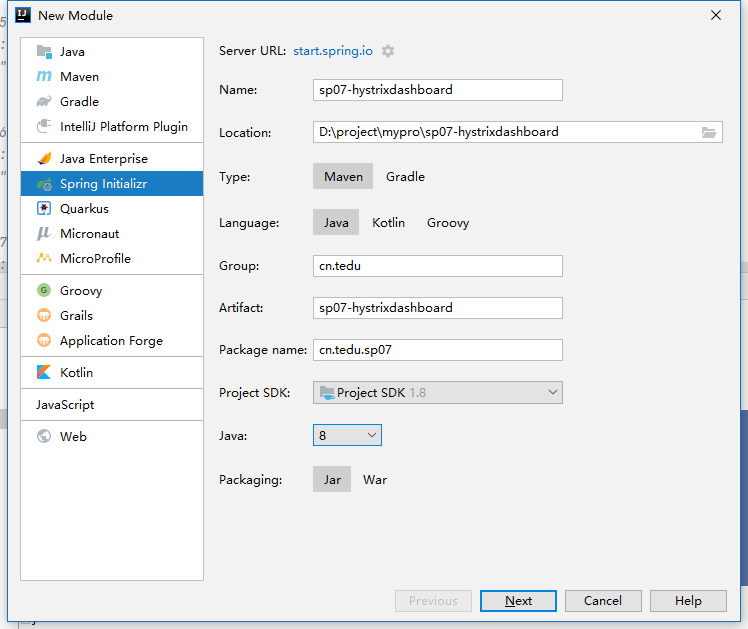
6.1.1 新建spring模块:sp07-hystrix-dashboard
6.1.2 添加依赖:hystrix dashboard
<?xml version="1.0" encoding="UTF-8"?>
<project xmlns="http://maven.apache.org/POM/4.0.0" xmlns:xsi="http://www.w3.org/2001/XMLSchema-instance"
         xsi:schemaLocation="http://maven.apache.org/POM/4.0.0 https://maven.apache.org/xsd/maven-4.0.0.xsd">
    <parent>
        <artifactId>springcloud1</artifactId>
        <groupId>cn.tedu</groupId>
        <version>0.0.1-SNAPSHOT</version>
    </parent>
    <modelVersion>4.0.0</modelVersion>
    <artifactId>sp07-hystrixdashboard</artifactId>
    <version>0.0.1-SNAPSHOT</version>
    <name>sp07-hystrixdashboard</name>
    <description>Demo project for Spring Boot</description>
    <properties>
        <java.version>1.8</java.version>
    </properties>
    <dependencies>
        <dependency>
            <groupId>org.springframework.boot</groupId>
            <artifactId>spring-boot-starter</artifactId>
        </dependency>
        <dependency>
            <groupId>org.springframework.cloud</groupId>
            <artifactId>spring-cloud-starter-netflix-hystrix-dashboard</artifactId>
        </dependency>
    </dependencies>
</project>
6.1.3 application.yml配置
server:
  port: 4001
hystrix:
  dashboard:
    proxy-stream-allow-list: localhost
6.1.4 启动类添加注解:
package cn.tedu.sp07;

import org.springframework.boot.SpringApplication;
import org.springframework.boot.autoconfigure.SpringBootApplication;
import org.springframework.cloud.netflix.hystrix.dashboard.EnableHystrixDashboard;

@EnableHystrixDashboard
@SpringBootApplication
public class Sp07HystrixDashboardApplication {

    public static void main(String[] args) {
        SpringApplication.run(Sp07HystrixDashboardApplication.class, args);
    }

}
6.1.5 访问测试
访问http://localhost:4001/hystrix看到如下界面就说明已经启动起来了
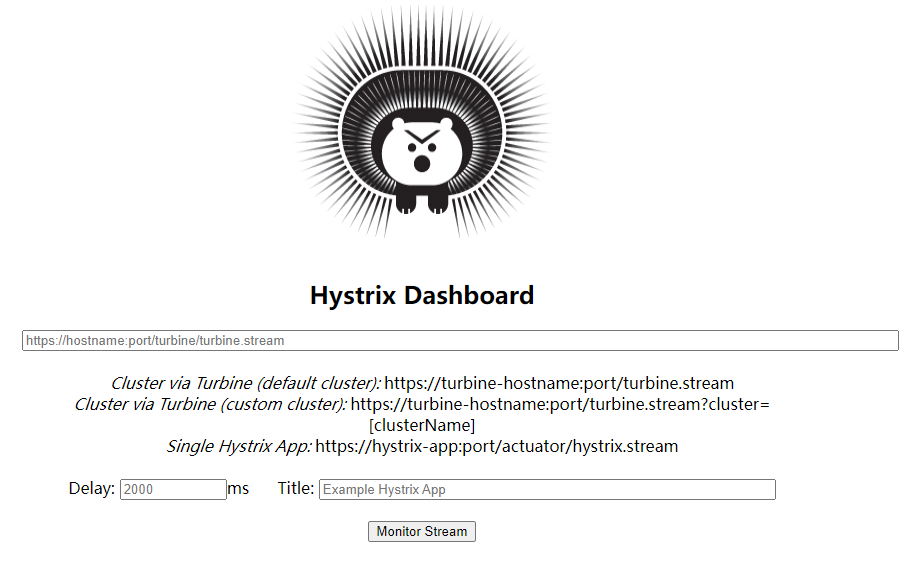
- 在最长的那个框中输入
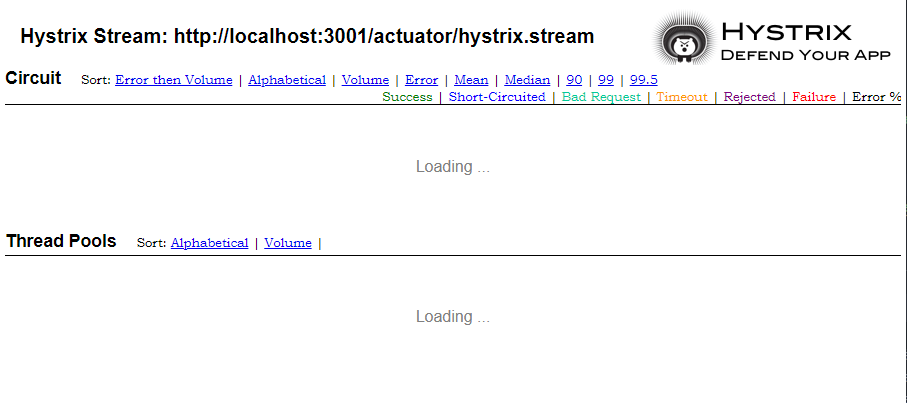
http://localhost:3001/actuator/hystrix.stream点击Monitor Stream,可以看到这样的界面,显示Loading…
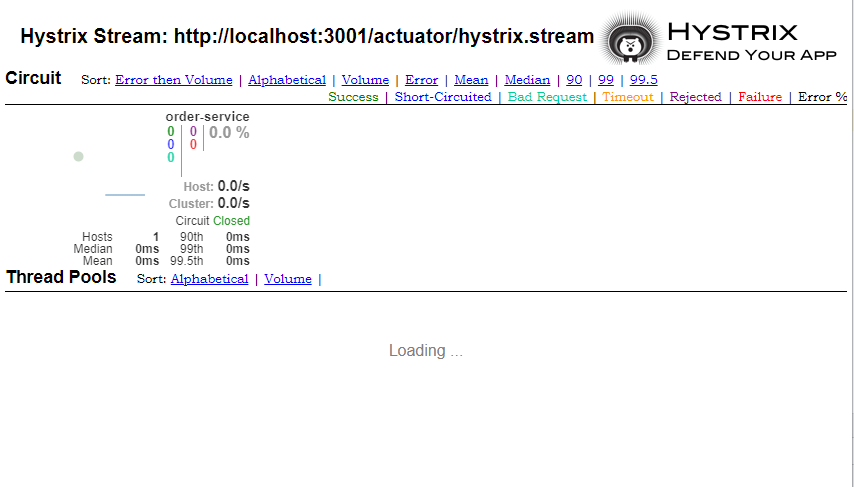
我们访问一下任意一下实际的服务后就可以看到服务的状态了
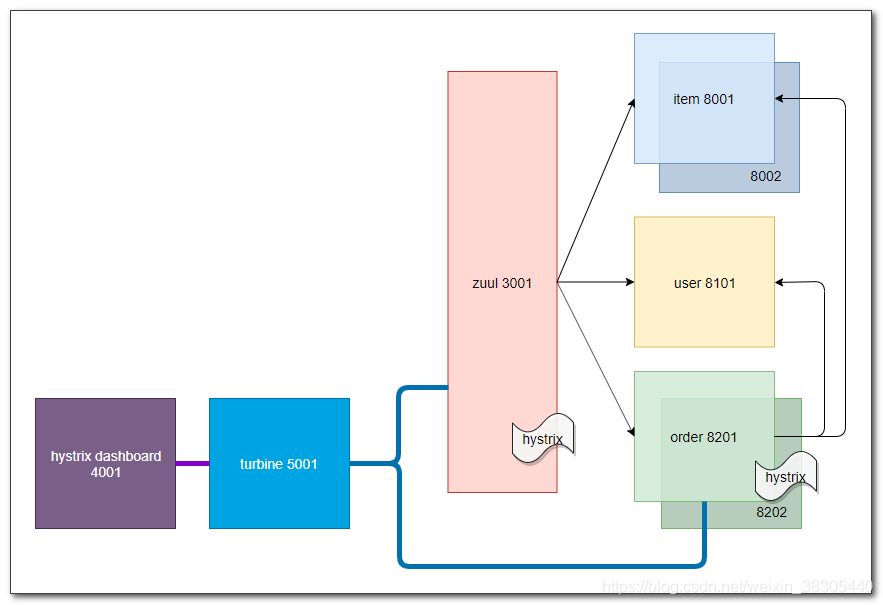
7 hystrix + turbine 集群聚合监控
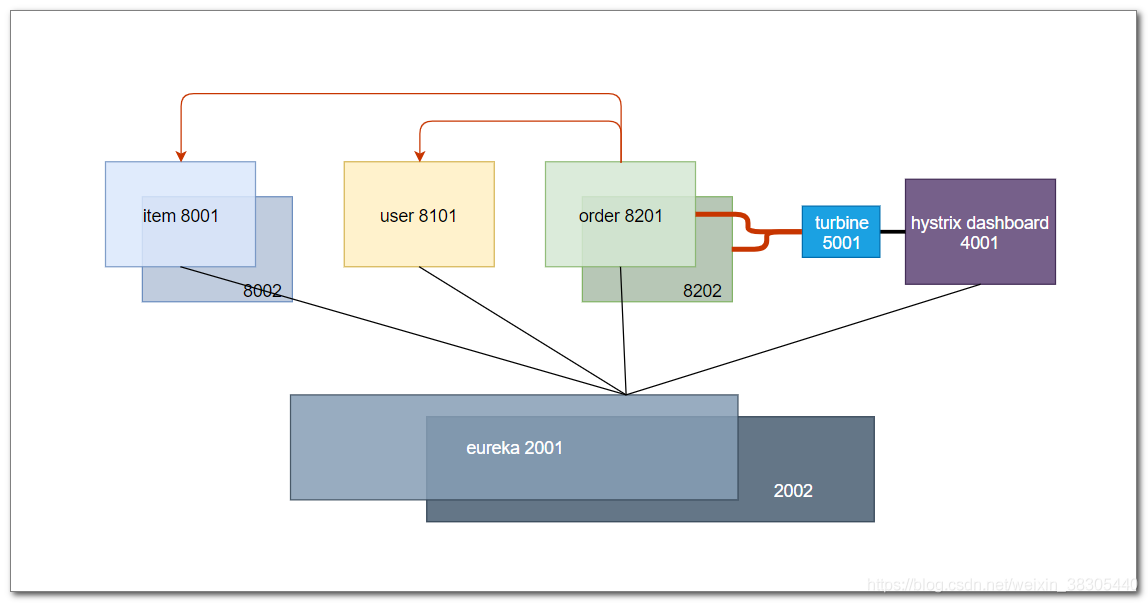
hystrix dashboard 一次只能监控一个服务实例,使用 turbine 可以汇集监控信息,将聚合后的信息提供给 hystrix dashboard 来集中展示和监控
7.1 创建sp08-turbine
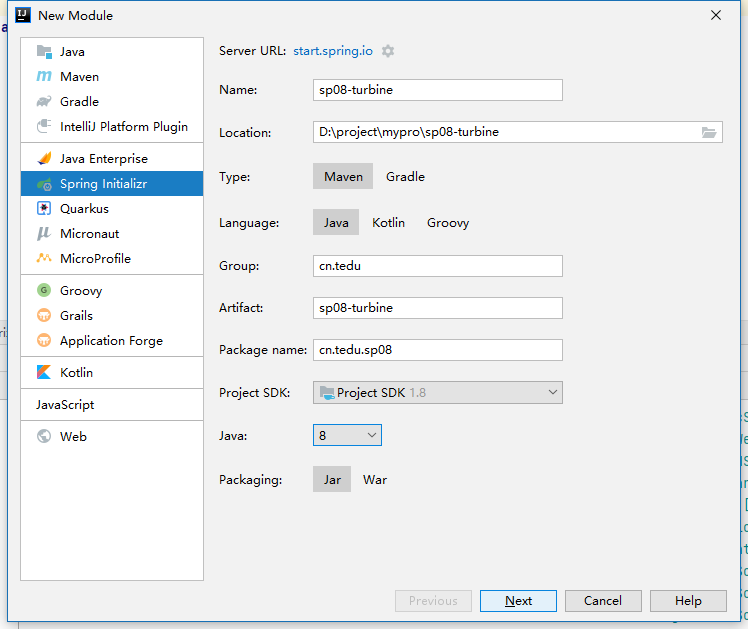
7.2 添加依赖
<?xml version="1.0" encoding="UTF-8"?>
<project xmlns="http://maven.apache.org/POM/4.0.0" xmlns:xsi="http://www.w3.org/2001/XMLSchema-instance"
         xsi:schemaLocation="http://maven.apache.org/POM/4.0.0 https://maven.apache.org/xsd/maven-4.0.0.xsd">
    <parent>
        <artifactId>springcloud1</artifactId>
        <groupId>cn.tedu</groupId>
        <version>0.0.1-SNAPSHOT</version>
    </parent>
    <modelVersion>4.0.0</modelVersion>

    <groupId>cn.tedu</groupId>
    <artifactId>sp08-turbine</artifactId>
    <version>0.0.1-SNAPSHOT</version>
    <name>sp08-turbine</name>
    <description>Demo project for Spring Boot</description>
    <properties>
        <java.version>1.8</java.version>
    </properties>
    <dependencies>
        <dependency>
            <groupId>org.springframework.cloud</groupId>
            <artifactId>spring-cloud-starter-netflix-eureka-client</artifactId>
        </dependency>
        <dependency>
            <groupId>org.springframework.cloud</groupId>
            <artifactId>spring-cloud-netflix-turbine</artifactId>
        </dependency>
    </dependencies>
</project>
7.3 配置application.yml
server:
  port: 5001
spring:
  application:
    name: turbine
eureka:
  client:
    service-url:
      defaultZone: http://172.18.6.173:2001/eureka,http://172.18.6.173:2002/eureka
turbine:
  app-config: zuul
  cluster-name-expression: new String("default")
7.4 添加注解
添加@EnableTurbine和@EnableDiscoveryClient两个注解
package cn.tedu.sp08;

import org.springframework.boot.SpringApplication;
import org.springframework.boot.autoconfigure.SpringBootApplication;
import org.springframework.cloud.client.discovery.EnableDiscoveryClient;
import org.springframework.cloud.netflix.turbine.EnableTurbine;

@EnableTurbine
@EnableDiscoveryClient
@SpringBootApplication
public class Sp08TurbineApplication {
    public static void main(String[] args) {
        SpringApplication.run(Sp08TurbineApplication.class, args);
    }
}
7.5 创建两套zuul的启动配置
7.5.1 设置启动参数

7.5.2 再复制出来一套
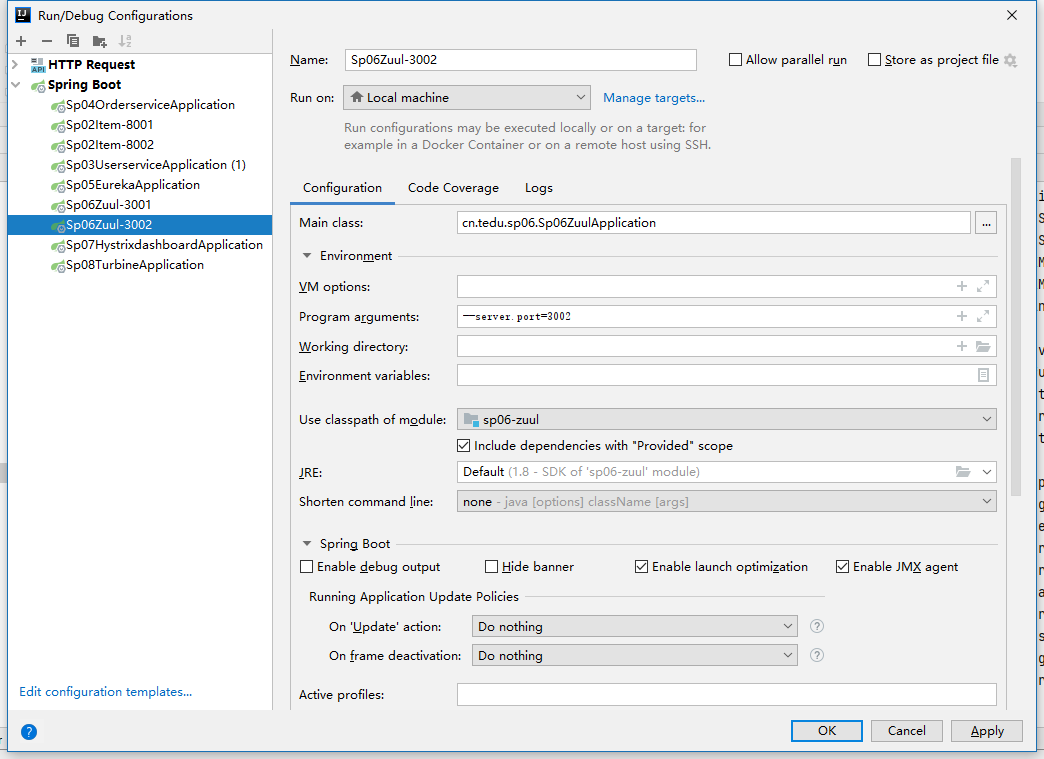
7.5.3 把这两个zuul都启动起来
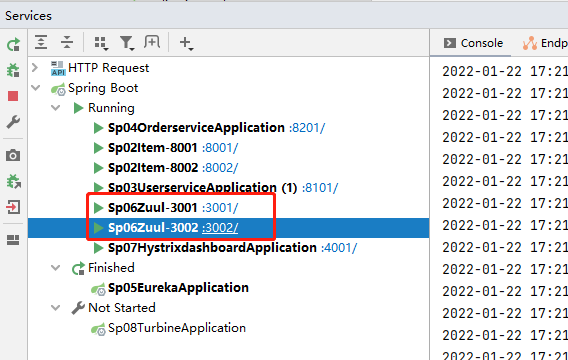
7.5.4 分别通过这两个网关做一下请求
从3001网关发请求
# 添加订单
POST http://localhost:3001/order-service/
token: 1
从3002网关发请求
# 添加订单
POST http://localhost:3002/order-service/
token: 1
此时下面这两个路径上就都有日志流了
http://localhost:3001/actuator/hystrix.stream
http://localhost:3002/actuator/hystrix.stream
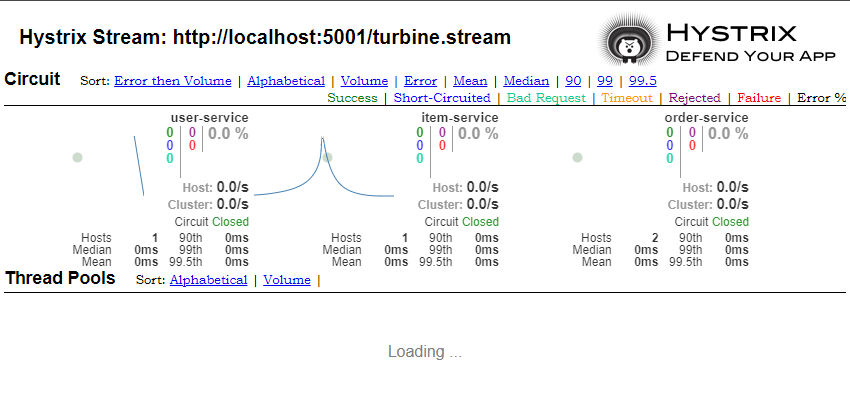
7.6 启动sp07-turbine
访问http://localhost:5001/turbine.stream
就可以看到聚合到一起的日志流了
7.7 把聚合的日志流添加到hystrix dashboard
打开http://localhost:4001/hystrix
输入:http://localhost:5001/turbine.stream
7.5.4 中的请求虽然也是通过了两个网关来发的,但都是order-service,可以再访问一下item-service和user-service
# 根据用户id查询用户
GET http://localhost:3001/user-service/8

# 根据订单号获得对应商品列表
GET http://localhost:3002/item-service/1
就可以看到三个服务的日志都进来了


 899
899


 被折叠的 条评论
为什么被折叠?
被折叠的 条评论
为什么被折叠?
 到【灌水乐园】发言


