


编译安装可以安装需要的模块,是深入使用nginx的必备
以下操作在debian11下,ubuntu、centos等也适用,默认root用户
以1.25.3版本为例,2023.9.26最新主线版本
nginx1.25和1.24主要增加了http3,所以一些配置需要改变
一、编译安装全过程
1.下载解压
nginx官网下载地址
进入安装目录
cd /usr/local
下载nginx-1.25.3
wget http://nginx.org/download/nginx-1.25.3.tar.gz
解压并进入目录
tar -zxvf nginx-1.25.3.tar.gz && cd /usr/local/nginx-1.25.3
2.安装依赖
以下依赖是根据编译需求安装的
deb系列
apt-get install build-essential libpcre3 libpcre3-dev libgeoip-dev zlib1g zlib1g.dev libxslt-dev libgd-dev libatomic-ops-dev libperl-dev libssl-dev
redhat系列
dnf install pcre-devel libxml2-devel libxslt-devel gd-devel perl-ExtUtils-Embed
3.编译安装
cd /usr/local/nginx-1.25.2
编译参数查看
./configure --help
编译
deb系列
./configure
--prefix=/usr/local/nginx
--with-select_module
--with-poll_module
--with-threads
--with-file-aio
--with-http_ssl_module
--with-http_v2_module
--with-http_v3_module
--with-http_realip_module
--with-http_addition_module
--with-http_xslt_module
--with-http_image_filter_module
--with-http_geoip_module
--with-http_sub_module
--with-http_dav_module
--with-http_flv_module
--with-http_mp4_module
--with-http_gunzip_module
--with-http_gzip_static_module
--with-http_auth_request_module
--with-http_random_index_module
--with-http_secure_link_module
--with-http_degradation_module
--with-http_slice_module
--with-http_stub_status_module
--with-http_perl_module
--with-http_sub_module
--with-pcre --with-pcre-jit
--with-debug
--with-stream
--with-stream_ssl_module
--with-mail
--with-mail_ssl_module
--with-libatomic
redhat系列
redhat系列有很多包缺失,也懒得一个个找安装了,比上面的deb系少了2个组件
./configure --prefix=/usr/local/nginx --with-select_module --with-poll_module --with-threads --with-file-aio --with-http_ssl_module --with-http_v2_module --with-http_v3_module --with-http_realip_module --with-http_addition_module --with-http_xslt_module --with-http_image_filter_module --with-http_sub_module --with-http_dav_module --with-http_flv_module --with-http_mp4_module --with-http_gunzip_module --with-http_gzip_static_module --with-http_auth_request_module --with-http_random_index_module --with-http_secure_link_module --with-http_degradation_module --with-http_slice_module --with-http_stub_status_module --with-http_perl_module --with-http_sub_module --with-pcre --with-pcre-jit --with-debug --with-stream --with-stream_ssl_module --with-mail --with-mail_ssl_module
上面的配置展开如下,直接复制上面的,下面的是方便查看,根据自己的需要来
./configure
--prefix=/usr/local/nginx
--with-select_module
--with-poll_module
--with-threads
--with-file-aio
--with-http_ssl_module
--with-http_v2_module
--with-http_v3_module
--with-http_realip_module
--with-http_addition_module
--with-http_xslt_module
--with-http_image_filter_module
--with-http_geoip_module
--with-http_sub_module
--with-http_dav_module
--with-http_flv_module
--with-http_mp4_module
--with-http_gunzip_module
--with-http_gzip_static_module
--with-http_auth_request_module
--with-http_random_index_module
--with-http_secure_link_module
--with-http_degradation_module
--with-http_slice_module
--with-http_stub_status_module
--with-http_perl_module
--with-http_sub_module
--with-pcre --with-pcre-jit
--with-debug
--with-stream
--with-stream_ssl_module
--with-mail
--with-mail_ssl_module
--with-libatomic
安装
make && make install
4.复制配置文件
习惯上/etc为配置文件存放目录,复制到这里方便统一管理
mkdir /etc/nginx
cp -r /usr/local/nginx/conf/* /etc/nginx
5.使用systemctl管理
编辑systemctl脚本
vi /usr/lib/systemd/system/nginx.service
内容如下
[Unit]
Description=nginx
After=network.target

[Service]
Type=forking
ExecStartPre=/usr/local/nginx/sbin/nginx -t -c /etc/nginx/nginx.conf
ExecStart=/usr/local/nginx/sbin/nginx -c /etc/nginx/nginx.conf
ExecReload=/usr/local/nginx/sbin/nginx -s reload
ExecStop=/usr/local/nginx/sbin/nginx -s stop
PrivateTmp=true

[Install]
WantedBy=multi-user.target
刷新systemctl脚本
systemctl daemon-reload
启动,开机启动
systemctl start nginx && systemctl enable nginx
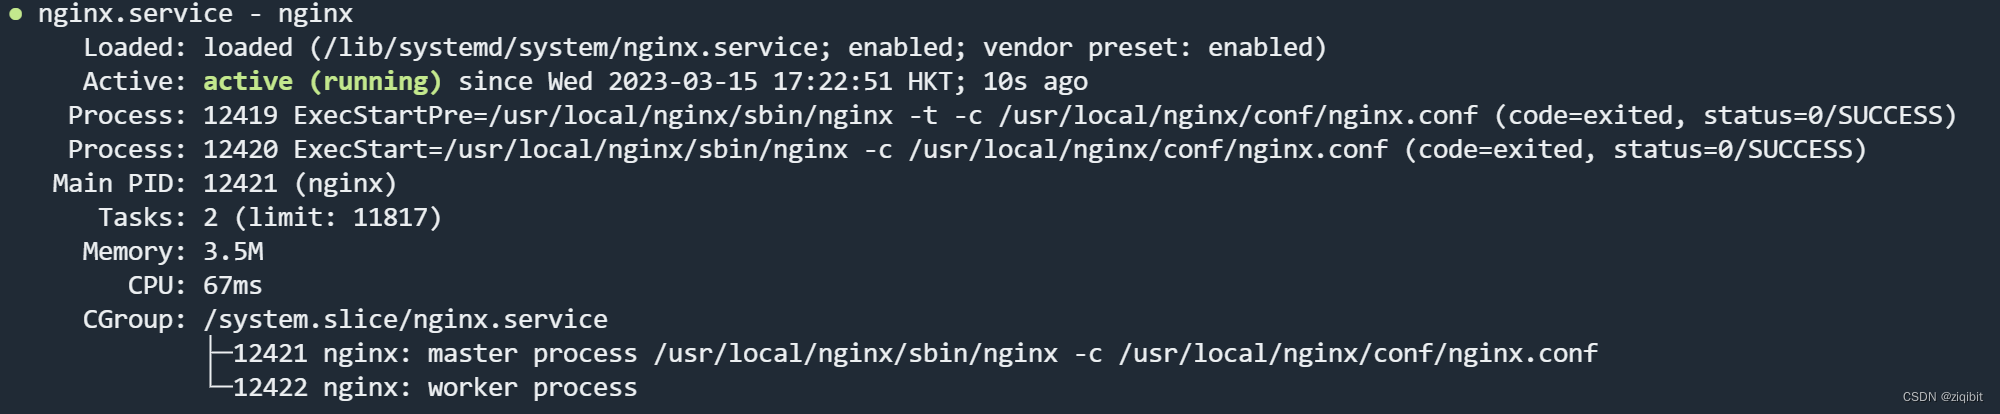
查看状态
systemctl status nginx
出现类似下面的说明编译安装成功
 web验证
web验证
浏览器访问ip,如果出现以下的信息说明成功(此时根目录为/usr/local/nginx/html)

5.其它
nginx的功能很多,其它具体应用看下面的我的其它博客的链接
nginx配置php-fpm:链接
nginx反向代理
二、bash脚本(仅供参考)
完全使用上面的进行攥写,方便自动化,使用bash脚本编写。
本人水平有限,也没有过多优化判断处理,不是每台设备都能跑通,新手推荐还是根据上面步骤一步步来。
仅适合deb系列,其它系列需要调整,仅作参考
1.创建bash脚本
vi /usr/local/nginx.sh
2.内容如下
#!/bin/bash

# 常量设置
nginx_version="1.25.3" # nginx版本
install_path="/usr/local" # 安装、操作目录

# 安装依赖
echo "......正在安装依赖......"
apt-get install -y build-essential libpcre3 libpcre3-dev libgeoip-dev zlib1g zlib1g.dev libxslt-dev libgd-dev libatomic-ops-dev libperl-dev libssl-dev
echo "......依赖安装完成......"

# 下载nginx源码包
echo "......正在下载源码包......"
wget -P ${install_path} http://nginx.org/download/nginx-${nginx_version}.tar.gz
echo "......源码包下载完成......"

# 解压缩
echo "......正在解压缩源码包......"
cd ${install_path}
tar -zvxf ${install_path}/nginx-${nginx_version}.tar.gz ${install_path}
echo "......源码包解压缩完成......"

# 编译安装
echo "......正在编译安装......"
${install_path}/nginx-${nginx_version}/configure --prefix=/usr/local/nginx --with-select_module --with-poll_module --with-threads --with-file-aio --with-http_ssl_module --with-http_v2_module --with-http_v3_module --with-http_realip_module --with-http_addition_module --with-http_xslt_module --with-http_image_filter_module --with-http_geoip_module --with-http_sub_module --with-http_dav_module --with-http_flv_module --with-http_mp4_module --with-http_gunzip_module --with-http_gzip_static_module --with-http_auth_request_module --with-http_random_index_module --with-http_secure_link_module --with-http_degradation_module --with-http_slice_module --with-http_stub_status_module --with-http_perl_module --with-http_sub_module --with-pcre --with-pcre-jit --with-debug --with-stream --with-stream_ssl_module --with-mail --with-mail_ssl_module --with-libatomic
cd ${install_path}/nginx-${nginx_version} && make && make install
echo "......编译安装完成......"

# 复制配置文件
echo "......正在复制配置文件......"
mkdir /etc/nginx
cp -r ${install_path}/nginx/conf/* /etc/nginx
echo "......配置文件复制完成......"

# 配置systemctl脚本
echo "......正在配置systemctl脚本......"
cat>/usr/lib/systemd/system/nginx.service<<EOF
[Unit]
Description=nginx
After=network.target

[Service]
Type=forking
ExecStartPre=/usr/local/nginx/sbin/nginx -t -c /etc/nginx/nginx.conf
ExecStart=/usr/local/nginx/sbin/nginx -c /etc/nginx/nginx.conf
ExecReload=/usr/local/nginx/sbin/nginx -s reload
ExecStop=/usr/local/nginx/sbin/nginx -s stop
PrivateTmp=true

[Install]
WantedBy=multi-user.target
EOF

systemctl daemon-reload
systemctl start nginx
systemctl enable nginx
systemctl status nginx

echo "......systemctl脚本配置完成......"
echo "......!!!脚本运行完成!!!......"
会显示是否运行正常
3.运行
sh /usr/local/nginx.sh
4.其它版本
如果需要自动安装其它版本,在bash脚本的常量中修改即可


 352
352


 被折叠的 条评论
为什么被折叠?
被折叠的 条评论
为什么被折叠?
 到【灌水乐园】发言


