


用GO语言构建一个简单的RESTful API
作者:Nic Raboy 2016.7.11 GO语言
原文:https://www.thepolyglotdeveloper.com/2016/07/create-a-simple-restful-api-with-golang/
翻译:一花一世界
时间:2016-09-09
排版:马克飞象(https://maxiang.io)
`
翻译前言
本人根据原文翻译过来,翻译过程中感觉一些常用词语难以用简单的词语表达,深知翻译不易。
如有不当之处,请指教,我会及时更新过来。
另外我也把生词附在文后,以后主要翻译有关GO语言的技术文章,主要以短小的为主。
`
正文
现在大多数应用程序在前后台已经分开了。 后台是一典型的RESTful API,也是全栈开发的关键部分。这些API会通常被分成多个路由集合, 它通常也指后台。 构建一个像这样API的应用,通常比把所有的杂揉到单一的应用中,则更为简洁和可维护。
我用各种编程语言实现了RESTful API, 例如Node.js、java, 但是近来我研究了很多GO语言编程。 由于它是一个快速、可靠、简洁编程语言,
因为这个特点,让GO语言看上去适合开发RESTful API, 这个特点也指代GOLang.
我们接下来看下用GO语言构建一个基本的CRUD操作究竟用到了什么。
为了简明, 我们不准备用真实的数据库, 我们会硬编码来作为模拟数据。这让我们重点关注核心的地方,像定义后台、基本的操作。
假设GO语言已经安装和配置在你的机器上了。 从(MAX and Linux)终端,或是windows命令提示行中执行如下:
Create New GoLang Project
创建一个Golang项目:
mkdir -p $GOPATH/src/github.com/nraboy/restapi
如果你命令行中不支持以上的任何一种, 只能自己找到方法手工创建目录
在刚才创建的工程中, 将创建一个包含主函数的文件;在本例中, 我们将用
$GOPATH/src/github.com/nraboy/restapi/myproject.go
在这个Go文件中, 我们将增加如下代码。 用许多代码,不用担心, 接下来我们会把它拆开。
$GOPATH/src/github.com/nraboy/restapi/myproject.go
package main

imprt (
    "encoding/json"
    "log"
    "net/http"

    "github.com/gorilla/mux"
)

type Person struct {
    ID        string   `json:"id,omitempty"`
    Firstname string   `json:"firstname,omitempty"`
    Lastname  string   `json:"lastname,omitempty"`
    Address   *Address `json:"address,omitempty"`
}

type Address struct {
    City  string `json:"city,omitempty"`
    State string `json:"state,omitempty"`
}

var people []Person

func GetPersonEndpoint(w http.ResponseWriter, req *http.Request) {
    params := mux.Vars(req)
    for _, item := range people {
        if item.ID == params["id"] {
            json.NewEncoder(w).Encode(item)
            return
        }
    }
    json.NewEncoder(w).Encode(&Person{})
}

func GetPeopleEndpoint(w http.ResponseWriter, req *http.Request) {
    json.NewEncoder(w).Encode(people)
}

func CreatePersonEndpoint(w http.ResponseWriter, req *http.Request) {
    params := mux.Vars(req)
    var person Person
    _ = json.NewDecoder(req.Body).Decode(&person)
    person.ID = params["id"]
    people = append(people, person)
    json.NewEncoder(w).Encode(people)
}

func DeletePersonEndpoint(w http.ResponseWriter, req *http.Request) {
    params := mux.Vars(req)
    for index, item := range people {
        if item.ID == params["id"] {
            people = append(people[:index], people[index+1:]...)
            break
        }
    }
    json.NewEncoder(w).Encode(people)
}

func main() {
    router := mux.NewRouter()
    people = append(people, Person{ID: "1", Firstname: "Nic", Lastname: "Raboy", Address: &Address{City: "Dublin", State: "CA"}})
    people = append(people, Person{ID: "2", Firstname: "Maria", Lastname: "Raboy"})
    router.HandleFunc("/people", GetPeopleEndpoint).Methods("GET")
    router.HandleFunc("/people/{id}", GetPersonEndpoint).Methods("GET")
    router.HandleFunc("/people/{id}", CreatePersonEndpoint).Methods("POST")
    router.HandleFunc("/people/{id}", DeletePersonEndpoint).Methods("DELETE")
    log.Fatal(http.ListenAndServe(":12345", router))
}
上面的代码究竟是什么鬼?
首先注意到我们导入了各种依赖包。 我们用JSON的数据格式工作, 因此要求有JSON编码包。 我们用HTTP来请求, 但net/http包是不一定要求。 mux包是个好帮手,更容易创建后台, 而且有更多的特性可用。 因为这是一个扩展包, 像下面这样下载:
go get github.com/gorilla/mux
关于mux更多的信息可以参考官方文档。
随着依赖包导入, 就可以创建结构对象,装载我们的数据,我们计划存储的数据是“人”的数据:
$GOPATH/src/github.com/nraboy/restapi/myproject.go
Go
type Person struct {
    ID        string   `json:"id,omitempty"`
    Firstname string   `json:"firstname,omitempty"`
    Lastname  string   `json:"lastname,omitempty"`
    Address   *Address `json:"address,omitempty"`
}
我们注意到, 在结构体中的属性, 同时我们也定义了一个标签,这标签说明数据怎样以JSON的形式存储。在每个标签里,有一个omitempty参数。 这意味着如果这个属性为空, 将会从JSON中排除,而不是显示一个空的字符串或值。
在Person结构体中, 有一个adress的指针。 这说明有一个嵌套的JSON对象, 它必需是一个指针,否则 omitempty会失败。 那么Adress长成什么样呢?
$GOPATH/src/github.com/nraboy/restapi/myproject.go
type Address struct {
    City  string `json:"city,omitempty"`
    State string `json:"state,omitempty"`
}
这里又是一个嵌套结构,但不同于前面说的。
因为不用数据库, 我们在工程中创建了一个全局变量。在应用中,这个变量是一个Person的切片,包含了所有用到的数据。
最简单的后台应用可能是GetPeopleEndpoint, 因为它会把完整的person值返回给前台。 我们将从 插入、删除和获取指定的记录开始。
$GOPATH/src/github.com/nraboy/restapi/myproject.go
Go
func GetPersonEndpoint(w http.ResponseWriter, req *http.Request) {
    params := mux.Vars(req)
    for _, item := range people {
        if item.ID == params["id"] {
            json.NewEncoder(w).Encode(item)
            return
        }
    }
    json.NewEncoder(w).Encode(&Person{})
}
在上面的GetPersonEndpoint中,得到一个整条记录。mux库可以从传入请求的数据中取得任何参数, 然后循环全局切片,匹配请求中指定的ID。 如果匹配到, 则解码JSON后显示出来,否则返回一个空的JSON对象。
现实中,后台会和数据库交互, 也可能包含一些应用逻辑。 这或许就是你反而要用一些查询的原因。
CreatePersonEndpoint 有点不同,因为从申请中接收一个JSON数据格式来工作。
$GOPATH/src/github.com/nraboy/restapi/myproject.go
func CreatePersonEndpoint(w http.ResponseWriter, req *http.Request) {
    params := mux.Vars(req)
    var person Person
    _ = json.NewDecoder(req.Body).Decode(&person)
    person.ID = params["id"]
    people = append(people, person)
    json.NewEncoder(w).Encode(people)
}
在上面中, 根据传入的JSON,解码后存在Person的对象中。 我们会依据mux找的Id分配一个新的对象,然后添加到全局的切片中。 最后, 返回全局数组包,它包含刚才新创建的内容。
在上述例子的场景中, 删除数据的方法也有点不一样。
$GOPATH/src/github.com/nraboy/restapi/myproject.go
func DeletePersonEndpoint(w http.ResponseWriter, req *http.Request) {
    params := mux.Vars(req)
    for index, item := range people {
        if item.ID == params["id"] {
            people = append(people[:index], people[index+1:]...)
            break
        }
    }
    json.NewEncoder(w).Encode(people)
}
在这种情况下,DeletePersonEndpoint 遍历所有的数据和之前看到的GetPersonEndpoint 有点相似。不同的是我们需要删除它,而不是打印它。当找到的Id被删除后, 我们会重新创建切片,不包含刚才的删除的数据。
Finally we end up in our runnable main function that brings the application together.
最后, 我们把所有应用放在一个可执行的主函数中
$GOPATH/src/github.com/nraboy/restapi/myproject.go
func main() {
    router := mux.NewRouter()
    people = append(people, Person{ID: "1", Firstname: "Nic", Lastname: "Raboy", Address: &Address{City: "Dublin", State: "CA"}})
    people = append(people, Person{ID: "2", Firstname: "Maria", Lastname: "Raboy"})
    router.HandleFunc("/people", GetPeopleEndpoint).Methods("GET")
    router.HandleFunc("/people/{id}", GetPersonEndpoint).Methods("GET")
    router.HandleFunc("/people/{id}", CreatePersonEndpoint).Methods("POST")
    router.HandleFunc("/people/{id}", DeletePersonEndpoint).Methods("DELETE")
    log.Fatal(http.ListenAndServe(":12345", router))
}
上面代码中, 首先创建一个新路由和增加两个对象到切片中。 接下来创建后台,它可以调用后台的函数。 注意我们用了GET, POST和适当的DELETE
我们也定义了传入的参数。
最后定义了服务端口12345, 这就接近尾声了。 想要运行并试下效果,需要一个工具,如Postman 或是cURL来测试所有的后台。
结论
以上你看到了怎样用go语言构建一个简单的RESTful API 。 然后用了模拟数据代替数据库, 还看到怎样用GO语言切片和JSOn创建各种后台应用。 在这个例子中,像web、手机、全互联loT通过创建API,你的应用程序易维护简、可扩展,只需要不同的前台而不需要再创建新后台了。
以下是自己的测试:
测试
1. 用firefox下的一个插件poster
2. poster工具

3. GET 所有
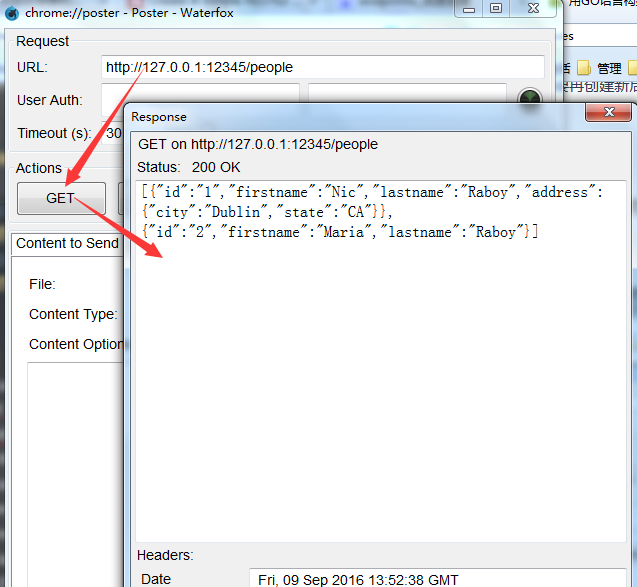
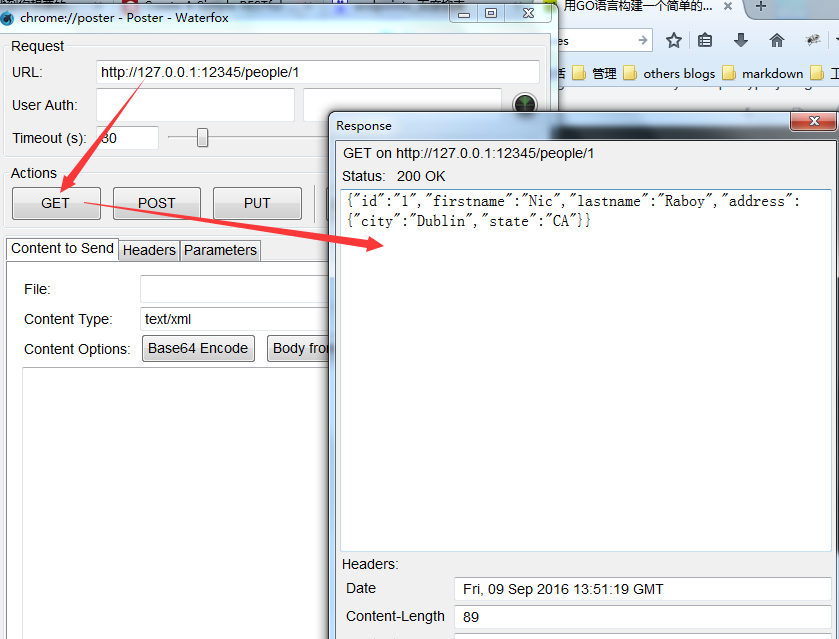
4. GET 其中一个Id
5. ADD

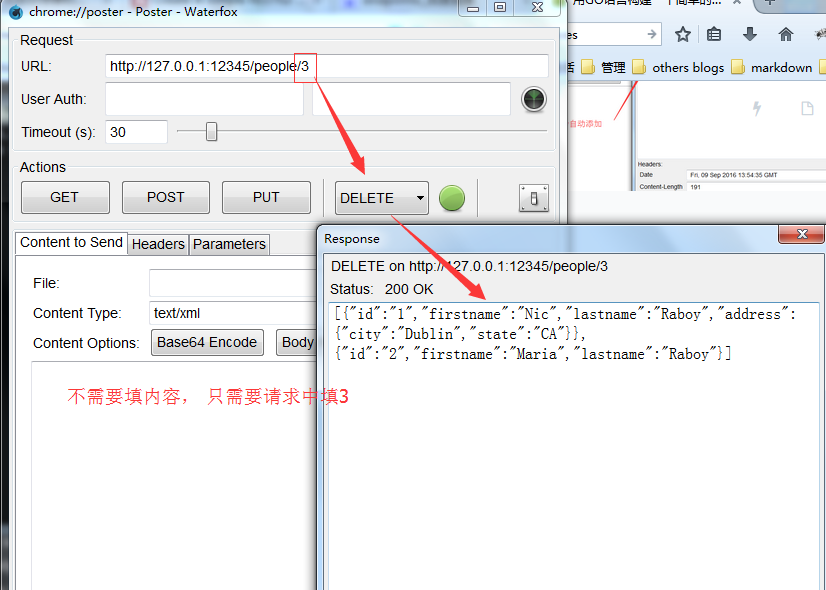
6. 删除
生词
- be critical of
- backend
- frontend
- Where things start to change
- be critical part of
- make sense of
- be referred to as
- what it takes to
- house 动词
- nested
- some form of
- In the scenario of
- similarly
- end up in
- give it a shot
- brings our project to a close


 237
237

 被折叠的 条评论
为什么被折叠?
被折叠的 条评论
为什么被折叠?
 到【灌水乐园】发言


