


观测云日志最佳案例-Nginx日志采集分析
k8s集群环境下采集nginx指标和日志
集群环境下部署nginx服务
要在Kubernetes集群中部署Nginx,可以用kubectl命令行工具来运行一个简单的YAML配置文件
步骤1、创建一个Nginx部署的YAML文件
创建一个名为nginx-deployment.yaml的文件,内容如下:
apiVersion: apps/v1
kind: Deployment
metadata:
  name: nginx-deployment
  labels:
    app: nginx
spec:
  replicas: 2   #确保运行两个nginx副本
  selector:
    matchLabels:
      app: nginx
  template:
    metadata:
      labels:
        app: nginx
    spec:
      containers:
      - name: nginx
        image: nginx:latest
        ports:
        - containerPort: 80
        volumeMounts:
        - name: config-volume
          mountPath: /etc/nginx/conf.d
          readOnly: false
      volumes:
      - name: config-volume
        configMap:
          name: nginx-config
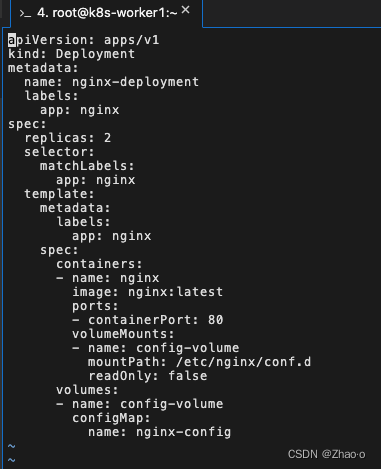
volumeMounts数据卷挂载部分后文会解释
步骤2、使用kubectl创建部署
kubectl apply -f nginx-deployment.yaml
步骤3、 检查部署状态
kubectl get deployments

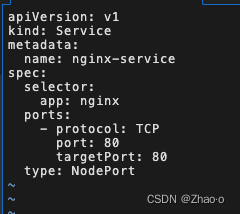
步骤4、创建一个Service以暴露Nginx部署
如果希望从集群外部访问Nginx服务,可以创建一个Service
apiVersion: v1
kind: Service
metadata:
  name: nginx-service
spec:
  selector:
    app: nginx
  ports:
    - protocol: TCP
      port: 80
      targetPort: 80
  type: NodePort
同样的apply这个yaml
kubectl apply -f nginx-service.yaml
kubectl get service nginx-service

至此查看所有pod应该nginx的pod已经正常运行

此时进入nginx容器中
kubectl exec -it nginx-deployment-7c5cffd45d-wd8r4 -n default /bin/bash
在容器中进入/etc/nginx目录,查看nginx.conf

这里没有关于location的转发,但在末尾有一行 include /etc/nginx/conf.d/*.conf;
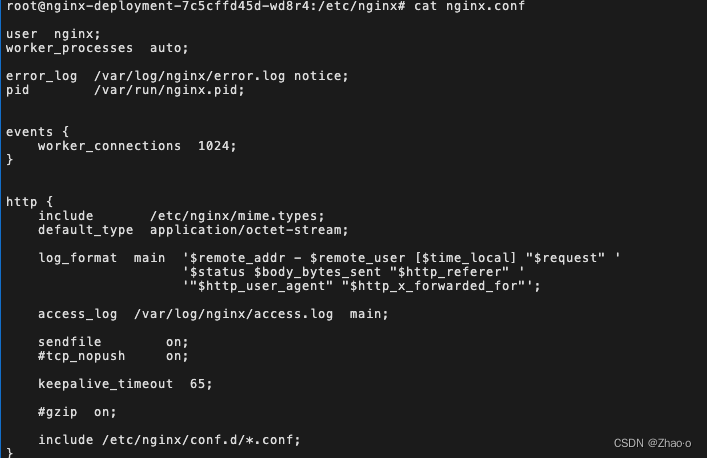
这行 include 指令的作用是包含 /etc/nginx/conf.d/ 目录下所有以 .conf 结尾的文件。这是 Nginx 配置的一种组织方式,通常用于将服务器的配置分散到不同的文件中,使其更加模块化和易于管理
在主机情况下,要添加 location 指令来进行请求转发,编辑 /etc/nginx/conf.d/ 目录下的文件之一或新增一个 .conf 文件。可以创建一个名为 default.conf 的文件,并在其中设置 server 块和 location 块
但是在集群环境下无法修改容器配置文件,所以需要通过 Kubernetes 的 ConfigMap 资源来定义这些配置,然后将它们挂载到容器中相应的位置
1、创建configmap
首先在宿主机中创建一个包含default.conf内容的configmap,我查UN更加爱你在本地的/etc/nginx目录下
并且编写该配置(观测云通过该路径采集信息)
$  server{
     listen 80;
     server_name localhost;
     //端口可自定义

      location /nginx_status {
          stub_status  on;
          allow 127.0.0.1;
          deny all;  #这里按自己需要配置
                             }

          }
外链图片转存失败,源站可能有防盗链机制,建议将图片保存下来直接上传
使用这个配置文件创建cm
kubectl create configmap nginx-config --from-file=default.conf=./default.conf
2、更新deployment配置
更新您的 Nginx Deployment 配置,以便使用 ConfigMap 作为卷。 nginx-deployment.yaml 文件中,添加对 ConfigMap 的引用:
apiVersion: apps/v1
kind: Deployment
metadata:
  name: nginx-deployment
spec:
  replicas: 1
  selector:
    matchLabels:
      app: nginx
  template:
    metadata:
      labels:
        app: nginx
    spec:
      containers:
      - name: nginx
        image: nginx:latest
        ports:
        - containerPort: 80
        volumeMounts:
        - name: config-volume
          mountPath: /etc/nginx/conf.d
      volumes:
      - name: config-volume
        configMap:
          name: nginx-config
也就是步骤1的挂载部分,这里配置了一个卷config-volume,它从 nginx-config ConfigMap 中挂载数据,并将其挂载到容器的 /etc/nginx/conf.d 目录
3、应用deployment
kubectl apply -f nginx-deployment.yaml
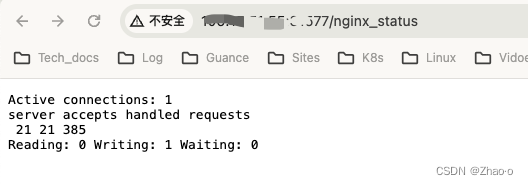
4、验证
一旦 Pod 启动,验证新的配置是否已经生效
kubectl exec -it <pod-name> -- cat /etc/nginx/conf.d/default.conf
正常生效后可以查看svc的端口,访问地址及端口以及相应的页面

Datakit 中开启 Nginx .inputs
在k8s环境中需要通过cm注入的方式
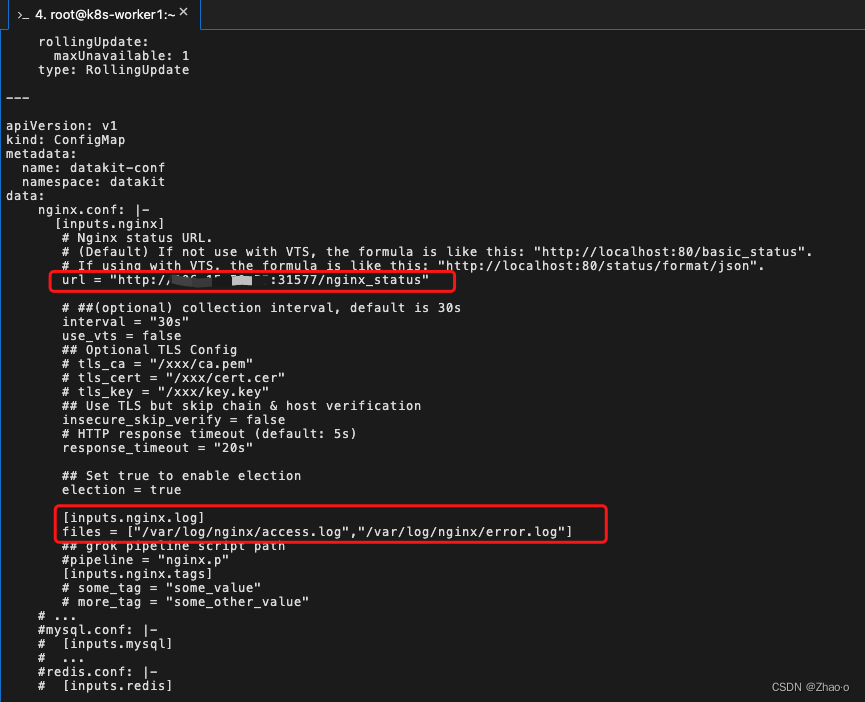
vi datakit.yaml 并添加如下内容
[inputs.nginx]
       # Nginx status URL.
       # (Default) If not use with VTS, the formula is like this: "http://localhost:80/basic_status".
       # If using with VTS, the formula is like this: "http://localhost:80/status/format/json".
       url = "http://xx.xx.xx.xx:31577/nginx_status"

       # ##(optional) collection interval, default is 30s
       interval = "30s"
       use_vts = false
       ## Optional TLS Config
       # tls_ca = "/xxx/ca.pem"
       # tls_cert = "/xxx/cert.cer"
       # tls_key = "/xxx/key.key"
       ## Use TLS but skip chain & host verification
       insecure_skip_verify = false
       # HTTP response timeout (default: 5s)
       response_timeout = "20s"

       ## Set true to enable election
       election = true

       [inputs.nginx.log]
       files = ["/var/log/nginx/access.log","/var/log/nginx/error.log"]
       ## grok pipeline script path
       #pipeline = "nginx.p"
       [inputs.nginx.tags]
       # some_tag = "some_value"
       # more_tag = "some_other_value"
并且在volume mounts中将数据卷挂载到容器内部
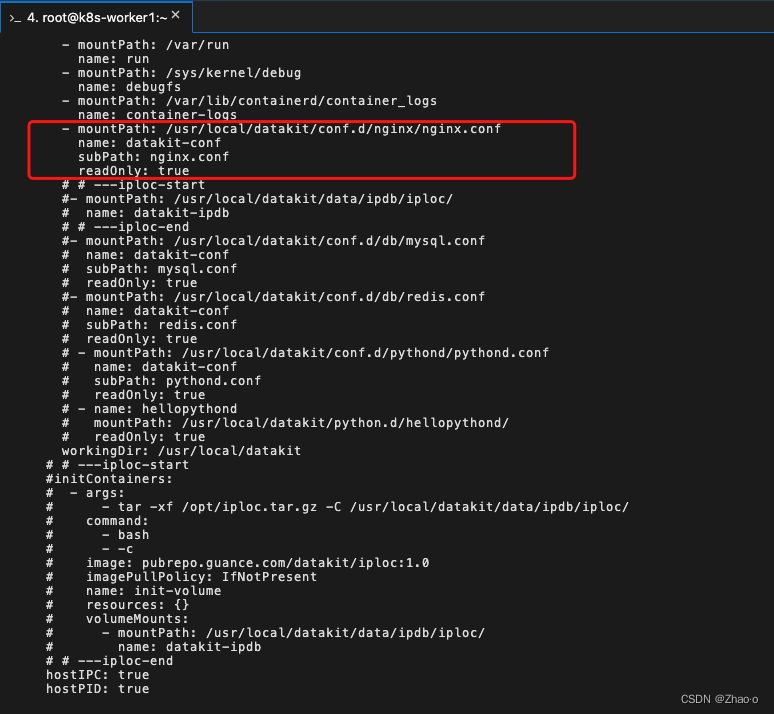
随后重新apply datakit.yaml
此时进入datakit容器,执行datakit monitor
kubectl exec -it datakit-j5hgg -n datakit /bin/bash

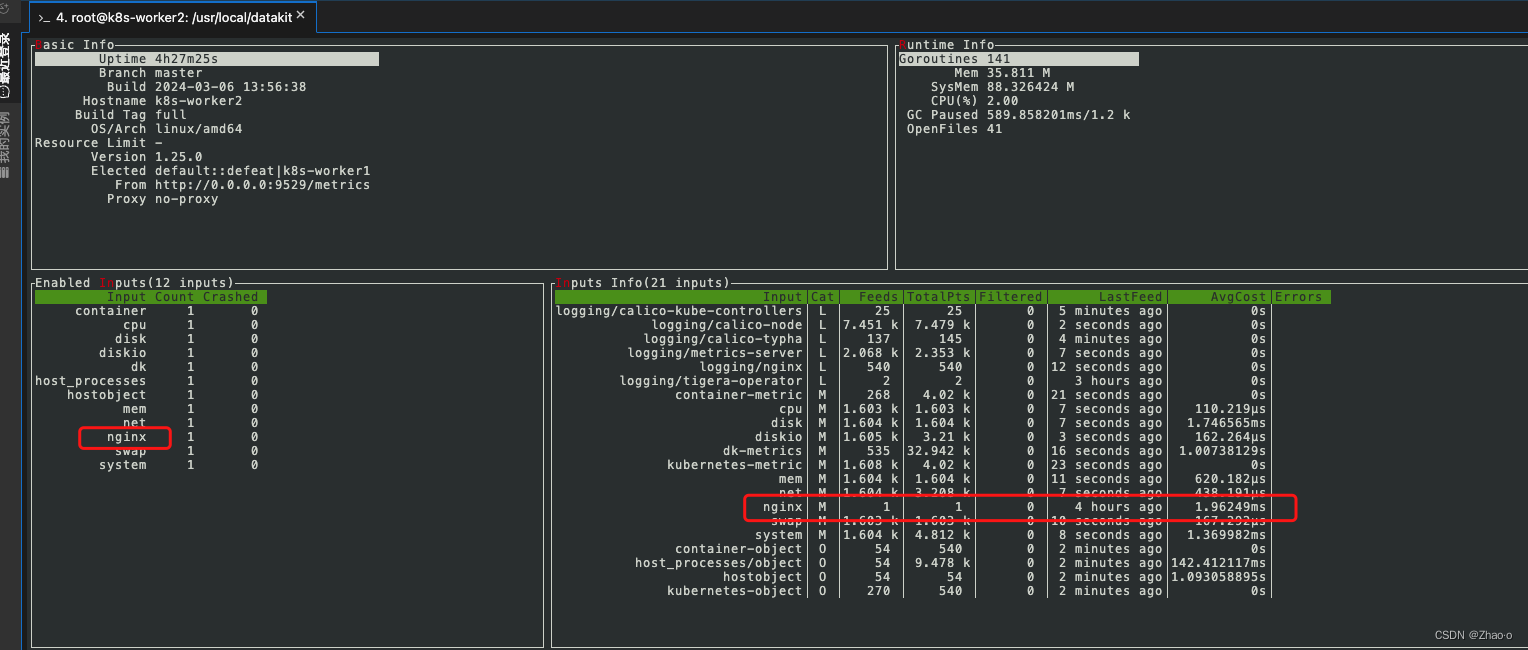
nginx指标已经成功采集
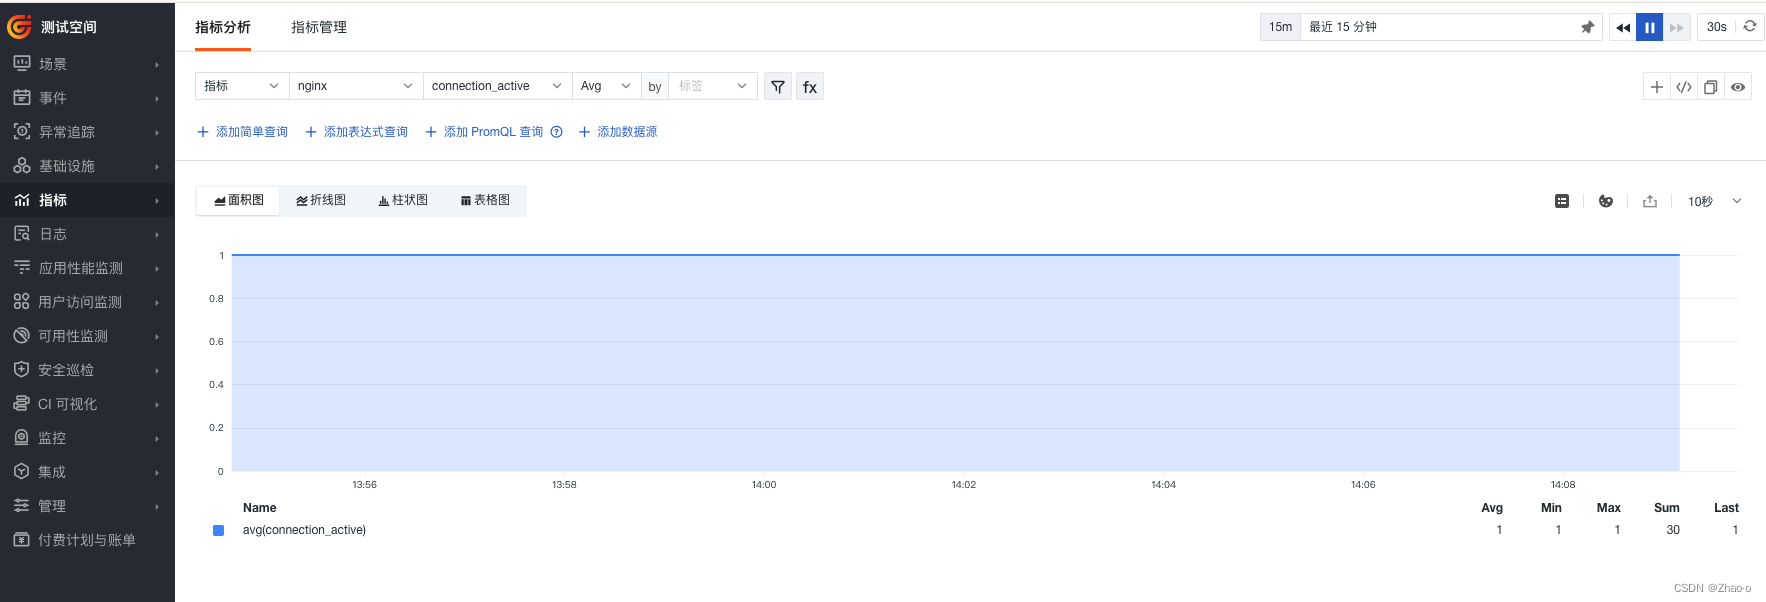
此时到观测云控制台,在指标中可以看到nginx的指标
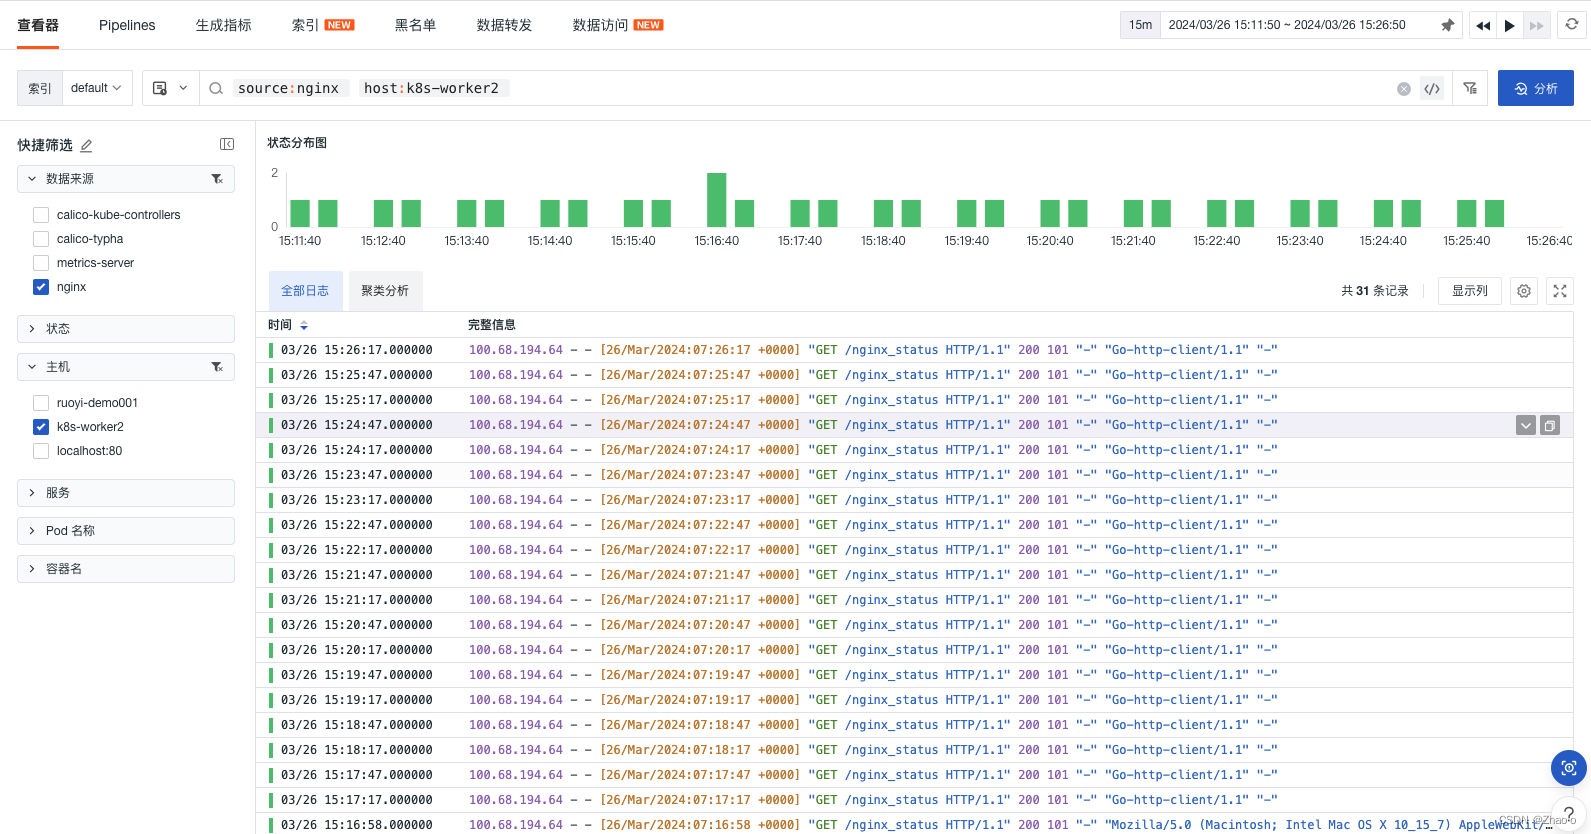
在日志中可以看到nginx的日志采集


 1万+
1万+

 被折叠的 条评论
为什么被折叠?
被折叠的 条评论
为什么被折叠?
 到【灌水乐园】发言


