


✨作者简介:00后,22年刚刚毕业,一枚在鹅厂搬砖的程序员。
✨前置任务:在阅读本篇文章之前希望读者已经阅读了上篇文章OkHttp原理第六篇-CacheInterceptor,本篇文章详细对
ConnectInterceptor进行解析,也希望读者在阅读之前已经对其进行了简单研究。
✨学习目标:学习
ConnectInterceptor如何建立Socket连接。
✨创作初衷:学习
OkHttp的原理,阅读Kotlin框架源码,提高自己对Kotlin代码的阅读能力。为了读代码而读代码,笔者知道这是不对的,但作为应届生,提高阅读源码的能力笔者认为还是很重要的。
OkHttp原理第七篇-ConnectInterceptor
主要作用为管理Socket连接
经历了这么多篇文章,重点还是分析其intercept()方法
object ConnectInterceptor : Interceptor {
    @Throws(IOException::class)
    override fun intercept(chain: Interceptor.Chain): Response {
        val realChain = chain as RealInterceptorChain
        // 初始化Exchange,看下(1.RealCall#initExchange)
        val exchange = realChain.call.initExchange(chain)
        // 将Exchange交给Chain,此时下面的拦截器就可以通过调用Exchange的方法间接操作输入输出流
        val connectedChain = realChain.copy(exchange = exchange)
        return connectedChain.proceed(realChain.request)
    }
}
1.RealCall#initExchange
/** Finds a new or pooled connection to carry a forthcoming request and response. */
internal fun initExchange(chain: RealInterceptorChain): Exchange {
    synchronized(this) {
        check(expectMoreExchanges) { "released" }
        check(!responseBodyOpen)
        check(!requestBodyOpen)
    }
	// exchangeFinder在RetryAndFollowUpInterceptor中创建,看下(ExchangeFinder的创建)小节
    val exchangeFinder = this.exchangeFinder!!
    val codec = exchangeFinder.find(client, chain)  //看下(2.ExchangeFinder#find),返回一个解析器
    val result = Exchange(this, eventListener, exchangeFinder, codec) // 将解析器再次包装为Exchange
    this.interceptorScopedExchange = result
    this.exchange = result
    synchronized(this) {
        this.requestBodyOpen = true
        this.responseBodyOpen = true
    }

    if (canceled) throw IOException("Canceled")
    return result // 返回Exchange
}
执行完initExchange()方法Exchange初始化完毕,将持有解析器,相当于间接持有网络输出输入流,回到最初的地方。
2.ExchangeFinder#find
此方法返回一个ExchangeCodec,理解成输入输出流即可
fun find(
    client: OkHttpClient,
    chain: RealInterceptorChain
): ExchangeCodec {
    try {
        // 寻找健康的连接,看下(3.ExchangeFinder#findHealthyConnection)
        val resultConnection = findHealthyConnection(
            connectTimeout = chain.connectTimeoutMillis,
            readTimeout = chain.readTimeoutMillis,
            writeTimeout = chain.writeTimeoutMillis,
            pingIntervalMillis = client.pingIntervalMillis,
            connectionRetryEnabled = client.retryOnConnectionFailure,
            doExtensiveHealthChecks = chain.request.method != "GET"
        )
        // 生成流解解析器,如果为http2则返回Http2ExchangeCodec,若不是http2则返回Http1ExchangeCodec
        return resultConnection.newCodec(client, chain)
    } catch (e: RouteException) {
        trackFailure(e.lastConnectException)
        throw e
    } catch (e: IOException) {
        trackFailure(e)
        throw RouteException(e)
    }
}
此方法分析完毕返回1.RealCall#initExchange,记得现在我们已经将流包装成了解析器。
3.ExchangeFinder#findHealthyConnection
// 找到一个连接,如果它是健康的则返回它。如果它不健康,则重复该过程,直到找到健康的连接。
@Throws(IOException::class)
private fun findHealthyConnection(
    connectTimeout: Int,
    readTimeout: Int,
    writeTimeout: Int,
    pingIntervalMillis: Int,
    connectionRetryEnabled: Boolean,
    doExtensiveHealthChecks: Boolean
): RealConnection {
    while (true) {
        // 重中之重的方法,最终会返回一个连接,看下(4.ExchangeFinder#findConnection)
        val candidate = findConnection(
            connectTimeout = connectTimeout,
            readTimeout = readTimeout,
            writeTimeout = writeTimeout,
            pingIntervalMillis = pingIntervalMillis,
            connectionRetryEnabled = connectionRetryEnabled
        )

        // 如果连接健康则返回
        if (candidate.isHealthy(doExtensiveHealthChecks)) {
            return candidate
        }

        // 如果连接不健康,则标记此连接不可产生新的输入输出流
        candidate.noNewExchanges()

        // 确保我们还有一些路线可以尝试。如果我们建立了一个新连接并且立即被检测为不健康,我们可能会耗尽所有路由的一个示例
        if (nextRouteToTry != null) continue

        // 切换到下个路由继续尝试
        val routesLeft = routeSelection?.hasNext() ?: true
        if (routesLeft) continue

        val routesSelectionLeft = routeSelector?.hasNext() ?: true
        if (routesSelectionLeft) continue

        throw IOException("exhausted all routes")
    }
}
此方法分析完毕返回2.ExchangeFinder#find,要记得返回的Connection已经有网络流了。
4.ExchangeFinder#findConnection
private fun findConnection(
    connectTimeout: Int,
    readTimeout: Int,
    writeTimeout: Int,
    pingIntervalMillis: Int,
    connectionRetryEnabled: Boolean
): RealConnection {
    if (call.isCanceled()) throw IOException("Canceled")

    // 若Call之前就绑定了连接则尝试复用.
    val callConnection = call.connection // This may be mutated by releaseConnectionNoEvents()!
    if (callConnection != null) {
        var toClose: Socket? = null
        synchronized(callConnection) {
            // 若连接不可以创建流或者连接的路由地址和请求的地址不相同,则不允许复用
            if (callConnection.noNewExchanges || !sameHostAndPort(callConnection.route().address.url)) {
                toClose = call.releaseConnectionNoEvents()
            }
        }

        // 如果呼叫的连接未释放,则重用连接
        if (call.connection != null) {
            check(toClose == null)
            return callConnection
        }

        // 释放连接
        toClose?.closeQuietly()
        eventListener.connectionReleased(call, callConnection)
    }

    // 我们需要一个新的连接,下述三个属性给新的连接统计数据
    refusedStreamCount = 0
    connectionShutdownCount = 0
    otherFailureCount = 0

    // 尝试在连接池中获取连接
    if (connectionPool.callAcquirePooledConnection(address, call, null, false)) {
        val result = call.connection!!
        eventListener.connectionAcquired(call, result)
        return result
    }
	// Route类出现,Route翻译为路线,具体看下述(Route和Address)小节
    // Nothing in the pool. Figure out what route we'll try next.
    val routes: List<Route>?
    val route: Route
    // nextRouteToTry是ExchangeFinder的属性,代表下一个要尝试的路线,若不为null,则使用此路线,第一次调用findConnection()方法时一定为null,不要忘记了findConnection()方法是在上述3.ExchangeFinder#findHealthyConnection的循环调用的,等第二次调用时nextRouteToTry可能不为null
    if (nextRouteToTry != null) {
        // Use a route from a preceding coalesced connection.
        routes = null
        route = nextRouteToTry!!
        nextRouteToTry = null
    // 路线选择器不为null,则选择下一个路线,第一次调用findConnection()方法时也一定为null
    } else if (routeSelection != null && routeSelection!!.hasNext()) {
        // Use a route from an existing route selection.
        routes = null
        route = routeSelection!!.next()
    } else {
        // 懒加载拿到路线选择器,第一次命中此else也一定为null
        var localRouteSelector = routeSelector
        // 若之前没有获取到路线选择器,则创建路线选择器,对于RouteSelector的分析在Route和Address的RouteSelector小节已经分析
        if (localRouteSelector == null) {
            localRouteSelector = RouteSelector(address, call.client.routeDatabase, call, eventListener)
            this.routeSelector = localRouteSelector
        }
        // 调用next()返回Selection,在(RouteSelector)小节的末尾已经分析过此类,主要是负责迭代路线集合
        val localRouteSelection = localRouteSelector.next()
        routeSelection = localRouteSelection
        routes = localRouteSelection.routes

        if (call.isCanceled()) throw IOException("Canceled")

        // Now that we have a set of IP addresses, make another attempt at getting a connection from
        // the pool. We have a better chance of matching thanks to connection coalescing.
        // 翻译:现在我们有了一组 IP 地址,再次尝试从池中获取连接。由于连接合并,我们有更好的匹配机会。
        if (connectionPool.callAcquirePooledConnection(address, call, routes, false)) {
            val result = call.connection!!
            eventListener.connectionAcquired(call, result)
            return result
        }

        route = localRouteSelection.next()
    }

    // Connect. Tell the call about the connecting call so async cancels work.
    // 在连接池中没有找到合适的连接则创建新的连接
    val newConnection = RealConnection(connectionPool, route)
    call.connectionToCancel = newConnection
    try {
       // 看下(RealConnection的连接过程)小节
        newConnection.connect(
            connectTimeout,
            readTimeout,
            writeTimeout,
            pingIntervalMillis,
            connectionRetryEnabled,
            call,
            eventListener
        )
    } finally {
        call.connectionToCancel = null
    }
    call.client.routeDatabase.connected(newConnection.route())

    // 由于HTTP2的连接复用,需要判断此次请求是否可以连接复用,这里笔者感觉有些问题因为在上面明明已经建立了新的连接,为什么之前不进行连接复用判断呢,笔者后来想了想可能由于并发的问题,假设说两个请求请求一个服务器,两个请求建立了两个Socket连接,但是却符合复用的规则,那么就应该关闭掉一个。
    if (connectionPool.callAcquirePooledConnection(address, call, routes, true)) {
        val result = call.connection!!
        nextRouteToTry = route
        newConnection.socket().closeQuietly()	// 若可以复用则关闭掉刚才开启的连接
        eventListener.connectionAcquired(call, result)
        return result
    }

    synchronized(newConnection) {
        connectionPool.put(newConnection)
        call.acquireConnectionNoEvents(newConnection)
    }

    eventListener.connectionAcquired(call, newConnection)
    // 返回连接
    return newConnection
}
分析到着返回3.ExchangeFinder#findHealthyConnection,只需要记得findConnection()方法返回的newConnection已经有网络输入输出流了。
ExchangeFinder的创建
ExchangeFinder主要用于寻找Socket的输入输出流
ExchangeFinder在下面代码中创建,第一个拦截器RetryAndFollowUpInterceptor的intercept()方法。
RetryAndFollowUpInterceptor#intercept
@Throws(IOException::class)
override fun intercept(chain: Interceptor.Chain): Response {
    ...
    while (true) {
        //创建ExchangeFinder,此类用于创建和寻找Exchange,Exchange主要处理此次请求中的IO的连接管理和事件请求,看下(1.RealCall#enterNetworkInterceptorExchange)
        call.enterNetworkInterceptorExchange(request, newExchangeFinder)
        ...

    }
}
1.RealCall#enterNetworkInterceptorExchange
fun enterNetworkInterceptorExchange(request: Request, newExchangeFinder: Boolean) {
    ...

    if (newExchangeFinder) {
        // 创建ExchangeFinder,
        this.exchangeFinder = ExchangeFinder(
            connectionPool,								// Socket连接池,看下述(Socket连接池小节)
            createAddress(request.url),					// 解析url,后续进行分析
            this,
            eventListener
        )
    }
}
Socket连接池
OkHttp使用RealConnectionPool类专门管理Socket连接
RealConnectionPool在创建Client时初始化,具体代码在OkHttpClient Builder的构造中
class Builder constructor() {
    ...
    internal var connectionPool: ConnectionPool = ConnectionPool() //看下(ConnectionPool小节)
    ...
}
ConnectionPool
// 管理 HTTP 和 HTTP2 连接的重用以减少网络延迟。共享相同地址的 HTTP 请求可以共享一个连接。这个类实现了哪些连接保持打开以供将来使用的策略。
// constructor: 使用适合单用户应用程序的调整参数创建一个新的连接池。此池中的调整参数可能会在未来的 OkHttp 版本中发生变化。目前,此池最多可容纳 5 个空闲连接,这些连接将在 5 分钟不活动后被驱逐。
class ConnectionPool internal constructor(
    internal val delegate: RealConnectionPool
) {
    // 三参构造,三个参数含义如下
    // maxIdleConnections 每个地址的最大的空闲连接数
    // keepAliveDuration  空闲时最大的存活时间
    // timeUnit           存活时间
    // 调用后会创建RealConnectionPool,并随之调用主构造给delegate赋值,ConnectionPool其实是一个空壳子,真正的功能都依托于delegate也就是RealConnectionPool, RealConnectionPool在下面(RealConnectionPool)小节分析
    constructor(
        maxIdleConnections: Int,
        keepAliveDuration: Long,
        timeUnit: TimeUnit
    ) : this(RealConnectionPool(
        taskRunner = TaskRunner.INSTANCE,
        maxIdleConnections = maxIdleConnections,
        keepAliveDuration = keepAliveDuration,
        timeUnit = timeUnit
    ))
	// 无参构造会调用此方法,然后调用三参的构造,看上面(三参构造)
    constructor() : this(5, 5, TimeUnit.MINUTES)

    /** 返回池中的空闲连接数. */
    fun idleConnectionCount(): Int = delegate.idleConnectionCount()

    /** 返回池中的连接总数. */
    fun connectionCount(): Int = delegate.connectionCount()

    /** 关闭并删除池中的所有空闲连接. */
    fun evictAll() {
        delegate.evictAll()
    }
}
RealConnectionPool
真正的Socket连接管理类,添加连接,删除连接,获取连接的逻辑都在此类中。
class RealConnectionPool(
    taskRunner: TaskRunner,     			// 理解为线程池即可
    private val maxIdleConnections: Int,	// 每个地址的最大空闲连接数
    keepAliveDuration: Long,				// 存活时间
    timeUnit: TimeUnit						// 存活时间单位
) {
    // 将时间转换为纳秒
    private val keepAliveDurationNs: Long = timeUnit.toNanos(keepAliveDuration)
	// 理解为初始化线程池即可
    private val cleanupQueue: TaskQueue = taskRunner.newQueue()
    // 清除任务,将其交给cleanupQueue线程池队列则可后续执行cleanup()方法,后续会分析
    private val cleanupTask = object : Task("$okHttpName ConnectionPool") {
        override fun runOnce() = cleanup(System.nanoTime())
    }

   	// 使用ConcurrentLinkedQueue来保存连接,具体的网络连接在OkHttp中抽象为RealConnection类
    private val connections = ConcurrentLinkedQueue<RealConnection>()

    init {
        // 存活时间必须大于0,不然报错
        require(keepAliveDuration > 0L) { "keepAliveDuration <= 0: $keepAliveDuration" }
    }
}
下面分析下增,删,查三个方法
查方法 1.RealConnectionPool#put
fun put(connection: RealConnection) {
    connection.assertThreadHoldsLock()
	// 添加连接
    connections.add(connection)
    // 添加后立马调用清除方法,去除失效的连接
    cleanupQueue.schedule(cleanupTask)
}
删方法 2.RealConnectionPool#cleanup
// 如果超过保持活动限制或空闲连接限制,则驱逐空闲时间最长的连接。返回休眠的持续时间(以纳秒为单位),直到下一次计划调用此方法。如果不需要进一步清理,则返回 -1。
fun cleanup(now: Long): Long {
    var inUseConnectionCount = 0
    var idleConnectionCount = 0
    var longestIdleConnection: RealConnection? = null
    var longestIdleDurationNs = Long.MIN_VALUE

    // 遍历连接池,找到空闲时间最长的连接
    for (connection in connections) {
        synchronized(connection) {
            // 如果正在使用则使inUseConnectionCount + 1, 若没有在使用则计算空闲时间并遍历下个连接
            if (pruneAndGetAllocationCount(connection, now) > 0) {
                inUseConnectionCount++
            } else {
                idleConnectionCount++

                // If the connection is ready to be evicted, we're done.
                val idleDurationNs = now - connection.idleAtNs
                if (idleDurationNs > longestIdleDurationNs) {
                    longestIdleDurationNs = idleDurationNs
                    longestIdleConnection = connection
                } else {
                    Unit
                }
            }
        }
    }

    when {
        // 如果空闲时间超过了规定时间或者空闲的连接总数超过了最大空闲连接数则需要移除连接
        longestIdleDurationNs >= this.keepAliveDurationNs
        || idleConnectionCount > this.maxIdleConnections -> {
            // We've chosen a connection to evict. Confirm it's still okay to be evict, then close it.
            val connection = longestIdleConnection!!
            synchronized(connection) {
                if (connection.calls.isNotEmpty()) return 0L // No longer idle.
                if (connection.idleAtNs + longestIdleDurationNs != now) return 0L // No longer oldest.
                connection.noNewExchanges = true
                connections.remove(longestIdleConnection)
            }

            connection.socket().closeQuietly()
            if (connections.isEmpty()) cleanupQueue.cancelAll()

            // Clean up again immediately.
            return 0L
        }
		// 存在空闲连接则返回下次失效的时间
        idleConnectionCount > 0 -> {
            // A connection will be ready to evict soon.
            return keepAliveDurationNs - longestIdleDurationNs
        }
		// 若都在使用中则返回创建连接池时的失效时间
        inUseConnectionCount > 0 -> {
            // All connections are in use. It'll be at least the keep alive duration 'til we run
            // again.
            return keepAliveDurationNs
        }

        else -> {
            // No connections, idle or in use.
            return -1
        }
    }
}
查方法 3.RealConnectionPool#callAcquirePooledConnection
fun callAcquirePooledConnection(
    address: Address,
    call: RealCall,
    routes: List<Route>?,
    requireMultiplexed: Boolean
): Boolean {
    // 遍历所有的连接
    for (connection in connections) {
        synchronized(connection) {
            // 想要多路复用但是connection连接不支持多路复用(非http2连接)则遍历下一个
            if (requireMultiplexed && !connection.isMultiplexed) return@synchronized
            // 若当前连接不符合复用则也遍历下一个 看下(4.RealConnection#isEligible)
            if (!connection.isEligible(address, routes)) return@synchronized
            // 满足了复用条件则给call设置连接 看下(5.RealCall#acquireConnectionNoEvents)
            call.acquireConnectionNoEvents(connection)
            return true
        }
    }
    return false
}
4.RealConnection#isEligible
internal fun isEligible(address: Address, routes: List<Route>?): Boolean {
    assertThreadHoldsLock()

    // If this connection is not accepting new exchanges, we're done.
    // 当前连接已经超过了最大的请求数或者当前连接不能在产生新的输入输出流了则当前连接不能被复用
    if (calls.size >= allocationLimit || noNewExchanges) return false

    // If the non-host fields of the address don't overlap, we're done.
    // 如果域名都不同,也肯定不允许复用连接了
    if (!this.route.address.equalsNonHost(address)) return false

    // If the host exactly matches, we're done: this connection can carry the address.
    // 如果域名匹配则一定可以复用
    if (address.url.host == this.route().address.url.host) {
        return true // This connection is a perfect match.
    }

    // At this point we don't have a hostname match. But we still be able to carry the request if
    // our connection coalescing requirements are met. See also:
    // https://hpbn.co/optimizing-application-delivery/#eliminate-domain-sharding
    // https://daniel.haxx.se/blog/2016/08/18/http2-connection-coalescing/
	// 若http2且域名不同,也可能可以满足复用条件,看完上面的文章,笔者在(域名分片连接复用)小节记录了自己的理解
    // 1. This connection must be HTTP/2.
    if (http2Connection == null) return false

    // 2. The routes must share an IP address.
    // routeMatchesAny()方法看下6.RealConnection#routeMatchesAny
    if (routes == null || !routeMatchesAny(routes)) return false

    // 3. This connection's server certificate's must cover the new host.
    // 此连接的服务器证书必须涵盖新域名
    if (address.hostnameVerifier !== OkHostnameVerifier) return false
    if (!supportsUrl(address.url)) return false

    // 4. Certificate pinning must match the host.
    // 检查证书匹配
    try {
        address.certificatePinner!!.check(address.url.host, handshake()!!.peerCertificates)
    } catch (_: SSLPeerUnverifiedException) {
        return false
    }

    return true // The caller's address can be carried by this connection.
}
5.RealCall#acquireConnectionNoEvents
fun acquireConnectionNoEvents(connection: RealConnection) {
    connection.assertThreadHoldsLock()

    check(this.connection == null)
    this.connection = connection
    // 一个连接可能对应多个请求,且为了避免内存泄露使用WeakReference
    connection.calls.add(CallReference(this, callStackTrace))
}
6.RealConnection#routeMatchesAny
// 如果当前的连接和Route列表中地址有相同的则代表可以复用,类似于Chorme的实现
private fun routeMatchesAny(candidates: List<Route>): Boolean {
    return candidates.any {
        it.proxy.type() == Proxy.Type.DIRECT &&
        route.proxy.type() == Proxy.Type.DIRECT &&
        route.socketAddress == it.socketAddress
    }
}
查方法相对来说比较复杂,主要是连接复用导致情况比较多,域名地址端口都相等的情况下可以直接复用,若域名不等OkHttp采用Chorme的实现方案
域名分片连接复用
HTTP1.1中由于每个请求需要不同的连接,且浏览器对同一个域名的连接数最大是 6-8 个,不同的浏览器会有所区别,移动端会更少一些,为了突破连接数的限制就会使用域名分片的技术,其实就是资源分域,将资源放在不同域名下 (比如二级子域名下),这样就可以针对不同域名创建连接并请求,以一种讨巧的方式突破限制,但是滥用此技术也会造成很多问题,比如每个 TCP 连接本身需要经过 DNS 查询、三步握手、慢启动等,还占用额外的 CPU 和内存,对于服务器来说过多连接也容易造成网络拥挤、交通阻塞等,对于移动端来说问题更明显。
随着HTTP2的引入,世界上的HTTP客户端都朝着为每个源使用一个TCP连接的方向发展,这对于HTTP/1来说是一个巨大的架构调整,由多链接转换到单一链接,那么HTTP2是如何做到合并连接的呢?
连接合并则是判断哪些请求可以使用同一个 TCP 连接,不同的浏览器会由不同的表现。
假设example.com在DNS中有两个名称条目:A.example.com和B.example.com,当通过DNS解析这些名称时,客户端会返回每个名称的IP地址列表A.example.com
还有一点,浏览器使用HTTP/2必然也是HTTPS,因此对于每个使用HTTP/2的服务器,还也应该有一个相应的服务器证书,其中包含一个名称列表或一个通配符模式,该服务器有权响应该证书。
在后续的例子中,首先将浏览器连接到A,假设解析A会从DNS返回IP 192.168.0.1和192.168.0.2,浏览器会连接到这些地址中的第一个,即以“1”结尾的地址。浏览器在TLS握手中获取服务器证书,另外,它还会获取服务器可以处理的主机名列表:A.example.com和B.example.com通用域名格式。(也可以是通配符,如*.example.com),等后续连接B时,证书同样有效。
这时浏览器想连接到B,首先请求DNS解析B假设返回IP 192.168.0.2和192.168.0.3。
域名A:192.168.0.1和192.168.0.2
域名B:192.168.0.2和192.168.0.3
到这不同的浏览器的不同实现就要来了。
浏览器的实现
Firefox
域名
A有两个地址,域名B有两个地址。地址列表不同,但有重叠-两个列表都包含192.168.0.2。域名A假设已经声明对域名B是有权限的。此时,Firefox不会再次连接到域名B。它将重用与域名A的连接,并通过该单一共享连接请求域名B的内容。这是目前使用的最具攻击性的合并方法。这种激进的合并有时也会有错误。当有一个仅使用IPv6的域名A和一个同时使用IPv4和IPv6地址的域名B时。当域名A重用与B的连接时,请求域名A上的数据仍然可以使用IPv4(假设主机A在其证书中覆盖了主机B)。
Chorme
结合性稍差。在上面的例子中,当浏览器请求A域名连接到192.168.0.1时,此时请求B域名DNS返回的IP是192.168.0.2和192.168.0.3,那么它显然不包含192.168.0.1,因此Chrome将创建到主机B的新连接。如果解析主机B返回的列表包含主机A已使用的连接的特定IP,则Chrome将重用与主机A的连接。
Edge and Safari
根本不进行合并,因此每个主机名将获得自己的单个连接。对于非常分散的站点,HTTP/2也有很多连接。
下面还有一些细节问题:
补充知识
421响应码
在**OkHttp原理第三篇—RetryAndFollowUpInterceptor的重定向小节中不知道读者还记不记得有一个421响应码,421响应码是专属于
HTTP/2的错误代码,当服务器收到其无法提供服务的权限(或方案)的资源请求时就会返回421**,浏览器收到后会在另一个连接上重试该请求,因此421响应码在OkHttp中也属于重定向的一种。
六个连接
在浏览器知道服务器使用HTTP/2之前,它可能会尝试6次连接,以便准备全速访问远程站点。一旦它发现它不需要所有这些连接,它将消除不必要的未使用的连接,并随着时间的推移逐渐减少到一个。当然,在后续连接到同一服务器时,客户机可能会缓存版本信息,这样就不必假定从HTTP/1开始。
本小节参考文献:https://daniel.haxx.se/blog/2016/08/18/http2-connection-coalescing/
Route和Address
在分析Route之前先学习Address是如何创建的,在**ExchangeFinder的创建**小节中调用了createAddress()方法创建了Address
Address的创建
ExchangeFinder是在RealCall中创建的,Address也是在此类中创建
RealCall#createAddress
代码非常简单,主要是解析url中的信息
private fun createAddress(url: HttpUrl): Address {
    var sslSocketFactory: SSLSocketFactory? = null
    var hostnameVerifier: HostnameVerifier? = null
    var certificatePinner: CertificatePinner? = null
    if (url.isHttps) {
        sslSocketFactory = client.sslSocketFactory
        hostnameVerifier = client.hostnameVerifier
        certificatePinner = client.certificatePinner
    }

    return Address(
        uriHost = url.host,
        uriPort = url.port,
        dns = client.dns,
        socketFactory = client.socketFactory,
        sslSocketFactory = sslSocketFactory,
        hostnameVerifier = hostnameVerifier,
        certificatePinner = certificatePinner,
        proxyAuthenticator = client.proxyAuthenticator,
        proxy = client.proxy,    							// 创建Client时设置的Proxy,在RetryAndFollowUpInterceptor的代理小节已经分析
        protocols = client.protocols,
        connectionSpecs = client.connectionSpecs,			// 连接规格
        proxySelector = client.proxySelector				// 代理选择器,默认用系统的
    )
}
ProxySelector和Proxy都是java.net包下的类,我们不再进行分析,只需要知道Proxy中包含了代理服务器的地址,若存在多个代理ProxySelector可以帮助选择合适代理。
Route解析
Route提供了真正连接服务器所需要的动态信息,明确需要连接的服务器IP地址及代理服务器,一个Address可能会有很多个路由Route供选择(一个DNS对应对个IP)。
class Route(
    @get:JvmName("address") val address: Address,
    @get:JvmName("proxy") val proxy: Proxy,
    @get:JvmName("socketAddress") val socketAddress: InetSocketAddress
){
	...
}
由于有多条路线,因此一定会存在路由管理器类,此类则是RouteSelector
RouteSelector
此类主要用于选择路线,先分析其属性和构造
class RouteSelector(
    private val address: Address,    			// 地址类上述已经分析
    private val routeDatabase: RouteDatabase,	// 失效路线的管理类
    private val call: Call,						// 本次的请求
    private val eventListener: EventListener
) {
    /* State for negotiating the next proxy to use. */
    private var proxies = emptyList<Proxy>()  // 代理集合
    private var nextProxyIndex: Int = 0

    /* State for negotiating the next socket address to use. */
    private var inetSocketAddresses = emptyList<InetSocketAddress>()

    /* State for negotiating failed routes */
    private val postponedRoutes = mutableListOf<Route>()

    init {
        resetNextProxy(address.url, address.proxy)
    }


    private fun resetNextProxy(url: HttpUrl, proxy: Proxy?) {
        // 初始化proxies数组
        fun selectProxies(): List<Proxy> {
            // 若在创建Client时指定了Proxy则返回指定的proxy
            if (proxy != null) return listOf(proxy)

            // 若地址都莫得,则直接标记为无Proxy
            val uri = url.toUri()
            if (uri.host == null) return immutableListOf(Proxy.NO_PROXY)

            // 根据地址返回代理人的类型,代理有三种类型
            // DIRECT 直连
            // HTTP   代表 HTTP 或 FTP 等高级协议的代理
            // SOCKS  代表SOCKS (V4 or V5)代理
            // 如果访问百度则会返回一个Size为1的列表,其类型为DIRECT的proxy
            val proxiesOrNull = address.proxySelector.select(uri) // 此处的proxySelector真实类型为DefaultProxySelector,在sun.net.spi包下
            if (proxiesOrNull.isNullOrEmpty()) return immutableListOf(Proxy.NO_PROXY)

            return proxiesOrNull.toImmutableList()
        }

        ...
        proxies = selectProxies()
        nextProxyIndex = 0
        ...
    }
}
执行完构造proxies属性将会不为空,若不设置代理的情况下访问百度,则proxies的size为1

后续我们将使用proxies中的元素创建路线,获取Route的方法为next()
RouteSelector#next
operator fun next(): Selection {
    if (!hasNext()) throw NoSuchElementException()

    // Compute the next set of routes to attempt.
    val routes = mutableListOf<Route>()
    // 若存在可用的proxy则利用此proxy创建路线,hasNextProxy()方法看下(1.RouteSelector#hasNext)
    while (hasNextProxy()) {
        // 在proxies列表中选择一个代理,看下(2.RouteSelector#nextProxy)
        val proxy = nextProxy()
        // 经过DNS等一系列操作,inetSocketAddresses已经有了许多地址
        for (inetSocketAddress in inetSocketAddresses) {
            // 将地址封装为路线,并放到routes列表中
            val route = Route(address, proxy, inetSocketAddress)
            // routeDatabase保存失效的路线,若路线实现则添加到失效集合中
            if (routeDatabase.shouldPostpone(route)) {
                postponedRoutes += route
            } else {
                routes += route
            }
        }

        if (routes.isNotEmpty()) {
            break
        }
    }

    if (routes.isEmpty()) {
        // We've exhausted all Proxies so fallback to the postponed routes.
        routes += postponedRoutes
        postponedRoutes.clear()
    }
	// 包装路线集合,先下(4.Selection)分析
    return Selection(routes)
}
1.RouteSelector#hasNext
operator fun hasNext(): Boolean = hasNextProxy() || postponedRoutes.isNotEmpty()

private fun hasNextProxy(): Boolean = nextProxyIndex < proxies.size //nextProxyIndex为proxies集合当前遍历到的下标,若还可以往下遍历则返回true
2.RouteSelector#nextProxy
private fun nextProxy(): Proxy {
    if (!hasNextProxy()) {
        throw SocketException(
            "No route to ${address.url.host}; exhausted proxy configurations: $proxies")
    }
    // nextProxyIndex代表当前遍历到的proxies列表的下标
    val result = proxies[nextProxyIndex++]
    // 解析代理,获取地址,看下(3.RouteSelector#resetNextInetSocketAddress)
    resetNextInetSocketAddress(result)
    return result
}
3.RouteSelector#resetNextInetSocketAddress
private fun resetNextInetSocketAddress(proxy: Proxy) {
    // 声明地址列表,一个代理可能会返回多个地址,以百度举例,经过dns解析,可能会返回好几个地址,因此需要使用列表
    val mutableInetSocketAddresses = mutableListOf<InetSocketAddress>()
    // inetSocketAddresses是RouteSelector类的属性,上述的RouteSelector#next()方法则遍历inetSocketAddresses挨个对地址进行尝试
    inetSocketAddresses = mutableInetSocketAddresses
	// 按照Proxy的类型进行分类,如果是请求域名为www.baidu.com,则proxy的类型为DIRECT,命中if
    val socketHost: String
    val socketPort: Int
    if (proxy.type() == Proxy.Type.DIRECT || proxy.type() == Proxy.Type.SOCKS) {
        socketHost = address.url.host
        socketPort = address.url.port
    } else {
        // 若是HTTP类型的proxy则需要判断其地址是否是有效的网络地址
        val proxyAddress = proxy.address()
        require(proxyAddress is InetSocketAddress) {
            "Proxy.address() is not an InetSocketAddress: ${proxyAddress.javaClass}"
        }
        socketHost = proxyAddress.socketHost
        socketPort = proxyAddress.port
    }
	// 若端口号不在1-65535之间则直接报错
    if (socketPort !in 1..65535) {
        throw SocketException("No route to $socketHost:$socketPort; port is out of range")
    }
	// 按照域名和端口解析出正确的地址
    if (proxy.type() == Proxy.Type.SOCKS) {
        mutableInetSocketAddresses += InetSocketAddress.createUnresolved(socketHost, socketPort)
    } else {
        // 若是HTTP或者DIRECT类型的Proxy则需要执行DNS查找地址
        eventListener.dnsStart(call, socketHost)

        // Try each address for best behavior in mixed IPv4/IPv6 environments.
        // DNS查收,返回地址列表,正如上文中所说一个域名可能对应多个地址
        val addresses = address.dns.lookup(socketHost)
        if (addresses.isEmpty()) {
            throw UnknownHostException("${address.dns} returned no addresses for $socketHost")
        }

        eventListener.dnsEnd(call, socketHost, addresses)
		// 将解析出的地址添加到列表中
        for (inetAddress in addresses) {
            mutableInetSocketAddresses += InetSocketAddress(inetAddress, socketPort)
        }
    }
}
resetNextInetSocketAddress()方法的作用经过上述分析已经很明确,通过Proxy的域名和端口解析出响应的地址。
回到RouteSelector#next,如果读者有兴趣可以阅读下面关于DNS负载均衡的一些小知识。
这里提出提出一个问题,一个域名为什么要对应多个地址?
一个域名对应多个IP的技术叫做DNS负载均衡
负载均衡是一种减少服务器压力的技术,DNS负载均衡则是借用DNS来实现的负载均衡,DNS不过多介绍,相信读者肯定知道DNS。
DNS负载均衡通过存储多个IP地址来降低对某一台服务器的压力,如下图:
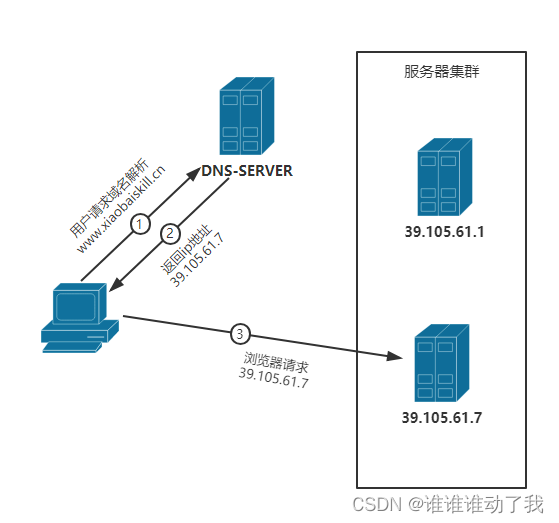
DNS服务器将保存www.xiaobaiskill.com的两个ip映射39.105.61.1,39.105.61.7
在第二步返回IP地址时,DNS服务器会根据算法返回某个地址,后续浏览器再请求此地址完成通信。
优点如下:
- 将负载均衡的工作交给
DNS,省去了网站管理维护负载均衡服务器的麻烦。 - 技术实现比较灵活、方便,简单易行,成本低,使用于大多数
TCP/IP应用。 - 对于部署在服务器上的应用来说不需要进行任何的代码修改即可实现不同机器上的应用访问。
- 服务器可以位于互联网的任意位置。
- 同时许多
DNS还支持基于地理位置的域名解析,即会将域名解析成距离用户地理最近的一个服务器地址,这样就可以加速用户访问,改善性能。
缺点如下:
- 目前的
DNS是多级解析的,每一级DNS都可能缓存A记录,当某台服务器下线之后,即使修改了A记录,要使其生效也需要较长的时间,这段时间,DNS任然会将域名解析到已下线的服务器上,最终导致用户访问失败。 - 不能够按服务器的处理能力来分配负载。
DNS负载均衡采用的是简单的轮询算法,不能区分服务器之间的差异,不能反映服务器当前运行状态,所以其的负载均衡效果并不是太好。 - 可能会造成额外的网络问题。为了使本
DNS服务器和其他DNS服务器及时交互,保证DNS数据及时更新,使地址能随机分配,一般都要将DNS的刷新时间设置的较小,但太小将会使DNS流量大增造成额外的网络问题。
优缺点摘自cywosp https://blog.csdn.net/cywosp/article/details/38017027
4.Selection
逻辑很简单,只是抽离了选择路线这个行为,读者可自行阅读
class Selection(val routes: List<Route>) {
    private var nextRouteIndex = 0

    operator fun hasNext(): Boolean = nextRouteIndex < routes.size

    operator fun next(): Route {
        if (!hasNext()) throw NoSuchElementException()
        return routes[nextRouteIndex++]
    }
}
总结一下RouteSelector初始化路线的逻辑
- 在创建
RouteSelector时会根据请求的url初始化proxy列表 - 后续调用
next()方法会在proxy列表取出一个proxy,根据此proxy的类型,再通过Address的域名和端口解析出Route列表
到这为止Route和Address小节分析结束,回到开篇的4.ExchangeFinder#findConnection继续向下分析。
RealConnection的连接过程
RealConnection通过调用connect()方法建立Socket连接,方法如下:
RealConnection#connect
fun connect(
    connectTimeout: Int,
    readTimeout: Int,
    writeTimeout: Int,
    pingIntervalMillis: Int,
    connectionRetryEnabled: Boolean,
    call: Call,
    eventListener: EventListener
) {
    check(protocol == null) { "already connected" }

    var routeException: RouteException? = null
    // 支持的连接规格 看下(1.ConnectionSpec)
    val connectionSpecs = route.address.connectionSpecs
    val connectionSpecSelector = ConnectionSpecSelector(connectionSpecs)
	// 若sslSocketFactory为空,则意味着无法使用https
    if (route.address.sslSocketFactory == null) {
        // 在无法使用http说的情况下还不允许明文的http请求,则一定要报错了
        if (ConnectionSpec.CLEARTEXT !in connectionSpecs) {
            throw RouteException(UnknownServiceException(
                "CLEARTEXT communication not enabled for client"))
        }
        // 判断平台对此域名是否支持http明文传输,在API 29,24,23,及其他 分别有不同的表现
        val host = route.address.url.host
        if (!Platform.get().isCleartextTrafficPermitted(host)) {
            throw RouteException(UnknownServiceException(
                "CLEARTEXT communication to $host not permitted by network security policy"))
        }
    } else {
        // route.address.protocols也是来自于Client创建时,其默认支持的协议为http2,http1.1
        // OkHttp暂不支持明文的http2
        if (Protocol.H2_PRIOR_KNOWLEDGE in route.address.protocols) {
            throw RouteException(UnknownServiceException(
                "H2_PRIOR_KNOWLEDGE cannot be used with HTTPS"))
        }
    }
	// 开始创建连接,在学习之前先学习(代理的深入)小节
    while (true) {
        try {
            // 若可使用https且代理的类型为HTTP则需要创建隧道代理
            if (route.requiresTunnel()) {
                // 创建隧道连接,看下(隧道连接的建立)小节
                connectTunnel(connectTimeout, readTimeout, writeTimeout, call, eventListener)
                if (rawSocket == null) {
                    // We were unable to connect the tunnel but properly closed down our resources.
                    break
                }
            } else {
                // 创建普通的Socket连接,看下述(Socket连接的创建)小节
                connectSocket(connectTimeout, readTimeout, call, eventListener)
            }
            establishProtocol(connectionSpecSelector, pingIntervalMillis, call, eventListener)
            eventListener.connectEnd(call, route.socketAddress, route.proxy, protocol)
            break
        } catch (e: IOException) {
            ...
        }
    }

    if (route.requiresTunnel() && rawSocket == null) {
        throw RouteException(ProtocolException(
            "Too many tunnel connections attempted: $MAX_TUNNEL_ATTEMPTS"))
    }

    idleAtNs = System.nanoTime()
}
1.ConnectionSpec
其主要表示OkHttp支持的连接规格,比如TLS的版本,加密方式等等
断点Address的connectionSpecs属性,如下:

连接规格在创建Client时初始化,默认为
internal val DEFAULT_CONNECTION_SPECS = immutableListOf(
    ConnectionSpec.MODERN_TLS, ConnectionSpec.CLEARTEXT)
Address中的ConnectionSpec数组也来自于Client,读者可自行阅读Address的创建小节,由于来自于Client其中有两个元素的结论也就得到印证。
- ConnectionSpec.MODERN_TLS
OkHttp的默认配置,适用于大多数客户端平台并可以连接到大多数服务器 - ConnectionSpec.CLEARTEXT
http,URL的未加密、未经身份验证的连接。
隧道连接的建立
RealConnection#connectTunnel
回顾代理的深入学习小节中的知识,隧道连接发起的是CONNET 请求,这会在下面代码中进行体现
private fun connectTunnel(
    connectTimeout: Int,
    readTimeout: Int,
    writeTimeout: Int,
    call: Call,
    eventListener: EventListener
) {
    // 创建CONNET请求,看下(1.RealConnection#createTunnelRequest)
    var tunnelRequest: Request = createTunnelRequest()
    val url = tunnelRequest.url
    // MAX_TUNNEL_ATTEMPT为21,隧道连接最多重试21次
    for (i in 0 until MAX_TUNNEL_ATTEMPTS) {
        // 即使是隧道连接也必须要建立Socket连接,看下述(Socket连接的创建)小节
        connectSocket(connectTimeout, readTimeout, call, eventListener)
        // 建立隧道连接,和当前方法形成重载,看下(2.RealConnection#createTunnel)
        tunnelRequest = createTunnel(readTimeout, writeTimeout, tunnelRequest, url)
        ?: break // Tunnel successfully created.

        // The proxy decided to close the connection after an auth challenge. We need to create a new
        // connection, but this time with the auth credentials.
        rawSocket?.closeQuietly()
        rawSocket = null
        sink = null
        source = null
        eventListener.connectEnd(call, route.socketAddress, route.proxy, null)
    }
}
1.RealConnection#createTunnelRequest
private fun createTunnelRequest(): Request {
    val proxyConnectRequest = Request.Builder()
    .url(route.address.url)
    .method("CONNECT", null)	// 创建CONNECT请求
    .header("Host", route.address.url.toHostHeader(includeDefaultPort = true))
    .header("Proxy-Connection", "Keep-Alive") // For HTTP/1.0 proxies like Squid.
    .header("User-Agent", userAgent)
    .build()
	// 假的Response,等待后续的验证
    val fakeAuthChallengeResponse = Response.Builder()
    .request(proxyConnectRequest)
    .protocol(Protocol.HTTP_1_1)
    .code(HTTP_PROXY_AUTH)
    .message("Preemptive Authenticate")
    .body(EMPTY_RESPONSE)
    .sentRequestAtMillis(-1L)
    .receivedResponseAtMillis(-1L)
    .header("Proxy-Authenticate", "OkHttp-Preemptive")
    .build()
	// 在(OkHttp原理第三篇—RetryAndFollowUpInterceptor的代理小节)中对代理的权限验证进行了分析,读者可自行回顾
    val authenticatedRequest = route.address.proxyAuthenticator
    .authenticate(route, fakeAuthChallengeResponse)

    return authenticatedRequest ?: proxyConnectRequest
}
2.RealConnection#createTunnel
private fun createTunnel(
    readTimeout: Int,
    writeTimeout: Int,
    tunnelRequest: Request,
    url: HttpUrl
): Request? {
    var nextRequest = tunnelRequest
    // Make an SSL Tunnel on the first message pair of each SSL + proxy connection.
    val requestLine = "CONNECT ${url.toHostHeader(includeDefaultPort = true)} HTTP/1.1"
    while (true) {
        // 获取到输入输出流
        val source = this.source!!
        val sink = this.sink!!
        // 将输入流输出流交给解析器,因为不同的HTTP版本报文格式不同,目前OkHttp有两种解析器HTTP1,HTTP2
        // HTTP2 引入了二进制分帧层,且有头部压缩
        val tunnelCodec = Http1ExchangeCodec(null, this, source, sink)
        source.timeout().timeout(readTimeout.toLong(), MILLISECONDS)
        sink.timeout().timeout(writeTimeout.toLong(), MILLISECONDS)
        // 将CONNECT请求发送出去
        tunnelCodec.writeRequest(nextRequest.headers, requestLine)
        tunnelCodec.finishRequest()
        // 解析收到的响应
        val response = tunnelCodec.readResponseHeaders(false)!!
        .request(nextRequest)
        .build()
        tunnelCodec.skipConnectBody(response)

        when (response.code) {
            // 如果响应码为200则代表代理服务器与真实服务器建立了Socket连接
            HTTP_OK -> {
                // Assume the server won't send a TLS ServerHello until we send a TLS ClientHello. If
                // that happens, then we will have buffered bytes that are needed by the SSLSocket!
                // This check is imperfect: it doesn't tell us whether a handshake will succeed, just
                // that it will almost certainly fail because the proxy has sent unexpected data.
                if (!source.buffer.exhausted() || !sink.buffer.exhausted()) {
                    throw IOException("TLS tunnel buffered too many bytes!")
                }
                return null
            }
			// 如果返回407则需要权限验证
            HTTP_PROXY_AUTH -> {
                nextRequest = route.address.proxyAuthenticator.authenticate(route, response)
                ?: throw IOException("Failed to authenticate with proxy")

                if ("close".equals(response.header("Connection"), ignoreCase = true)) {
                    return nextRequest
                }
            }

            else -> throw IOException("Unexpected response code for CONNECT: ${response.code}")
        }
    }
}
总结:隧道连接的建立也依托于普通的Socket连接,隧道连接会创建CONNECT请求,若返回200则意味着代理服务器与正式服务器成功建立的Socket连接,返回407则需要验证身份,建立失败则会重试21次,如果还未成功则标志此次连接真正失败。
Socket连接的创建
学习过Socket编程的读者一定清楚,对于客户端而言调用Socket的connect()方法就是表明建立连接,下述方法的本质也是调用connect()方法完成连接。
private fun connectSocket(
    connectTimeout: Int,
    readTimeout: Int,
    call: Call,
    eventListener: EventListener
) {
    val proxy = route.proxy
    val address = route.address
	// 创建Socket
    val rawSocket = when (proxy.type()) {
        Proxy.Type.DIRECT, Proxy.Type.HTTP -> address.socketFactory.createSocket()!!	// socketFactory为DefaultSocketFactory,createSocket()也只是返回一个空Socket
        else -> Socket(proxy)	// 将代理交给Socket
    }
    // 赋值,给RealConnection的rawSocket赋值
    this.rawSocket = rawSocket

    eventListener.connectStart(call, route.socketAddress, proxy)
    rawSocket.soTimeout = readTimeout
    try {
        // 调用连接方法 等价于调用Socket的connect()方法,学习过Socket编程的小伙伴一定了解
        Platform.get().connectSocket(rawSocket, route.socketAddress, connectTimeout)
    } catch (e: ConnectException) {
        throw ConnectException("Failed to connect to ${route.socketAddress}").apply {
            initCause(e)
        }
    }

    // The following try/catch block is a pseudo hacky way to get around a crash on Android 7.0
    // More details:
    // https://github.com/square/okhttp/issues/3245
    // https://android-review.googlesource.com/#/c/271775/
    try {
        // 获取到Socket的输入输出流,此时RealConnection将持有Socket的输入输出流
        source = rawSocket.source().buffer()
        sink = rawSocket.sink().buffer()
    } catch (npe: NullPointerException) {
        if (npe.message == NPE_THROW_WITH_NULL) {
            throw IOException(npe)
        }
    }
}
总结
RealConnection的连接过程本质就是Socket的连接过程,其根本目的也是拿到Socket的输入流和输出流。回到ConnectInterceptor的4.ExchangeFinder#findConnection继续向下分析。
代理的深入学习
在**OkHttp原理第三篇—RetryAndFollowUpInterceptor的代理小节**中我们对网络代理进行了简单的分析,忘记的小伙伴可以去回顾一下,HTTP代理更倾向于客户端也就是正向代理。
简述
HTTP代理有两种方式:
- 第一种是 RFC 7230 - HTTP/1.1: Message Syntax and Routing(即修订后的
RFC 2616,HTTP/1.1协议的第一部分)描述的普通代理。这种代理扮演的是「中间人」角色,对于连接到它的客户端来说,它是服务端;对于要连接的服务端来说,它是客户端。它就负责在两端之间来回传送HTTP报文。 - 第二种是 Tunneling TCP based protocols through Web proxy servers(通过
Web代理服务器用隧道方式传输基于TCP的协议)描述的隧道代理。它通过HTTP协议正文部分(Body)完成通讯,以HTTP的方式实现任意基于TCP的应用层协议代理。这种代理使用HTTP的CONNECT方法建立连接,但CONNECT最开始并不是RFC 2616 - HTTP/1.1的一部分,直到2014年发布的HTTP/1.1修订版中,才增加了对CONNECT及隧道代理的描述,详见 RFC 7231 - HTTP/1.1: Semantics and Content。实际上这种代理早就被广泛实现,此种代理主要是解决第一种代理无法转发HTTPS的BUG,中间人与服务器建立TCP连接,而不需要再建立TLS连接。
代理的连接过程
第一种代理(普通代理)
HTTP/1.1 协议的第一部分。其代理过程为:
client请求proxyproxy解析请求获取origin server地址proxy向origin server转发请求proxy接收origin server的响应proxy向client转发响应
其中proxy获取目的服务器地址的标准方法是解析 request line 里的 request-URL。因为proxy需要解析报文,因此普通代理无法适用于https,因为报文都是加密的。
第二种代理(隧道代理)
通过 Web 代理服务器用隧道方式传输基于 TCP 的协议。
请求包括两个阶段,一是连接(隧道)建立阶段,二是数据通信(请求响应)阶段,数据通信是基于 TCP packet ,代理服务器不会对请求及响应的报文作任何的处理,都是原封不动的转发,因此可以代理 HTTPS请求和响应。
代理过程为:
client向proxy发送CONNET请求(包含了origin server的地址)proxy与origin server建立TCP连接proxy向client发送响应client向proxy发送请求,proxy 原封不动向origin server转发请求,请求数据不做任何封装,为原生TCP packet.
代理的优点
HTTP代理有以下优点:
HTTP代理可以突破自身IP访问限制,访问到一些web供应商屏蔽的网站。- 访问到一些内部网站或资源,如用代理使用教育网内部地址访问一些学校的内部图书馆或者数据库。
- 突破
IP封锁。使用代理服务器可以绕过人为限制访问的网站。 - 使用
HTTP代理还能有效提高访问速度。由于代理服务器都设置有比较大的服务器硬盘缓冲区,当有外界信息通过时,代理服务器的缓冲区也会把这些数据保存下来,下一次如果需要访问相同的地址或获取相同的内容时,代理服务器会从缓冲区直接把数据发送回去,有效提高了用户的访问速度。 - 通过
HTTP代理还可以有效隐藏自己的真实IP,避免许多不必要的打扰,免受许多攻击。
SOCKS代理
网络代理除了HTTP代理之外还有一种代理为SOCKS代理
SOCKS代理与其他类型的代理不同,它只是简单地传递数据包,而并不关心是何种应用协议,可以是HTTP请求,所以SOCKS代理服务器比其他类型的代理服务器速度要快得多。
SOCKS代理又分为SOCKS4和SOCKS5:
SOCKS4代理只支持TCP协议(即传输控制协议)SOCKS5代理则既支持TCP协议又支持UDP协议(即用户数据包协议),还支持各种身份验证机制、服务器端域名解析等。
SOCK4能做到的 SOCKS5都可得到,但SOCKS5能够做到的SOCK4则不一定能做到,比如我们常用的聊天工具QQ在使用代理时就要求用SOCKS5代理,因为它需要使用UDP协议来传输数据
代理的连接过程小节参考文献:
Jerry Qu https://imququ.com/post/web-proxy.html
码农翻身记 https://www.jianshu.com/p/63ba15d8877a
总结
ConnectInterceptor的intercept()虽然非常简短,但是内部却很复杂,其作用也是获取到网络连接的输入输出流,获取连接的过程分为复用和新建。
- 复用的逻辑是非常复杂的,复用规则具体分为两种情况域名完全一致,以及域名不一致时,具体的规则读者可以再复习之前的文章。
- 新建连接的逻辑也不简单,分为隧道连接和普通连接,具体详情读者看上面文章回顾即可。
获取连接后,获取输入输出流就比较简单了,只是调用Socket的API就可以获取,复杂的是对他们进行层层包装,具体的包装过程读者自行阅读上面文章回顾。
最终的流结构为:Exchange(ExchangeCodec(流)),ExchangeCodec有两个实现类Http1ExchangeCodec和Http1ExchangeCodec, Exchange最终会交给CallServerInterceptor进行操作。
✨ 原创不易,还希望各位大佬支持一下 \textcolor{blue}{原创不易,还希望各位大佬支持一下} 原创不易,还希望各位大佬支持一下
👍 点赞,你的认可是我创作的动力! \textcolor{green}{点赞,你的认可是我创作的动力!} 点赞,你的认可是我创作的动力!
⭐️ 收藏,你的青睐是我努力的方向! \textcolor{green}{收藏,你的青睐是我努力的方向!} 收藏,你的青睐是我努力的方向!
✏️ 评论,你的意见是我进步的财富! \textcolor{green}{评论,你的意见是我进步的财富!} 评论,你的意见是我进步的财富!
下篇预告:分析第五个拦截器-CallServerInterceptor ,分析其如何处理输入输出流


 1141
1141

 被折叠的 条评论
为什么被折叠?
被折叠的 条评论
为什么被折叠?
 到【灌水乐园】发言


