


一、概念
AIDL (Android Interface Definition Language)
AIDL:当两个进程之间想要实现通信时,借助AIDL可以生成可序列化的参数,将对象分解成操作系统可以理解的基本单元,并且有序的通过进程边界,从而达到在不同进程间传递数据对象的目的。
二、编写AIDL需要注意的一些事项
1.接口名和aidl文件名相同.
2.接口和方法前不用加访问权限修饰符public,private,protected等,也不能用final,static.
3.aidl默认支持的类型包话java基本类型(int,long,boolean等)和(String,List,Map,
CharSequence),使用这些类型时不需要import声明.对于List和Map中的元素类型必须是aidl支持的类型.如果使用自定义类型作为参数或返回值,自定义类型必须实现Parcelable接口.
4.自定义类型和AIDL生成的其它接口类型在aidl描述文件中,应该显式import,即便在该类和定义的包在同一个包中.
5.在aidl文件中所有非Java基本类型参数必须加上in、out、inout标记,以指明参数是输入参数、输出参数还是输入输出参数.
6.Java原始类型默认的标记为in,不能为其它标记
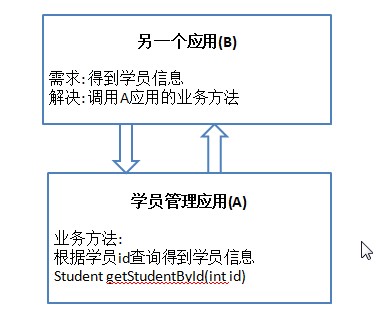
三、实例
我们这里通过写一个在B应用当中调用A应用的业务方法来达到通信的例子来解释AIDL的使用方法及步骤:
第一步:创建IStudentService.aidl
package com.jinru.service.test.remote;


interface IStudentService {
       Student getStudentById(int id);
}
第二步:定义自定义类Student
import android.os.Parcel;
import android.os.Parcelable;
//在这里必须实现Parceable接口,为了方便后面的数据打包,解包
public class Student implements Parcelable{

    private int id;
    private String name;
    private int age;

    public Student(int id, String name, int age) {
        super();
        this.id = id;
        this.name = name;
        this.age = age;
    }

    public Student() {
        super();
    }

    public int getId() {
        return id;
    }

    public void setId(int id) {
        this.id = id;
    }

    public String getName() {
        return name;
    }

    public void setName(String name) {
        this.name = name;
    }

    public int getAge() {
        return age;
    }

    public void setAge(int age) {
        this.age = age;
    }

    @Override
    public String toString() {
        return "Student [id=" + id + ", name=" + name + ", age=" + age + "]";
    }

    @Override
    public int describeContents() {
        return 0;
    }

    //将当前对象的属性数据写到Parcel包对象中(也就是打包)
    //打包: 将对象的数据保存到包对象中
    @Override
    public void writeToParcel(Parcel dest, int flags) {
        //写id
        dest.writeInt(id);
        //写name
        dest.writeString(name);
        //写age
        dest.writeInt(age);
    }
 // 添加一个静态成员,名为CREATOR,该对象实现了Parcelable.Creator接口
    public static final Parcelable.Creator<Student> CREATOR  = new Creator<Student>() {

        //提供保存多个student对象的容器对象
        @Override
        public Student[] newArray(int size) {
            return new Student[size];
        }

        //解包: 从包对象中读取数据并封装成一个指定类型的对象,注意:写跟读的顺序要一致!!**有序的通过进程边界**
        @Override
        public Student createFromParcel(Parcel source) {
            int id = source.readInt();
            String name = source.readString();
            int age = source.readInt();
            return new Student(id, name, age);
        }
    };
}
第三步:创建文件 Student.aidl
package com.jinru.service.test.remote;
parcelable Student;
第四步:在第一步写的接口当中添加导包
import com.jinru.service.test.remote.Student;
第五步:上面的步骤完成以后,eclipse自动生成一个通信接口类

第六步:修改服务端。在远程服务中创建StudentService类继承IStudentService.Stub并实现他的抽象方法getStudentById,并修改onBind()方法中的返回值。
package com.jinru.service.remote;

import android.app.Service;
import android.content.Intent;
import android.os.Binder;
import android.os.IBinder;
import android.os.RemoteException;
import android.util.Log;

/**
 * 自定义远程Service
 * @author Administrator
 *
 */
public class MyRemoteService extends Service {


    @Override
    public void onCreate() {
        super.onCreate();
        Log.e("TAG", "MyRemoteService onCreate()");
    }

    @Override
    public IBinder onBind(Intent intent) {
        Log.e("TAG", "MyRemoteService onBind()");
        return new StudentService();
    }

    @Override
    public void onDestroy() {
        super.onDestroy();
        Log.e("TAG", "MyRemoteService onDestroy()");
    }


    class StudentService extends IStudentService.Stub {

        @Override
    public Student getStudentById(int id) throws RemoteException {
    Log.e("TAG", "service getStudentById() "+id);
            return new Student(id, "Tom", 12);
        }
    }
}
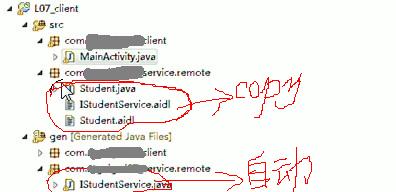
第七步:进行客户端编码
1. 复制服务端AIDL的相关定义
2. eclipse自动生成一个通信接口类
3. 在Activity中bind远程Service,并调用业务方法
private ServiceConnection connection = new ServiceConnection() {

    public void onServiceDisconnected(ComponentName name) {
   }

    public void onServiceConnected(ComponentName name, IBinder service) {
    studentService = IStudentService.Stub.asInterface(service);
   }
};
最后,客户端的Activity里面的完整代码就是这样子了:
public class MainActivity extends Activity {

    private ServiceConnection conn;
    private IStudentService studentService;
    private EditText et_aidl_id;

    @Override
    protected void onCreate(Bundle savedInstanceState) {
        super.onCreate(savedInstanceState);
        setContentView(R.layout.activity_main);

        et_aidl_id = (EditText) findViewById(R.id.et_aidl_id);
    }


    public void invokeRemote(View v) throws RemoteException {
        if(studentService!=null) {
            int id = Integer.parseInt(et_aidl_id.getText().toString());
            Student student = studentService.getStudentById(id); //调用远程Service端的方法
            Toast.makeText(this, student.toString(), 0).show();
        } else {
            Toast.makeText(this, "远程服务还没有绑定", 0).show();
        }

    }

    //绑定远程Service
    public void bindRemoteService(View v) {
        if(conn==null) {
            conn = new ServiceConnection() {

    @Override
    public void onServiceDisconnected(ComponentName name) {
                }
    @Override
    public void onServiceConnected(ComponentName name, IBinder service) {
    Log.e("TAG", "onServiceConnected()");
    studentService = IStudentService.Stub.asInterface(service);
                }
            };

    Intent intent = new Intent("com.atguigu.l07_service.remote.MyRemoteService.Action");
            bindService(intent , conn, Context.BIND_AUTO_CREATE);
            Toast.makeText(this, "绑定远程服务", 0).show();
        } else {
            Toast.makeText(this, "远程服务已绑定", 0).show();
        }
    }

    public void unbindRemoteService(View v) {
        if(conn!=null) {
            unbindService(conn);
            conn = null;
            studentService = null;
            Toast.makeText(this, "解绑远程服务", 0).show();
        } else {
            Toast.makeText(this, "远程服务还没有绑定", 0).show();
        }
    }
}
最后附上客户端的activity_main 的xml文件:
<?xml version="1.0" encoding="utf-8"?>
<LinearLayout xmlns:android="http://schemas.android.com/apk/res/android"
    android:layout_width="fill_parent"
    android:layout_height="fill_parent"
    android:orientation="vertical" >

    <Button
        android:layout_width="fill_parent"
        android:layout_height="wrap_content"
        android:onClick="bindRemoteService"
        android:text="bind remote Service" />

    <EditText
        android:id="@+id/et_aidl_id"
        android:layout_width="fill_parent"
        android:layout_height="50dip"
        android:hint="学员ID"
        android:text="3" />

    <Button
        android:layout_width="fill_parent"
        android:layout_height="wrap_content"
        android:onClick="invokeRemote"
        android:text="调用远程服务端的方法" />

    <Button
        android:layout_width="fill_parent"
        android:layout_height="wrap_content"
        android:onClick="unbindRemoteService"
        android:text="unbind remote Service" />

</LinearLayout>
服务端的activity_main的xml文档:(其实这个无所谓)
<?xml version="1.0" encoding="utf-8"?>
<LinearLayout xmlns:android="http://schemas.android.com/apk/res/android"
    android:layout_width="fill_parent"
    android:layout_height="fill_parent"
    android:orientation="vertical" >

    <TextView
        android:layout_width="wrap_content"
        android:layout_height="wrap_content"
        android:text="1. 测试启动本地服务"
        android:textSize="25sp" />

    <LinearLayout
        android:layout_width="match_parent"
        android:layout_height="wrap_content" >

        <Button
            android:id="@+id/button1"
            android:layout_width="0dp"
            android:layout_height="wrap_content"
            android:layout_weight="1"
            android:onClick="startMyService"
            android:text="启动服务" />

        <Button
            android:layout_width="0dp"
            android:layout_height="wrap_content"
            android:layout_weight="1"
            android:onClick="stopMyService"
            android:text="停止服务" />
    </LinearLayout>

    <TextView
        android:layout_width="wrap_content"
        android:layout_height="wrap_content"
        android:layout_marginTop="10dp"
        android:text="2.  测试绑定本地服务"
        android:textSize="25sp" />

    <LinearLayout
        android:layout_width="match_parent"
        android:layout_height="wrap_content" >

        <Button
            android:layout_width="0dp"
            android:layout_height="wrap_content"
            android:layout_weight="1"
            android:onClick="bindMyService"
            android:text="绑定服务" />

        <Button
            android:id="@+id/button2"
            android:layout_width="0dp"
            android:layout_height="wrap_content"
            android:layout_weight="1"
            android:onClick="unbindMyService"
            android:text="解绑服务" />
    </LinearLayout>

</LinearLayout>
注意:别忘记在服务器端注册Service,运行的时候要先启动服务器端,然后启动客户端


 2120
2120

 被折叠的 条评论
为什么被折叠?
被折叠的 条评论
为什么被折叠?
 到【灌水乐园】发言


