


先看一下下面代码运行结果
MainActivity
public class MainActivity extends Activity {

    @Override
    protected void onCreate(Bundle savedInstanceState) {
        super.onCreate(savedInstanceState);
        setContentView(R.layout.activity_main);
    }

    @Override
    public void onContentChanged() {
        super.onContentChanged();
        ListView listView = (ListView) findViewById(R.id.listview);
        listView.setAdapter(new InflateAdapter(this));
    }
}<?xml version="1.0" encoding="utf-8"?>
<LinearLayout xmlns:android="http://schemas.android.com/apk/res/android"
android:layout_width="match_parent"
android:layout_height="match_parent"
android:orientation="vertical">
<ListView
android:id="@+id/listview"
android:layout_width="match_parent"
android:layout_height="match_parent"></ListView>
</LinearLayout>
inflate_layout_item.xml
<?xml version="1.0" encoding="utf-8"?>
<TextView xmlns:android="http://schemas.android.com/apk/res/android"
    android:id="@+id/inflate_item_tv"
    android:layout_width="100dp"
    android:layout_height="50dp"
    android:text="LayoutItem"
    android:gravity="center"
android:background="#0ff"/><?xml version="1.0" encoding="utf-8"?>
<LinearLayout xmlns:android="http://schemas.android.com/apk/res/android"
android:layout_width="wrap_content"
android:layout_height="wrap_content">
<TextView
android:layout_width="100dp"
android:layout_height="50dp"
android:text="LayoutParent"
android:gravity="center"
android:background="#ff0"/>
</LinearLayout>public class InflateAdapter extends BaseAdapter {
private LayoutInflater mInflater = null;
public InflateAdapter(Context context) {
mInflater = LayoutInflater.from(context);
}
@Override
public int getCount() {
return 8;
}
@Override
public Object getItem(int position) {
return null;
}
@Override
public long getItemId(int position) {
return 0;
}
@Override
public View getView(int position, View convertView, ViewGroup parent) {
View[] viewList = {
mInflater.inflate(R.layout.inflate_layout_item, null),
// mInflater.inflate(R.layout.inflate_layout_item, parent),
mInflater.inflate(R.layout.inflate_layout_item, parent, false),
// mInflater.inflate(R.layout.inflate_layout_item, parent, true),
mInflater.inflate(R.layout.inflate_layout_item, null, true),
mInflater.inflate(R.layout.inflate_layout_item, null, false),
mInflater.inflate(R.layout.inflate_layout_parent, null),
// mInflater.inflate(R.layout.inflate_layout_parent, parent),
mInflater.inflate(R.layout.inflate_layout_parent, parent, false),
// mInflater.inflate(R.layout.inflate_layout_parent, parent, true),
mInflater.inflate(R.layout.inflate_layout_parent, null, true),
mInflater.inflate(R.layout.inflate_layout_parent, null, false),
};
convertView = viewList[position];
return convertView;
}
}运行结果
当打开上面viewList数组中任意一行注释都会抛出异常(java.lang.UnsupportedOperationException: addView(View, LayoutParams) is not supported in AdapterView)
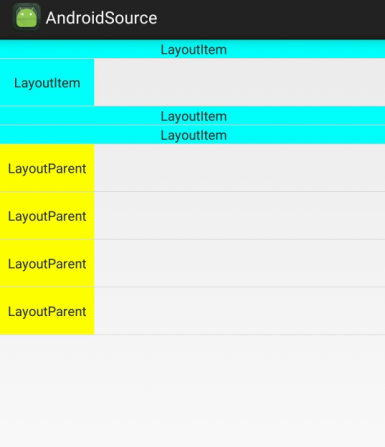
为什么注释掉的有问题,其它的能正常工作呢,带着这些问题去看源码到底是怎么个回事?
LayoutInflater初始化
Activity
final void attach(Context context, ActivityThread aThread,
            Instrumentation instr, IBinder token, int ident,
            Application application, Intent intent, ActivityInfo info,
            CharSequence title, Activity parent, String id,
            NonConfigurationInstances lastNonConfigurationInstances,
            Configuration config, String referrer, IVoiceInteractor voiceInteractor,
            Window window) {
        attachBaseContext(context);

        mFragments.attachHost(null /*parent*/);

        mWindow = new PhoneWindow(this, window);
        ......
        }
PhoneWindow
 public PhoneWindow(Context context, Window preservedWindow) {
        this(context);
        ......
        }
public PhoneWindow(Context context) {
super(context);
mLayoutInflater = LayoutInflater.from(context);
}LayoutInflater
 public static LayoutInflater from(Context context) {
        LayoutInflater LayoutInflater =
                (LayoutInflater) context.getSystemService(Context.LAYOUT_INFLATER_SERVICE);
        if (LayoutInflater == null) {
            throw new AssertionError("LayoutInflater not found.");
        }
        return LayoutInflater;
}LayoutInflater lif = LayoutInflater.from(Context context);
LayoutInflater lif = (LayoutInflater) context.getSystemService(Context.LAYOUT_INFLATER_SERVICE);
得到LayoutInflater对象之后我们就是传递xml然后解析得到View,如下方法:
public View inflate(@LayoutRes int resource, @Nullable ViewGroup root) {
        return inflate(resource, root, root != null);
    }
inflate()方法一般接收两个参数,第一个参数就是要加载的布局id,第二个参数是指给该布局的外部再嵌套一层父布局,如果不需要就直接传null。这样就成功成功创建了一个布局的实例,之后再将它添加到指定的位置就可以显示出来了。
public View inflate(@LayoutRes int resource, @Nullable ViewGroup root, boolean attachToRoot) {
        final Resources res = getContext().getResources();
        if (DEBUG) {
            Log.d(TAG, "INFLATING from resource: \"" + res.getResourceName(resource) + "\" ("
                    + Integer.toHexString(resource) + ")");
        }

        final XmlResourceParser parser = res.getLayout(resource);
        try {
            return inflate(parser, root, attachToRoot);
        } finally {
            parser.close();
        }
    }
public View inflate(XmlPullParser parser, @Nullable ViewGroup root, boolean attachToRoot) {
        synchronized (mConstructorArgs) {
            Trace.traceBegin(Trace.TRACE_TAG_VIEW, "inflate");

            final Context inflaterContext = mContext;
            final AttributeSet attrs = Xml.asAttributeSet(parser);
            Context lastContext = (Context) mConstructorArgs[0];
            mConstructorArgs[0] = inflaterContext;
            View result = root;

            try {
                // Look for the root node.
                int type;
                while ((type = parser.next()) != XmlPullParser.START_TAG &&
                        type != XmlPullParser.END_DOCUMENT) {
                    // Empty
                }

                if (type != XmlPullParser.START_TAG) {  //如果一开始就是END_DOCUMENT,那说明xml文件有问题
                    throw new InflateException(parser.getPositionDescription()
                            + ": No start tag found!");
                }

                final String name = parser.getName(); //这里得到name一定是START_TAG,也就是xml文件里的root节点

                if (DEBUG) {
                    System.out.println("**************************");
                    System.out.println("Creating root view: "
                            + name);
                    System.out.println("**************************");
                }

                if (TAG_MERGE.equals(name)) {
                    //处理merge tag的情况(merge在APP的xml是用作性能优化)
		    //root必须非空且attachToRoot为true,否则抛异常结束(APP使用merge时注意事项,
                    //merge的xml并不代表某个具体的view,只是将它包起来的其他xml的内容 加到某个上层ViewGroup中。)
                    if (root == null || !attachToRoot) {
                        throw new InflateException("<merge /> can be used only with a valid "
                                + "ViewGroup root and attachToRoot=true");
                    }
		//递归inflate方法调运
                    rInflate(parser, root, inflaterContext, attrs, false);
                } else {
                    // Temp is the root view that was found in the xml
                    final View temp = createViewFromTag(root, name, inflaterContext, attrs);//根据Tag节点来创建View对象,这里只创建根布局

                    ViewGroup.LayoutParams params = null;

                    if (root != null) {
                        if (DEBUG) {
                            System.out.println("Creating params from root: " +
                                    root);
                        }
                        // Create layout params that match root, if supplied
                        params = root.generateLayoutParams(attrs); //根据root来获取对应的LayoutParams实例
                        if (!attachToRoot) {
                            // Set the layout params for temp if we are not
                            // attaching. (If we are, we use addView, below)  还原了原有的root根节点属性值
                            temp.setLayoutParams(params);//解释了上面mInflater.inflate(R.layout.inflate_layout_item, parent, false)情况
                        }
                    }

                    if (DEBUG) {
                        System.out.println("-----> start inflating children");
                    }

                    // Inflate all children under temp against its context.
                    rInflateChildren(parser, temp, attrs, true);  //循环遍历这个根布局下的子元素

                    if (DEBUG) {
                        System.out.println("-----> done inflating children");
                    }

                    // We are supposed to attach all the views we found (int temp)
                    // to root. Do that now.
                    if (root != null && attachToRoot) {
                        root.addView(temp, params);//root非空且attachToRoot=true,则将xml布局view添加到root(容器)上
                    }

                    // Decide whether to return the root that was/ passed in or the
                    // top view found in xml.
                    if (root == null || !attachToRoot) {
                        result = temp;
                    }
                }

            } catch (XmlPullParserException e) {
                final InflateException ie = new InflateException(e.getMessage(), e);
                ie.setStackTrace(EMPTY_STACK_TRACE);
                throw ie;
            } catch (Exception e) {
                final InflateException ie = new InflateException(parser.getPositionDescription()
                        + ": " + e.getMessage(), e);
                ie.setStackTrace(EMPTY_STACK_TRACE);
                throw ie;
            } finally {
                // Don't retain static reference on context.
                mConstructorArgs[0] = lastContext;
                mConstructorArgs[1] = null;

                Trace.traceEnd(Trace.TRACE_TAG_VIEW);
            }

            return result;
        }
}- inflate(xmlId,null) 只创建并返回temp对应的View
- inflate(xmlId,parent) 创建temp的View,然后执行root.addView(temp, params),最后返回root
- inflate(xmlId,parent,false) 创建temp的View,然后执行temp.setLayoutParams(params),最后返回是temp
- inflate(xmlId,parent,true) 创建temp的View,然后执行root.addView(temp, params),最后返回root
- inflate(xmlId,null,false) 创建并返回temp对应的View
- inflate(xmlId,null,true) 创建并返回temp对应的View
现在分析一下上面注释掉代码报错的原因:
(java.lang.UnsupportedOperationException: addView(View, LayoutParams) is not supported in AdapterView),抛异常是在AdapterView上
public class ListView extends AbsListView public abstract class AbsListView extends AdapterView<ListAdapter>@Override
public void addView(View child) {
throw new UnsupportedOperationException("addView(View) is not supported in AdapterView");
}
/**
* This method is not supported and throws an UnsupportedOperationException when called.
*
* @param child Ignored.
* @param index Ignored.
*
* @throws UnsupportedOperationException Every time this method is invoked.
*/
@Override
public void addView(View child, int index) {
throw new UnsupportedOperationException("addView(View, int) is not supported in AdapterView");
}上面可以知道,这个inflate()方法不能同时存在parent和attachToRoot=true,否则就会报错,因为AdapterView源码中调用了root.addView(temp, params);而此时的root是我们的ListView


 4559
4559

 被折叠的 条评论
为什么被折叠?
被折叠的 条评论
为什么被折叠?
 到【灌水乐园】发言


