


前言
本文为《Android开发艺术探索》(下面简称“艺术探索”)第八章读书笔记。现在应届生真的好强,比如这位的简书minmin_1123的简书,对《艺术探索》各章节的内容总结的有条有理。
Activity,Window,WindowManager有什么联系
Window表示一个窗口的概念,在日常开发中直接接触Window的机会并不多,但是在某些特殊时候我们需要在桌面上显示一个类似悬浮窗的东西,那么这种效果就需要用到Window来实现。Window的具体实现位于WindowManagerService中, WindowManager和WindowManagerService的交互是一个IPC过程。Android中所的视图都是通过Window来呈现的,不管是 Activity,Dialog还是Toast,它们的视图实际上都是附加在Window上的,因此Window实际是View的直接管理者。从第4章中所讲述的View的事件分发机制也可以知道,单击事件由Window传递给DecorView,然后再DecorView传递给我们的View,连Activity的设置视图的方法setContentView在底也是通过Window来完成的。
从源码角度看,他们之间的依赖,继承关系如下图:
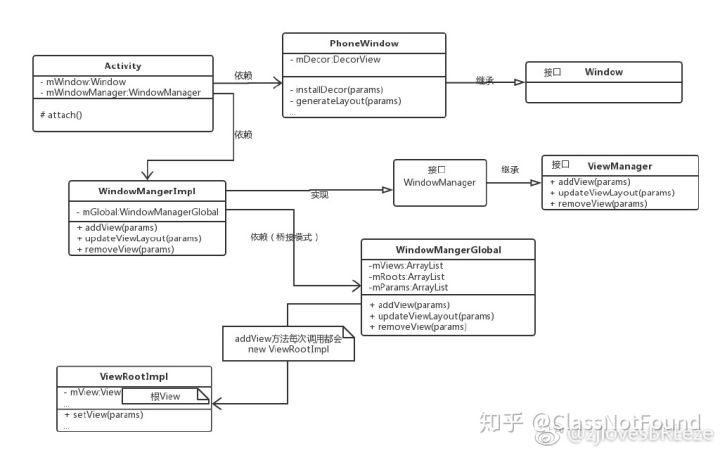
通过查看Activity,Dialog的源码发现,他们所依赖的WindowManager,是通过context.getSystemService()方法获取的,该方法底层又是从SystemServiceRegistry获取服务,而这些服务都是在SystemServiceRegistry的静态代码块中初始化的,所以不管有多少Activity,Dialog,WindowManager的实例只有一个:
/**
SystemServiceRegistry中的静态代码块
*/
static{
...其他service注册
...
    registerService(Context.WINDOW_SERVICE, WindowManager.class,
                new CachedServiceFetcher<WindowManager>() {
            @Override
            public WindowManager createService(ContextImpl ctx) {
                return new WindowManagerImpl(ctx);
            }});
...
}
WindowManagerImpl中依赖的WindowManagerGlobal也是单例模式创建的,所以app范围内,WindowManagerGlobal实例也只有一个,其内部的mViews,mRoots,mParams域维护了Activity(或Dialog等)的根View和ViewRootImpl以及布局参数之间的对应关系。
WindowManager的重要方法
由上面的UML图可知,WindowManager的实现类是WindowManagerImpl,而WindowManagerImpl中的addView,removeView等方法,又是直接调用了WindowManagerGlobal的相应方法。
WindowManagerGlobal#addView()
addView方法内部的实现流程如下:
1.校验参数合法性。如果是子Window,调整布局参数。
if (view == null) {
            throw new IllegalArgumentException("view must not be null");
        }
        if (display == null) {
            throw new IllegalArgumentException("display must not be null");
        }
        if (!(params instanceof WindowManager.LayoutParams)) {
            throw new IllegalArgumentException("Params must be WindowManager.LayoutParams");
        }

        final WindowManager.LayoutParams wparams = (WindowManager.LayoutParams) params;
        if (parentWindow != null) {
            parentWindow.adjustLayoutParamsForSubWindow(wparams);
        } else {
            // If there's no parent, then hardware acceleration for this view is
            // set from the application's hardware acceleration setting.
            final Context context = view.getContext();
            if (context != null
                    && (context.getApplicationInfo().flags
                            & ApplicationInfo.FLAG_HARDWARE_ACCELERATED) != 0) {
                wparams.flags |= WindowManager.LayoutParams.FLAG_HARDWARE_ACCELERATED;
            }
}
2.检查View是否已经被添加,如果有,直接抛出异常
int index = findViewLocked(view, false);
if (index >= 0) {
   if (mDyingViews.contains(view)) {
     // Don't wait for MSG_DIE to make it's way through root's queue.
       mRoots.get(index).doDie();
    } else {
       throw new IllegalStateException("View " + view + " has already been added to the window manager.");
   }
// The previous removeView() had not completed executing. Now it has.
}
3.创建ViewRootImpl,并用mRoots,mViews,mParams列表来维护对应关系
root = new ViewRootImpl(view.getContext(), display);
view.setLayoutParams(wparams);
mViews.add(view);
mRoots.add(root);
mParams.add(wparams);
4.通过ViewRootImpl的setView方法,触发View的绘制流程并完成Window的添加
WindowManagerGlobal#removeView
一张图总结removeView所涉及的主要方法以及他们之间的关系:
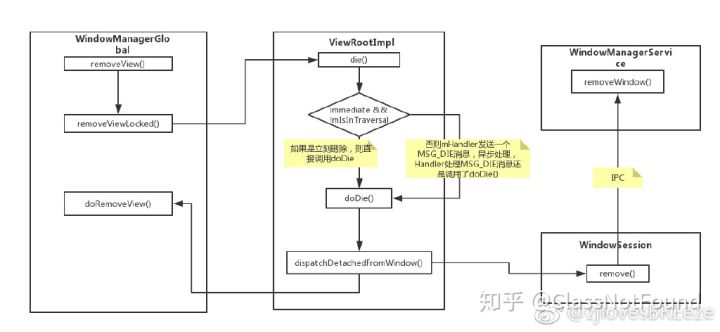
解释一下图中部分方法的作用:
a. removeViewLocked方法内部调用die方法,die方法会返回一个布尔值dffered表示是否延迟删除View。如果dffered为true,则会把该View添加到WindowManagerGlobal的mDyingViews列表中。
b. dispatchDetachedFromWindow方法内部,会触发View的onDetachedFromWindow(),onDetachedFromWindowInternal();因此,正如《艺术探索》第三章自定义View注意事项中提及的,可在该方法中停止动画,终止线程,回收资源等。
c. doDie内部先后调用了dispatchDetachedFromWindow和doRemoveView。doRemoveView的工作是把mRoots,mViews,mParams,mDyingViews的数据刷新了。
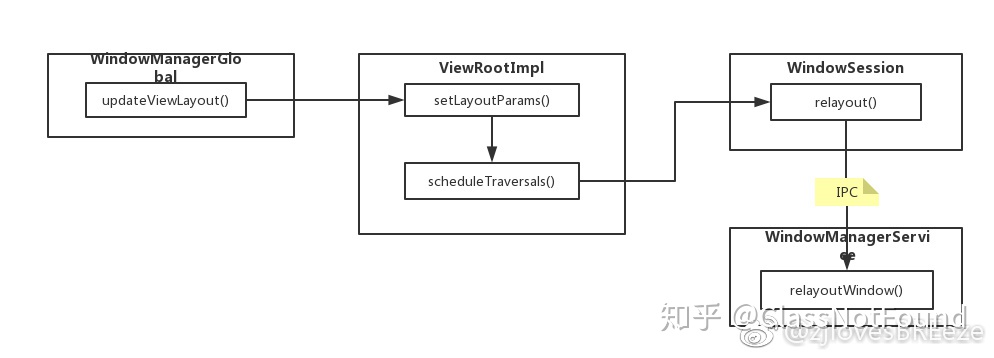
WindowManagerGlobal#updateViewLayout
还是图比较清楚,并且没什么好解释的:
Window的创建过程
在解释“Activity,Window,WindowManager有什么联系”时引用了《艺术探索》中的一段话,其中说到
Android中所有的视图都是通过Window呈现的。View是附加在Window上的。Window是View的直接管理者。
其实通过分析Activity,Dialog,Toast中Window的创建过程,更能够体会他们与Window的关系。
Activity的Window创建,视图显示
ActivityThread的内部Handler(H)接收到LAUNCH_ACTIVITY消息后,会调用handleLaunchActivity去启动Activity,handleLaunchActivity会调用performLaunchActivity,performLaunchActivity会通过ClassLoader实例化Activity,然后就会调用Activity的attach方法,Activity的Window就是在attach方法中被实例化的:
//Activity的attach方法,sdk version 25
final void attach(Context context, ActivityThread aThread,
            Instrumentation instr, IBinder token, int ident,
            Application application, Intent intent, ActivityInfo info,
            CharSequence title, Activity parent, String id,
            NonConfigurationInstances lastNonConfigurationInstances,
            Configuration config, String referrer, IVoiceInteractor voiceInteractor,
            Window window) {
        attachBaseContext(context);

        mFragments.attachHost(null /*parent*/);

        mWindow = new PhoneWindow(this, window);//代码1
        mWindow.setWindowControllerCallback(this);
        mWindow.setCallback(this);
        mWindow.setOnWindowDismissedCallback(this);
        mWindow.getLayoutInflater().setPrivateFactory(this);
        if (info.softInputMode != WindowManager.LayoutParams.SOFT_INPUT_STATE_UNSPECIFIED) {
            mWindow.setSoftInputMode(info.softInputMode);
        }
        if (info.uiOptions != 0) {
            mWindow.setUiOptions(info.uiOptions);
        }
        mUiThread = Thread.currentThread();

        mMainThread = aThread;
        mInstrumentation = instr;
        mToken = token;
        mIdent = ident;
        mApplication = application;
        mIntent = intent;
        mReferrer = referrer;
        mComponent = intent.getComponent();
        mActivityInfo = info;
        mTitle = title;
        mParent = parent;
        mEmbeddedID = id;
        mLastNonConfigurationInstances = lastNonConfigurationInstances;
        if (voiceInteractor != null) {
            if (lastNonConfigurationInstances != null) {
                mVoiceInteractor = lastNonConfigurationInstances.voiceInteractor;
            } else {
                mVoiceInteractor = new VoiceInteractor(voiceInteractor, this, this,
                        Looper.myLooper());
            }
        }
        //代码2
        mWindow.setWindowManager(
                (WindowManager)context.getSystemService(Context.WINDOW_SERVICE),
                mToken, mComponent.flattenToString(),
                (info.flags & ActivityInfo.FLAG_HARDWARE_ACCELERATED) != 0);
        if (mParent != null) {
            mWindow.setContainer(mParent.getWindow());
        }
        mWindowManager = mWindow.getWindowManager();
        mCurrentConfig = config;
    }
可以看到在sdk25中Window是直接通过new PhoneWindow()实例化的(《艺术探索》中可能基于sdk25之前的源码,分析出Activity的Window是通过PolicyManager.makeNewWindow()创建的,其底层也是new出了PhoneWindow)。之后就是给Window设置回调,这里直接传入了this,即Activity实现了Window的回调接口:
//Window的内部类Callback
 public interface Callback {
         .....
        public boolean dispatchKeyEvent(KeyEvent event);
        public boolean dispatchKeyShortcutEvent(KeyEvent event);
        //看到了熟悉的dispatchTouchEvent
        public boolean dispatchTouchEvent(MotionEvent event);
        ......
}
以上,我们知道了Activity的Window的具体实现是PhoneWindow,那么我们通过setContentView设置的视图内容是如何依附到PhoneWindow的呢?通过Activity的setContentView源码可知,其调用了PhoneWindow的setContentView方法:
//PhoneWindow setContentView
public void setContentView(int layoutResID) {
        if (mContentParent == null) {
            installDecor();
        } else if (!hasFeature(FEATURE_CONTENT_TRANSITIONS)) {
            mContentParent.removeAllViews();
        }
        if (hasFeature(FEATURE_CONTENT_TRANSITIONS)) {
            final Scene newScene = Scene.getSceneForLayout(mContentParent, layoutResID,
                    getContext());
            transitionTo(newScene);
        } else {
            mLayoutInflater.inflate(layoutResID, mContentParent);
        }
        mContentParent.requestApplyInsets();
        final Callback cb = getCallback();
        if (cb != null && !isDestroyed()) {
            cb.onContentChanged();
        }
        mContentParentExplicitlySet = true;
    }
经过setContentView中的一系列操作后,最终我们设置的布局文件在Activity的视图中处于如下图所示的位置:
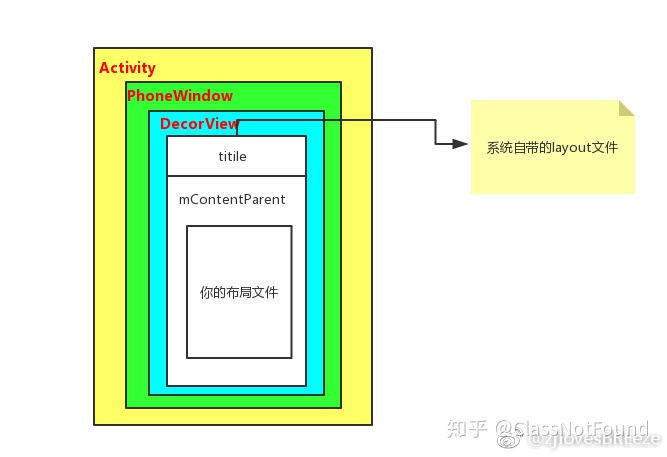
其实这张图表示的并不严谨,因为Activity,PhoneWindow并不是View树中的一个层级,真正承载视图的是DecorView。图中所示的系统自带的layout样式,也不一定有title,installDecor方法内部调用的generateLayout方法,会根据不同的feature,加载不同的系统布局样式:
protected ViewGroup generateLayout(DecorView decor) {
    ....
     int layoutResource;
    int features = getLocalFeatures();
        if ((features & (1 << FEATURE_SWIPE_TO_DISMISS)) != 0) {
            layoutResource = R.layout.screen_swipe_dismiss;
        } else if ((features & ((1 << FEATURE_LEFT_ICON) | (1 << FEATURE_RIGHT_ICON))) != 0) {
            if (mIsFloating) {
                TypedValue res = new TypedValue();
                getContext().getTheme().resolveAttribute(
                        R.attr.dialogTitleIconsDecorLayout, res, true);
                layoutResource = res.resourceId;
            } else {
                layoutResource = R.layout.screen_title_icons;
            }
             removeFeature(FEATURE_ACTION_BAR);
        } else if ((features & ((1 << FEATURE_PROGRESS) | (1 <<
 && (features & (1 << FEATURE_ACTION_BAR)) == 0) {
            layoutResource = R.layout.screen_progress;
        }......
        .....
         mDecor.onResourcesLoaded(mLayoutInflater, layoutResource);

        ViewGroup contentParent = (ViewGroup)findViewById(ID_ANDROID_CONTENT);
        if (contentParent == null) {
            throw new RuntimeException("Window couldn't find content container view");
        }
        .....
        return contentParent;
 }
根据feature找到不同样式的layout后,mDecor.onResourcesLoaded()方法会把系统的layout添加到decorview中。可以看出,不管是哪个layoutResource,都会含有一个id为ID_ANDROID_CONTENT的ViewGroup,其实这就是mContentParent,我们通过setContentView设置的layout会作为mContentParent的子View被加载。
其实经过如上过程,activity的视图内容就和Window关联起来了,接下来就是绘制视图,并把Window显示出来,这些步骤是在ActivityThread的handleResumeActivity()方法触发的:
//ActivityThread handleResumeActivity方法
final void handleResumeActivity(IBinder token,
boolean clearHide, boolean isForward, boolean reallyResume, int seq, String reason) {
.....
r.window = r.activity.getWindow();
View decor = r.window.getDecorView();
decor.setVisibility(View.INVISIBLE);
ViewManager wm = a.getWindowManager();
WindowManager.LayoutParams l = r.window.getAttributes();
a.mDecor = decor;
l.type = WindowManager.LayoutParams.TYPE_BASE_APPLICATION;
l.softInputMode |= forwardBit;
if (r.mPreserveWindow) {
a.mWindowAdded = true;
r.mPreserveWindow = false;
// Normally the ViewRoot sets up callbacks with the Activity
// in addView->ViewRootImpl#setView. If we are instead reusing
// the decor view we have to notify the view root that the
// callbacks may have changed.
ViewRootImpl impl = decor.getViewRootImpl();
if (impl != null) {
impl.notifyChildRebuilt();
}
}
if (a.mVisibleFromClient && !a.mWindowAdded) {
a.mWindowAdded = true;
wm.addView(decor, l);
}
....
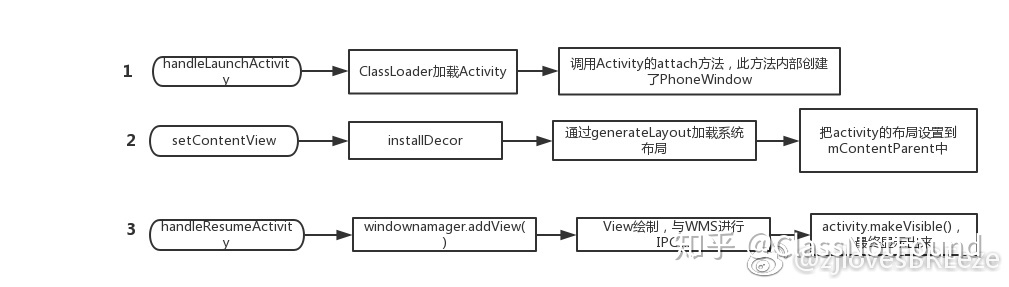
}可以看到最终调用了WindowManager的addView方法,这个方法之前已经分析过了。最后用一张图简单总结Activity视图显示经历的三个过程:
Dialog的Window的创建过程
Dialog的视图也是依附在PhoneWindow上的,这一点可以从其构造函数中看出:
Dialog(@NonNull Context context, @StyleRes int themeResId, boolean createContextThemeWrapper) {
        if (createContextThemeWrapper) {
            if (themeResId == 0) {
                final TypedValue outValue = new TypedValue();
                context.getTheme().resolveAttribute(R.attr.dialogTheme, outValue, true);
                themeResId = outValue.resourceId;
            }
            mContext = new ContextThemeWrapper(context, themeResId);
        } else {
            mContext = context;
        }

        mWindowManager = (WindowManager) context.getSystemService(Context.WINDOW_SERVICE);

        final Window w = new PhoneWindow(mContext);
        mWindow = w;
        w.setCallback(this);
        w.setOnWindowDismissedCallback(this);
        w.setWindowManager(mWindowManager, null, null);
        w.setGravity(Gravity.CENTER);

        mListenersHandler = new ListenersHandler(this);
    }
Dialog也可以通过setContentView设置自定义的布局,其内部实现和Activity一样,也是调用了PhoneWindow的setContentView方法。Dialog的Window被添加到WindowManager中,是在其show方法被调用时发生的。
Toast的显示过程
Toast的创建和显示过程中,不存在PhoneWindow,也就不存在Dialog和Activity中视图创建时会创建DecorView以及把自定义layout设置到mContentParent的过程。
我们经常使用Toast.makeText方法,会默认加载系统自带的布局,该布局中包含一个TextView,我们传入的文字信息就会被设置在这个TextView上。
//Toast的构造方法和makeText方法
public Toast(Context context) {
        mContext = context;
        mTN = new TN();
        mTN.mY = context.getResources().getDimensionPixelSize(
                com.android.internal.R.dimen.toast_y_offset);
 //这里点进config.xml查看可发现,默认的gravity是CENTER_HORIZANTAL和BOTTOM
        mTN.mGravity = context.getResources().getInteger(
                com.android.internal.R.integer.config_toastDefaultGravity);
    }

public static Toast makeText(Context context, CharSequence text, @Duration int duration) {
  Toast result = new Toast(context);
 LayoutInflater inflate = (LayoutInflater)
 context.getSystemService(Context.LAYOUT_INFLATER_SERVICE);
 View v = inflate.inflate(com.android.internal.R.layout.transient_notification, null);
 TextView tv = (TextView)v.findViewById(com.android.internal.R.id.message);
 tv.setText(text);
 result.mNextView = v;
 result.mDuration = duration;
 return result;
}Toast的显示过程,用流程图来表达更清楚(图片引用自CSDN废墟的树):

总结
《艺术探索》第3章,第4章,第8章的读书笔记,我是放在一起写的,第三章介绍了View的事件体系,第四章介绍了View的绘制过程,第八章其实是介绍了开发中常见的Activity,Dialog,Toast中的View是如何被管理和显示的。我认为这三张串联起来,作者描述了Android“视图系统”(我自己这么称呼的。。)的工作原理。


 1237
1237


 被折叠的 条评论
为什么被折叠?
被折叠的 条评论
为什么被折叠?
 到【灌水乐园】发言


