


 本文详细介绍了MySQL的binlog功能,包括启用binlog的配置方法、查看binlog状态、模拟数据丢失并恢复的过程。通过实例展示了如何利用binlog备份和恢复数据库,包括创建数据库、建表、插入数据、删库跑路后的恢复操作,强调了binlog在数据安全和灾难恢复中的重要作用。
提示:文章写完后,目录可以自动生成,如何生成可参考右边的帮助文档
文章目录
前言
早上在公交车上看到**_江南一点雨**写的关于mysql-binlog的文章,文章里对用binlog恢复数据库的使用方法写的十分详尽,我这种仅限于会安装mysql的水平都能看懂,所以没出差就在公司试一下。
一、binlog是什么?
binlog其实和oracle的archivelog归档日志一样。
二、MYSQL开启binlog
查看mysql有没有开启binlog
mysql> show variables like 'log_bin%';
+---------------------------------+-----------------------------+
| Variable_name                   | Value                       |
+---------------------------------+-----------------------------+
| log_bin                         | ON                          |
| log_bin_basename                | /var/lib/mysql/binlog       |
| log_bin_index                   | /var/lib/mysql/binlog.index |
| log_bin_trust_function_creators | OFF                         |
| log_bin_use_v1_row_events       | OFF                         |
+---------------------------------+-----------------------------+
5 rows in set (0.00 sec)
log_bin=no 代表数据库没有启用binlog功能。
怎么确定mysql当前使用的是哪个my.cnf配置文件
用下面命令查看mysql所有配置文件,mysql会自动从第一个识别,如果不是就往后顺延。
[root@hisdb etc]# mysql --help | grep 'Default options' -A 1
Default options are read from the following files in the given order:
/etc/my.cnf /etc/mysql/my.cnf /usr/etc/my.cnf ~/.my.cnf
或者
[root@hisdb etc]# whereis my.cnf
my: /etc/my.cnf
在my.cnf中插入以下参数
# 这个参数表示启用 binlog 功能,并指定 binlog 的存储目录
log-bin=binlog
# 设置一个 binlog 文件的最大字节
# 设置最大 100MB
max_binlog_size=104857600
# 设置了 binlog 文件的有效期(单位:天)
expire_logs_days = 7
# binlog 日志只记录指定库的更新(配置主从复制的时候会用到)
#binlog-do-db=javaboy_db
# binlog 日志不记录指定库的更新(配置主从复制的时候会用到)
#binlog-ignore-db=javaboy_no_db
# 写缓存多少次,刷一次磁盘,默认 0 表示这个操作由操作系统根据自身负载自行决定多久写一次磁盘
# 1 表示每一条事务提交都会立即写磁盘,n 则表示 n 个事务提交才会写磁盘
sync_binlog=0
# 为当前服务取一个唯一的 id(MySQL5.7 之后需要配置)
server-id=1
重启mysql
mysql> show variables like 'log_bin%';
+---------------------------------+-----------------------------+
| Variable_name                   | Value                       |
+---------------------------------+-----------------------------+
| log_bin                         | ON                          |
| log_bin_basename                | /var/lib/mysql/binlog       |
| log_bin_index                   | /var/lib/mysql/binlog.index |
| log_bin_trust_function_creators | OFF                         |
| log_bin_use_v1_row_events       | OFF                         |
+---------------------------------+-----------------------------+
5 rows in set (0.01 sec)
三、模拟数据丢失(删库跑路)
创建实例test、建表并插入数据
mysql> create database test;
Query OK, 1 row affected (0.02 sec)

mysql> use test;
Database changed
mysql> create table employee6(emp_id int auto_increment primary key, emp_name varchar(50), age int, dept_id int);
Query OK, 0 rows affected (0.07 sec)

mysql> insert into employee6(emp_name,age,dept_id) values
    -> ('tianyun',19,200),
    -> ('tom',26,201),
    -> ('jack',30,201),
    -> ('alice',24,202),
    -> ('robin',40,200),
    -> ('natasha',28,204);
Query OK, 6 rows affected (0.11 sec)
Records: 6  Duplicates: 0  Warnings: 0

mysql> commit;
Query OK, 0 rows affected (0.00 sec)

mysql> create table t1 as select * from employee6 where 1=1;
Query OK, 6 rows affected (0.05 sec)
Records: 6  Duplicates: 0  Warnings: 0

mysql> commit;
Query OK, 0 rows affected (0.00 sec)
查看当前binlog列表
mysql> show master logs;
+---------------+-----------+-----------+
| Log_name      | File_size | Encrypted |
+---------------+-----------+-----------+
| binlog.000001 |       499 | No        |
| binlog.000002 |      1648 | No        |
+---------------+-----------+-----------+
2 rows in set (0.00 sec)
手动切换binlog,每次切换都会产生一个新的binlog,之前插入t1表的过程被记录在了binlog.000002中。
mysql> flush logs;
Query OK, 0 rows affected (0.03 sec)

mysql> show master logs;
+---------------+-----------+-----------+
| Log_name      | File_size | Encrypted |
+---------------+-----------+-----------+
| binlog.000001 |       499 | No        |
| binlog.000002 |      1692 | No        |
| binlog.000003 |       156 | No        |
+---------------+-----------+-----------+
3 rows in set (0.00 sec)
查看binlog文件,里面可以找到我们做的所有操作记录和相对应的pos点。
mysql> show binlog events in 'binlog.000002';
+---------------+------+----------------+-----------+-------------+----------------------------------------------------------------------------------------------------------------------------------------------------------------------------------------+
| Log_name      | Pos  | Event_type     | Server_id | End_log_pos | Info                                                                                                                                                                                   |
+---------------+------+----------------+-----------+-------------+----------------------------------------------------------------------------------------------------------------------------------------------------------------------------------------+
| binlog.000002 |    4 | Format_desc    |         1 |         125 | Server ver: 8.0.27, Binlog ver: 4                                                                                                                                                      |
| binlog.000002 |  125 | Previous_gtids |         1 |         156 |                                                                                                                                                                                        |
| binlog.000002 |  156 | Anonymous_Gtid |         1 |         233 | SET @@SESSION.GTID_NEXT= 'ANONYMOUS'                                                                                                                                                   |
| binlog.000002 |  233 | Query          |         1 |         341 | create database test /* xid=7 */                                                                                                                                                       |
| binlog.000002 |  341 | Anonymous_Gtid |         1 |         420 | SET @@SESSION.GTID_NEXT= 'ANONYMOUS'                                                                                                                                                   |
| binlog.000002 |  420 | Query          |         1 |         613 | use `test`; create table employee6(emp_id int auto_increment primary key, emp_name varchar(50), age int, dept_id int) /* xid=13 */                                                     |
| binlog.000002 |  613 | Anonymous_Gtid |         1 |         692 | SET @@SESSION.GTID_NEXT= 'ANONYMOUS'                                                                                                                                                   |
| binlog.000002 |  692 | Query          |         1 |         767 | BEGIN                                                                                                                                                                                  |
| binlog.000002 |  767 | Table_map      |         1 |         832 | table_id: 91 (test.employee6)                                                                                                                                                          |
| binlog.000002 |  832 | Write_rows     |         1 |         982 | table_id: 91 flags: STMT_END_F                                                                                                                                                         |
| binlog.000002 |  982 | Xid            |         1 |        1013 | COMMIT /* xid=15 */                                                                                                                                                                    |
| binlog.000002 | 1013 | Anonymous_Gtid |         1 |        1092 | SET @@SESSION.GTID_NEXT= 'ANONYMOUS'                                                                                                                                                   |
| binlog.000002 | 1092 | Query          |         1 |        1167 | BEGIN                                                                                                                                                                                  |
| binlog.000002 | 1167 | Query          |         1 |        1409 | use `test`; CREATE TABLE `t1` (
  `emp_id` int NOT NULL DEFAULT '0',
  `emp_name` varchar(50) DEFAULT NULL,
  `age` int DEFAULT NULL,
  `dept_id` int DEFAULT NULL
) START TRANSACTION |
| binlog.000002 | 1409 | Table_map      |         1 |        1467 | table_id: 92 (test.t1)                                                                                                                                                                 |
| binlog.000002 | 1467 | Write_rows     |         1 |        1617 | table_id: 92 flags: STMT_END_F                                                                                                                                                         |
| binlog.000002 | 1617 | Xid            |         1 |        1648 | COMMIT /* xid=18 */                                                                                                                                                                    |
| binlog.000002 | 1648 | Rotate         |         1 |        1692 | binlog.000003;pos=4                                                                                                                                                                    |
+---------------+------+----------------+-----------+-------------+----------------------------------------------------------------------------------------------------------------------------------------------------------------------------------------+
18 rows in set (0.01 sec)
备份test实例
[root@hisdb mysql]# mysqldump -uroot -p --flush-logs --lock-tables -B test>/home/test.bak.sql
Enter password:
[root@hisdb mysql]# cd /home/
[root@hisdb home]# ls
mysql80-community-release-el7-3.noarch.rpm  oracle  soft  test.bak.sql  z
备份完成后在test中插入t2表,这个操作被记录在了binlog.000003中
mysql> create table t2 (name varchar(20));
Query OK, 0 rows affected (0.06 sec)

mysql> insert into t2 values('ning');
Query OK, 1 row affected (0.01 sec)

mysql> commit;
Query OK, 0 rows affected (0.00 sec)

mysql> insert into t2 values('lllng');
Query OK, 1 row affected (0.09 sec)

mysql> commit;
Query OK, 0 rows affected (0.00 sec)
删库跑路,删除test实例
mysql> show databases;
+--------------------+
| Database           |
+--------------------+
| information_schema |
| mysql              |
| performance_schema |
| sys                |
| test               |
+--------------------+
5 rows in set (0.00 sec)

mysql> drop database test;
Query OK, 2 rows affected (1.39 sec)

mysql> show databases;
+--------------------+
| Database           |
+--------------------+
| information_schema |
| mysql              |
| performance_schema |
| sys                |
+--------------------+
4 rows in set (0.00 sec)
mysql> exit
用之前的备份做恢复,这里因为数据量很小所以恢复很快。
[root@hisdb home]# mysql -uroot -p < /home/test.bak.sql
Enter password:
恢复结束后查看数据
[root@hisdb home]# mysql -uroot -p'Huawei12#$'
mysql: [Warning] Using a password on the command line interface can be insecure.
Welcome to the MySQL monitor.  Commands end with ; or \g.
Your MySQL connection id is 18
Server version: 8.0.27 MySQL Community Server - GPL

Copyright (c) 2000, 2021, Oracle and/or its affiliates.

Oracle is a registered trademark of Oracle Corporation and/or its
affiliates. Other names may be trademarks of their respective
owners.

Type 'help;' or '\h' for help. Type '\c' to clear the current input statement.

mysql> show databases;
+--------------------+
| Database           |
+--------------------+
| information_schema |
| mysql              |
| performance_schema |
| sys                |
| test               |
+--------------------+
5 rows in set (0.01 sec)

mysql> select * from t1;
ERROR 1046 (3D000): No database selected
mysql> use test;
Reading table information for completion of table and column names
You can turn off this feature to get a quicker startup with -A

Database changed
mysql> select * from t1;
+--------+----------+------+---------+
| emp_id | emp_name | age  | dept_id |
+--------+----------+------+---------+
|      1 | tianyun  |   19 |     200 |
|      2 | tom      |   26 |     201 |
|      3 | jack     |   30 |     201 |
|      4 | alice    |   24 |     202 |
|      5 | robin    |   40 |     200 |
|      6 | natasha  |   28 |     204 |
+--------+----------+------+---------+
6 rows in set (0.00 sec)
这里因为做备份的时候t2表还没创建,所以用备份恢复后查询不到t2表,t2表需要用binlog来恢复。
mysql> select * from t2;
ERROR 1146 (42S02): Table 'test.t2' doesn't exist
用binlog恢复test实例到删库前时间点
mysql> show master logs;
+---------------+-----------+-----------+
| Log_name      | File_size | Encrypted |
+---------------+-----------+-----------+
| binlog.000001 |       499 | No        |
| binlog.000002 |      1692 | No        |
| binlog.000003 |       200 | No        |
+---------------+-----------+-----------+
4 rows in set (0.00 sec)
查看binlog.000003并找到删库前的pos点
mysql> show binlog events in 'binlog.000003';
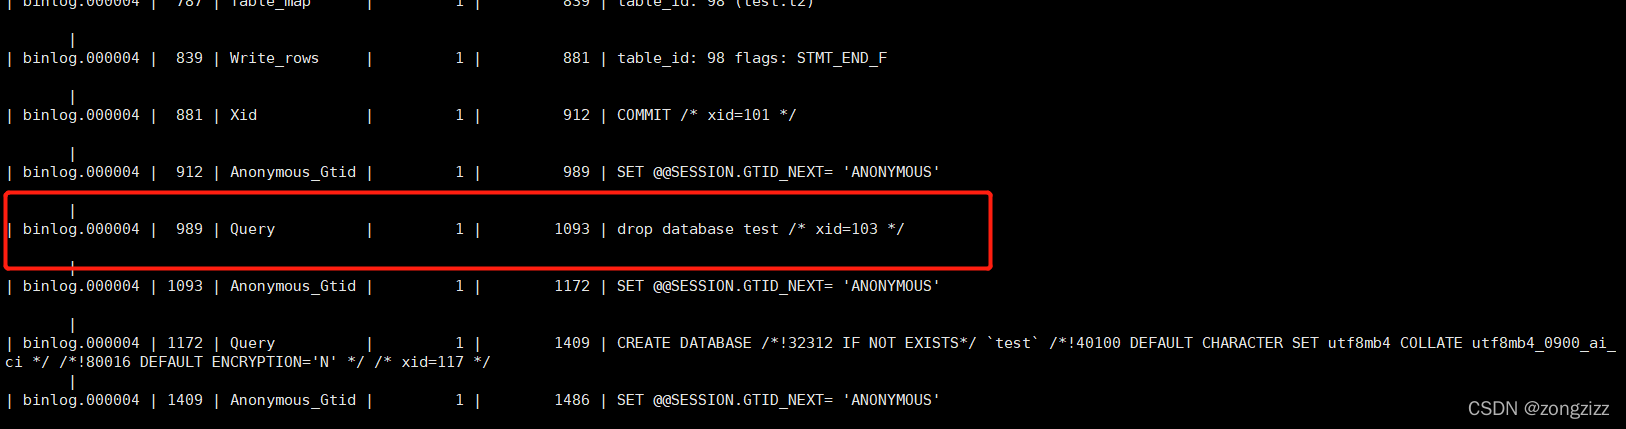
可以看到,在 989-1093 这个 Pos 中发生了删库跑路事件,那么我们只需要回放该文件将数据恢复到 989 这个位置即可。
[root@hisdb home]# mysqlbinlog /var/lib/mysql/binlog.000003 --stop-position=989 --database=test | mysql -uroot -p
Enter password: WARNING: The option --database has been used. It may filter parts of transactions, but will include the GTIDs in any case. If you want to exclude or include transactions, you should use the options --exclude-gtids or --include-gtids, respectively, instead.
看到安全提示后在下面继续输入密码就行了。
恢复完成,查看t2表是否存在。
mysql> use test;
Reading table information for completion of table and column names
You can turn off this feature to get a quicker startup with -A

Database changed
mysql> select * from t2;
+-------+
| name  |
+-------+
| ning  |
| lllng |
+-------+
2 rows in set (0.00 sec)
t2表已经恢复出来了。


 2266
2266

 被折叠的 条评论
为什么被折叠?
被折叠的 条评论
为什么被折叠?
 到【灌水乐园】发言


