


Shiro
Shiro 核心框架

| 名称 | 介绍 |
|---|---|
subject | subject 是主体,记录了当前操作用户的主体,外部的程序通过 subject 与 Security Manager 交互从而进行认证和授权 |
Security Manager | Security Manager 是安全管理器,对全部的 subject 进行管理,是 Shiro 的核心。在安全管理器中,通过 Authenticator 进行认证,通过 Authorizer 进行授权,通过 Session Manager 进行会话管理,通过 Cache Manager 进行缓存管理,通过 Cryptography 进行密码管理 |
Authenticator | Authenticator 是认证器,对用户进行身份的认证 |
Authorizer | Authorizer 是授权器,对用户进行权限的授予和鉴别 |
Realm | Realm 是领域,安全管理器通过 Realm 获取用户的权限数据,一般在 Realm 中查询数据库获取用户信息 |
Session Manager | Session Manager 是和会话管理器,Shiro 自定义了一套会话管理器,不需要依赖于 Web 容器的 session,因此它可以在非 Web 应用中使用 |
SessionDAO | 管理会话操作的一套接口,可以将 session 保存到数据库等 |
Cache Manager | Cache Manager 是缓存管理器,可以将用户的认证数据、权限数据保存在缓存中,提高性能 |
Cryptography | Cryptography 是密码管理器,Shiro 提供了加密解密的组件,方便开发使用 |
SpringBoot 中 Shiro 的配置使用
引入 Shiro 依赖
创建 Maven 项目,引入相应的依赖
    <parent>
        <groupId>org.springframework.boot</groupId>
        <artifactId>spring-boot-starter-parent</artifactId>
        <version>2.2.2.RELEASE</version>
        <relativePath/> <!-- lookup parent from repository -->
    </parent>

    <dependencies>
        <dependency>
            <groupId>org.springframework.boot</groupId>
            <artifactId>spring-boot-starter-web</artifactId>
        </dependency>

        <!-- https://mvnrepository.com/artifact/org.apache.shiro/shiro-spring-boot-web-starter -->
        <dependency>
            <groupId>org.apache.shiro</groupId>
            <artifactId>shiro-spring-boot-web-starter</artifactId>
            <version>1.9.0</version>
        </dependency>

        <!-- 引入redis -->
        <dependency>
            <groupId>org.springframework.boot</groupId>
            <artifactId>spring-boot-starter-data-redis</artifactId>
        </dependency>


        <dependency>
            <groupId>org.projectlombok</groupId>
            <artifactId>lombok</artifactId>
            <optional>true</optional>
        </dependency>

        <dependency>
            <groupId>org.springframework.boot</groupId>
            <artifactId>spring-boot-starter-test</artifactId>
            <scope>test</scope>
        </dependency>
    </dependencies>
自定义 Realm
自定义 Realm 实现 AuthorizingRealm,将用户认证、鉴权信息提供给认证管理器以及权限管理器
-
在
doGetAuthorzationInfo()方法中,可以实现对账号的授权,授予权限或者角色 -
在
doGetAuthenticationInfo()方法中,将用户的信息加密后交由 Shiro 执行认证
/**
 * @author zqf
 */
public class UserRealm extends AuthorizingRealm {

    /**
     * 授权
     * @param principalCollection
     * @return
     */
    @Override
    protected AuthorizationInfo doGetAuthorizationInfo(PrincipalCollection principalCollection) {
        System.out.println("执行了授权=>doGetAuthorizationInfo");
        SimpleAuthorizationInfo authorizationInfo = new SimpleAuthorizationInfo();
        // 此处应为获取当前用户信息并根据信息查询其拥有的权限的逻辑
        Subject currentUser = SecurityUtils.getSubject();
        // 权限赋予:demo测试写成固定权限,应查询数据库获得
        authorizationInfo.addStringPermission("user:add");
        // 角色赋予:demo测试写成固定角色,应查询数据库获得
        authorizationInfo.addRole("tourist");
        // 由shiro执行权限鉴别
        return authorizationInfo;
    }

    /**
     * 认证
     * @param authenticationToken
     * @return
     * @throws AuthenticationException
     */
    @Override
    protected AuthenticationInfo doGetAuthenticationInfo(AuthenticationToken authenticationToken) throws AuthenticationException {
        System.out.println("执行了认证=>doGetAuthenticationInfo");
        // 在 token 中获得用户名
        UsernamePasswordToken token = (UsernamePasswordToken) authenticationToken;
        String principal = (String) token.getPrincipal();
        // 此处应该为从数据库中查询用户信息的逻辑
        // demo测试写成固定用户
        if (!"123456@163.com".equals(token.getUsername())) {
            return null;
        }
        // 构造加密后的密码
        Md5Hash md5Hash = new Md5Hash("123456", "salt", 1024);
        // 由shiro执行密码的认证
        return new SimpleAuthenticationInfo(principal, md5Hash.toHex(), new MySimpleByteSource("salt"), this.getName());

    }
}
上述过程中,对于“盐”的传递需要我们自定义一个类继承 ByteSource 和 Serializable 接口,因为 Shiro 提供的 ByteSource 接口没有实现序列化,故在使用 Redis 作为缓存时将产生序列化错误
MySimpleByteSource 代码如下:
/**
 * @author zqf
 */
public class MySimpleByteSource implements ByteSource, Serializable {

    private static final long serialVersionUID = 1L;

    private  byte[] bytes;
    private String cachedHex;
    private String cachedBase64;

    public MySimpleByteSource(){
    }

    public MySimpleByteSource(byte[] bytes) {
        this.bytes = bytes;
    }

    public MySimpleByteSource(char[] chars) {
        this.bytes = CodecSupport.toBytes(chars);
    }

    public MySimpleByteSource(String string) {
        this.bytes = CodecSupport.toBytes(string);
    }

    public MySimpleByteSource(ByteSource source) {
        this.bytes = source.getBytes();
    }

    public MySimpleByteSource(File file) {
        this.bytes = (new MySimpleByteSource.BytesHelper()).getBytes(file);
    }

    public MySimpleByteSource(InputStream stream) {
        this.bytes = (new MySimpleByteSource.BytesHelper()).getBytes(stream);
    }

    public static boolean isCompatible(Object o) {
        return o instanceof byte[] || o instanceof char[] || o instanceof String || o instanceof ByteSource || o instanceof File || o instanceof InputStream;
    }

    public void setBytes(byte[] bytes) {
        this.bytes = bytes;
    }

    @Override
    public byte[] getBytes() {
        return this.bytes;
    }


    @Override
    public String toHex() {
        if(this.cachedHex == null) {
            this.cachedHex = Hex.encodeToString(this.getBytes());
        }
        return this.cachedHex;
    }

    @Override
    public String toBase64() {
        if(this.cachedBase64 == null) {
            this.cachedBase64 = Base64.encodeToString(this.getBytes());
        }

        return this.cachedBase64;
    }

    @Override
    public boolean isEmpty() {
        return this.bytes == null || this.bytes.length == 0;
    }
    @Override
    public String toString() {
        return this.toBase64();
    }

    @Override
    public int hashCode() {
        return this.bytes != null && this.bytes.length != 0? Arrays.hashCode(this.bytes):0;
    }

    @Override
    public boolean equals(Object o) {
        if(o == this) {
            return true;
        } else if(o instanceof ByteSource) {
            ByteSource bs = (ByteSource)o;
            return Arrays.equals(this.getBytes(), bs.getBytes());
        } else {
            return false;
        }
    }

    private static final class BytesHelper extends CodecSupport {
        private BytesHelper() {
        }

        public byte[] getBytes(File file) {
            return this.toBytes(file);
        }

        public byte[] getBytes(InputStream stream) {
            return this.toBytes(stream);
        }
    }

}
配置 Redis 缓存管理器
使用中一般集成 Redis 实现缓存,配置文件中配置 Redis 服务的地址
spring:
  redis:
    host: <Your_Redis_IP>
    port: 6379
    database: 0
自定义 RedisCache 继承 Cache 接口实现缓存的存取
/**
 * Redis 缓存
 * @param <K> key
 * @param <V> value
 *
 * @author zqf
 */
@SuppressWarnings("all")
public class RedisCache<K, V> implements Cache<K, V> {

    private String cacheName;

    public RedisCache() {
    }

    public RedisCache(String cacheName) {
        this.cacheName = cacheName;
    }

    /**
     * 获取 redisTemplate 实例
     * <p>
     * 因为没有交由容器管理,故无法直接注入
     *
     * @return redisTemplate
     */
    private RedisTemplate getRedisTemplate() {
        RedisTemplate redisTemplate = (RedisTemplate) ApplicationContextUtil.getBean("redisTemplate");
        redisTemplate.setKeySerializer(new StringRedisSerializer());
        redisTemplate.setHashKeySerializer(new StringRedisSerializer());
        return redisTemplate;
    }

    @Override
    public V get(K k) throws CacheException {
        System.out.println("获取缓存>>>" + k);
        return (V) getRedisTemplate().opsForHash().get(this.cacheName, k.toString());
    }

    @Override
    public V put(K k, V v) throws CacheException {
        System.out.println("设置缓存key>>>" + k);
        System.out.println("设置缓存value>>>" + v);
        getRedisTemplate().opsForHash().put(this.cacheName, k.toString(), v);
        return null;
    }

    @Override
    public V remove(K k) throws CacheException {
        return (V) getRedisTemplate().opsForHash().delete(this.cacheName, k.toString());
    }

    @Override
    public void clear() throws CacheException {
        getRedisTemplate().delete(this.cacheName);
    }

    @Override
    public int size() {
        return getRedisTemplate().opsForHash().size(this.cacheName).intValue();
    }

    @Override
    public Set<K> keys() {
        return getRedisTemplate().opsForHash().keys(this.cacheName);
    }

    @Override
    public Collection<V> values() {
        return getRedisTemplate().opsForHash().values(this.cacheName);
    }

}
获取 RedisTemplate 实例对象时,因为该类不能交由容器管理,故需要使用 spring 上下文工具类进行对象的获取
ApplicationContextUtil 代码如下:
/**
 * spring 上下文工具类
 */
@Component
public class ApplicationContextUtil implements ApplicationContextAware {

    /**
     * 上下文对象实例
     */
    private static ApplicationContext applicationContext;

    @Override
    public void setApplicationContext(ApplicationContext applicationContext) throws BeansException {
        ApplicationContextUtil.applicationContext = applicationContext;
    }

    /**
     * 获取applicationContext
     *
     * @return
     */
    public static ApplicationContext getApplicationContext() {
        return applicationContext;
    }

    /**
     * 通过name获取 Bean.
     *
     * @param name
     * @return
     */
    public static Object getBean(String name) {
        return getApplicationContext().getBean(name);
    }

    /**
     * 通过class获取Bean.
     *
     * @param clazz
     * @param <T>
     * @return
     */
    public static <T> T getBean(Class<T> clazz) {
        return getApplicationContext().getBean(clazz);
    }

    /**
     * 通过name,以及Clazz返回指定的Bean
     *
     * @param name
     * @param clazz
     * @param <T>
     * @return
     */
    public static <T> T getBean(String name, Class<T> clazz) {
        return getApplicationContext().getBean(name, clazz);
    }
}
自定义 RedisCacheManager 即 Redis 缓存管理器,继承 CacheManager 接口进行缓存管理
/**
 * Redis 缓存管理
 *
 * @author zqf
 */
public class RedisCacheManager implements CacheManager {

    @Override
    public <K, V> Cache<K, V> getCache(String cacheName) throws CacheException {
        System.out.println("缓存名称>>>"+ cacheName);
        return new RedisCache<K,V>(cacheName);
    }
}
配置类 ShiroConfig 实现各个组件的拼装
编写 ShiroConfig 类,对我们自定义的组件进行配置,配置类中主要需要完成三步工作
-
创建自定义的 Realm 对象
-
实现凭证匹配器的设置,设置加密算法,hash 次数等;
-
实现缓存管理器的设置,开启全局缓存,开启认证、鉴权缓存
-
-
创建 DefaultWebSecurityManager 安全管理器
- 实现安全管理器对 Realm 的关联
-
配置 ShiroFilterFactoryBean 用于拦截所有请求,进行认证与鉴权
-
为 filter 配置安全管理器
-
为 filter 配置资源审查的规则
-
为 filter 配置失败跳转页
-
/**
 * @author zqf
 */
@Configuration
public class ShiroConfig {

    /**
     * 创建自定义 Realm 对象
     */
    @Bean
    public UserRealm getUserRealm() {
        // 创建 Realm
        UserRealm userRealm = new UserRealm();
        // 为 Realm 设置凭证匹配器
        HashedCredentialsMatcher credentialsMatcher = new HashedCredentialsMatcher();
        // 设置凭证匹配器加密算法
        credentialsMatcher.setHashAlgorithmName("md5");
        // 设置凭证匹配器的 hash 次数
        credentialsMatcher.setHashIterations(1024);
        // 为 userRealm 配置凭证匹配器
        userRealm.setCredentialsMatcher(credentialsMatcher);
        // 为 userRealm 配置自定义的 RedisCacheManager 缓存管理器
        userRealm.setCacheManager(new RedisCacheManager());
        // 开启全局缓存
        userRealm.setCachingEnabled(true);
        // 开启认证缓存
        userRealm.setAuthenticationCachingEnabled(true);
        // 开启授权缓存
        userRealm.setAuthorizationCachingEnabled(true);

        return userRealm;
    }

    /**
     * 创建 DefaultWebSecurityManager 安全管理器
     */
    @Bean
    public DefaultWebSecurityManager securityManager(UserRealm userRealm) {
        DefaultWebSecurityManager securityManager = new DefaultWebSecurityManager();
        // 关联 Realm
        securityManager.setRealm(userRealm);
        return securityManager;
    }

    /**
     * 配置 ShiroFilterFactoryBean,用于拦截所有请求
     *
     * anon:无需认证就可以访问
     * authc:必须认证才可以访问
     * user: 必须拥有记住我功能才能用
     * roles:拥有某个角色权限才能访问
     * perms:拥有对某个资源的权限才能访问
     */
    @Bean
    public ShiroFilterFactoryBean shiroFilterFactoryBean(DefaultWebSecurityManager securityManager) {
        ShiroFilterFactoryBean factoryBean = new ShiroFilterFactoryBean();
        // 为filter配置安全管理器
        factoryBean.setSecurityManager(securityManager);
        Map<String, String> filterMap = new LinkedHashMap<>();
        // 为filter配置资源审查规则
        // 必须登录之后才可以访问/user/* 下的所有请求
        filterMap.put("/start/*", "authc");
        // 鉴权,必须有相应的权限才能访问某接口
        filterMap.put("/user/add", "perms[user:add]");
        filterMap.put("/user/update", "perms[user:update]");
        filterMap.put("/user/delete", "roles[admin]");
        filterMap.put("/user/get", "roles[tourist]");

        factoryBean.setFilterChainDefinitionMap(filterMap);

        // 如果未登录,就跳转到登录页
        factoryBean.setLoginUrl("/unLogin");
        // 设置未授权请求
        factoryBean.setUnauthorizedUrl("/unAuth");

        return factoryBean;
    }

}
编写控制层代码用于验证测试
登录登出控制层
/**
 * @author zqf
 */
@RestController
@RequestMapping("/start")
public class StartController {

    @GetMapping("/login/{username}/{password}")
    public String login(@PathVariable("username") String username,
                        @PathVariable("password") String password) {
        // 获取当前用户
        Subject currentUser = SecurityUtils.getSubject();
        // 执行登陆操作
        UsernamePasswordToken token = new UsernamePasswordToken(username, password);
        try {
            currentUser.login(token);
            System.out.println(token);
            return "登陆成功~";
        } catch (AuthenticationException e) {
            e.printStackTrace();
            return "登陆失败~";
        }
    }

    @GetMapping("/logout")
    public String logout() {
        Subject currentUser = SecurityUtils.getSubject();
        currentUser.logout();
        return "登出成功~";
    }

}
操作控制层
/**
 * @author zqf
 */
@RestController
@RequestMapping("/user")
public class UserController {

    @PostMapping("/add")
    public String add() {
        return "执行新增成功~";
    }

    @DeleteMapping("/delete")
    public String delete() {
        return "执行删除成功~";
    }

    @PutMapping("/update")
    public String update() {
        return "执行更新成功~";
    }

    @GetMapping("/get")
    public String get() {
        return "查询到对应信息~";
    }

}
相应的认证逻辑逻辑和方法所需的权限配置在前文已经介绍
测试使用
启动项目,访问登录接口,首先会尝试获取认证缓存执行认证,然后对缓存进行设置或更新
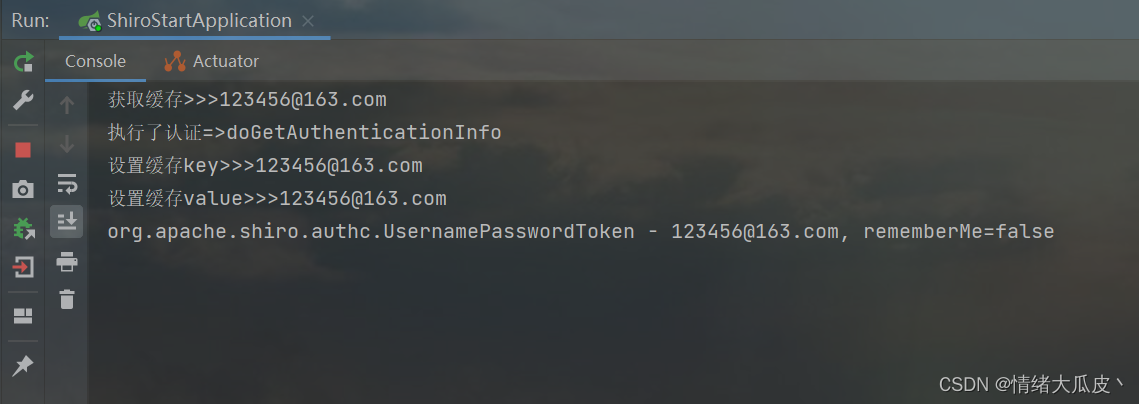
访问 /add 接口,首先尝试获取授权缓存进行鉴权,然后进行设置

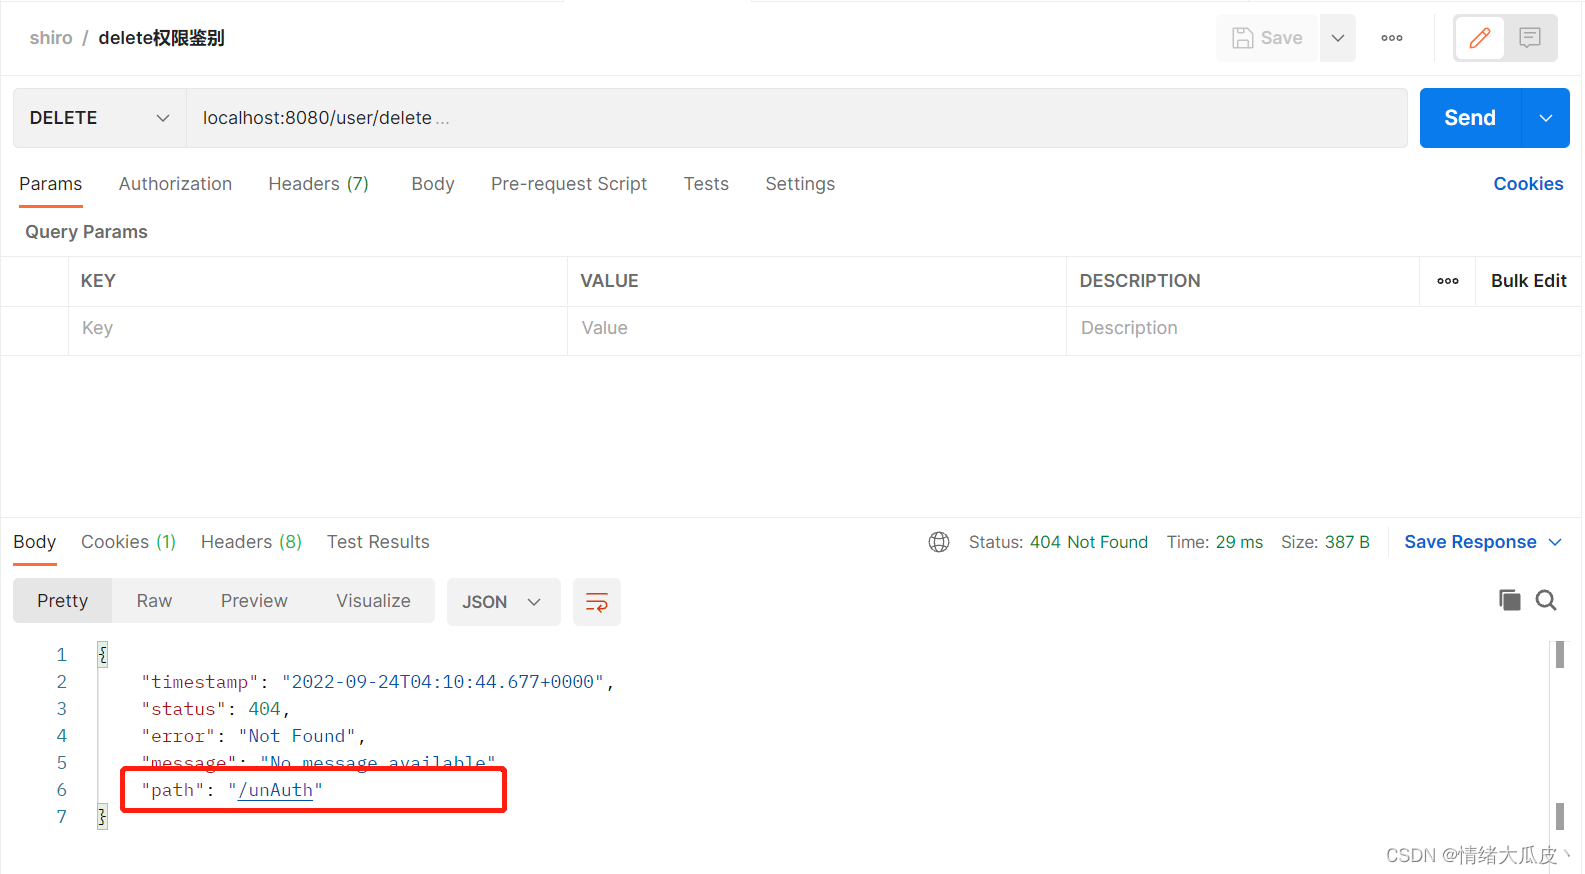
访问 /delete 接口,此时直接村缓存中读取账号权限,鉴权失败,没有对应权限,故跳转"/unAuth"
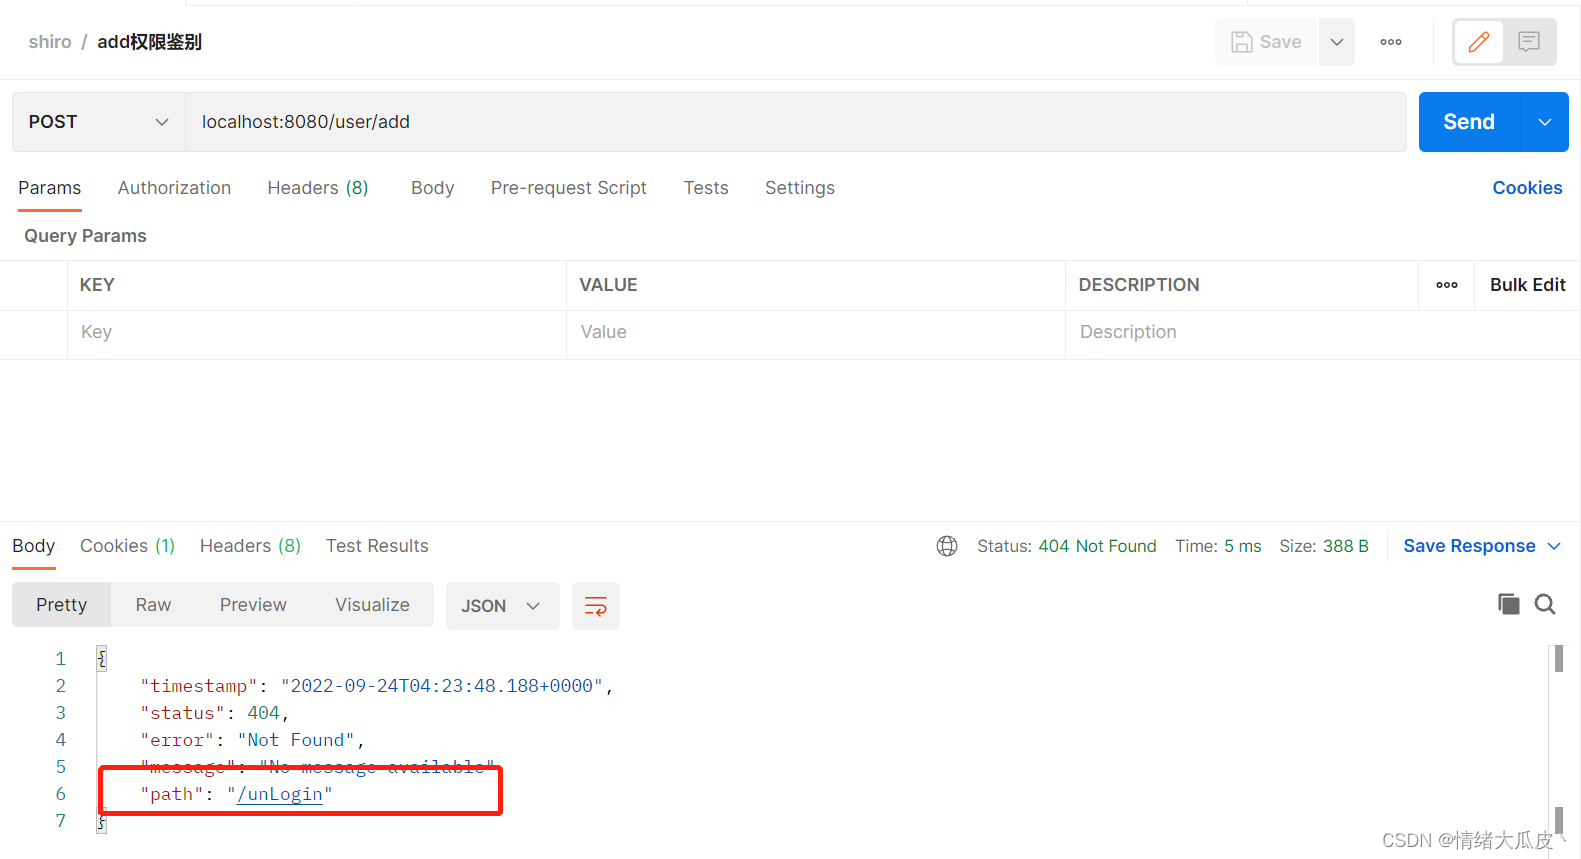
退出登录直接访问 /add 接口,显示未登录,跳转“unLogin”


 3027
3027


 被折叠的 条评论
为什么被折叠?
被折叠的 条评论
为什么被折叠?
 到【灌水乐园】发言


