


安装文档
前言
从零开始配置并启动graphite监控服务,兼顾django1.6及1.7版本,其他版本可供参考。graphite能够正常启动并通过web浏览器访问的必要条件如下:
1. 安装Apache并启动服务
2. 安装diamond并启动
3. 启动carbon-cache进程
4. 关闭防火墙
5. 关闭selinux
系统环境
centos-7.0 最小化安装(所有依赖环境全部手动安装)
详细步骤
默认所有安装步骤均为root用户操作,如果不是root用户安装命令前需要加上sudo
安装net-tools
最小化安装的centos无法使用ifconfig和netstat命令,后续安装步骤需要查看数据使用,使用以下命令安装:
# yum install net-tools
安装apache
yum安装apache
# yum install httpd启动apache
# service httpd start
安装carbon
# yum install groupinstall "Development Tools"
# yum install python-devel
# yum install git
# easy_install pip
# pip install twisted
# cd /tmp
# git clone https://github.com/graphite-project/carbon.git
# cd carbon/
# python setup.py install
/opt/graphite文件夹下现在应该包含了carbon库和配置
# ls  /opt/graphite/
bin  conf  examples  lib  storage
安装Whisper
whisper是一个用来存储时间序列数据的数据库,安装Whisper需要运行如下命令:
# cd /tmp
# git clone https://github.com/graphite-project/whisper.git
# cd whisper/
# python setup.py install
安装成功后Whisper脚本应该在相应的位置:
# ls /usr/bin/whisper*
/usr/bin/whisper-create.py  /usr/bin/whisper-fetch.py  /usr/bin/whisper-merge.py                   /usr/bin/whisper-update.py
/usr/bin/whisper-diff.py    /usr/bin/whisper-fill.py   /usr/bin/whisper-resize.py
/usr/bin/whisper-dump.py    /usr/bin/whisper-info.py   /usr/bin/whisper-set-aggregation-method.py
启动Carbon缓存
Carbon安装包中已经包含了关于端口号和其他多个位置参数的明确缺省值在对应的.example文件中,拷贝这些已有的示例配置文件作为默认配置
# cp aggregation-rules.conf.example aggregation-rules.conf
# cp blacklist.conf.example blacklist.conf
# cp carbon.amqp.conf.example carbon.amqp.conf
# cp carbon.conf.example carbon.conf
# cp dashboard.conf.example dashboard.conf
# cp graphTemplates.conf.example graphTemplates.conf
# cp relay-rules.conf.example relay-rules.conf
# cp rewrite-rules.conf.example rewrite-rules.conf
# cp storage-aggregation.conf.example storage-aggregation.conf
# cp storage-schemas.conf.example storage-schemas.conf
# cp whitelist.conf.example whitelist.conf
执行如下命令,可以启动一个carbon-cache进程:
# cd /opt/graphite/bin/
# ./carbon-cache.py start
Starting carbon-cache (instance a)
可以查看到进程应该正在监听2003端口:
# ps -elfa | grep carbon-cache
1 S root     26992     1  0  80   0 - 80057 ep_pol 17:50 ?        00:00:00 /usr/bin/python ./carbon-cache.py start
0 S root     27012 26835  0  80   0 - 28165 pipe_w 17:53 pts/1    00:00:00 grep --color=auto carbon-cache
# netstat -nap | grep 2003
tcp        0      0 0.0.0.0:2003            0.0.0.0:*               LISTEN      26992/python
安装graphite-web
检查依赖
# cd /tmp
# git clone https://github.com/graphite-project/graphite-web.git
# cd graphite-web/
# python check-dependencies.py
[REQUIRED] Unable to import the 'cairo' module, do you have pycairo installed for python 2.7.5?
[REQUIRED] Unable to import the 'django' module, do you have Django installed for python 2.7.5?
[REQUIRED] Unable to import the 'pytz' module, do you have pytz module installed for python 2.7.5?
[REQUIRED] Unable to import the 'pyparsing' module, do you have pyparsing module installed for python 2.7.5?
[REQUIRED] Unable to import the 'tagging' module, do you have django-tagging installed for python 2.7.5?
[OPTIONAL] Unable to import the 'memcache' module, do you have python-memcached installed for python 2.7.5? This feature is not required but greatly improves performance.
[OPTIONAL] Unable to import the 'ldap' module, do you have python-ldap installed for python 2.7.5? Without python-ldap, you will not be able to use LDAP authentication in the graphite webapp.
[OPTIONAL] Unable to import the 'txamqp' module, this is required if you want to use AMQP as an input to Carbon. Note that txamqp requires python 2.5 or greater.
[OPTIONAL] Unable to import the 'python-rrdtool' module, this is required for reading RRD.
[OPTIONAL] Unable to import the 'whitenoise' module. This is useful for serving static files.
5 optional dependencies not met. Please consider the optional items before proceeding.
5 necessary dependencies not met. Graphite will not function until these dependencies are fulfilled.
执行python check-dependencies.py检查安装graphite-web所需要的依赖环境,根据检查结果安装依赖包,所有必需的[REQUIRED]依赖包都必须安装,可选的[OPTIONAL]按说明根据需要选择安装。
注意: 此处给出了安装结果,pip安装时不指定版本的话会默认安装最新版本,本教程安装过程分别使用了Django1.6.11和Django1.7.11来部署graphite,其他版本未做尝试,值得注意的是如果安装过程中使用了Django1.6.11版本,在上述步骤中安装 django-tagging 时必须指定版本号<4.0,通常安装3.6版本即可,否则部署完Django之后会无法初始化数据库。
安装依赖
# yum install cairo-devel
已安装:
cairo-devel.x86_64 0:1.14.2-1.el7
# yum install pycairo-devel
已安装:
pycairo-devel.x86_64 0:1.8.10-8.el7
# pip install django==1.7.11
Successfully installed django-1.7.11
# pip install pyparsing
Successfully installed pyparsing-2.1.4
# pip install django-tagging
Successfully installed django-tagging-0.4.3
# pip install python-memcached
Successfully installed python-memcached-1.57 six-1.10.0
# pip install txamqp
Successfully installed txamqp-0.6.2
# pip install pytz
Successfully installed pytz-2016.4
安装完依赖后,接下来可以安装graphite-web:
# cd /tmp/graphite-web/
# python setup.py install
# ls /opt/graphite/webapp/
content  graphite  graphite_web-0.10.0_alpha-py2.7.egg-info
安装脚本会将web应用文件移动到/opt/graphite/webapp文件夹下适当位置
数据库初始化
运行如下命令初始化内部数据库:
# cd /opt/graphite/
# export PYTHONPATH=$PYTHONPATH:`pwd`/webapp
# echo $PYTHONPATH
:/opt/graphite/webapp
# django-admin.py syncdb --settings=graphite.settings
You have installed Django's auth system, and don't have any superusers defined.
Would you like to create one now? (yes/no): yes
Username (leave blank to use 'root'):
Email address: test@163.com
Password:
Password (again):
Superuser created successfully.
上述命令创建一个新的数据库并保存在/opt/graphite/storage目录下,django1.7后syncdb不建议使用,由migrate取代,此处使用migrate创建数据库的话不会提示创建Superuser,需要稍后手动添加(详情见后文)。django1.7 release notes关于syncdb说明如下:
syncdb has been deprecated and replaced by migrate. Don’t worry - calls to syncdb will still work as before.
# ls /opt/graphite/storage/
ceres  graphite.db  lists  log  rrd  whisper
Graphite Web应用设置
包含graphite-web设置的配置示例文件位于/opt/graphite/webapp/graphite文件夹下。拷贝.example配置文件。graphite-web项目使用local_settings.py文件作为项目配置文件,修改项目配置时只需改动此文件。参考配置:
# cd /opt/graphite/webapp/graphite
# cp local_settings.py.example  local_settings.py
# vi local_settings.py
#####################################
# General Configuration #
#####################################
SECRET_KEY = 'UNSAFE_DEFAULT'
SECRET_KEY = 'UNSAFE_DEFAULT'
TIME_ZONE = 'UTC'
FLUSHRRDCACHED = 'unix:/var/run/rrdcached.sock'
# Logging
LOG_ROTATION = True
#LOG_ROTATION_COUNT = 1
LOG_RENDERING_PERFORMANCE = True
LOG_CACHE_PERFORMANCE = True
# Enable full debug page display on exceptions (Internal Server Error pages)
DEBUG = True

#####################################
# Filesystem Paths #
#####################################
GRAPHITE_ROOT = '/opt/graphite'
CONF_DIR = '/opt/graphite/conf'
STORAGE_DIR = '/opt/graphite/storage'
STATIC_ROOT = '/opt/graphite/static'

DASHBOARD_CONF = '/opt/graphite/conf/dashboard.conf'
GRAPHTEMPLATES_CONF = '/opt/graphite/conf/graphTemplates.conf'
WHISPER_DIR = '/opt/graphite/storage/whisper'
RRD_DIR = '/opt/graphite/storage/rrd'
# Data directories using the "Standard" finder (i.e. not Ceres)
STANDARD_DIRS = [WHISPER_DIR, RRD_DIR] # Default: set from the above variables
LOG_DIR = '/opt/graphite/storage/log/webapp'
INDEX_FILE = '/opt/graphite/storage/index'  # Search index file

##########################
# Database Configuration #
##########################
DATABASES = {
'default': {
    'NAME': '/opt/graphite/storage/graphite.db',
    'ENGINE': 'django.db.backends.sqlite3',
    'USER': '',
    'PASSWORD': '',
    'HOST': '',
    'PORT': ''
  }
}
按照步骤操作到现在为止,主机上应该用一个运行在2003端口上的carbon-cache进程和一个7002查询端口,这些事graphite-webapp默认使用端口:
# ps -elfa | grep carbon-cache
1 S root     26992     1  0  80   0 - 80057 ep_pol 17:50 ?        00:00:00 /usr/bin/python ./carbon-cache.py start
0 R root     27145 26835  0  80   0 - 28165 -      18:19 pts/1    00:00:00 grep --color=auto carbon-cache
# netstat -nap | grep 2003
tcp        0      0 0.0.0.0:2003            0.0.0.0:*               LISTEN      26992/python
# netstat -nap |grep 7002
tcp        0      0 0.0.0.0:7002            0.0.0.0:*               LISTEN      26992/python
安装diamond
安装
# cp /tmp
# git clone https://github.com/BrightcoveOS/Diamond.git
# cd Diamond/
# python setup.py install
配置并启动
# cp /etc/diamond/diamond.conf{.example,}
# service diamond start
Starting diamond (via systemctl):                          [  确定  ]
启动Web程序
运行之前还有一些服务需要启动和进行一些配置:
关闭防火墙:
# service firewalld stop
Redirecting to /bin/systemctl stop  firewalld.service
关闭selinux选项:
setenforce 0
httpd服务和diamond服务已在之前的步骤中启动,如果没有启动请重启服务。
拷贝必要文件:
如果/opt/graphite/webapp/graphite目录下没有manage.py文件(未知原因),需要手动拷贝该文件到对应目录下:
# find / -name manage.py
/tmp/graphite-web/webapp/manage.py
/usr/lib64/python2.7/site-packages/django/conf/project_template/manage.py
# cp /tmp/graphite-web/webapp/manage.py /opt/graphite/webapp/graphite/
# cd /opt/graphite/webapp/graphite
注意 如果之前重启过或者删除了/tmp目录下的graphite文件夹,可以拷贝python安装目录中django包里的*/project_template/manage.py文件,然后修改该文件对应行如下:
os.environ.setdefault("DJANGO_SETTINGS_MODULE", "settings")
生成静态网页资源:
# python manage.py collectstatic --pythonpath=/opt/graphite/webapp/
注意: 要生成静态网页资源之前的local_settings中DEBUG选项必须设置为True
启动服务器:
# python manage.py runserver --settings=graphite.settings --pythonpath=/opt/graphite/webapp/ 0.0.0.0:8085
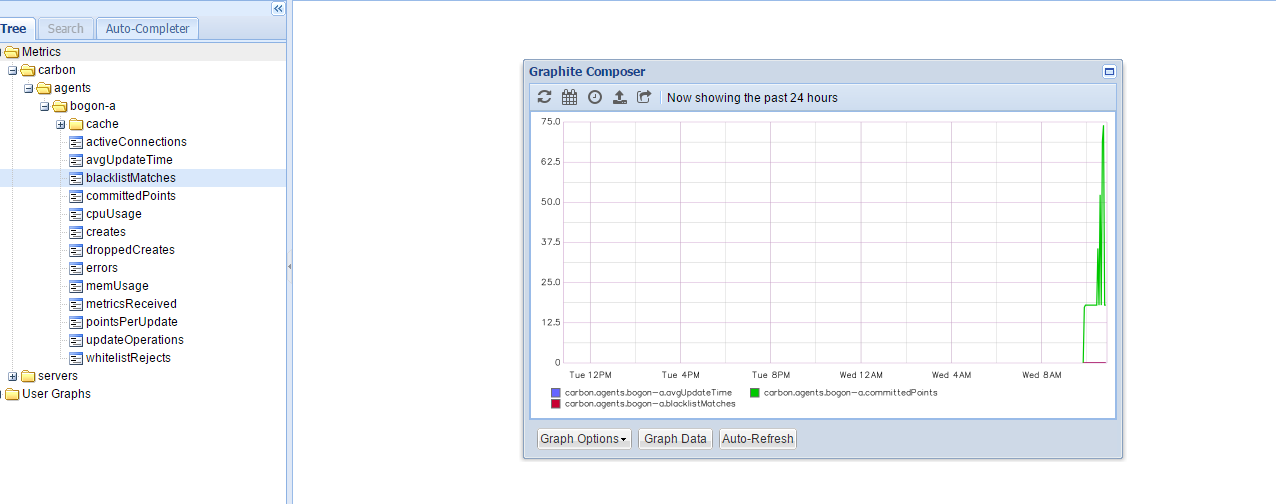
打开浏览器,输入http://ip:8085就可以看到graphite服务器界面。
注意 如果之前初始化数据库时用的是syncdb命令,可以直接点解右上角使用预设的superuser用户名密码登录,如果使用migrate命令初始化数据库,需要先添加superuser然后才能登录,添加命令如下(django1.7以上):
# python manage.py createsuperuser
按提示操作即可
成功登陆:
参考链接
Graphite 监控上手指南
Django 1.7中文入门教程
用graphite diamond做监控
stackoverflow
Django 1.7 release notes


 7319
7319

 被折叠的 条评论
为什么被折叠?
被折叠的 条评论
为什么被折叠?
 到【灌水乐园】发言


