


我们在实际开发的时候,会使用到很多的注解,特别是使用Spring或者Spring家族时,会大量的使用注解,那我们有没有想过Spring的这些注解都是怎么实现的呢?为什么加了这些注解就会有对应的效果呢?以及如果我们自己要实现注解?步骤和方法有哪些呢?
1.注解是什么?
注解(Annotation)也叫元数据,用于对代码进行说明,可以对包、类、接口、字段、方法参数、局部变量等进行注解。其实说白就是代码里的特殊标志,这些标志可以在编译,类加载,运行时被读取,并根据这些信息执行相应的处理,以便于其他工具补充信息或者进行部署。
元数据(Metadata),又称中介数据、中继数据,为描述数据的数据(data about data),主要是描述数据属性(property)的信息,用来支持如指示存储位置、历史数据、资源查找、文件记录等功能。
如果说注释是写给人看的,那么注解就是写给程序看的。它更像一个标签,贴在一个类、一个方法或者字段上。它的目的是为当前读取该注解的程序提供判断依据。比如程序只要读到加了@Test的方法,就知道该方法是待测试方法,又比如@Before注解,程序看到这个注解,就知道该方法要放在@Test方法之前执行。
1.1 注解的类型
一般常用的注解可以分为三类:
-
元注解,元注解是用于定义注解的注解,包括@Retention(标明注解被保留的阶段)、@Target(标明注解使用的范围)、@Inherited(标明注解可继承)、@Documented(标明是否生成javadoc文档)。
public enum RetentionPolicy { //此注解类型的信息只会记录在源文件中,编译时将被编译器丢弃,也就是说不会保存在编译好的class文件中 //例如:@SuppressWarnings SOURCE, //编译器将注解记录在class文件中,但不会加载到JVM中。如果一个注解声明没指定范围,则系统默认值就是CLASS //例如:@Override CLASS, //注解信息会保留在源文件、类文件中,在执行的时也加载到Java的JVM中,因此可以通过反射进行读取。 //例如:Deprecated RUNTIME } -
Java自带的标准注解,包括@Override(标明重写某个方法)、@Deprecated(标明某个类或方法过时)和@SuppressWarnings(标明要忽略的警告),使用这些注解后编译器就会进行检查。
-
自定义注解,可以根据自己的需求定义注解。
1.2.注解配置和xml配置的关系
我们知道Spring早期是使用xml来进行配置的,现在更推荐注解配置,那么xml配置和注解配置的区别是什么呢?
我们可以认为xml和注解都是元数据。
xml: 是一种集中式的元数据,与源代码无绑定。
注解:是一种分散式的元数据,与源代码紧绑定。
1.3 注解的作用
-
生成文档,通过代码里标识的元数据生成javadoc文档。
-
编译检查,通过代码里标识的元数据让编译器在编译期间进行检查验证。
-
编译时动态处理,编译时通过代码里标识的元数据动态处理,例如动态生成代码。
-
运行时动态处理,运行时通过代码里标识的元数据动态处理,例如使用反射注入实例。
2.注解实现
2.1 实现注解的步骤
(1).声明注解
(2).添加注解
(3). 获取添加了注解的目标。通常是Class对象,Method对象,Field对象,还有Constructor对象,Parameter对象,Annotation对象等
a.通过已知对象,获取Class对象
b.通过全类路径,获取Class对象
c.扫描包路径,获取Class对象
(4).实现注解处理器。借助反射,获取注解对象,读取注解属性值, 然后根据注解及属性值做相应处理
2.2 不基于spring容器实现
(1). 已知class,直接反射
举个例子:
申明注解
@Retention(RetentionPolicy.RUNTIME)
@Target(ElementType.FIELD)
public @interface Person {

    String name() default "";

    String sex() default "";

    int age() default 18;

}
定义一个普通实体类
public class Human {
	// 姓名
    private String name;
	// 性别
    private String sex;
	// 年龄
    private Integer age;

    @Override
    public String toString() {
        return "Human{" +
                "name='" + name + '\'' +
                ", sex='" + sex + '\'' +
                ", age=" + age +
                '}';
    }

}
注解实现及测试
public class Example01 {

    @Person(name="张三", sex = "男", age = 23)
    private Human human1;

    @Person(name="小红", sex = "女", age = 21)
    private Human human2;

    public static void main(String[] args) throws NoSuchMethodException, IllegalAccessException, InvocationTargetException, InstantiationException {
        Example01 example01 = new Example01();
        System.out.println(example01.human1);
        System.out.println(example01.human2);
        example01.initField();
        System.out.println(example01.human1);
        System.out.println(example01.human2);
    }
// 注解实现
    public void initField() throws NoSuchMethodException, IllegalAccessException, InvocationTargetException, InstantiationException {
        Class clazz = this.getClass();
        Field[] fields = clazz.getDeclaredFields();
        for(Field field : fields){
            Person person = field.getDeclaredAnnotation(Person.class);
            if(person != null) {
                Human human = ((Class<Human>) field.getType()).getDeclaredConstructor().newInstance();
                human.setSex(person.sex());
                human.setName(person.name());
                human.setAge(person.age());
                field.set(this, human);
            }
        }
    }

}
(2). 类扫描,然后反射
类扫描的方法:
A. spring(spring工具包)
B. reflections(反射工具包)
C. 自己实现
举例1:借助spring-core
声明注解
@Retention(RetentionPolicy.RUNTIME)
@Target(ElementType.TYPE)
public @interface Cat {

    String name() default "";

}
添加注解
@Cat(name="tom")
public class Tomcat {

    private String name;

    public Tomcat(){

    }

    public Tomcat(String name) {
        this.name = name;
    }

    @Override
    public String toString() {
        return "Tomcat{" +
                "name='" + name + '\'' +
                '}';
    }

}
实现注解并测试
public class SpringExample {
    public static void main(String[] args) throws ClassNotFoundException, NoSuchMethodException, IllegalAccessException, InvocationTargetException, InstantiationException {
        // 创建对象,参数先写false  因为参数为true调用默认注册过滤器
        ClassPathScanningCandidateComponentProvider classPathScanningCandidateComponentProvider = new ClassPathScanningCandidateComponentProvider(false);
        // 可使用AnnotationTypeFilter结合ClassPathScanningCandidateComponentProvider去获取我们想类信息
        classPathScanningCandidateComponentProvider.addIncludeFilter(new AnnotationTypeFilter(Cat.class));
        // 放入自己的包, 给扫描
        Set<BeanDefinition> beanDefinitions = classPathScanningCandidateComponentProvider.findCandidateComponents("com.xiaoge.demo2");
        for(BeanDefinition beanDefinition : beanDefinitions){
            // 获取到tomcat了的全限定类名 因为tomcat类装载了cat注解
            String beanClassName = beanDefinition.getBeanClassName();
            // 反射
            Class clazz = Class.forName(beanClassName);
            Cat cat = (Cat) clazz.getDeclaredAnnotation(Cat.class);
            String name = cat.name();
            Object object = clazz.getDeclaredConstructor(String.class).newInstance(name);
            System.out.println(object);
        }
    }
}
举例2:借助reflections反射工具包
声明注解
@Retention(RetentionPolicy.RUNTIME)
@Target(ElementType.TYPE)
public @interface Cat {
    String name() default "";
}
添加注解
@Cat(name="tom")
public class Tomcat {
    private String name;

    public Tomcat(){

    }

    public Tomcat(String name) {
        this.name = name;
    }

    @Override
    public String toString() {
        return "Tomcat{" +
                "name='" + name + '\'' +
                '}';
    }
}
使用注解及测试
public class ReflectionsExample {
    public static void main(String[] args) throws NoSuchMethodException, IllegalAccessException, InvocationTargetException, InstantiationException {
        // 扫描包
        Reflections reflections = new Reflections("com.xiaoge.demo3", new TypeAnnotationsScanner(), new SubTypesScanner(), new FieldAnnotationsScanner());
        // 获取获取类, 该类是装载过Cat注解的
        Set<Class<?>> cats = reflections.getTypesAnnotatedWith(Cat.class);
        for(Class<?> clazz : cats){
            // 反射
            Cat cat = (Cat) clazz.getDeclaredAnnotation(Cat.class);
            String name = cat.name();
            Object object = clazz.getDeclaredConstructor(String.class).newInstance(name);
            System.out.println(object);
        }
    }
}
基于以上的例子,我们会发现,如果存在多个自定义注解的时候,获取到添加了注解的目标,是整个实现自定义注解过程中,比较频繁发生的事情,如果每个注解的实现都去扫描包,很显然,扫描包这个动作重复了,而且效率低下,那有没有什么办法,可以减少扫描或者我们自己根本不需要扫描呢?一种方式是把扫描抽离出来做为公共初始化方法,另外一种方式就是如果我们的程序里面使用了spring容器,那么我们可以借助spring容器,借助spring的扫描,我们可以不需要自己扫描。
2.3 基于spring容器实现
2.3.1 spring模块结构(部分)
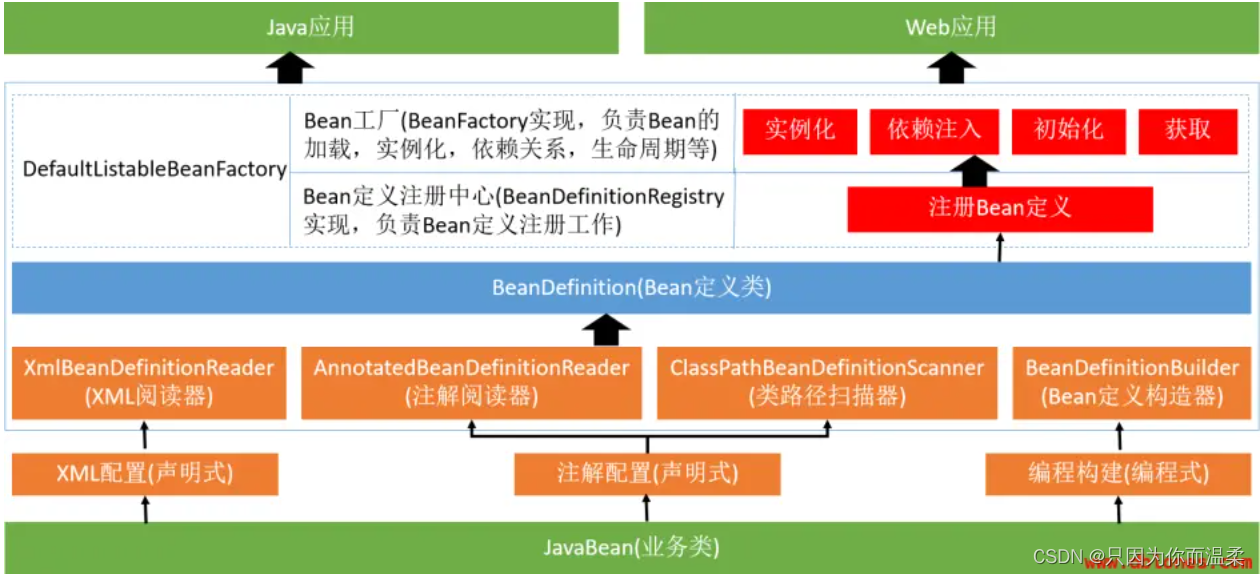
整个Spring IOC容器,核心模块包括构造Bean定义,实例化BeanFactory,注册Bean定义,实例化Bean并完成依赖注入,提供Bean获取。核心组件包括BeanDefinition实例对象,BeanFactory实例对象,Bean实例对象。
2.3.2 spring容器核心流程(部分)

核心流程:
1.BeanFactory实例化
2.注册Bean定义
3.实例化普通单例Bean
4.依赖注入属性
5.普通Bean初始化
6.所有普通单例Bean实例化完成
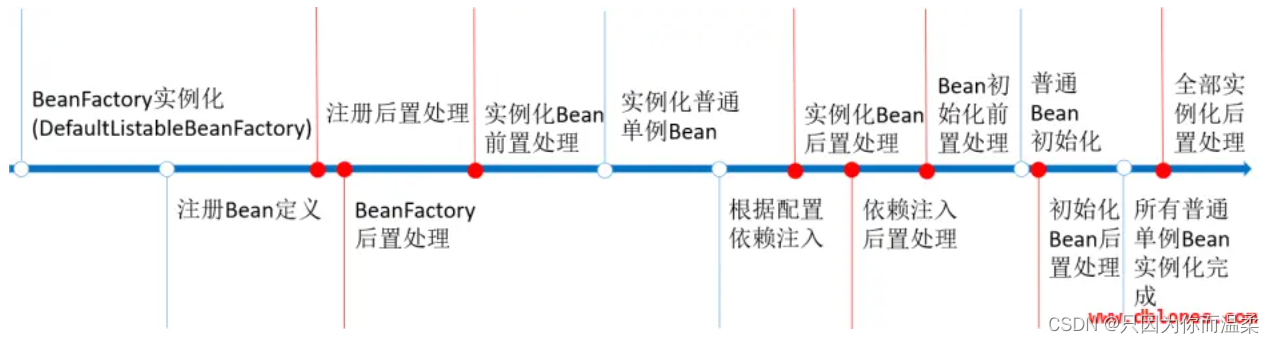
加入钩子后流程:
1.BeanFactory实例化
2.注册Bean定义
3.注册后置处理,实现BeanDefinitionRegistryPostProcessor.postProcessBeanDefinitionRegistry
4.BeanFactory后置处理,实现BeanFactoryPostProcessor.postProcessBeanFactory
5.实例化Bean前置处理,实现InstantiationAwareBeanPostProcessor.postProcessBeforeInstantiation
6.实例化普通单例Bean
7.依赖注入属性
8.实例化Bean后置处理,实现InstantiationAwareBeanPostProcessor.postProcessAfterInstantiation
9.依赖注入后置处理,实现InstantiationAwareBeanPostProcessor.postProcessPropertyValues
10.Bean初始化前置处理,实现BeanPostProcessor.postProcessBeforeInitialization
11.普通Bean初始化( @PostConstruct注解方法初始化, InitializingBean接口afterPropertiesSet方法初始化, @Bean注解init-method属性方法初始化)
12.Bean初始化后置处理,实现BeanPostProcessor.postProcessBeforeInitialization
13.所有普通单例Bean实例化完成
14.所有普通单例bean实例化后置处理,实现SmartInitializingSingleton.afterSingletonsInstantiated
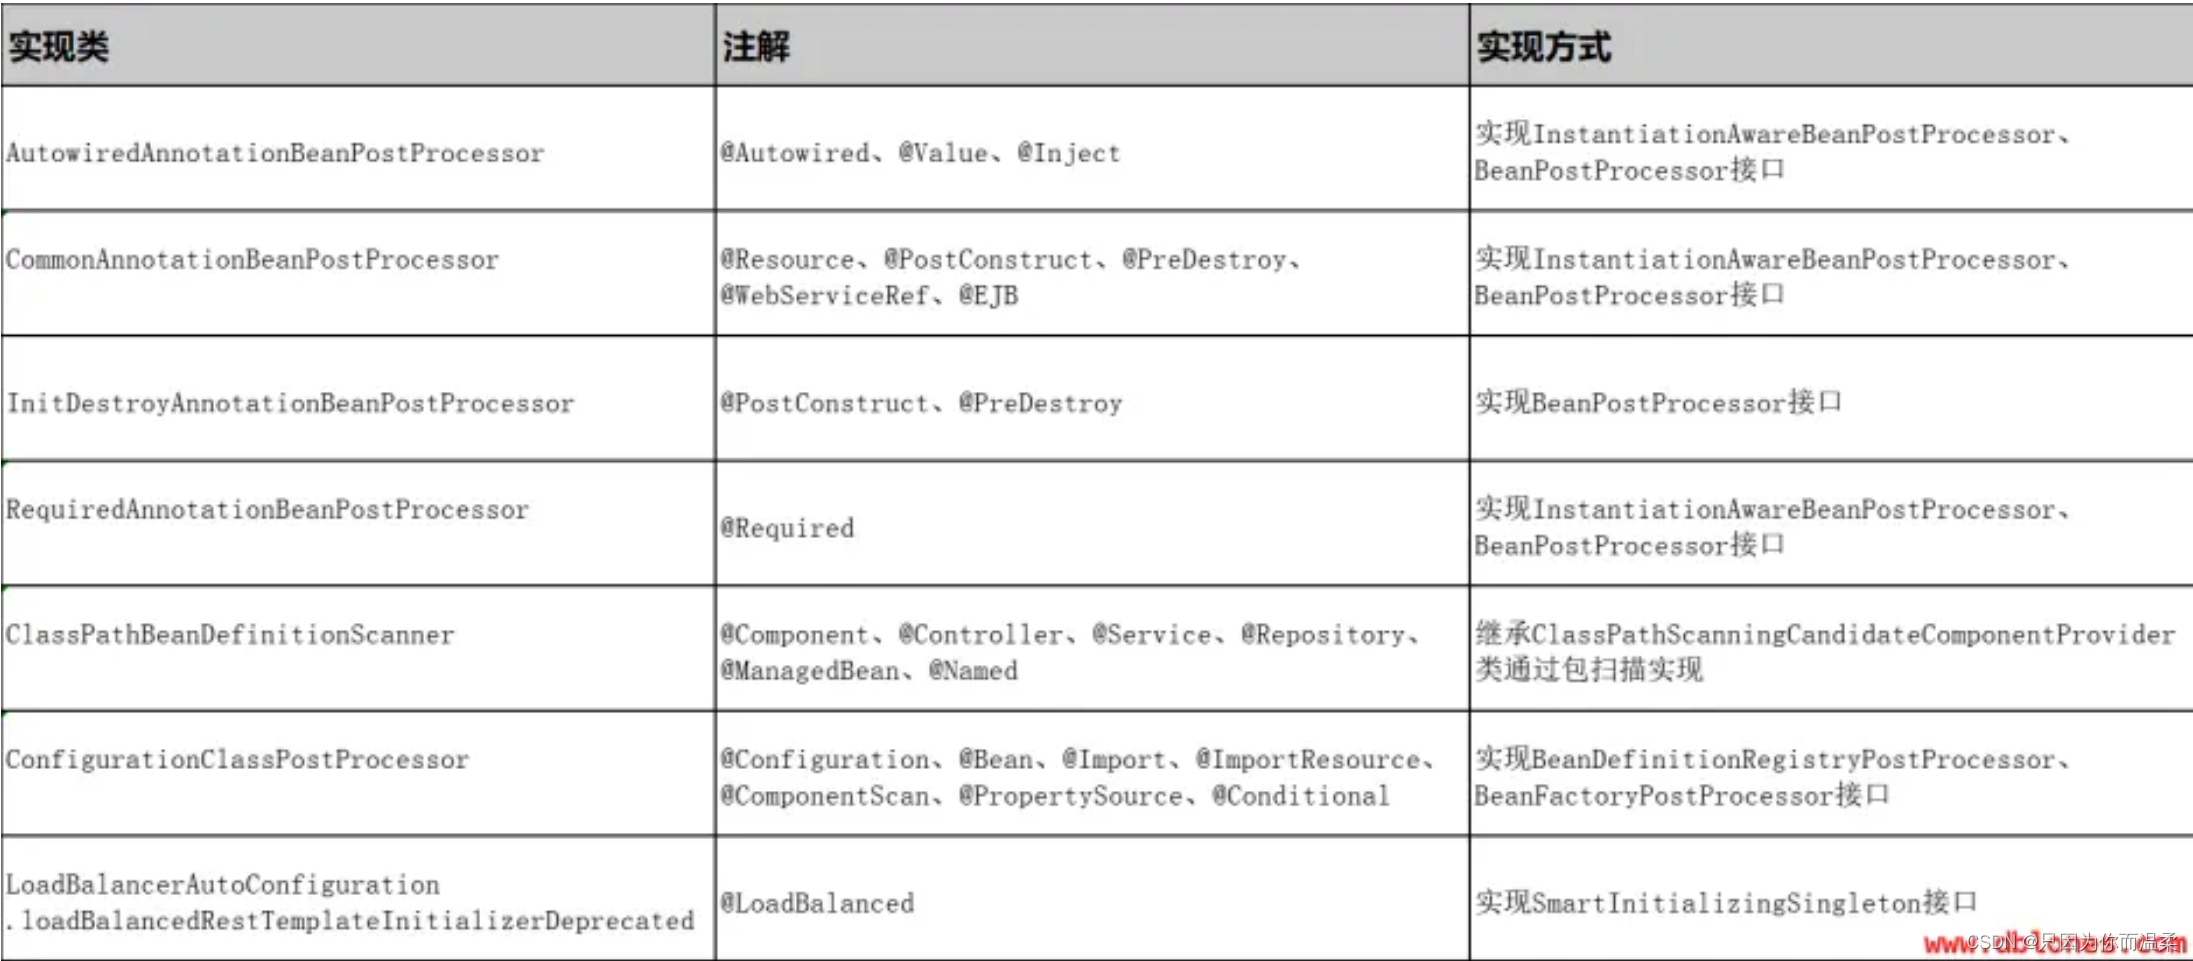
2.3.3 spring常见注解实现(部分)
2.3.4 借助spring接口实现注解方式
(1). 基于BeanDefinitionRegistryPostProcessor接口
这个接口一般用来注册bean定义,当然也可以修改bean定义信息,触发时机在BeanFactory实例化后,注册了一些系统内置的bean定义之后
public interface BeanDefinitionRegistryPostProcessor extends BeanFactoryPostProcessor {
    void postProcessBeanDefinitionRegistry(BeanDefinitionRegistry registry) throws BeansException;
}
ConfigurationClassPostProcessor就是基于BeanDefinitionRegistryPostProcessor接口实现@Configuration、@Bean、@Import、@ImportResource、@ComponentScan、@PropertySource、@Conditional等注解的。
举例:
声明注解
@Target({ElementType.TYPE}) //声明应用在属性上
@Retention(RetentionPolicy.RUNTIME) //运行期生效
@Documented
public @interface Registry {
    String value() default "";
}
添加注解
@Registry
public class Dog {
}
注解实现
/**
 * @Classname AnnotationBeanDefinitionRegistryPostProcessor
 * @Date 2022/7/26 12:47
 * @Created by ZhangXiao
 * @Description 自定义注解注入到ioc容器 通过 实现 BeanDefinitionRegistryPostProcessor接口
 *
 * 在所有bean定义信息将要被加载,bean实例还未创建的;
 * 优先于BeanFactoryPostProcessor执行;
 * 利用BeanDefinitionRegistryPostProcessor给容器中在额外添加一些组件
 *
 */
@Component
public class AnnotationBeanDefinitionRegistryPostProcessor implements BeanDefinitionRegistryPostProcessor {
    @Override
    public void postProcessBeanDefinitionRegistry(BeanDefinitionRegistry registry) throws BeansException {
        // sring扫描器
        ClassPathScanningCandidateComponentProvider classPathScanningCandidateComponentProvider = new ClassPathScanningCandidateComponentProvider(false);
        // 可使用AnnotationTypeFilter结合ClassPathScanningCandidateComponentProvider去获取我们想类信息
        classPathScanningCandidateComponentProvider.addIncludeFilter(new AnnotationTypeFilter(Registry.class));
        // 放入自己的包, 给扫描
        Set<BeanDefinition> beanDefinitions = classPathScanningCandidateComponentProvider.findCandidateComponents("com.xiaoge.spring");
        for(BeanDefinition beanDefinition : beanDefinitions){
            // 注入到ioc容器
            registry.registerBeanDefinition(beanDefinition.getBeanClassName(), beanDefinition);
        }
    }

    @Override
    public void postProcessBeanFactory(ConfigurableListableBeanFactory beanFactory) throws BeansException {

    }
}
测试验证
@Configuration
@ComponentScan("com.xiaoge.spring")
public class Example04 {
    public static void main(String[] args) {
        ApplicationContext context = new AnnotationConfigApplicationContext(Example04.class);
        Dog dog = context.getBean(Dog.class);
        System.out.println(dog);
    }
}
(2). BeanFactoryPostProcessor
这个接口一般修改bean定义信息,触发时机在BeanFactory实例化后,注册了bean定义之后,BeanDefinitionRegistryPostProcessor接口的postProcessBeanDefinitionRegistry方法之后
public interface BeanFactoryPostProcessor {
	void postProcessBeanFactory(ConfigurableListableBeanFactory beanFactory) throws BeansException;
}
@Configuration注解的代理实现就是在这个阶段通过ConfigurationClassPostProcessor类实现的。
(3).InstantiationAwareBeanPostProcessor
是BeanPostProcessor的子接口,通过接口字面意思翻译该接口的作用是感知Bean实例化的处理器。就是全面干预Bean实例化过程,包括Bean实例化前后,设置属性,初始化前后。
public interface InstantiationAwareBeanPostProcessor extends BeanPostProcessor {
    Object postProcessBeforeInstantiation(Class<?> beanClass, String beanName) throws BeansException;

    boolean postProcessAfterInstantiation(Object bean, String beanName) throws BeansException;

    PropertyValues postProcessPropertyValues(
            PropertyValues pvs, PropertyDescriptor[] pds, Object bean, String beanName) throws BeansException;
}
方法描述postProcessBeforeInitializationBeanPostProcessor接口中的方法,在Bean的自定义初始化方法之前执行postProcessAfterInitializationBeanPostProcessor接口中的方法,在Bean的自定义初始化方法执行完成之后执行postProcessBeforeInstantiation自身方法,是最先执行的方法,它在目标对象实例化之前调用,该方法的返回值类型是Object,我们可以返回任何类型的值。由于这个时候目标对象还未实例化,所以这个返回值可以用来代替原本该生成的目标对象的实例(比如代理对象)。如果该方法的返回值代替原本该生成的目标对象,后续只有postProcessAfterInitialization方法会调用,其它方法不再调用;否则按照正常的流程走postProcessAfterInstantiation在目标对象实例化之后调用,这个时候对象已经被实例化,但是该实例的属性还未被设置,都是null。因为它的返回值是决定要不要调用postProcessPropertyValues方法的其中一个因素(因为还有一个因素是mbd.getDependencyCheck());如果该方法返回false,并且不需要check,那么postProcessPropertyValues就会被忽略不执行;如果返回true,postProcessPropertyValues就会被执行postProcessPropertyValues对属性值进行修改,如果postProcessAfterInstantiation方法返回false,该方法可能不会被调用。可以在该方法内对属性值进行修改
我们常见的注解@Autowired、@Value、@Inject、@Resource、@PostConstruct、@PreDestroy、@WebServiceRef、@EJB、@Required就是借助InstantiationAwareBeanPostProcessor接口实现的,其中@Autowired、@Value、@Inject是AutowiredAnnotationBeanPostProcessor类实现的,@Resource、@PostConstruct、@PreDestroy、@WebServiceRef、@EJB是CommonAnnotationBeanPostProcessor 类实现的,@Required是RequiredAnnotationBeanPostProcessor类实现的。
(4). BeanPostProcessor
对实例Bean进行后置处理, Bean初始化方法调用前被调用或Bean初始化方法调用后被调用
public interface BeanPostProcessor {
    //bean初始化方法调用前被调用
    Object postProcessBeforeInitialization(Object bean, String beanName) throws BeansException;
    //bean初始化方法调用后被调用
    Object postProcessAfterInitialization(Object bean, String beanName) throws BeansException;
}
运行顺序
=Spring IOC容器实例化Bean=
=Bean属性赋值=
=调用BeanPostProcessor的postProcessBeforeInitialization方法=
=调用bean实例的初始化方法=
=调用BeanPostProcessor的postProcessAfterInitialization方法=
我们常见的注解@@PostConstruct、@PreDestroy就是借助BeanPostProcessor 接口实现的,具体是通过InitDestroyAnnotationBeanPostProcessor类实现的。
举例:
声明注解
@Target({ElementType.FIELD}) //声明应用在属性上
@Retention(RetentionPolicy.RUNTIME) //运行期生效
@Documented
public @interface Boy {
	String name() default "";
}
添加注解
@Service
public class Hello {
    @Boy(name = "小明")
    String name = "world";

    public void say() {
        System.out.println("hello, " + name);
    }
}
注解实现
/**
 * @Classname BoyAnnotationBeanPostProcessor
 * @Date 2022/7/26 12:47
 * @Created by ZhangXiao
 * @Description 自定义注解通过后置处理器完成赋值 通过 实现 BeanPostProcessor
 *
 * Bean后置处理器本身也是一个Bean, bean创建对象初始化前后进行拦截工作的
 *
 */
@Component
public class BoyAnnotationBeanPostProcessor implements BeanPostProcessor {
    @Override
    public Object postProcessBeforeInitialization(Object bean, String beanName) throws BeansException {
        // 第一次扫描事主体类, 第二次扫描是Hello
        /**
         * 利用Java反射机制注入属性
         */
        Field[] declaredFields = bean.getClass().getDeclaredFields();
        for (Field declaredField : declaredFields) {
            Boy annotation = declaredField.getAnnotation(Boy.class);
            if (null == annotation) {
                continue;
            }
            // 忽略访问权限修饰符的安全检查, 暴力反射
            declaredField.setAccessible(true);
            try {
                declaredField.set(bean, annotation.name());
            } catch (IllegalAccessException e) {
                e.printStackTrace();
            }
        }
        return bean;
    }
    @Override
    public Object postProcessAfterInitialization(Object bean, String beanName) throws BeansException {
        return bean;
    }
}
测试验证
@Configuration
@ComponentScan("com.xiaoge.spring2")
public class Example5 {
    public static void main(String[] args) {
        ApplicationContext context = new AnnotationConfigApplicationContext(Example5.class);
        Hello hello = context.getBean(Hello.class);
        hello.say();
    }
}
(5). SmartInitializingSingleton
对全体实例bean进行后置处理。
public interface SmartInitializingSingleton {

   void afterSingletonsInstantiated();
}
Spring Cloud中的@LoadBalanced就是借助SmartInitializingSingleton接口实现的。
(6). AOP
对方法进行拦截。
常见权限,加解密,日志,方法调用等处理可以借助AOP完成。


 305
305


 被折叠的 条评论
为什么被折叠?
被折叠的 条评论
为什么被折叠?
 到【灌水乐园】发言


