


1,oauth2需要配置三部分
(1)配置spring security 因为oauth2是基于security的
用来验证用户名和密码的
(2)配置认证服务器
用来分发token并且存储token,因为本地没有安装redis,所以本文采用数据库的形式存储token
(3)配置资源服务器
保护被需要访问的资源,解析token
导入依赖
<!--spring security oauth-->
<dependency>
    <groupId>org.springframework.boot</groupId>
    <artifactId>spring-boot-starter-security</artifactId>
</dependency>
<dependency>
    <groupId>org.springframework.boot</groupId>
    <artifactId>spring-boot-starter-data-redis</artifactId>
</dependency>
<dependency>
    <groupId>org.springframework.boot</groupId>
    <artifactId>spring-boot-starter-actuator</artifactId>
</dependency>
<dependency>
    <groupId>org.springframework.security.oauth</groupId>
    <artifactId>spring-security-oauth2</artifactId>
    <version>RELEASE</version>
</dependency>

<!--数据库依赖-->
<dependency>
    <groupId>org.mybatis.spring.boot</groupId>
    <artifactId>mybatis-spring-boot-starter</artifactId>
    <version>1.3.0</version>
</dependency>

<dependency>
    <groupId>mysql</groupId>
    <artifactId>mysql-connector-java</artifactId>
</dependency>
一,配置认证服务器
//认证服务器,用来认证用户分发token,并存储
@Configuration
@EnableAuthorizationServer
public class MyAuthorizationServerConfigurer extends AuthorizationServerConfigurerAdapter {

    @Autowired
    private AuthenticationManager authenticationManager;
//    @Autowired
//    RedisConnectionFactory redisConnectionFactory;

    @Autowired
    private DataSource dataSource;


    @Override
    //配置令牌端点的安全约束
    public void configure(AuthorizationServerSecurityConfigurer security) throws Exception {
        //允许表单登录
        security.allowFormAuthenticationForClients();
    }


    @Override
    //配置客户端详情服务 两种客户端模式 password 和 client
    public void configure(ClientDetailsServiceConfigurer clients) throws Exception {
        clients.inMemory()
                //clientid
                .withClient("client_2")
                //resourceIds自定义随便起
                .resourceIds("abc")
                //认证模式为password模式
                .authorizedGrantTypes("password", "refresh_token")
                .scopes("select")
                .authorities("client")
                //由于设置的加密方式,所以client密码和用户的password都需要加密
                //client密码
                .secret(new BCryptPasswordEncoder().encode("123456"));
    }

    @Bean
    public TokenStore tokenStore() {
        return new JdbcTokenStore(dataSource);
    }

    //设置token 比如token的有效时长等
    @Bean
    public AuthorizationServerTokenServices tokenServices() {
        DefaultTokenServices defaultTokenServices = new DefaultTokenServices();
        defaultTokenServices.setAccessTokenValiditySeconds(1000000);
        defaultTokenServices.setRefreshTokenValiditySeconds(200000);
        defaultTokenServices.setSupportRefreshToken(true);
        defaultTokenServices.setReuseRefreshToken(false);
        defaultTokenServices.setTokenStore(tokenStore());
        return defaultTokenServices;
    }

    @Override
    //配置授权以及令牌的访问端点和令牌服务
    public void configure(AuthorizationServerEndpointsConfigurer endpoints) throws Exception {
        //redis token存储
//        endpoints
                .tokenStore(new RedisTokenStore(redisConnectionFactory))
//                .authenticationManager(authenticationManager);
        //数据库存储
        endpoints.tokenStore(tokenStore())
                .authenticationManager(authenticationManager)
                //设置访问token端点的方法类型,允许get提交
                .allowedTokenEndpointRequestMethods(HttpMethod.GET, HttpMethod.GET);
    }
}
二,配置spring security
@Configuration
@EnableWebSecurity
public class MySecurityConfig extends WebSecurityConfigurerAdapter {
    @Override
    protected void configure(HttpSecurity http) throws Exception {
        http
            .requestMatchers().anyRequest()
            //设置符合条件的端点通过,不被保护
            .and().authorizeRequests().antMatchers("/oauth/*").permitAll();
    }

    //设置内存用户(本文把用户信息存到内存,也可以采用查询数据库的方式)
    @Bean
    @Override
    protected UserDetailsService userDetailsService() {
        InMemoryUserDetailsManager manager = new InMemoryUserDetailsManager();
        manager.createUser(User.withUsername("user_1").password(new BCryptPasswordEncoder().encode("123456")).authorities("USER").build());
        return manager;
    }

    //这一步的配置是必不可少的,否则SpringBoot会自动配置一个AuthenticationManager,覆盖掉内存中的用户
    @Bean
    @Override
    public AuthenticationManager authenticationManagerBean() throws Exception {
        AuthenticationManager manager = super.authenticationManagerBean();
        return manager;
    }

    @Bean
    PasswordEncoder passwordEncoder() {
        return new BCryptPasswordEncoder();
    }

    //设置密码加密规则
    @Override
    protected void configure(AuthenticationManagerBuilder auth) throws Exception {
        auth.userDetailsService(userDetailsService()).passwordEncoder(passwordEncoder());
    }

    //设置不用密码加密   不推荐
//    @Bean
//    public static NoOpPasswordEncoder passwordEncoder() {
//        return (NoOpPasswordEncoder) NoOpPasswordEncoder.getInstance();
//    }
}
三,配置资源服务器
//资源服务器用来验证token
@Configuration
@EnableResourceServer
public class MyResourceServerConfigurer extends ResourceServerConfigurerAdapter {

    @Override
    public void configure(ResourceServerSecurityConfigurer resources) throws Exception {
        resources.resourceId("abc").stateless(true);
    }

    @Override
    public void configure(HttpSecurity http) throws Exception {
        http
                .sessionManagement().sessionCreationPolicy(SessionCreationPolicy.IF_REQUIRED)
                .and()
                .requestMatchers().anyRequest()
                .and()
                .anonymous()
                .and()
                .authorizeRequests()
                .antMatchers("/abc/**").authenticated();//配置abc访问控制,必须认证过后才可以访问
    }
}
四,编写需要收保护的资源
@RestController
public class CeShiapi {

    Logger logger = LoggerFactory.getLogger(CeShiapi.class);

    @GetMapping("/abc")
    public String testSwagger() {
        logger.info("我是日志");
        System.out.println("aaaaaa");
        return "bbbbb";
    }
}
数据库存储token的表结构一共是两张表
DROP TABLE IF EXISTS `oauth_access_token`;
CREATE TABLE `oauth_access_token` (
        `token_id` varchar(256) DEFAULT NULL,
`token` blob,
        `authentication_id` varchar(256) DEFAULT NULL,
`user_name` varchar(256) DEFAULT NULL,
`client_id` varchar(256) DEFAULT NULL,
`authentication` blob,
        `refresh_token` varchar(256) DEFAULT NULL
) ENGINE=MyISAM DEFAULT CHARSET=utf8;


DROP TABLE IF EXISTS `oauth_refresh_token`;
CREATE TABLE `oauth_refresh_token` (
        `token_id` varchar(256) DEFAULT NULL,
`token` blob,
        `authentication` blob
) ENGINE=MyISAM DEFAULT CHARSET=utf8;
启动项目
结果
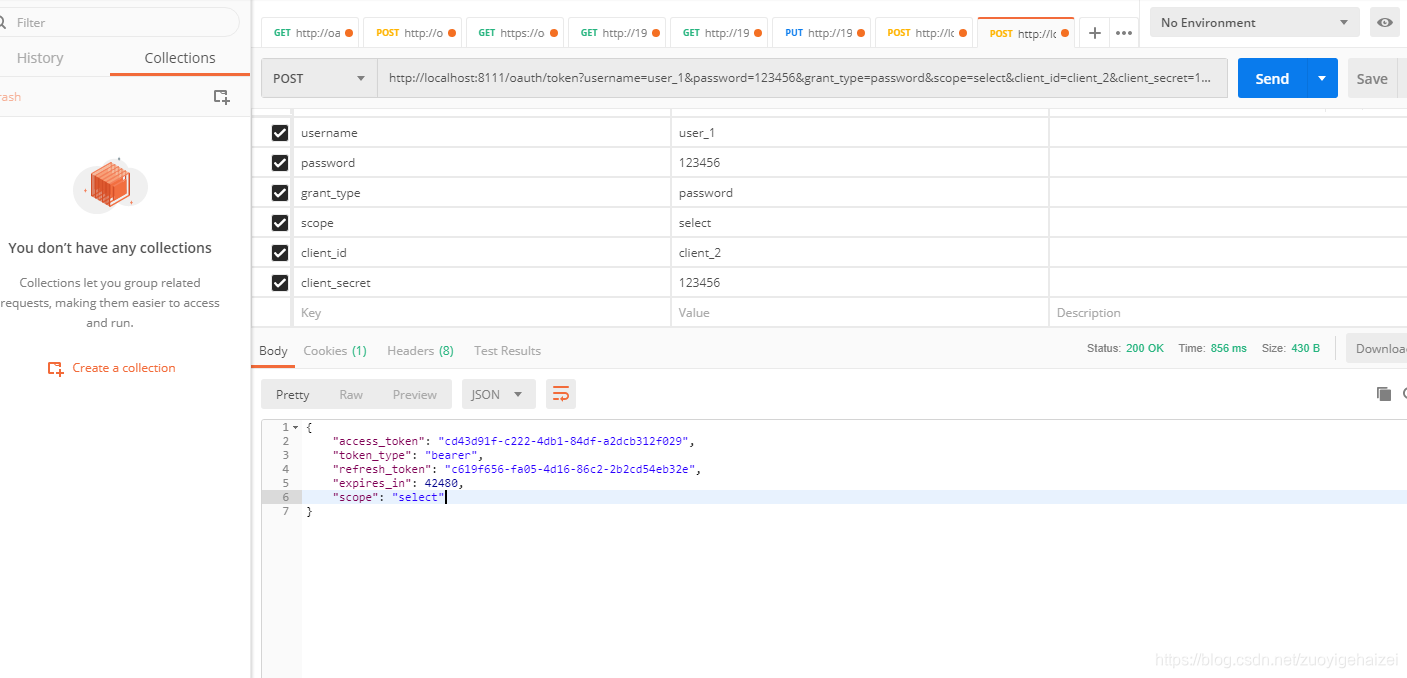

访问资源http://localhost:8111/abc 受保护

加上token http://localhost:8111/abc?access_token=cd43d91f-c222-4db1-84df-a2dcb312f029

访问成功!


 485
485


 被折叠的 条评论
为什么被折叠?
被折叠的 条评论
为什么被折叠?
 到【灌水乐园】发言


