


springBoot:缓存以及其工作原理
前言
我们都知道,一个程序的瓶颈通常都在数据库,很多场景需要获取相同的数据。比如网站页面数据等,需要一次次的请求数据库,导致大部分时间都浪费在数据库查询和方法调用上,这时就可以利用到缓存来缓解这个问题。
JSR107、Spring缓存抽象等概念
JSP107:
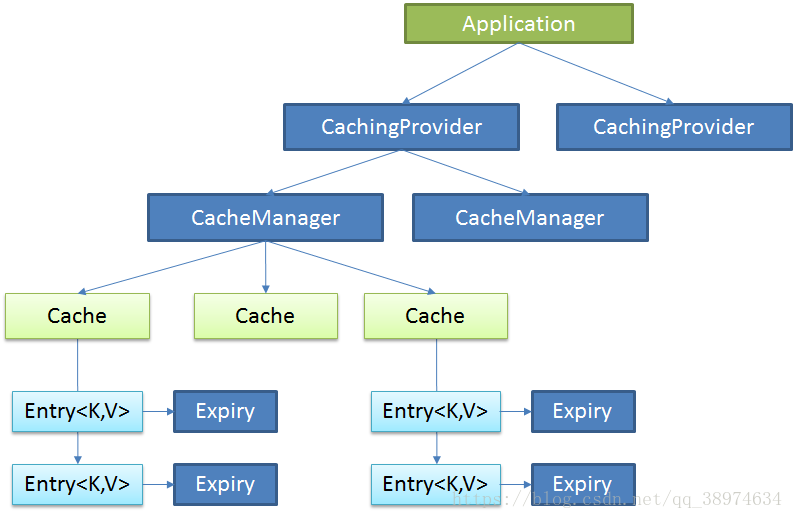
Java Caching定义了5个核心接口,分别是CachingProvider, CacheManager, Cache, Entry 和 Expiry。
- CachingProvider:定义了创建、配置、获取、管理和控制多个CacheManager。一个应用可以在运行期访问多个CachingProvider。
- CacheManager:定义了创建、配置、获取、管理和控制多个唯一命名的Cache,这些Cache存在于CacheManager的上下文中。一个CacheManager仅被一个CachingProvider所拥有。
- Cache:是一个类似Map的数据结构并临时存储以Key为索引的值。一个Cache仅被一个CacheManager所拥有。
- Entry:是一个存储在Cache中的key-value对.
- Expiry:每一个存储在Cache中的条目有一个定义的有效期。一旦超过这个时间,条目为过期的状态。一旦过期,条目将不可访问、更新和删除。缓存有效期可以通过ExpiryPolicy设置。
首先是原生的JCache:
不得不说,使用java原生的缓存规范来实现我们的需求是很麻烦的,所有spring才对JSR-107进行了抽象,简化为Cache和CacheManager来帮助我们开发,我们可以通过两张图来对比一下使用了spring缓存抽象和使用Java Caching的区别:
Spring缓存抽象:

可以很明显的看到,我们使用Spring以后,仅仅只需要操作CacheManager就可以来方便进行开发.
SpringBoot缓存原理
SpringBoot使用缓存需要引入spring-boot-starter-cache
<dependency>
  <groupId>org.springframework.boot</groupId>
  <artifactId>spring-boot-starter-cache</artifactId>
</dependency>
根据以往对SpringBoot的解析中,我们先找到缓存自动配置类:CacheAutoConfiguration
在代码中我们可以看到CacheAutoConfiguration在启动的时候,加载了10个缓存配置类,比如我们常用的:RedisCacheConfiguration,EhCacheCacheConfiguration等

这些缓存配置类 都会有规则判断
@Configuration(proxyBeanMethods = false)  //声明这是一个配置类
@ConditionalOnMissingBean({CacheManager.class})  //如果容器中没有CacheManager 才会实例化这个Bean
@Conditional({CacheCondition.class})
class SimpleCacheConfiguration {
现在我并没有在SpringBoot中配置其他缓存管理器,但CacheAutoConfiguration在启动的时候加载了10个缓存配置类,那么到底哪个配置起作用了呢?
首先在配置文件中添加:
debug: true #打开自动配置类报告
然后启动项目:


在启动日志中,我们可以看到SpringBoot默认为我们匹配(matched)了一个SimpleCacheConfiguration,而其他的9个缓存配置都是Did not match(不匹配)。那么也就是说SpringBoot的默认缓存配置类是SimpleCacheConfiguration
(ps:如果我们使用了Redis组件,匹配的缓存配置类就是:RedisCacheConfiguration)
那么SimpleCacheConfiguration这个缓存配置类又为我们做了什么呢?
@Configuration(proxyBeanMethods = false)
@ConditionalOnMissingBean({CacheManager.class})
@Conditional({CacheCondition.class})
class SimpleCacheConfiguration {
    SimpleCacheConfiguration() {
    }
    @Bean
    ConcurrentMapCacheManager cacheManager(CacheProperties cacheProperties, CacheManagerCustomizers cacheManagerCustomizers) {
        ConcurrentMapCacheManager cacheManager = new ConcurrentMapCacheManager();
        List<String> cacheNames = cacheProperties.getCacheNames();
        if (!cacheNames.isEmpty()) {
            cacheManager.setCacheNames(cacheNames);
        }
        return (ConcurrentMapCacheManager)cacheManagerCustomizers.customize(cacheManager);
    }
}
在代码中我们可以看到,SimpleCacheConfiguration给容器中注入了一个CacheManager
通过这CacheManager(缓存管理器)我们可以创建、配置、获取、管理和控制多个唯一命名的Cache
二、 缓存注解
- Cache:缓存接口,定义缓存操作。实现:RedisCache,EnCacheCache等
- CacheManager:缓存管理器,管理各种缓存(Cache)组件
- @Cacheable:触发缓存写入,主要针对方法配置。
- @CacheEvict:清除缓存。
- @CachePut:更新缓存(不会影响到方法的运行)。
- @Caching:开启基于缓存的注解
- @CacheConfig:设置类级别上共享的一些常见缓存设置。
- keyGenerator:缓存数据时Key的生产策略
- serialize:缓存数据时value序列化策略
具体详细介绍参考:https://blog.csdn.net/xiaoyao2246/article/details/83995882
三、 缓存使用
要在Springboot中使用缓存需要以下几步:
第一步: 导入spring-boot-starter-cache模块
第二步: @EnableCaching开启缓存
第三步: 使用缓存注解
1.首先在pom文件中引入缓存坐标
        <dependency>
            <groupId>org.springframework.boot</groupId>
            <artifactId>spring-boot-starter-cache</artifactId>
        </dependency>
2.在主程序中开启缓存注解
@EnableCaching  //开启缓存
@MapperScan("com.meng.demo.mapper")
@SpringBootApplication
public class DemoCacheApplication {

    public static void main(String[] args) {
        SpringApplication.run(DemoCacheApplication.class, args);
    }

}
测试:@Cacheable
将方法的运行结果进行缓存,以后要相同的数据,直接从缓存中获取,不用调用方法
service:
@Cacheable(cacheNames = "user")
public UserPO getUser(Integer id){
  System.out.println("访问数据库:"+id);
    return userMapper.getOne(id);
}
测试方法:
 @Test
    void contextLoads() {
        Integer id = 1;
        UserPO user1 = userService.getUser(1);
        System.out.println("第一次查询:"+user1.getUserName());

        UserPO user2 = userService.getUser(1);
        System.out.println("第二次查询:"+user2.getUserName());
    }
测试结果:

测试:@CachePut
主要用于修改了数据库的某个数据,同时更新缓存,运行时机:先调用目标方法,再将目标方法的结果缓存起来
service:
 @Cacheable(cacheNames = "user")
    public UserPO getUser(Integer id){
        System.out.println("访问数据库:"+id);
        return userJpaMapper.getOne(id);
    }

    @CachePut(value = "user",key = "#result.id")
    public UserPO update(UserPO po) {
        System.out.println("数据库更新");
        userMapper.update(po);
        return po;
    }
测试方法:
 @Test
    void updataUser() {
        Integer id = 2;
        UserPO user1 = userService.getUser(id);
        System.out.println("第一次查询:"+user1.getUserName()+", 年龄:"+user1.getAge());

        UserPO po = new UserPO();
        po.setId(id);
        po.setAge(50);
        userService.update(po);

        UserPO user2 = userService.getUser(id);
        System.out.println("第二次查询:"+user2.getUserName()+", 年龄:"+user2.getAge());
    }
测试结果

@CacheEvict
该注解用于删除一个缓存
 /**
     * allEntries:删除所有的缓存   allEntries = true
     * beforeInvocation:缓存的清除是否在方法之前执行,默认是在方法之后执行
     * 其他参数与@Cacheable大致一样
     */
    @CacheEvict(value = "user", key = "#id", allEntries = true)
    public void delete(Integer id) {
        userJpaMapper.deleteById(id);
    }
@Caching
该注解用于存放多个缓存注解,有时候对于一个方法,想放置多个缓存,既想缓存又想更新时使用
    /**
     * 可以放多个注解
     * @param lastName
     * @return
     */
    @Caching(
            cacheable = {
                    @Cacheable(value = "user", key = "#id")
            },
            put = {
                    @CachePut(value = "user", key = "#result.id"),
                    @CachePut(value = "emp", key = "#result.email")
            }
    )
    public UserPO getUser(Integer id){
        System.out.println("访问数据库:"+id);
        return userJpaMapper.getOne(id);
    }
@CacheConfig
有的时候觉得每次在使用缓存注解的时候都要指定缓存的名字,或者指定缓存的cacheManager之类的,觉得很麻烦。那么就可以在类上使用@CacheConfig统一的配置缓存的名字
@CacheConfig(value = "user")
@Service
public class UserService {
自定义key的生成策略
对于key,我们可以让它自动生成,生成的策略可以有我们自己制定,之需要在配置类中将我们的定制规则加入到容器中即可
@Bean
public KeyGenerator keyGenerator(){
    return new KeyGenerator(){
        @Override
        public Object generate(Object o, Method method, Object... objects) {
            return method.getName() + "[" + Arrays.asList(objects) + "]";
        }
    };
}


 4057
4057


 被折叠的 条评论
为什么被折叠?
被折叠的 条评论
为什么被折叠?
 到【灌水乐园】发言


