


教程:使用 Q# 实现量子随机数生成器
- 项目
- 2024/07/03
- 8 个参与者
本文内容
本教程介绍如何编写一个基本量子程序 Q# ,以利用量子力学的性质生成随机数。
在本教程中,将:
- 创建 Q# 程序。
- 查看程序的主要组件 Q# 。
- 定义问题的逻辑。
- 将经典操作和量子操作相结合来解决问题。
- 使用量子位和叠加来生成量子随机数生成器。
提示
若要加速量子计算之旅,请查看 Azure Quantum 代码,这是 Azure Quantum 网站的独特功能。 在这里,你可以运行内置Q#示例或你自己的Q#程序,通过提示生成新Q#代码,在 VS Code for the Web 中打开并运行代码,只需单击一下,并询问 Copilot 有关量子计算的任何问题。
先决条件
-
若要在 Azure Quantum 的 Copilot 中运行代码示例,
- Microsoft(MSA)电子邮件帐户。
-
若要在 Visual Studio Code 中开发和运行代码示例,请执行以下操作:
-
最新版本的 Visual Studio Code 或打开 网页版 VS Code(推荐)。
-
最新版本的 Azure Quantum Development Kit 扩展。 有关安装详细信息,请参阅 在 VS Code 上安装 QDK。
-
如果要使用 Jupyter Notebook,则还需要安装 Python 和 Jupyter 扩展以及最新的
qsharpPython 包。 为此,请打开终端并运行以下命令:$ pip install --upgrade qsharp
-
定义问题
经典计算机生成的不是随机数,而是伪随机数。 伪随机数生成器根据某初始值(称为“种子”)生成一个确定的数字序列。 为了更好地估计随机值,此种子通常是 CPU 时钟的当前时间。
另一方面,量子计算机可以生成真正的随机数。 这是因为叠加量子比特的测量是一个概率过程。 测量结果是随机的,无法预测结果。 这是量子随机数生成器的基本原理。
量子比特是可以叠加的量子信息的单位。 测量时,量子比特的状态只能为 0 或 1。 但在测量前,量子比特的状态表示进行测量时读取值为 0 或 1 的概率。
从处于基态(例如 0)的量子比特入手。 随机数生成器的第一步是使用 Hadamard 运算将量子位置于相等叠加中。 此状态的度量结果为 0 或 50% 概率为 50% 的结果,这是一个真正的随机位。
在叠加中测量量子位后,无法知道将得到什么,每次调用代码时,结果都是不同的值。 但如何才能通过这种行为生成更大的随机数?
假设重复这个过程四次,生成以下二进制数字序列:
0,1,1,0
如果将这些位连接或合并成一个位字符串,就可以形成更大的数字。 在此示例中,位序列 0110 等同于十进制的 6。
0110 binary≡6 decimal
如果多次重复执行此过程,则可以将多个比特组合成任何一个大数字。 现在,你可以向你的上级提供这个数字作为安全密码,因为你可以确信没有太空黑客能够确定度量序列的结果。
定义随机数生成器逻辑
让我们概述一下随机数生成器的逻辑,前提是我们有一个随机位生成器:
- 将
max定义为要生成的最大数字。 - 定义需要生成的随机比特的数目。 相关方法是计算表示最大为
max的整数所需的位数nBits。 - 生成长度为
nBits的随机位字符串。 - 如果位字符串表示一个大于
max的数,则返回到步骤 3。 - 否则,此过程完成。 返回生成的数字(整数形式)。
例如,我们将 max 设置为 12。 也就是说,12 是要用作安全密码的最大数字。
需要 ⌊ln(12)/ln(2)+1⌋ 或 4 比特来表示一个介于 0 和 12 之间的数字。 (为简便起见,我们将跳过推导此公式的过程。)
假设生成了位字符串 1101 binary,它等同于 13 decimal。 由于 13 大于 12,因此将复该过程。
接下来,生成位字符串 0110 binary,它等同于 6 decimal。 由于 6 小于 12,因此该过程完成。
量子随机数生成器将返回数字 6 作为密码。 在实际操作中,将较大的数字设置为最大数字,因为较小的数字很容易通过尝试所有可能的密码而被破解。 实际上,为了增加猜测或破解密码的难度,可以使用 ASCII 代码将二进制数转换为文本,并使用数字、符号和混合大小写的字母生成密码。
编写随机位生成器
第一步是编写生成 Q# 随机位的操作。 此操作将是随机数生成器的构建基块之一。
operation GenerateRandomBit() : Result {
    // Allocate a qubit.
    use q = Qubit();

    // Set the qubit into superposition of 0 and 1 using the Hadamard
    H(q);

    // At this point the qubit `q` has 50% chance of being measured in the
    // |0〉 state and 50% chance of being measured in the |1〉 state.
    // Measure the qubit value using the `M` operation, and store the
    // measurement value in the `result` variable.
    let result = M(q);

    // Reset qubit to the |0〉 state.
    // Qubits must be in the |0〉 state by the time they are released.
    Reset(q);

    // Return the result of the measurement.
    return result;
}
现在来看看新代码。
- 定义
GenerateRandomBit运算,它不接受输入,并生成Result类型的值。Result类型表示测量的结果,可能为以下任一值:Zero或One。 - 使用关键字分配单个量子比特
use。 分配后,量子比特始终处于Zero状态。 - 使用该
H操作将量子位置于相等叠加中。 - 使用
M运算测量量子比特,返回度量值(Zero或One)。 - 使用
Reset操作将量子比特重置为 |0} 状态。
通过 H 操作将量子比特置于叠加态并通过 M 操作对其进行测量以后,每次调用代码时,结果都会是一个不同值。
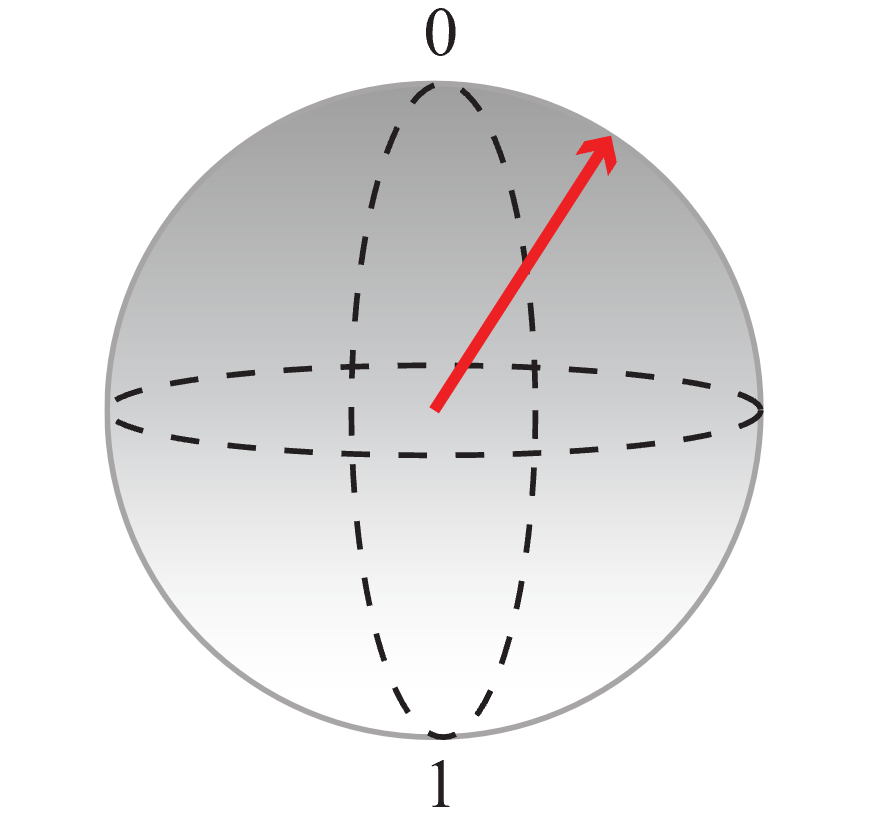
Q#使用 Bloch 球可视化代码
在 Bloch 球中,北极表示经典值 0,南极表示经典值 1。 任何叠加态都可以用球上的某个点来表示(用箭头表示)。 箭头末端越靠近极点,量子位塌缩成经典值(在度量时分配给该极点)的概率越高。 例如,下图中箭头所表示的量子比特状态在你测量它时有较高的概率给出值 0。
你可以使用此表示法将代码的功能可视化:
-
首先,从初始化为状态 0 的某个量子比特着手,并应用
H操作来创建一个相等的叠加,其中获得 0 和 1 的概率相同。
-
然后,测量该量子比特并保存输出:

由于测量的结果是随机的,并且测量结果为 0 和 1 的概率相同,因此获得了一个完全随机的位。 可以多次调用此操作来创建整数。 例如,如果调用此操作三次来获取三个随机位,就可以生成随机的 3 位数(即 0 到 7 之间的随机数)。
编写完整的随机数生成器
-
首先,需要将所需的 Q# 命名空间添加到程序。 对于完整的随机数生成器,需要包括三 Q# 个命名空间:
Microsoft.Quantum.Math,Microsoft.Quantum.Intrinsic以及Microsoft.Quantum.Convert。Q#复制
open Microsoft.Quantum.Convert; open Microsoft.Quantum.Intrinsic; open Microsoft.Quantum.Math; -
接下来,定义
GenerateRandomNumberInRange操作。 此操作重复调用GenerateRandomBit操作以生成位字符串。Q#复制
    /// Generates a random number between 0 and `max`.
    operation GenerateRandomNumberInRange(max : Int) : Int {
        // Determine the number of bits needed to represent `max` and store it
        // in the `nBits` variable. Then generate `nBits` random bits which will
        // represent the generated random number.
        mutable bits = [];
        let nBits = BitSizeI(max);
        for idxBit in 1..nBits {
            set bits += [GenerateRandomBit()];
        }
        let sample = ResultArrayAsInt(bits);

        // Return random number if it is within the requested range.
        // Generate it again if it is outside the range.
        return sample > max ? GenerateRandomNumberInRange(max) | sample;
    }
让我们花点时间回顾一下新代码。
- 你需要计算表示最大为
max的整数所需的位数。 命名空间BitSizeI中的Microsoft.Quantum.Math函数将整数转换为表示它所需的位数。 SampleRandomNumberInRange操作使用for循环来生成随机数,直到生成的数字等于或小于max为止。for循环的工作方式与其他编程语言中的for循环完全相同。- 变量
bits是可变变量。 可变变量是计算过程中可以更改的变量。 使用set指令可以更改可变变量的值。 - 该
ResultArrayAsInt函数来自Microsoft.Quantum.Convert命名空间。 此函数将位字符串转换为正整数。
- 你需要计算表示最大为
-
最后,添加入口点。 在此示例中,该
Main操作是程序的入口点。 它调用GenerateRandomNumberInRange该操作以生成介于 0 和 100 之间的随机数。Q#复制
@EntryPoint() operation Main() : Int { let max = 100; Message($"Sampling a random number between 0 and {max}: "); // Generate random number in the 0..max range. return GenerateRandomNumberInRange(max); }let指令声明在计算过程中不更改的变量。 在这里,我们将最大值定义为 100。 -
随机数生成器的完整代码如下所示:
Q#复制
namespace QuantumRandomNumberGenerator {
    open Microsoft.Quantum.Convert;
    open Microsoft.Quantum.Intrinsic;
    open Microsoft.Quantum.Math;

    @EntryPoint()
    operation Main() : Int {
        let max = 100;
        Message($"Sampling a random number between 0 and {max}: ");

        // Generate random number in the 0..max range.
        return GenerateRandomNumberInRange(max);
    }

    /// Generates a random number between 0 and `max`.
    operation GenerateRandomNumberInRange(max : Int) : Int {
        // Determine the number of bits needed to represent `max` and store it
        // in the `nBits` variable. Then generate `nBits` random bits which will
        // represent the generated random number.
        mutable bits = [];
        let nBits = BitSizeI(max);
        for idxBit in 1..nBits {
            set bits += [GenerateRandomBit()];
        }
        let sample = ResultArrayAsInt(bits);

        // Return random number if it is within the requested range.
        // Generate it again if it is outside the range.
        return sample > max ? GenerateRandomNumberInRange(max) | sample;
    }

    operation GenerateRandomBit() : Result {
        // Allocate a qubit.
        use q = Qubit();

        // Set the qubit into superposition of 0 and 1 using the Hadamard
        H(q);

        // At this point the qubit `q` has 50% chance of being measured in the
        // |0〉 state and 50% chance of being measured in the |1〉 state.
        // Measure the qubit value using the `M` operation, and store the
        // measurement value in the `result` variable.
        let result = M(q);

        // Reset qubit to the |0〉 state.
        // Qubits must be in the |0〉 state by the time they are released.
        Reset(q);

        // Return the result of the measurement.
        return result;
    }
}
运行随机数生成器程序
可以在 Azure Quantum 中的 Copilot 和 Visual Studio Code 中作为独立Q#应用程序或使用 Python 主机程序运行该程序。
可以使用 Azure Quantum 中的 Copilot 免费测试 Q# 代码 - 只需Microsoft(MSA)电子邮件帐户即可。 有关 Azure Quantum 中的 Copilot 的详细信息,请参阅 探索 Azure Quantum。
-
在浏览器中打开 Azure Quantum 中的 Copilot。
-
将以下代码复制并粘贴到代码编辑器中。
Q#复制
namespace Tutorial { open Microsoft.Quantum.Convert; open Microsoft.Quantum.Intrinsic; open Microsoft.Quantum.Math; @EntryPoint() operation Main() : Int { let max = 100; Message($"Sampling a random number between 0 and {max}: "); // Generate random number in the 0..max range. return GenerateRandomNumberInRange(max); } /// # Summary /// Generates a random number between 0 and `max`. operation GenerateRandomNumberInRange(max : Int) : Int { // Determine the number of bits needed to represent `max` and store it // in the `nBits` variable. Then generate `nBits` random bits which will // represent the generated random number. mutable bits = []; let nBits = BitSizeI(max); for idxBit in 1..nBits { set bits += [GenerateRandomBit()]; } let sample = ResultArrayAsInt(bits); // Return random number if it is within the requested range. // Generate it again if it is outside the range. return sample > max ? GenerateRandomNumberInRange(max) | sample; } /// # Summary /// Generates a random bit. operation GenerateRandomBit() : Result { // Allocate a qubit. use q = Qubit(); // Set the qubit into superposition of 0 and 1 using the Hadamard // operation `H`. H(q); // At this point the qubit `q` has 50% chance of being measured in the // |0〉 state and 50% chance of being measured in the |1〉 state. // Measure the qubit value using the `M` operation, and store the // measurement value in the `result` variable. let result = M(q); // Reset qubit to the |0〉 state. // Qubits must be in the |0〉 state by the time they are released. Reset(q); // Return the result of the measurement. return result; // Note that Qubit `q` is automatically released at the end of the block. } } -
选择要运行的镜头数,然后单击“ 运行”。
-
结果显示在直方图和 结果 字段中。
-
单击 “解释代码 ”提示 Copilot 向你解释代码。
提示
在 Azure Quantum 中的 Copilot 中,可以通过单击代码编辑器右侧角的 VS Code 徽标按钮,在 VS Code 网页 版中打开程序。
备注
此代码片段当前未在任何可用的 Azure Quantum 硬件 targets上运行,因为可调用 ResultArrayAsInt 方需要具有 完整计算配置文件的 QPU。
相关内容
浏览其他 Q# 教程:
- 量子纠缠 演示如何编写一个 Q# 程序来操作和测量量子比特,并演示叠加和纠缠的影响。
- Grover 的搜索算法 演示如何编写 Q# 使用 Grover 搜索算法的程序。
- Quantum Fourier 转换 探索了如何编写 Q# 直接处理特定量子比特的程序。
- Quantum Katas 是自我节奏的教程和编程练习,旨在同时教授量子计算和Q#编程的元素。


 1029
1029

 被折叠的 条评论
为什么被折叠?
被折叠的 条评论
为什么被折叠?
 到【灌水乐园】发言


