


利用CoreImage进行简单的人脸检测,对于要求不高的需求还是能够满足的。主要代码如下:
一些参数
#import "ViewController.h"

typedef NS_ENUM(NSInteger,ZWViewType){
   ZWViewType_eyes,
   ZWViewType_mouth
};

//设置颜色
#define ZWEyesColor [UIColor blueColor]
#define ZWMouthColor [UIColor greenColor]
//设置图层大小比例
#define ZWEyesScale 0.2
#define ZWMouthScale 0.4

@interface ViewController ()

@end
初始化图片,并对图片进行放大处理
- (void)viewDidLoad {
    [super viewDidLoad];

    UIImage* image = [UIImage imageNamed:@"person.png"];
    image = [self strectImageWithImage:image targetSize:CGSizeMake(200, 200)];
    UIImageView *imageV = [[UIImageView alloc] initWithImage: image];
    [imageV setFrame:CGRectMake(0, 0, image.size.width,image.size.height)];
    imageV.center = self.view.center;
    [self.view addSubview:imageV];

    [self drawFaceWithImageView:imageV];

}
图片放大方法
#pragma mark-放大图片
-(UIImage *)strectImageWithImage:(UIImage *)image targetSize:(CGSize)size{

    UIGraphicsBeginImageContext(size);
    CGRect thumbnailRect = CGRectZero;
    thumbnailRect.origin = CGPointMake(0, 0);
    thumbnailRect.size.width  = size.width;
    thumbnailRect.size.height = size.height;
    [image drawInRect:thumbnailRect];

    UIImage * newImage = UIGraphicsGetImageFromCurrentImageContext();
    UIGraphicsEndImageContext();

    if (newImage) {
        return  newImage;
    }
    return nil;
}
进行人脸识别成功后需要对人脸面部的部位进行坐标转换
#pragma mark-进行人脸识别
-(void)drawFaceWithImageView:(UIImageView *)imageView{

    CIImage* ciimage = [CIImage imageWithCGImage:imageView.image.CGImage];
    NSDictionary* opts = [NSDictionary dictionaryWithObject:
                          CIDetectorAccuracyHigh forKey:CIDetectorAccuracy];
    CIDetector* detector = [CIDetector detectorOfType:CIDetectorTypeFace
                                              context:nil options:opts];
    //所有的人脸数据
    NSArray* features = [detector featuresInImage:ciimage];

    //得到图片的尺寸
    CGSize inputImageSize = [ciimage extent].size;
    //初始化transform
    CGAffineTransform  transform = CGAffineTransformIdentity;
    //设置缩放,
    transform = CGAffineTransformScale(transform, 1, -1);
    //将图片上移
    transform = CGAffineTransformTranslate(transform, 0, -inputImageSize.height);

    for (CIFaceFeature *faceFeature in features){
        //获取人脸的frame
        CGRect faceViewBounds = CGRectApplyAffineTransform(faceFeature.bounds, transform);
        //获取人脸范围的宽
        CGFloat faceWidth = faceFeature.bounds.size.width;
        //描绘人脸区域
        UIView* faceView = [[UIView alloc] initWithFrame:faceViewBounds];
        faceView.layer.borderWidth = 1;
        faceView.layer.borderColor = [[UIColor redColor] CGColor];
        [imageView addSubview:faceView];

        if(faceFeature.hasLeftEyePosition){
            //获取人左眼对应的point
            CGPoint faceViewLeftPoint = CGPointApplyAffineTransform(faceFeature.leftEyePosition, transform);
            //添加遮罩
            [imageView addSubview:[self createCoverViewWithPoint:faceViewLeftPoint andWith:faceWidth andType:ZWViewType_eyes]];
        }

        if(faceFeature.hasRightEyePosition){
            //获取人右眼对应的point
            CGPoint faceViewRightPoint = CGPointApplyAffineTransform(faceFeature.rightEyePosition, transform);
            //添加遮罩
            [imageView addSubview:[self createCoverViewWithPoint:faceViewRightPoint andWith:faceWidth andType:ZWViewType_eyes]];
        }

        if(faceFeature.hasMouthPosition){
            //获取人嘴巴对应的point
            CGPoint faceViewMouthPoint = CGPointApplyAffineTransform(faceFeature.mouthPosition, transform);
            //添加遮罩
            [imageView addSubview:[self createCoverViewWithPoint:faceViewMouthPoint andWith:faceWidth andType:ZWViewType_mouth]];
        }

    }
}
添加View的代码:
#pragma mark-绘制遮罩
-(UIView *)createCoverViewWithPoint:(CGPoint)point andWith:(CGFloat)width andType:(ZWViewType)type{
CGFloat newWidth = 0;
UIColor *color = nil;
switch (type) {
case ZWViewType_eyes:
newWidth = width * ZWEyesScale;
color= ZWEyesColor;
break;
case ZWViewType_mouth:
newWidth = width * ZWMouthScale;
color= ZWMouthColor;
break;
default:
break;
}
UIView* cover = [[UIView alloc] initWithFrame:
CGRectMake( 0, 0, newWidth, newWidth)];
[cover setBackgroundColor:[color colorWithAlphaComponent:0.3]];
[cover setCenter:point];
cover.layer.cornerRadius = newWidth/2;
return cover;
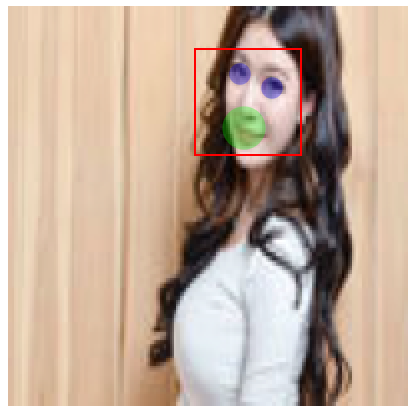
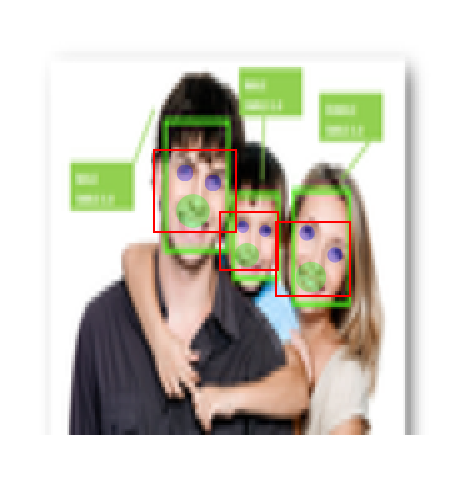
}看下效果图:
效果图1:
效果图2:

效果图3:
//进行人脸面部表情位置计算的第二种方式,无需进行位置的偏移,直接计算出各个部位的frame,需要保持图片的frame和imageView的frame一致。
 for (CIFaceFeature *f in features){
        //旋转180,仅y
        CGRect aRect = f.bounds;
        //利用翻转的对称性计算出y值
        aRect.origin.y = self.imageView.bounds.size.height - aRect.size.height - aRect.origin.y;//

        UIView *vv = [[UIView alloc]initWithFrame:aRect];
        vv.backgroundColor = [UIColor redColor];
        vv.alpha = 0.6;
        [self.imageView addSubview:vv];

        if (f.hasLeftEyePosition){

            UIView *vv = [[UIView alloc]initWithFrame:CGRectMake(0, 0, 10, 10)];
            //旋转180,仅y
            CGPoint newCenter =  f.leftEyePosition;
            //利用翻转的对称性计算出y值
            newCenter.y = self.imageView.bounds.size.height-newCenter.y;
            vv.center = newCenter;

            vv.backgroundColor = [UIColor yellowColor];
            vv.alpha = 0.6;
            [self.imageView addSubview:vv];

        }
        if (f.hasRightEyePosition){
            UIView *vv = [[UIView alloc]initWithFrame:CGRectMake(0, 0, 10, 10)];
            //旋转180,仅y
            CGPoint newCenter =  f.rightEyePosition;
            //利用翻转的对称性计算出y值
            newCenter.y = self.imageView.bounds.size.height-newCenter.y;
            vv.center = newCenter;
            vv.backgroundColor = [UIColor blueColor];
            vv.alpha = 0.6;
            [self.imageView addSubview:vv];

        }
        if (f.hasMouthPosition){
            UIView *vv = [[UIView alloc]initWithFrame:CGRectMake(0, 0, 10, 10)];
            //旋转180,仅y
            CGPoint newCenter =  f.mouthPosition;
            newCenter.y = self.imageView.bounds.size.height-newCenter.y;
            vv.center = newCenter;
            vv.backgroundColor = [UIColor greenColor];
            vv.alpha = 0.6;
            [self.imageView addSubview:vv];
        }
    }


 381
381

 被折叠的 条评论
为什么被折叠?
被折叠的 条评论
为什么被折叠?
 到【灌水乐园】发言


