


web服务器
www所用的协议:
HTTP超文本传输协议(HyperText Transfer Protocal)
WEB服务器 www web http apache http server tomcat nginx IIS
网址及HTTP简介
网页文件位置: /var/www/html
- URL:Uniform Resource Locator,统一资源定位符,对可以从互联网上得到的资源的位置和访问方法的一种简洁的表示,是互联网上标准资源的地址。
- 网址格式:<协议>://<主机或主机名>[:port]/<目录资源,路径>浏览器常支持的协议有:http、https、ftp等主机地址或者主机名:主机地址就是服务器在因特网所在的IP地址。如果是主机名的话,那么就需要域名解析了
- 端口号(port):http为80/8080,https为443 (IANA:互联网数字分配机构)
- 0-1023:众所周知,永久地分配给固定的应用程序使用,特权端口(只有管理员有权限启用并让进程监听)
- 1024-41951:亦为注册端口,但要求不是特别严格,分配给程序注册为某应用使用:3306/TCP
- 41952-60000:客户端程序随机使用的端口,动态端口,或私有端口
- 端口号(port):http为80/8080,https为443 (IANA:互联网数字分配机构)
HTTP协议请求的工作流程
(1)终端客户在web浏览器地址栏输入访问地址http://www.ceshi.com:80/index.html
(2)web浏览器请求DNS服务器把域名www.ceshi.com解析成web服务器的IP地址
(3)web浏览器将端口号(默认是80)从访问地址(URL)中解析出来
(4)web浏览器通过解析后的ip地址及端口号与web服务器之间建立一条TCP连接
(5)建立TCP连接后,web浏览器向web服务器发送一条HTTP请求报文
(6)web服务器响应并读取浏览器的请求信息,然后返回一条HTTP响应报文。
(7)web服务器关闭HTTP连接,关闭TCP连接,web浏览器显示访问的网站内容到屏幕上。
www服务器的类型(静态网站(HTML), 动态网站(jsp python,php,perl)与后台有交互)
www服务器的基本配置
服务器端:在linux上面实现网页服务器需要Apache这套服务器软件,httpd提供Apache主程序 http://
httpd.apache.org/docs/2.4/
安装软件:httpd
配置文件:
1. 主要的配置文件 /etc/httpd/conf/httpd.conf 。
2. 额外的参数文件 /etc/httpd/conf.d/*.conf 。
如果你不想要修改原始配置文件httpd.conf的话,那么你可以将你自己的额外参数文件独立出来,
例如你想要有自己的额外设置值,可以将它写入 /etc/httpd/conf.d/zhuji.conf (注意,扩展
名一定是.conf),而启动Apache时,这个文件就会被读入主要配置文件当中了。
3. 默认的首页所在目录 /var/www/html/ ,当输入网址时所显示的数据,就是放在这个目录当中的首
页文件(默认为index.html)。
4. 默认给一些可执行的CGI(网页程序)程序放置的目录 /var/www/cgi-bin/ ,当输入网址/cgi-bin/
时所显示的数据所在。
5. 默认的Apache日志文件都放在 /var/log/httpd/ ,对于流量比较大的网站来说,一个星期的日志
文件的数据可以达到1GB左右
实验
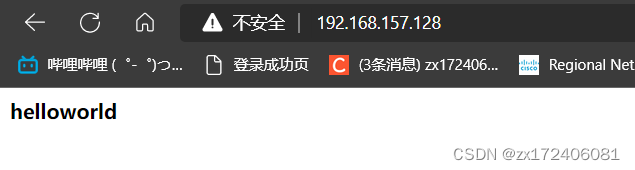
1.虚拟机开启httpd并写一个简单网页文件,基于http使windows浏览器能够访问
1.编辑网页文件
[root@localhost html]# cd /var/www/html
[root@localhost html]# ll
total 4
-rw-r--r--. 1 root root 18 Oct 18 20:25 index.html
[root@localhost html]# vim index.html

<b>helloworld</b> //网页内容

2.设置防火墙状态和安全子系统
[root@localhost ~]#systemctl stop firewalld //stop单次,disable永久
[root@localhost html]# vim /etc/selinux/config
# This file controls the state of SELinux on the system.
# SELINUX= can take one of these three values:
#     enforcing - SELinux security policy is enforced.
#     permissive - SELinux prints warnings instead of enforcing.
#     disabled - No SELinux policy is loaded.
SELINUX=permissive //设置为警示关闭状态
# SELINUXTYPE= can take one of these three values:
#     targeted - Targeted processes are protected,
#     minimum - Modification of targeted policy. Only selected processes are protected.
#     mls - Multi Level Security protection.
SELINUXTYPE=targeted

3.访问虚拟机服务器的网页文件
http://192.168.157.128:80!
2.建立两个基于ip地址访问的网站
- 第一步,先添加两个ip地址
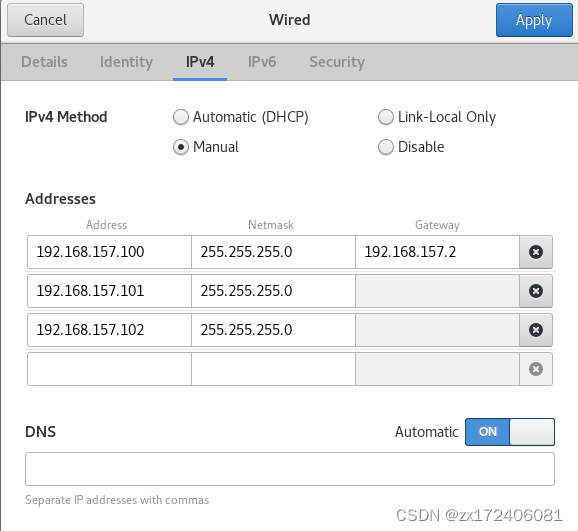
- 第二步,定义基于不同ip地址来访问网站的配置文件
[root@localhost conf.d]# vim /etc/httpd/conf.d/vhosts.conf

<VirtualHost 192.168.157.100:80>
        ServerName 192.168.157.100
        DocumentRoot /var/www/openlab
</VirtualHost>

<Directory /var/www>
        AllowOverride none
        Require all granted
</Directory>

<VirtualHost 192.168.157.101:80>
        ServerName www.haha.com
        DocumentRoot /var/www/w1
</VirtualHost>

<VirtualHost 192.168.157.102:80>
        ServerName 192.168.157.102
        DocumentRoot /var/www/w2
</VirtualHost>
- 第三步,创建对应路径的网页资源文件
[root@localhost conf.d]# cd /var/www
[root@localhost www]# ll
total 0
drwxr-xr-x. 2 root root  6 Jul 13  2021 cgi-bin
drwxr-xr-x. 2 root root 24 Oct 20 14:35 html
drwxr-xr-x. 2 root root 24 Oct 22 19:33 openlab
drwxr-xr-x. 2 root root 24 Oct 22 19:36 w1
drwxr-xr-x. 2 root root 24 Oct 22 20:30 w2
[root@localhost www]# vim openlab/index.html //w1和w2同理

this is 100
- 第四步,验证
[root@localhost www]# systemctl start httpd
[root@localhost www]# systemctl stop firewalld.service
[root@localhost www]# getenforce
Permissive
[root@localhost www]# curl 192.168.157.100
this is 100
[root@localhost www]# curl 192.168.157.101
this is 101
[root@localhost www]# curl 192.168.157.102
this is 102 by port 8888(yuming)
3.建立两个基于不同端口访问的网站
- 第一步,修改配置文件
[root@localhost conf.d]# vim vhosts.conf
<VirtualHost 192.168.157.100:80>
        ServerName 192.168.157.100
        DocumentRoot /var/www/openlab
</VirtualHost>

<Directory /var/www>
        AllowOverride none
        Require all granted
</Directory>

<VirtualHost 192.168.157.101:80>
        ServerName 192.168.157.101
        DocumentRoot /var/www/w1
</VirtualHost>

<VirtualHost 192.168.157.101:8888>
        ServerName 192.168.157.101
        DocumentRoot /var/www/w2
</VirtualHost>
LISTEN 8888
- 第二步,验证
[root@localhost conf.d]# curl 192.168.157.101:80
this is 101
[root@localhost conf.d]# curl 192.168.157.101:8888
this is 102 by port 8888(yuming)
4.建立一个同时拥有两个域名的网站
[root@localhost conf.d]# vim /etc/hosts //本地dns缓存
192.168.157.101 www.haha.com www.hehe.com
192.168.157.102 www.heihei.com

[root@localhost conf.d]# vim vhosts.conf
<VirtualHost 192.168.157.100:80>
        ServerName 192.168.157.100
        DocumentRoot /var/www/openlab
</VirtualHost>

<Directory /var/www>
        AllowOverride none
        Require all granted
</Directory>

<VirtualHost 192.168.157.101:80>
        ServerName 192.168.157.101
        DocumentRoot /var/www/w1
</VirtualHost>

<VirtualHost 192.168.157.102:80>
        ServerName www.heihei.com
        DocumentRoot /var/www/w2
</VirtualHost>
验证:
[root@localhost conf.d]# curl www.haha.com
this is 101
[root@localhost conf.d]# curl www.hehe.com
this is 101
[root@localhost conf.d]# curl www.heihei.com
this is 102 by port 8888(yuming)


 562
562


 被折叠的 条评论
为什么被折叠?
被折叠的 条评论
为什么被折叠?
 到【灌水乐园】发言


