


一、引言
在 Servlet3.0 之前,我们在使用 Spring MVC 的时候,必须依赖web.xml配置文件,并且DispatcherServlet必须要在web.xml 里配置。而 Servlet3.0 可以支持全部采用注解驱动,现在启动一个Web容器并不强制依赖于web.xml部署描述文件了,这大大简化了配置web.xml的麻烦。
既然用注解代替了了web.xml配置文件,那如何使用Spring MVC呢,下面通过一个例子来探索其中的原理。
二、创建一个SpringBoot工程
准备一个SpringMVC的Maven工程
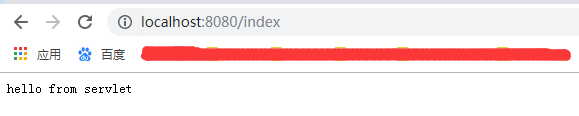
写一个最基本的Servlet,然后就可以访问了http://localhost:8080/index:
@WebServlet(urlPatterns = "/index")
public class IndexServlet extends HttpServlet {

    @Override
    protected void doGet(HttpServletRequest req, HttpServletResponse resp)
    				throws ServletException, IOException {
        resp.getWriter().write("hello from servlet");
    }

    @Override
    protected void doPost(HttpServletRequest req, HttpServletResponse resp)
    				throws ServletException, IOException {
        doGet(req,resp);
    }
}

// 启动类
@SpringBootApplication
@ServletComponentScan //启动器启动时,扫描本目录以及子目录带有的webservlet注解的
public class SpringbootHelloworldApplication {

    public static void main(String[] args) {
        SpringApplication.run(SpringbootHelloworldApplication.class, args);
    }

}
是不是发现比之前采用web.xml配置的方式相比,省事太多了。
三、原理
1、ServletContainerInitializer
之前Web容器要整合其它模块,都是通过web.xml配置文件,但现在使用注解驱动的话,就没有了web.xml配置文件了,那怎么做呢?这就是Servlet3.0带来的特别特别重要的一个类:ServletContainerInitializer。我们用它来整合Web容器和其它模块。这里只做说明,不做解释,说明来源于官方文档。
Servlet容器启动会扫描当前应用里每一个jar包中,指定目录下META-INF/services/javax.servlet.ServletContainerInitializer中的实现类,并回调其中的onStartup()方法。
当然,我们可以自己提供ServletContainerInitializer的实现类,然后自己书写逻辑。但是一定且必须将实现类绑定在META-INF/services/javax.servlet.ServletContainerInitializer这个文件里,文件内容就是ServletContainerInitializer实现类的全类名;
这样Servlet容器在启动的时候就会自动调用我们提供ServletContainerInitializer的实现类,并执行其中的onStartup()方法。
好,下面来证明一下。特此说明,此处如果创建SpringBoot工程,使用内嵌的Tomcat是不会起作用的,亲测。
// 容器启动的时候会将@HandlesTypes指定的这个类型下面的子类(实现类,子接口等)传递过来,
// 但不包括它自己
@HandlesTypes(value = {IndexService.class})
public class MyServletContainerInitializer implements ServletContainerInitializer {
/**
* 应用启动的时候,会运行onStartup方法
* Set<Class<?>> set:感兴趣的类型的所有子类型;
* ServletContext sc:代表当前Web应用的ServletContext;
*/
@Override
public void onStartup(Set<Class<?>> set, ServletContext sc) throws ServletException {
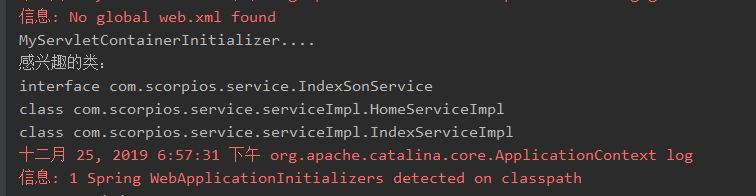
System.out.println("MyServletContainerInitializer....");
System.out.println("感兴趣的类:");
// 这里的set,会把所有我们感兴趣的类型都拿到
for(Class clazz: set){
System.out.println(clazz);
}
}
}
项目目录结构如下:

启动容器,我们会看到:Tomcat启动时,会执行我们自定义的MyServletContainerInitializer,并回调其中的onStartup()方法,并把我们用@HandlesTypes(IndexService.class)关心的接口子类型(包含子接口、抽象类、实现类)都放到了onStartup()方法的第一个参数中。但是需要注意:不包含自己。
下面我们来关注一下,onStartup()方法中的第二个参数:ServletContext。它的作用,不用说了吧。拿到它,是不是可以干点啥了?对,我们可以用编码的方式,在项目启动的时候给ServletContext里面添加组件,即使用ServletContext注册Web组件(Servlet、Filter、Listener)。
//==========================编码形式注册三大组件============================
//注册组件ServletRegistration
ServletRegistration.Dynamic servlet = sc.addServlet("userServlet", new UserServlet());
//配置servlet的映射信息
servlet.addMapping("/user");

//注册Listener
sc.addListener(UserListener.class);

//注册Filter  FilterRegistration
FilterRegistration.Dynamic filter = sc.addFilter("userFilter", UserFilter.class);
//配置Filter的映射信息
filter.addMappingForUrlPatterns(EnumSet.of(DispatcherType.REQUEST), true, "/*");
好了,Servlet3.0这个重要的特性说完了,是不是很有用?下面我们要来分析一下,是如何整合SpringMVC框架的。
四、如何整合SpringMVC?
前面已经介绍过ServletContainerInitializer会被Servlet容器自动执行,我们是不是已经猜到Spring是怎么做的了吧?让我们查看一下spring-web的jar包:
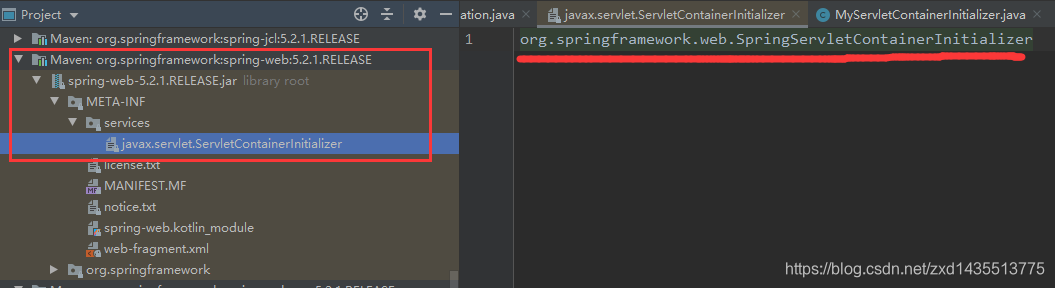 很显然的发现,
SpringMVC也是通过这种方式和Servlet容器进行整合的。web容器在启动时,就会自动去加载org.springframework.web.SpringServletContainerInitializer这个类。
// 此处更重要的是这个WebApplicationInitializer接口的实现类
@HandlesTypes(WebApplicationInitializer.class)
public class SpringServletContainerInitializer implements ServletContainerInitializer {

	@Override
	public void onStartup(@Nullable Set<Class<?>> webAppInitializerClasses, ServletContext servletContext)
			throws ServletException {

		List<WebApplicationInitializer> initializers = new LinkedList<>();

		if (webAppInitializerClasses != null) {
			for (Class<?> waiClass : webAppInitializerClasses) {
				// Be defensive: Some servlet containers provide us with invalid classes,
				// no matter what @HandlesTypes says...
				if (!waiClass.isInterface() && !Modifier.isAbstract(waiClass.getModifiers()) &&
						WebApplicationInitializer.class.isAssignableFrom(waiClass)) {
					try {
						initializers.add((WebApplicationInitializer)
								ReflectionUtils.accessibleConstructor(waiClass).newInstance());
					}
					catch (Throwable ex) {
						throw new ServletException("Failed to instantiate WebApplicationInitializer class", ex);
					}
				}
			}
		}

		if (initializers.isEmpty()) {
			servletContext.log("No Spring WebApplicationInitializer types detected on classpath");
			return;
		}

		servletContext.log(initializers.size() + " Spring WebApplicationInitializers detected on classpath");
		AnnotationAwareOrderComparator.sort(initializers);
		// 循环执行它下面所以实现类的onStartup()
		for (WebApplicationInitializer initializer : initializers) {
			initializer.onStartup(servletContext);
		}
	}

}
看一下WebApplicationInitializer继承结构:
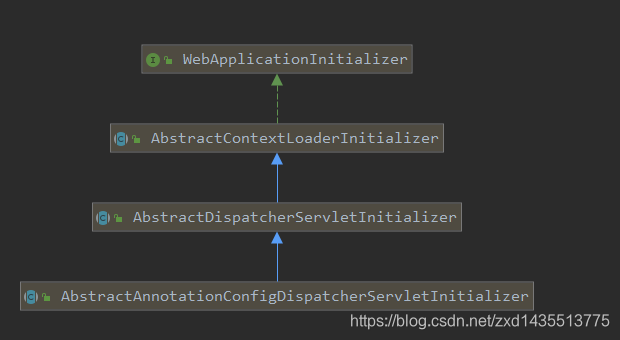
步骤分析:
Web应用启动会加载WebApplicationInitializer接口的下的所有实现类,并为WebApplicationInitializer实现类创建对象。
(1)、AbstractContextLoaderInitializer:
	@Override
	public void onStartup(ServletContext servletContext) throws ServletException {
		registerContextLoaderListener(servletContext);
	}
	protected void registerContextLoaderListener(ServletContext servletContext) {
		// 创建根容器:createRootApplicationContext();子类实现
		WebApplicationContext rootAppContext = createRootApplicationContext();
		if (rootAppContext != null) {
			ContextLoaderListener listener = new ContextLoaderListener(rootAppContext);
			listener.setContextInitializers(getRootApplicationContextInitializers());
			servletContext.addListener(listener);
		}

	}
(2)、AbstractDispatcherServletInitializer:
@Override
public void onStartup(ServletContext servletContext) throws ServletException {
	super.onStartup(servletContext);
	registerDispatcherServlet(servletContext);
}


protected void registerDispatcherServlet(ServletContext servletContext) {
	String servletName = getServletName();
	// 创建一个web的IoC容器:createServletApplicationContext(); 子类实现
	WebApplicationContext servletAppContext = createServletApplicationContext();
	// 创建了DispatcherServlet;createDispatcherServlet();
	FrameworkServlet dispatcherServlet = createDispatcherServlet(servletAppContext);
	dispatcherServlet.setContextInitializers(getServletApplicationContextInitializers());

	// 将创建的DispatcherServlet添加到ServletContext中;
	ServletRegistration.Dynamic registration = servletContext.addServlet(servletName, dispatcherServlet);
	if (registration == null) {
		throw new IllegalStateException("Failed to register servlet with name '" + servletName + "'. " +
				"Check if there is another servlet registered under the same name.");
	}

	registration.setLoadOnStartup(1);
	registration.addMapping(getServletMappings());
	registration.setAsyncSupported(isAsyncSupported());

	Filter[] filters = getServletFilters();
	if (!ObjectUtils.isEmpty(filters)) {
		for (Filter filter : filters) {
			registerServletFilter(servletContext, filter);
		}
	}
	// 空方法
	customizeRegistration(registration);
}
(3)、AbstractAnnotationConfigDispatcherServletInitializer:
@Override
@Nullable
protected WebApplicationContext createRootApplicationContext() {
	Class<?>[] configClasses = getRootConfigClasses();
	if (!ObjectUtils.isEmpty(configClasses)) {
		AnnotationConfigWebApplicationContext context =
				new AnnotationConfigWebApplicationContext();
		context.register(configClasses);
		return context;
	}
	else {
		return null;
	}
}

@Override
protected WebApplicationContext createServletApplicationContext() {
	AnnotationConfigWebApplicationContext context =
			new AnnotationConfigWebApplicationContext();
	Class<?>[] configClasses = getServletConfigClasses();
	if (!ObjectUtils.isEmpty(configClasses)) {
		context.register(configClasses);
	}
	return context;
}

@Nullable
protected abstract Class<?>[] getRootConfigClasses();

@Nullable
protected abstract Class<?>[] getServletConfigClasses();
注解方式配置的DispatcherServlet初始化器
说明:虽然父类只有两个abstract抽象方法(createRootApplicationContext()、createServletApplicationContext())要求子类必须实现。但是父类的设计都是可以扩展的,若你想定制化自己的需求,都是可以通过重写父类的protected方法进行扩展。比如:你想定制化自己的DispatcherServlet(父类默认值是单纯的new一下),那么你就可以通过重写createDispatcherServlet()去定制。
定制的时候知道继承哪个抽象类么?当然是继承树的最底层AbstractAnnotationConfigDispatcherServletInitializer啦。
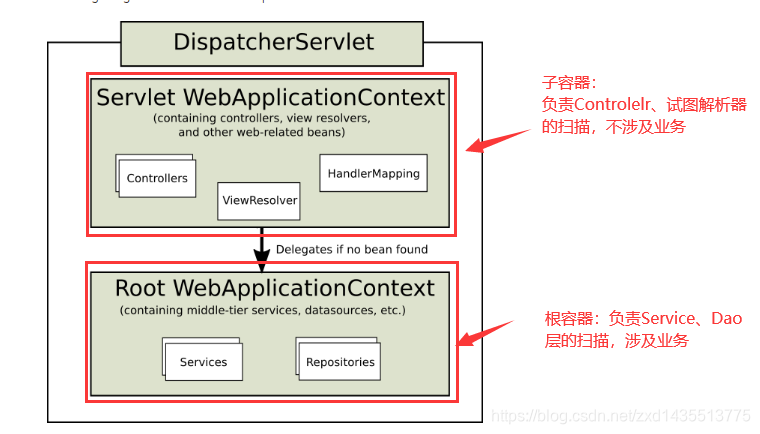
Spring容器推荐使用父子容器的概念:
可以参考Spring的官网查看:
/**
 * 自己实现 基于注解驱动的ServletInitializer来初始化DispatcherServlet
 */
public class MyWebAppInitializer extends
				AbstractAnnotationConfigDispatcherServletInitializer {

    /**
     * 根容器的配置类:(Spring的配置文件)父容器;
     */
    @Override
    protected Class<?>[] getRootConfigClasses() {
        return new Class<?>[]{RootConfig.class};
    }

    /**
     * web容器的配置类(SpringMVC配置文件)子容器;
     */
    @Override
    protected Class<?>[] getServletConfigClasses() {
        return new Class<?>[]{AppConfig.class};
    }

    //获取DispatcherServlet的映射信息
    // 注意:
    //	/:拦截所有请求(包括静态资源(xx.js,xx.png)),但是不包括*.jsp;
    //  /*:拦截所有请求;连*.jsp页面都拦截;jsp页面是tomcat的jsp引擎解析的;
    @Override
    protected String[] getServletMappings() {
        return new String[]{"/"};
    }

    // 若你想定制化父类的一些默认行为,这里都是可以复写父类的protected方法的
    // SpringMVC 也推荐你这么干
    @Override
    protected FrameworkServlet createDispatcherServlet(WebApplicationContext servletAppContext) {
        DispatcherServlet dispatcherServlet = (DispatcherServlet) super.createDispatcherServlet(servletAppContext);
        return dispatcherServlet;
    }

}
测试类:
@Controller
public class HelloController {

    @Autowired
    HelloService helloService;

    @ResponseBody
    @RequestMapping("/hello")
    public String hello() {
        System.out.println(helloService);
        return "hello...";
    }
}
这样我们就可以正常访问controller的请求了。
注意:
(1)、子容器能得到父容器的Bean,但是父容器得不到子容器的Bean;
(2)、父子容器中,属性值都不是互通的,@Value注入的时候需要注意;
经过上面的分析,是不是已经知道web容器是怎么集成Spring框架的了?哈哈。。。。
五、总结
从Spring3.2开始,就推荐全部使用注解来驱动应用了。在当下流行的SpringBoot环境中,注解驱动可以说体现的淋漓尽致,完全摒弃了之前的xml配置文件,化简为繁。
额外多说一句,在SpringBoot中不同的在于:是Spring容器驱动web容器(默认情况下,提供内嵌的web容器)。而本文说的是web容器驱动Spring容器。
本文精髓:Servlet3.0特性的运用。
启动Spring容器有三种方式:可以参看下面的这篇文章:


 1797
1797


 被折叠的 条评论
为什么被折叠?
被折叠的 条评论
为什么被折叠?
 到【灌水乐园】发言


