


####### samba #######
1.samba作用
提供cifs协议实现共享文件
2.安装
yum install samba samba-common samba-client -y
systemctl start smb nmb
systemctl enable smb nmb
3.添加smb用户
smb用户必须时本地用户
smbpasswd -a student
New SMB password: #输入smb当前用户密码
Retype new SMB password: #确认密码
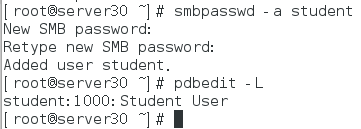
pdbedit -L #查看smb用户信息
pdbedit -x smb用户 #删除smb用户
setsebool -P enable_samba_home_dirs on ##在selinux中设定smb用户可以访问自己的家目录

4.共享目录的基本设定
vim /etc/samba/smb.conf
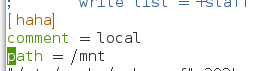
[haha] 共享名称
comment = 对共享目录的描述
path = 共享目录的绝对路径
workgroup = WESTOS
semanage fcontext -a -t samba_share_t '目录名称(/.*)?'
restorecon -RvvF 目录名称
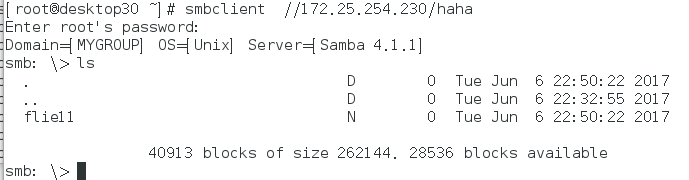
scilient //172.25.254.230/haha -U student
当共享目录为系统建立目录
setsebool -P samba_export_all_ro on #只读共享
setsebool -P samba_export_all_rw on #读写共享
#匿名用户访问
guest ok = yes
map to guest = bad user

#访问控制
hosts allow = 172.25.254.130 #仅允许
valid users = westos #当前共享的有效用户为westos
valid users = @westos #当前共享的有效用户为westos组
valid users = +westos #当前共享的有效用户为westos组
#读写控制
所有用户均可写
chmod o+w /mnt
setsebool -P samba_export_all_rw on
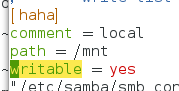
vim /etc/samba/smb.conf
writable = yes
测试 在客户端中
mount -o username=student,password=student //172.25.254.230/haha /mnt
touch /mnt/file1

设定指定用户可写
write list = student #可写用户
write list = +student #可写用户组
write list = @student
admin users = westos #共享的超级用户指定
6.smb多用户挂载
在client上
vim /root/haha
username=student
password=student
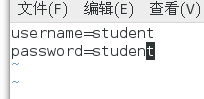
chmod 600 /root/haha
yum install cifs-utils -y
mount -o credentials=/root/haha,multiuser,sec=ntlmssp //172.25.254.230/haha /mnt/

#credentials=/root/haha 指定挂载时所用到的用户文件
#multiuser 支持多用户认证
#sec=ntlmssp 认证方式为标准smb认证方式
su - kiosk
ls /mnt
ls: cannot access /mnt: Permission denied #因为没有作smb的认证所以无法访问smb共享
cifscreds add -u student 172.25.254.230
Password: ##smb用户westos的密码
ls /mnt

1.samba作用
提供cifs协议实现共享文件
2.安装
yum install samba samba-common samba-client -y
systemctl start smb nmb
systemctl enable smb nmb
3.添加smb用户
smb用户必须时本地用户
smbpasswd -a student
New SMB password: #输入smb当前用户密码
Retype new SMB password: #确认密码
pdbedit -L #查看smb用户信息
pdbedit -x smb用户 #删除smb用户
setsebool -P enable_samba_home_dirs on ##在selinux中设定smb用户可以访问自己的家目录
4.共享目录的基本设定
vim /etc/samba/smb.conf
[haha] 共享名称
comment = 对共享目录的描述
path = 共享目录的绝对路径
workgroup = WESTOS
scilient //172.25.254.230/haha -U student

semanage fcontext -a -t samba_share_t '目录名称(/.*)?'
restorecon -RvvF 目录名称
scilient //172.25.254.230/haha -U student
当共享目录为系统建立目录
setsebool -P samba_export_all_ro on #只读共享
setsebool -P samba_export_all_rw on #读写共享
scilient //172.25.254.230/haha -U student
#匿名用户访问
guest ok = yes
map to guest = bad user
#访问控制
hosts allow = 172.25.254.130 #仅允许
hosts deny = 172.25.254.130 #仅拒绝


valid users = westos #当前共享的有效用户为westos
valid users = @westos #当前共享的有效用户为westos组
valid users = +westos #当前共享的有效用户为westos组
#读写控制
所有用户均可写
chmod o+w /mnt
setsebool -P samba_export_all_rw on
vim /etc/samba/smb.conf
writable = yes
测试 在客户端中
mount -o username=student,password=student //172.25.254.230/haha /mnt
touch /mnt/file1
设定指定用户可写
write list = student #可写用户
write list = +student #可写用户组
write list = @student
admin users = westos #共享的超级用户指定
6.smb多用户挂载
在client上
vim /root/haha
username=student
password=student
chmod 600 /root/haha
yum install cifs-utils -y
mount -o credentials=/root/haha,multiuser,sec=ntlmssp //172.25.254.230/haha /mnt/
#credentials=/root/haha 指定挂载时所用到的用户文件
#multiuser 支持多用户认证
#sec=ntlmssp 认证方式为标准smb认证方式
su - kiosk
ls /mnt
ls: cannot access /mnt: Permission denied #因为没有作smb的认证所以无法访问smb共享
cifscreds add -u student 172.25.254.230
Password: ##smb用户westos的密码
ls /mnt


 302
302

 被折叠的 条评论
为什么被折叠?
被折叠的 条评论
为什么被折叠?
 到【灌水乐园】发言


