


实验六:静态路由协议的设置
这个是目前学的最复杂的一个:把路由器和交换机合起来应用:
这个需要好好理理思路:
(一)先在下图上设置网络拓扑图如下:

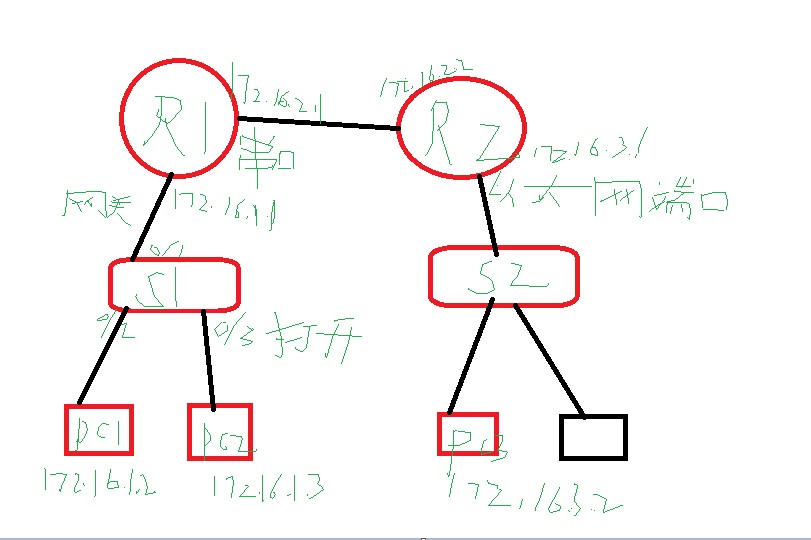
选用路由器是选R3620,1sot 选2个因特网口和一个串口的,路由器R1,R2
选取交换机S2950,交换机s1,s2
R1~R2 串口serial0/0 指定数据通信端DCE,R,serial0/0
R1 0/1~s1 0/1.....R2 0/1~S2 0/1
最后添加路由表,r1和r2互通,p1,p2,p3设置好网关,
一共有三个网络,上图已标记清楚,
二;在下图上设置如下:
(1)首先设置好路由器,让路由器R1和R2可以想通。
R1: enable
configure terminal
hostname R1
interface serial 0/0
ip address 172.16.2.1 255.255.255.0
clock rate 64000 DCE端
no shutdown
r1
Router>
Router>
Router>enable
Router#configure terminal
Enter configuration commands, one per line.  End with CNTL/Z.
Router(config)#hostname R1
R1(config)#interface serial 0/0
R1(config-if)#ip address 172.16.2.1 255.255.255.0
R1(config-if)#clock rate 64000
R1(config-if)#no shutdown
%LINK-3-UPDOWN: Interface Serial0/0, changed state to up
%LINK-3-UPDOWN: Interface Serial0/0, changed state to down
%LINEPROTO-5-UPDOWN: Line protocol on Interface Serial0/0, changed state to down
%LINK-3-UPDOWN: Interface Serial0/0, changed state to up
%LINEPROTO-5-UPDOWN: Line protocol on Interface Serial0/0, changed state to up
R1(config-if)#
R1(config-if)#end
R1#configure terminal
Enter configuration commands, one per line.  End with CNTL/Z.
R1(config)#interface ethernet 0/0
R1(config-if)#ip address 172.16.1.1 255.255.255.0
R1(config-if)#no shutdown
%LINK-3-UPDOWN: Interface Ethernet0/0, changed state to up

R1(config-if)#exit
R1(config)#exit

R1#configure terminal
Enter configuration commands, one per line.  End with CNTL/Z.
R1(config)#ip route 172.16.3.0 255.255.255.0 172.16.2.2
R1(config)#exit
R1#show ip route
Codes: C - connected, S - static, I - IGRP, R - RIP, M - mobile, B - BGP
       D - EIGRP, EX - EIGRP external, O - OSPF, IA - OSPF inter area
       E1 - OSPF external type 1, E2 - OSPF external type 2, E - EGP
       i - IS-IS, L1 - IS-IS level-1, L2 - IS-IS level-2, * - candidate default
       U - per-user static route

Gateway of last resort is not set

     172.16.0.0/24 is subnetted, 3 subnets
C       172.16.2.0 is directly connected, Serial0/0
C       172.16.1.0 is directly connected, Ethernet0/0
S       172.16.3.0 [1/0] via 172.16.2.2

R1#
R2:
configure terminal
hostname R1
interface serial 0/0
ip address 172.16.2.2 255.255.255.0
DP端
no shutdown
并测试R1和R2是否可以通信:ping 172.16.2.1
Router>
Router>
Router>enable
Router#configure terminal
Enter configuration commands, one per line.  End with CNTL/Z.
Router(config)#hostname R2
R2(config)#interface serial 0/0
R2(config-if)#no shutdown
%LINK-3-UPDOWN: Interface Serial0/0, changed state to up
R2(config-if)#ip address 172.16.2.2  255.255.255.0
R2(config-if)#exit
R2(config)#exit
R2#

R2#configure terminal
Enter configuration commands, one per line.  End with CNTL/Z.
R2(config)#interface enternet  0/0
R2(config-if)#ip address 172.16.3.1 255.255.255.0
R2(config-if)#no shutdown
%LINK-3-UPDOWN: Interface Ethernet0/0, changed state to up
R2(config-if)#exit
R2(config)#exit
R2#configure terminal
Enter configuration commands, one per line.  End with CNTL/Z.
R2(config)#ip route 172.16.1.0 255.255.255.0 172.16.2.1
R2(config)#exit
R2#show ip route
Codes: C - connected, S - static, I - IGRP, R - RIP, M - mobile, B - BGP
       D - EIGRP, EX - EIGRP external, O - OSPF, IA - OSPF inter area
       E1 - OSPF external type 1, E2 - OSPF external type 2, E - EGP
       i - IS-IS, L1 - IS-IS level-1, L2 - IS-IS level-2, * - candidate default
       U - per-user static route

Gateway of last resort is not set

     172.16.0.0/24 is subnetted, 3 subnets
C       172.16.2.0 is directly connected, Serial0/0
C       172.16.3.0 is directly connected, Ethernet0/0
S       172.16.1.0 [1/0] via 172.16.2.1
(2)设置网关
R1
enable
configure terminal
interface ehternet 0/0以太网端口
ip address 172.16.1.1 255.255.255.0
no shutdown
PC1
ipconfig /ip 172.16.1.2 255.255.255.0
ipconfig /dg 172.16.1.1 网关的设置,
ipconfig /all
PC2
ipconfig /ip 172.16.1.3 255.255.255.0
ipconfig /dg 172.16.1.1 网关的设置,
ipconfig /all
路由器R2设置如上:R2
enable
configure terminal
interface ehternet 0/0以太网端口
ip address 172.16.3.1 255.255.255.0
no shutdown
PC3
ipconfig /ip 172.16.3.2 255.255.255.0
ipconfig /dg 172.16.3.1 网关的设置,
ipconfig /all
(3)把交换机s1,s2和网关相连的接口打开,
enable
hostname S1
interface fastethernet 0/1
no shutdown
exit
interface fastethernet 0/2
no shutdown
exit
interface fasethernet 0/3
no shutdown
exit
s2
Switch>
Switch>
Switch>
Switch>
Switch>enable
Switch#configure terminal
Enter configuration commands, one per line.  End with CNTL/Z.
Switch(config)#hostname R2
R2(config)#interface fastethernet 0/1
R2(config-if)#no shutdown
R2(config-if)#exit
R2(config)#interface fastethernet 0/2
R2(config-if)#no shutdown

R2(config-if)#exit
R2(config)#interface fastethernet 0/1
R2(config-if)#no shutdown
R2(config-if)#exit
R2(config)#interface fastethernet 0/2
R2(config-if)#no shutdown
R2(config-if)#exit
R2(config)#interface fastethernet 0/3
R2(config-if)#no shutdown
R2(config-if)#exit
pc1设置如下:
Press Enter to begin
C:>
C:>ipconfig /ip 172.16.1.2 255.255.255.0
C:>ipconfig /dg 172.16.1.1
C:>ipconfig /all

  HELP
     Manipulates ip address for Workstation.

     IPCONFIG [/ip] [/dg]
     /ip         Adds the ip address and subnet mask to the workstation
     /dg        Adds the default gateway to the workstation

  Examples:
     ¢   ipconfig /ip  157.1.1.12 255.0.0.0
     ¢   ipconfig /dg 157.1.1.1

  Boson BOSS 5.0 IP Configuration
     Ethernet adapter Local Area Connection:
        IP Address. . . . . . . . . . . . : 172.16.1.2
        Subnet Mask . . . . . . . . . . . : 255.255.255.0
        Default Gateway . . . . . . . . . : 172.16.1.1


You can also use winipcfg to configure the IP Address

Ethernet adapter Local Area Connection:
    Description . . . . . . . . . . . : Realtek RTL8139/810X Family PCI Fast
Ethernet NIC
    Physical Address. . . . . . . . . : 000C.8975.3749

C:>ping 172.16.1.1
Pinging 172.16.1.1 with 32 bytes of data:

Reply from 172.16.1.1: bytes=32 time=60ms TTL=241
Reply from 172.16.1.1: bytes=32 time=60ms TTL=241
Reply from 172.16.1.1: bytes=32 time=60ms TTL=241
Reply from 172.16.1.1: bytes=32 time=60ms TTL=241
Reply from 172.16.1.1: bytes=32 time=60ms TTL=241

Ping statistics for 172.16.1.1:     Packets: Sent = 5, Received = 5, Lost = 0 (0% loss),
Approximate round trip times in milli-seconds:
     Minimum = 50ms, Maximum =  60ms, Average =  55ms

C:>
C:>
C:>ping 172.16.3.2
Pinging 172.16.3.2 with 32 bytes of data:

Reply from 172.16.3.2: bytes=32 time=60ms TTL=241
Reply from 172.16.3.2: bytes=32 time=60ms TTL=241
Reply from 172.16.3.2: bytes=32 time=60ms TTL=241
Reply from 172.16.3.2: bytes=32 time=60ms TTL=241
Reply from 172.16.3.2: bytes=32 time=60ms TTL=241

Ping statistics for 172.16.3.2:     Packets: Sent = 5, Received = 5, Lost = 0 (0% loss),
Approximate round trip times in milli-seconds:
     Minimum = 50ms, Maximum =  60ms, Average =  55ms

C:>
pc2_____________________________________________________
ress Enter to begin
C:>
C:>
C:>ipconfig /ip 172.16.1.3 255.255.255.0
C:>ipconfig /dg 172.16.1.1
C:>ipconfig /all
HELP
Manipulates ip address for Workstation.
IPCONFIG [/ip] [/dg]
/ip Adds the ip address and subnet mask to the workstation
/dg Adds the default gateway to the workstation
Examples:
¢ ipconfig /ip 157.1.1.12 255.0.0.0
¢ ipconfig /dg 157.1.1.1
Boson BOSS 5.0 IP Configuration
Ethernet adapter Local Area Connection:
IP Address. . . . . . . . . . . . : 172.16.1.3
Subnet Mask . . . . . . . . . . . : 255.255.255.0
Default Gateway . . . . . . . . . : 172.16.1.1
You can also use winipcfg to configure the IP Address
Ethernet adapter Local Area Connection:
Description . . . . . . . . . . . : Realtek RTL8139/810X Family PCI Fastpc3________________________________________
:>
C:>
C:>ipconfig /ip 172.16.3.2 255.255.255.0
C:>ipconfig /dg 172.16.3.1
C:>ipconfig /all
HELP
Manipulates ip address for Workstation.
IPCONFIG [/ip] [/dg]
/ip Adds the ip address and subnet mask to the workstation
/dg Adds the default gateway to the workstation
Examples:
¢ ipconfig /ip 157.1.1.12 255.0.0.0
¢ ipconfig /dg 157.1.1.1
Boson BOSS 5.0 IP Configuration
Ethernet adapter Local Area Connection:
IP Address. . . . . . . . . . . . : 172.16.3.2
Subnet Mask . . . . . . . . . . . : 255.255.255.0
Default Gateway . . . . . . . . . : 172.16.3.1
You can also use winipcfg to configure the IP Address
Ethernet adapter Local Area Connection:
Description . . . . . . . . . . . : Realtek RTL8139/810X Family PCI Fast
Ethernet NIC
C:>ping 172.16.3.1
Pinging 172.16.3.1 with 32 bytes of data:
Reply from 172.16.3.1: bytes=32 time=60ms TTL=241
Reply from 172.16.3.1: bytes=32 time=60ms TTL=241
Reply from 172.16.3.1: bytes=32 time=60ms TTL=241
Reply from 172.16.3.1: bytes=32 time=60ms TTL=241
Reply from 172.16.3.1: bytes=32 time=60ms TTL=241
Ping statistics for 172.16.3.1: Packets: Sent = 5, Received = 5, Lost = 0 (0% loss),
Approximate round trip times in milli-seconds:
Minimum = 50ms, Maximum = 60ms, Average = 55ms
C:>ping 172.16.1.2
Pinging 172.16.1.2 with 32 bytes of data:
Request timed out.
Request timed out.
Request timed out.
Request timed out.
Request timed out.
Ping statistics for 172.16.1.2:
Packets: Sent = 5, Received = 0, Lost = 5 (100% loss),
Approximate round trip times in milli-seconds:
Minimum = 0ms, Maximum = 0ms, Average = 0ms
再次进行测试。
PC1可以和R1通信啦,
pc1, ping 172.16.1.1
由于此时还没有设置路由表信息,所以此时的路由表转发数据报时,只可以存储,无法转发出去,没有路由表。
此时Pc1和pc3无法通信。
(4)这也是本次实验的重点。
添加路由表信息。
pc1~px3切换到全局模式下,ip route 172.16.3.0 255.255.255.0 172.16.2.2
第一个是目的网路号,第二个是目的网路号对应的子网掩码,第三个是到目的网路的下一跳端口。
show ip route
pc3~pc1
ip route 172.16.1.0 255.255.255.0 172.16.2.1
show ip route
进行最后一次的测试:
pc1~pc3:ping 172.16.3.2
pc3~pc1: ping 172.16.1.2
到次结束。


 318
318

 被折叠的 条评论
为什么被折叠?
被折叠的 条评论
为什么被折叠?
 到【灌水乐园】发言


