


需求
将监控数据绘制成图表推送到企业微信
实现步骤
1.pyecharts图片渲染工具介绍
2.使用echarts将数据生成为html可视化图表
3.图片压缩
4.推送企业微信机器人
pyecharts图片渲染
pyecharts渲染图片
pyecharts 官方提供了 selenium, phantomjs 和 pyppeteer 三种方式,本文使用selenium,测试发现pyecharts Table不能通过selenium渲染成图片,所以本文还使用了html-table和imgkit库来生成表格和转换图片
imgkit模块安装和使用
pip install imgkit
pip install html-table
wkhtmltopdf工具包下载地址
按照系统版本下载对应的安装包安装
options参数可参考官方文档
#简单示例
import imgkit
path_wkimg = r'C:\Program Files\wkhtmltopdf\bin\wkhtmltoimage.exe'
cfg = imgkit.config(wkhtmltoimage=path_wkimg)
options = {
    "encoding": "UTF-8"
}
#截图html网页
imgkit.from_url(url="https://www.baidu.com",output_path='img.jpg',options=options,config=cfg)
#截图本地html文件
imgkit.from_file("render.html","render.jpg")
selenium模块安装和使用
pip install selenium
下载对应浏览器驱动,本文使用chrome,下载地址
selenium官方文档地址
option参数文档:https://selenium-python.readthedocs.io/api.html#module-selenium.webdriver.chrome.options
#简单测试
import time
from selenium import webdriver
driver = webdriver.Chrome()
#打开谷歌浏览器
driver.get('http://www.google.com/');
time.sleep(5)
#定位搜索框
search_box = driver.find_element_by_name('q')
#输入关键字查询
search_box.send_keys('ChromeDriver')
#截图
driver.get_screenshot_as_file("ChromeDriver.jpg")
search_box.submit()
time.sleep(5) # Let the user actually see something!
driver.quit()
echarts基础图表绘制
echarts官方文档
模块安装
pip install pyecharts
pip install pyecharts-snapshot
常用的一些图表参数
#画布大小设置
init_opts=opts.InitOpts(width='600px', height='400px')
#背景色"white", "green"和rgb
init_opts=opts.InitOpts(bg_color='rgba(123, 200, 88, 0.4)')
#标题
set_global_opts(title_opts=opts.TitleOpts(title="我是主标题",subtitle='我是副标题',pos_left='center',pos_top='10%'))
#Y轴名称
set_global_opts(yaxis_opts=opts.AxisOpts(name='销售额/万元'))
#图例
pos_left='20%',pos_bottom='90%' #图例显示位置
legend_icon='circle' 可选'circle', 'rect', 'roundRect', 'triangle', 'diamond', 'pin', 'arrow', 'none' #图例样式形状
item_gap=100 #图例间隔
orient='vertical'  #图例水平、垂直排列
set_global_opts(legend_opts=opts.LegendOpts(is_show=True,pos_left='20%',pos_bottom='90%',orient='vertical',item_gap=100))
#设置主题
c = Bar(init_opts=opts.InitOpts(theme=ThemeType.DARK))
#内置主题
theme_list = ['chalk',
              'dark',
              'essos',
              'infographic',
              'light',
              'macarons',
              'purple-passion',
              'roma',
              'romantic',
              'shine',
              'vintage',
              'walden',
              'westeros',
              'white',
              'wonderland']
#设置标题
c.set_global_opts(title_opts=opts.TitleOpts(title=title))
系列参数
#设置渐变效果
color_js = """
            new echarts.graphic.LinearGradient(
                                0,
                                1,
                                0,
                                0,
                                [{offset: 0, color: '#008B8B'},
                                 {offset: 1, color: '#FF6347'}],
                                false)
           """
itemstyle_opts=opts.ItemStyleOpts(color=JsCode(color_js)))
#设置标签效果
label_opts=opts.LabelOpts(position='top',
                                  color='red',
                                  font_family='Arial',
                                  font_size=12,
                                  font_style='italic',
                                  interval=1,
                                  formatter='{b}:{d}%'
                                  )
#设置标记线配置
markline_opts=opts.MarkLineOpts(
            data=[
                opts.MarkLineItem(type_="min", name="最小值"),
                opts.MarkLineItem(type_="max", name="最大值"),
                opts.MarkLineItem(type_="average", name="平均值"),
            ]
常用图表数据输入格式
#直方图
bar = {
        "x": ['AAA','BBB','CCC','DDD'
,'EEE','FFF'],
        "y": {
            "A": [1140,590,270,540,390,670],
            "B": [540,390,670,1140,590,270]
        },
        "title": "直方图测试"
}

#折线图
line = {
        "x": ['AAA','BBB','CCC','DDD','EEE','FFF'],
        "y": {
            "A": [1140,590,270,540,390,670],
            "B": [540,390,670,1140,590,270]
        },
        "title": "折线图测试"
}
#饼图
pie = {
        "x": ['AAA','BBB','CCC','DDD','EEE','FFF'],
        "y": {
            "A": [1140,590,270,540,390,670]
        },
        "title": "饼图测试"
}
#表格
table = {
        "x": [['AAA','BBB','CCC','DDD','EEE','FFF'],],
        "y": [[1140,590,270,540,390,670],[540,390,670,1140,590,270],],
        "title": "表格测试"
}
#漏斗图
funnel = {
        "x": ['AAA','BBB','CCC','DDD','EEE','FFF'],
        "y": {
            "A": [1140,590,270,540,390,670]
        },
        "title": "漏斗图测试"
}
集成flask框架生成图片源码
from snapshot_selenium import snapshot as driver
from pyecharts.charts import Bar,Line,Boxplot,Scatter,EffectScatter,Kline,HeatMap,PictorialBar,Geo,Map,Pie,Funnel,Gauge,Liquid,ThemeRiver
from flask import Flask, request, session, g, redirect, url_for, abort, render_template, flash
from pyecharts.components import Table
from pyecharts.commons.utils import JsCode
from pyecharts import options as opts
from pyecharts.render import make_snapshot
from pyecharts.globals import ThemeType
from pyecharts.faker import Faker
import requests
import base64
import hashlib
import imgkit
from HTMLTable import  HTMLTable
import os
from PIL import Image
app = Flask(__name__)

def get_size(file):
    # 获取文件大小:KB
    size = os.path.getsize(file)
    return size / 1024

def get_outfile(infile, outfile):
    if outfile:
        return outfile
    dir, suffix = os.path.splitext(infile)
    outfile = '{}-out{}'.format(dir, suffix)
    return outfile

def compress_image(infile, outfile='', mb=2048, step=10, quality=80):
    """不改变图片尺寸压缩到指定大小
    :param infile: 压缩源文件
    :param outfile: 压缩文件保存地址
    :param mb: 压缩目标,KB
    :param step: 每次调整的压缩比率
    :param quality: 初始压缩比率
    :return: 压缩文件地址,压缩文件大小
    """
    o_size = get_size(infile)
    if o_size <= mb:
        return infile,o_size
    outfile = get_outfile(infile, outfile)
    while o_size > mb:
        im = Image.open(infile)
        im.save(outfile, quality=quality)
        if quality - step < 0:
            break
        quality -= step
        o_size = get_size(outfile)
    return outfile, get_size(outfile)

def render_image(c):
    image_file = "first_bar.png"
    #使用imgkit生成图片
    #path_wkimg = r'C:\Program Files\wkhtmltopdf\bin\wkhtmltoimage.exe'
    #imgkit.config(wkhtmltoimage=path_wkimg)
    #imgkit.from_file(c.render(), image_file)
    #outfile,size = compress_image(image_file)
    #print(outfile,size)

    #使用selenium生成图片
    make_snapshot(driver, c.render(), image_file)
    jpg_md5 = hashlib.md5(open(outfile, 'rb').read()).hexdigest()
    with open(outfile, 'rb') as f:
        data_ = f.read()
        encodestr = str(base64.b64encode(data_), 'utf-8')
    data = {
        "msgtype": "image",
        "image": {
            "base64": encodestr,
            "md5": jpg_md5
        }
    }
    webhook_url = 'https://qyapi.weixin.qq.com/cgi-bin/webhook/send?key=xxx'
    headers = {
        "Content-Type": "application/json"
    }

    res = requests.post(webhook_url, json=data, headers=headers)
    print(res.text)
    return res.text

color_js = """
            new echarts.graphic.LinearGradient(
                                0,
                                1,
                                0,
                                0,
                                [{offset: 0, color: '#008B8B'},
                                 {offset: 1, color: '#FF6347'}],
                                false)
           """

@app.route('/bar', methods=['POST'])
def bar():
    x = request.json.get("x")
    y = request.json.get("y")
    title = request.json.get("title")
    c = Bar(init_opts=opts.InitOpts(theme=ThemeType.DARK))
    c.add_xaxis(x)
    for yaxis in y.keys():
        c.add_yaxis(series_name=yaxis, y_axis=y.get(yaxis), itemstyle_opts=opts.ItemStyleOpts(color=JsCode(color_js)))
    c.set_global_opts(title_opts=opts.TitleOpts(title=title))
    c.set_series_opts(
        markline_opts=opts.MarkLineOpts(
            data=[
                opts.MarkLineItem(type_="min", name="最小值"),
                opts.MarkLineItem(type_="max", name="最大值"),
                opts.MarkLineItem(type_="average", name="平均值"),
            ]
        )
    )
    return render_image(c)

@app.route('/line', methods=['POST'])
def line():
    x = request.json.get("x")
    y = request.json.get("y")
    title = request.json.get("title")
    c = Line(init_opts=opts.InitOpts(theme=ThemeType.DARK))
    c.add_xaxis(x)
    for yaxis in y.keys():
        c.add_yaxis(series_name=yaxis, y_axis=y.get(yaxis),itemstyle_opts=opts.ItemStyleOpts(color=JsCode(color_js)))
    c.set_global_opts(title_opts=opts.TitleOpts(title=title))
    c.set_series_opts(areastyle_opts=opts.AreaStyleOpts(opacity=0.3))
    return render_image(c)

@app.route('/pie', methods=['POST'])
def pie():
    x = request.json.get("x")
    y = request.json.get("y")
    title = request.json.get("title")
    c = Pie(init_opts=opts.InitOpts(theme=ThemeType.WHITE))
    for yaxis in y.keys():
        c.add(yaxis,[list(z) for z in zip(x, y.get(yaxis))],radius=["20%", "50%"])
    c.set_global_opts(title_opts=opts.TitleOpts(title=title))
    c.set_series_opts(
        label_opts=opts.LabelOpts(position='top',
                                  color='red',
                                  font_family='Arial',
                                  font_size=12,
                                  font_style='italic',
                                  interval=1,
                                  formatter='{b}:{d}%'
                                  )
    )
    return render_image(c)

@app.route('/table', methods=['POST'])
def table():
    x = request.json.get("x")
    y = request.json.get("y")
    title = request.json.get("title")
    table = HTMLTable(caption=title)
    table.append_header_rows(x)
    table.append_data_rows(y)
    # 标题样式
    table.caption.set_style({
        'font-size': '15px',
    })
    # 表格样式,即<table>标签样式
    table.set_style({
        'border-collapse': 'collapse',
        'word-break': 'keep-all',
        'white-space': 'nowrap',
        'font-size': '14px',
    })
    # 统一设置所有单元格样式,<td>或<th>
    table.set_cell_style({
        'width': "250px",
        'border-color': '#000',
        'border-width': '1px',
        'border-style': 'solid',
        'padding': '5px',
    })
    # 表头样式
    table.set_header_row_style({
        'color': '#fff',
        'background-color': '#48a6fb',
        'font-size': '18px',
    })
    # 覆盖表头单元格字体样式
    table.set_header_cell_style({
        'padding': '15px',
    })
    # 调小次表头字体大小
    table[1].set_cell_style({
        'padding': '8px',
        'font-size': '15px',
    })
    # 遍历数据行,如果增长量为负,标红背景颜色
    for row in table.iter_data_rows():
        if row[2].value < 0:
            row.set_style({
                'background-color': '#ffdddd',
            })
    body = table.to_html()
    # html的charset='UTF-8'必须加上,否则中午会乱码
    html = "<!DOCTYPE html><html><head><meta charset='UTF-8'></head><body>{0}</body></html>".format(body)
    # 生成图片
    image_file = 'table.jpg'
    imgkit.from_string(html, image_file)
    jpg_md5 = hashlib.md5(open(image_file, 'rb').read()).hexdigest()
    with open(image_file, 'rb') as f:
        data_ = f.read()
        encodestr = str(base64.b64encode(data_), 'utf-8')
    data = {
        "msgtype": "image",
        "image": {
            "base64": encodestr,
            "md5": jpg_md5
        }
    }
    webhook_url = 'https://qyapi.weixin.qq.com/cgi-bin/webhook/send?key=xxx'
    headers = {
        "Content-Type": "application/json"
    }
    res = requests.post(webhook_url, json=data, headers=headers)
    return res.text

@app.route('/funnel', methods=['POST'])
def funnel():
    x = request.json.get("x")
    y = request.json.get("y")
    title = request.json.get("title")
    c = Funnel()
    for yaxis in y.keys():
        c.add("", [list(z) for z in zip(x, y.get(yaxis))])
    c.set_global_opts(title_opts=opts.TitleOpts(title=title))
    return render_image(c)

if __name__ == '__main__':
    app.run()
客户端代码
import requests

bar = {
        "x": ['AAA','BBB','CCC','DDD','EEE','FFF'],
        "y": {
            "A": [1140,590,270,540,390,670],
            "B": [540,390,670,1140,590,270]
        },
        "title": "直方图测试"
}
line = {
        "x": ['AAA','BBB','CCC','DDD','EEE','FFF'],
        "y": {
            "A": [1140,590,270,540,390,670],
            "B": [540,390,670,1140,590,270]
        },
        "title": "折线图测试"
}
pie = {
        "x": ['AAA','BBB','CCC','DDD','EEE','FFF'],
        "y": {
            "A": [1140,590,270,540,390,670]
        },
        "title": "饼图测试"
}
table = {
        "x": [['AAA','BBB','CCC','DDD','EEE','FFF'],],
        "y": [[1140,590,270,540,390,670],[540,390,670,1140,590,270],],
        "title": "表格测试"
}
funnel = {
        "x": ['AAA','BBB','CCC','DDD','EEE','FFF'],
        "y": {
            "A": [1140,590,270,540,390,670]
        },
        "title": "漏斗图测试"
}
headers = {
	"Content-Type":	"application/json"
}

res = requests.post("http://127.0.0.1:5000/bar",json=bar,headers=headers)
res = requests.post("http://127.0.0.1:5000/bar",json=line,headers=headers)
res = requests.post("http://127.0.0.1:5000/bar",json=table,headers=headers)
res = requests.post("http://127.0.0.1:5000/bar",json=pie,headers=headers)
res = requests.post("http://127.0.0.1:5000/bar",json=funnel,headers=headers)
imgkit和snapshot_selenium两种方式对比
imgkit生成图片速度比selenium快很多,但是图片质量selenium好很多,且imgkit有些样式会乱,实际效果如下
使用selenium生成图片效果


imgkit生成图片的效果


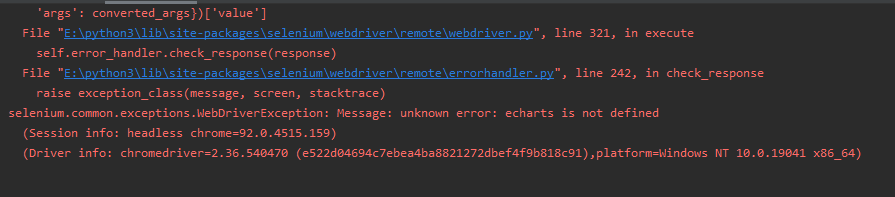
遇到的问题
echarts官方Table组件生成的html通过selenium渲染会报错
具体原因可以查看https://github.com/pyecharts/pyecharts/issues/1170
def render_image(c):
    image_file = "first_bar.png"
    make_snapshot(driver, c.render(), image_file)
    jpg_md5 = hashlib.md5(open(image_file, 'rb').read()).hexdigest()

c = Table()
c.add(["City name", "Area", "Population", "Annual Rainfall"],[
["Brisbane", 5905, 1857594, 1146.4],
["Adelaide", 1295, 1158259, 600.5],
["Darwin", 112, 120900, 1714.7],
["Hobart", 1357, 205556, 619.5],
["Sydney", 2058, 4336374, 1214.8],
["Melbourne", 1566, 3806092, 646.9],
["Perth", 5386, 1554769, 869.4],
])
render_image(c)


 247
247


 被折叠的 条评论
为什么被折叠?
被折叠的 条评论
为什么被折叠?
 到【灌水乐园】发言


