


1. mvc常见知识点
2.1 @RequestMapping
- 基本使用
@RequestMapping("/user")						//value省略
@RequestMapping(value = "/user")				//值的省略
@RequestMapping(value = {"/user"})				//value的类型String[] 需要{}扩住
-
请求方式设置:
-
回顾表单常见的请求方式:get、post
- get --> /userServlet?username=jack&password=1234
- post --> 表单提交
<form method="post">
-
通过method属性设置请求方式
//被修饰的方法,可以通过post和get两种请求方式进行访问。
@RequestMapping(value="/selectAll",method = {RequestMethod.GET, RequestMethod.POST} )

//被修饰的方法,只能通过get请求方式进行访问。
@RequestMapping(value="/selectAll",method = RequestMethod.GET)

//被修饰的方法,只能通过post请求方式进行访问。
@RequestMapping(value="/selectAll",method = RequestMethod.POST )

// 如果没有设置method,默认所有请求都可以访问。
-
2.2 方法返回值
2.2.1 默认返回值 ModelAndView
package com.czxy.mvcanno.controller;

import org.springframework.stereotype.Controller;
import org.springframework.web.bind.annotation.RequestMapping;
import org.springframework.web.servlet.ModelAndView;

/**
 * @author 桐叔
 * @email liangtong@itcast.cn
 */
@Controller
@RequestMapping("/book")
public class BookController {

    @RequestMapping("/list")
    public ModelAndView list() {

        //1 创建对象
        ModelAndView modelAndView = new ModelAndView();
        //2 设置视图
        modelAndView.setViewName("book");       //之前 return "book";
        //3 设置模型数据 key-value
        modelAndView.addObject("username","jack");

        return modelAndView;
    }
}
2.2.2 设置Model + String
    @RequestMapping("/list2")
    public String list2(Model model) {
        // 设置数据即可
        model.addAttribute("username","rose");

        return "book";
    }
2.2.3 返回值void
-
场景1:对浏览器没有任何响应,将适配默认视图名对应jsp,一般此页面不存在,将抛404异常。
-
默认视图名:访问路径
-

    @RequestMapping("/void1")
    public void void1() {
        System.out.println("void1 执行了 ");
    }
-
-
场景2:通过
请求调度器进行操作(请求转发/请求包含)@RequestMapping("/void2") public void void2(HttpServletRequest request , HttpServletResponse response) throws Exception { request.setAttribute("username","void2"); // 请求转发 request.getRequestDispatcher("/WEB-INF/pages/book.jsp").forward(request, response); // 请求包含 // request.getRequestDispatcher("/WEB-INF/pages/book.jsp").include(request, response); } -
场景3:通过response以流的方式,向浏览器响应数据。
@RequestMapping("/void3") public void void3(HttpServletRequest request , HttpServletResponse response) throws Exception { response.getWriter().print("void3"); } -
场景4:以JSON数据方式响应,必须添加注解
@ResponseBody@RequestMapping("/void4") @ResponseBody public void void4() throws Exception { System.out.println("哈哈"); }
2.2.4 返回字符串
-
返回值字符串有2种情况:请求转发(默认)、重定向

-
默认:请求转发
public String list() { return "视图名"; } -
请求转发
public String list() { return "forward:视图名"; } -
重定向
public String list() {
    return "redirect:路径";
}
2.3 异常处理
2.3.1 目标
- 使用全局异常处理器,统一维护异常信息。
2.3.2 步骤
- 步骤1:编写自定义异常
- 步骤2:编写Controller,一个参数,控制逻辑代码(正常、系统异常、自定义异常)
- 步骤3:编写异常处理类
- 步骤4:异常信息展示页面
2.3.3 实现
-
步骤1:编写自定义异常
-
运行时异常:RuntimeException 【推荐】,并重新构造方法。
package com.czxy.mvcanno.exception; /** * @author 桐叔 * @email liangtong@itcast.cn */ public class CustomExcption extends RuntimeException { public CustomExcption() { } public CustomExcption(String message) { super(message); } public CustomExcption(String message, Throwable cause) { super(message, cause); } public CustomExcption(Throwable cause) { super(cause); } public CustomExcption(String message, Throwable cause, boolean enableSuppression, boolean writableStackTrace) { super(message, cause, enableSuppression, writableStackTrace); } } -
编译时异常:Exception
-
-
步骤2:编写Controller,一个参数,控制逻辑代码(正常、系统异常、自定义异常)
package com.czxy.mvcanno.controller;

import com.czxy.mvcanno.exception.CustomExcption;
import org.springframework.stereotype.Controller;
import org.springframework.web.bind.annotation.RequestMapping;

@Controller
@RequestMapping("/item")
public class ItemController {

    @RequestMapping("/list")
    public String list(Integer id ) {
        if(id == 1) {
            // 系统异常
            int i = 1 / 0;
        } else if( id == 2 ) {
            // 自定义
            throw new CustomExcption("自定义异常信息");
        }
        //正常
        return "list";
    }
}
<a href="${pageContext.request.contextPath}/item/list.action?id=1">异常处理 id =1 系统异常</a> <br/> <a href="${pageContext.request.contextPath}/item/list.action?id=2">异常处理 id =2 自定义异常 </a> <br/> <a href="${pageContext.request.contextPath}/item/list.action?id=3">异常处理正常</a> <br/> -
步骤3:编写异常处理类
- 注意:检查配置类,是否扫描异常处理类

package com.czxy.mvcanno.resolver;

import com.czxy.mvcanno.exception.CustomExcption;
import org.springframework.stereotype.Component;
import org.springframework.web.servlet.HandlerExceptionResolver;
import org.springframework.web.servlet.ModelAndView;

import javax.servlet.http.HttpServletRequest;
import javax.servlet.http.HttpServletResponse;

@Component
public class CustomExceptionResolver  implements HandlerExceptionResolver {
    @Override
    public ModelAndView resolveException(HttpServletRequest httpServletRequest, HttpServletResponse httpServletResponse, Object o, Exception e) {
        // 1 统一异常
        CustomExcption customExcption = null;
        if(e instanceof CustomExcption) {
            customExcption = (CustomExcption) e;
        } else {
            customExcption = new CustomExcption("系统繁忙,请稍后重试!");
        }

        // 2 错误信息返回
        ModelAndView modelAndView = new ModelAndView();
        modelAndView.addObject("message" ,customExcption.getMessage());
        modelAndView.setViewName("error");

        return modelAndView;
    }
}
-
步骤4:异常信息展示页面
<%-- Created by IntelliJ IDEA. User: Administrator Date: 2021-10-12 Time: 17:09 To change this template use File | Settings | File Templates. --%> <%@ page contentType="text/html;charset=UTF-8" language="java" %> <html> <head> <title>友好页面</title> </head> <body> ${message} </body> </html> -
效果

2.3.4 总结
- 在实际开发中,不能够让用户看到404/500等异常信息。需要提供优化页面。
- 统一处理异常,就是友好页面一种展示形式。
- 注意:配置类,是否扫描各种类?
2.4 文件上传
2.4.1 单文件上传
-
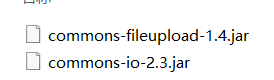
步骤1:环境搭建,拷贝jar包
-
步骤2:环境搭建,编写配置类

    @Bean
    public CommonsMultipartResolver multipartResolver(){
        CommonsMultipartResolver multipartResolver = new CommonsMultipartResolver();
        // 设置所有的上传文件的总大小 10M
        multipartResolver.setMaxInMemorySize(10*1024*1024);
        // 设置单个文件上传的大小 4M
        multipartResolver.setMaxUploadSize(4*1024*1024);
        multipartResolver.setDefaultEncoding("utf-8");
        return multipartResolver;
    }
-
步骤3:编写表单
<form action="${pageContext.request.contextPath}/file/upload.action" method="post" enctype="multipart/form-data"> 选择文件: <input type="file" name="image" /> <br/> <input type="submit" value="上传"/> <br/> </form> -
步骤4:编写处理类
package com.czxy.mvcanno.controller;

import org.apache.commons.io.FileUtils;
import org.springframework.stereotype.Controller;
import org.springframework.web.bind.annotation.RequestMapping;
import org.springframework.web.multipart.MultipartFile;

import java.io.File;
import java.io.IOException;

@Controller
@RequestMapping("/file")
public class FileController {

    @RequestMapping("/upload")
    public String upload(MultipartFile image) throws Exception {
        System.out.println("上传文件名:" + image.getOriginalFilename());
        System.out.println("上传文件流:" + image.getInputStream());

        File file = new File("D:\\xml", image.getOriginalFilename());
        FileUtils.copyInputStreamToFile(image.getInputStream(), file );
        return "book";
    }
}


 434
434


 被折叠的 条评论
为什么被折叠?
被折叠的 条评论
为什么被折叠?
 到【灌水乐园】发言


