


该系列文章均转载自
由于原文好像无法打开,正好自己有记录,所以正好分享出来。
Mesh(网格,三角面)是构成空间形体的基本元素,前面的正方形也是由两个Mesh构成的。本篇将介绍使用Mesh构成四面体,椎体等基本空间形体。
Design设计
在使用OpenGL 框架时一个好的设计原则是使用“Composite Pattern”(组合模式),本篇采用如下设计:
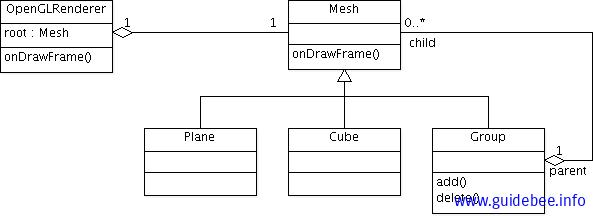
Mesh
首先定义一个基类 Mesh,所有空间形体最基本的构成元素为Mesh(三角形网格) ,其基本定义如下:
public class Mesh {
 // Our vertex buffer.
 private FloatBuffer verticesBuffer = null;

 // Our index buffer.
 private ShortBuffer indicesBuffer = null;

 // The number of indices.
 private int numOfIndices = -1;

 // Flat Color
 private float[] rgba
     = new float[] { 1.0f, 1.0f, 1.0f, 1.0f };

 // Smooth Colors
 private FloatBuffer colorBuffer = null;

 // Translate params.
 public float x = 0;

 public float y = 0;

 public float z = 0;

 // Rotate params.
 public float rx = 0;

 public float ry = 0;

 public float rz = 0;

 public void draw(GL10 gl) {
     // Counter-clockwise winding.
     gl.glFrontFace(GL10.GL_CCW);
     // Enable face culling.
     gl.glEnable(GL10.GL_CULL_FACE);
     // What faces to remove with the face culling.
     gl.glCullFace(GL10.GL_BACK);
     // Enabled the vertices buffer for writing and
     //to be used during
     // rendering.
     gl.glEnableClientState(GL10.GL_VERTEX_ARRAY);
     // Specifies the location and data format
     //of an array of vertex
     // coordinates to use when rendering.
     gl.glVertexPointer(3, GL10.GL_FLOAT, 0, verticesBuffer);
     // Set flat color
     gl.glColor4f(rgba[0], rgba[1], rgba[2], rgba[3]);
     // Smooth color
     if (colorBuffer != null) {
     // Enable the color array buffer to be
     //used during rendering.
     gl.glEnableClientState(GL10.GL_COLOR_ARRAY);
     gl.glColorPointer(4, GL10.GL_FLOAT, 0, colorBuffer);
     }

     gl.glTranslatef(x, y, z);
     gl.glRotatef(rx, 1, 0, 0);
     gl.glRotatef(ry, 0, 1, 0);
     gl.glRotatef(rz, 0, 0, 1);

     // Point out the where the color buffer is.
     gl.glDrawElements(GL10.GL_TRIANGLES, numOfIndices,
     GL10.GL_UNSIGNED_SHORT, indicesBuffer);
     // Disable the vertices buffer.
     gl.glDisableClientState(GL10.GL_VERTEX_ARRAY);
     // Disable face culling.
     gl.glDisable(GL10.GL_CULL_FACE);
     }

     protected void setVertices(float[] vertices) {
     // a float is 4 bytes, therefore
     //we multiply the number if
     // vertices with 4.
     ByteBuffer vbb
     = ByteBuffer.allocateDirect(vertices.length * 4);
     vbb.order(ByteOrder.nativeOrder());
     verticesBuffer = vbb.asFloatBuffer();
     verticesBuffer.put(vertices);
     verticesBuffer.position(0);
 }

 protected void setIndices(short[] indices) {
     // short is 2 bytes, therefore we multiply
     //the number if
     // vertices with 2.
     ByteBuffer ibb
         = ByteBuffer.allocateDirect(indices.length * 2);
         ibb.order(ByteOrder.nativeOrder());
         indicesBuffer = ibb.asShortBuffer();
         indicesBuffer.put(indices);
         indicesBuffer.position(0);
     numOfIndices = indices.length;
 }

 protected void setColor(float red, float green,
 float blue, float alpha) {
     // Setting the flat color.
     rgba[0] = red;
     rgba[1] = green;
     rgba[2] = blue;
     rgba[3] = alpha;
 }

 protected void setColors(float[] colors) {
     // float has 4 bytes.
     ByteBuffer cbb
         = ByteBuffer.allocateDirect(colors.length * 4);
         cbb.order(ByteOrder.nativeOrder());
         colorBuffer = cbb.asFloatBuffer();
         colorBuffer.put(colors);
         colorBuffer.position(0);
 }

}
- setVertices 允许子类重新定义顶点坐标。
- setIndices 允许子类重新定义顶点的顺序。
- setColor /setColors允许子类重新定义颜色。
- x,y,z 定义了平移变换的参数。
- rx,ry,rz 定义旋转变换的参数。
Plane
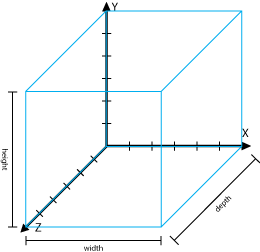
有了Mesh定义之后,再来构造Plane,plane可以有宽度,高度和深度,宽度定义为沿X轴方向的长度,深度定义为沿Z轴方向长度,高度为Y轴方向。
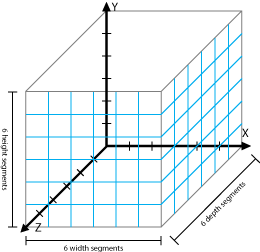
Segments为形体宽度,高度,深度可以分成的份数。 Segments在构造一个非均匀分布的Surface特别有用,比如在一个游戏场景中,构造地貌,使的Z轴的值随机分布在-0.1到0.1之间,然后给它渲染好看的材质就可以造成地图凹凸不平的效果。
上面图形中Segments为一正方形,但在OpenGL中我们需要使用三角形,所有需要将Segments分成两个三角形。为Plane 定义两个构造函数:
// Let you decide the size of the plane but still only one segment.
public Plane(float width, float height)
// For alla your settings.
public Plane(float width, float height, int widthSegments, int heightSegments)
比如构造一个1 unit 宽和 1 unit高,并分成4个Segments,使用图形表示如下:
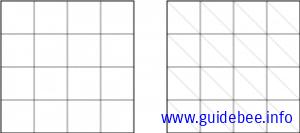
左边的图显示了segments ,右边的图为需要创建的Face(三角形)。
Plane类的定义如下:
public class Plane extends Mesh {
    public Plane() {
        this(1, 1, 1, 1);
    }

    public Plane(float width, float height) {
        this(width, height, 1, 1);
    }

    public Plane(float width, float height, int widthSegments,
                 int heightSegments) {
        float[] vertices = new float[(widthSegments + 1) * (heightSegments + 1)
                * 3];
        short[] indices = new short[(widthSegments + 1) * (heightSegments + 1)
                * 6];

        float xOffset = width / -2;
        float yOffset = height / -2;
        float xWidth = width / (widthSegments);
        float yHeight = height / (heightSegments);
        int currentVertex = 0;
        int currentIndex = 0;
        short w = (short) (widthSegments + 1);
        for (int y = 0; y < heightSegments + 1; y++) {
            for (int x = 0; x < widthSegments + 1; x++) {
                vertices[currentVertex] = xOffset + x * xWidth;
                vertices[currentVertex + 1] = yOffset + y * yHeight;
                vertices[currentVertex + 2] = 0;
                currentVertex += 3;

                int n = y * (widthSegments + 1) + x;

                if (y < heightSegments && x < widthSegments) {
                    // Face one
                    indices[currentIndex] = (short) n;
                    indices[currentIndex + 1] = (short) (n + 1);
                    indices[currentIndex + 2] = (short) (n + w);
                    // Face two
                    indices[currentIndex + 3] = (short) (n + 1);
                    indices[currentIndex + 4] = (short) (n + 1 + w);
                    indices[currentIndex + 5] = (short) (n + 1 + w - 1);

                    currentIndex += 6;
                }
            }
        }

        setIndices(indices);
        setVertices(vertices);
    }
}
Cube
下面来定义一个正方体(Cube),为简单起见,这个四面体只可以设置宽度,高度,和深度,没有和Plane一样提供Segments支持。
public class Cube extends Mesh {
    public Cube(float width, float height, float depth) {
        width  /= 2;
        height /= 2;
        depth  /= 2;

        float vertices[] = { -width, -height, -depth, // 0
                width, -height, -depth, // 1
                width,  height, -depth, // 2
                -width,  height, -depth, // 3
                -width, -height,  depth, // 4
                width, -height,  depth, // 5
                width,  height,  depth, // 6
                -width,  height,  depth, // 7
        };

        short indices[] = { 0, 4, 5,
                0, 5, 1,
                1, 5, 6,
                1, 6, 2,
                2, 6, 7,
                2, 7, 3,
                3, 7, 4,
                3, 4, 0,
                4, 7, 6,
                4, 6, 5,
                3, 0, 1,
                3, 1, 2, };

        setIndices(indices);
        setVertices(vertices);
    }
}
Group
Group可以用来管理多个空间几何形体,如果把Mesh比作Android的View ,Group可以看作Android的ViewGroup,Android的View的设计也是采用的“Composite Pattern”。
Group的主要功能是把针对Group的操作(如draw)分发到Group中的每个成员对应的操作(如draw)。
Group定义如下:
public class Group extends Mesh {
    private Vector<Mesh> children = new Vector<Mesh>();

    @Override
    public void draw(GL10 gl) {
        int size = children.size();
        for( int i = 0; i < size; i++)
            children.get(i).draw(gl);
    }

    /**
     * @param location
     * @param object
     * @see java.util.Vector#add(int, java.lang.Object)
     */
    public void add(int location, Mesh object) {
        children.add(location, object);
    }

    /**
     * @param object
     * @return
     * @see java.util.Vector#add(java.lang.Object)
     */
    public boolean add(Mesh object) {
        return children.add(object);
    }

    /**
     *
     * @see java.util.Vector#clear()
     */
    public void clear() {
        children.clear();
    }

    /**
     * @param location
     * @return
     * @see java.util.Vector#get(int)
     */
    public Mesh get(int location) {
        return children.get(location);
    }

    /**
     * @param location
     * @return
     * @see java.util.Vector#remove(int)
     */
    public Mesh remove(int location) {
        return children.remove(location);
    }

    /**
     * @param object
     * @return
     * @see java.util.Vector#remove(java.lang.Object)
     */
    public boolean remove(Object object) {
        return children.remove(object);
    }

    /**
     * @return
     * @see java.util.Vector#size()
     */
    public int size() {
        return children.size();
    }


}
Genderer代码:
public class OpenGLRenderer implements GLSurfaceView.Renderer {
private Mesh root;
public OpenGLRenderer() {
// Initialize our cube.
Group group = new Group();
Cube cube = new Cube(1, 1, 1);
cube.rx = 45;
cube.ry = 45;
group.add(cube);
root = group;
}
/*
* (non-Javadoc)
*
* @see
* android.opengl.GLSurfaceView.Renderer#onSurfaceCreated(javax.microedition
* .khronos.opengles.GL10, javax.microedition.khronos.egl.EGLConfig)
*/
@Override
public void onSurfaceCreated(GL10 gl, javax.microedition.khronos.egl.EGLConfig eglConfig) {
// Set the background color to black ( rgba ).
gl.glClearColor(0.0f, 0.0f, 0.0f, 0.5f);
// Enable Smooth Shading, default not really needed.
gl.glShadeModel(GL10.GL_SMOOTH);
// Depth buffer setup.
gl.glClearDepthf(1.0f);
// Enables depth testing.
gl.glEnable(GL10.GL_DEPTH_TEST);
// The type of depth testing to do.
gl.glDepthFunc(GL10.GL_LEQUAL);
// Really nice perspective calculations.
gl.glHint(GL10.GL_PERSPECTIVE_CORRECTION_HINT, GL10.GL_NICEST);
}
/*
* (non-Javadoc)
*
* @see
* android.opengl.GLSurfaceView.Renderer#onDrawFrame(javax.microedition.
* khronos.opengles.GL10)
*/
@Override
public void onDrawFrame(GL10 gl) {
// Clears the screen and depth buffer.
gl.glClear(GL10.GL_COLOR_BUFFER_BIT | GL10.GL_DEPTH_BUFFER_BIT);
// Replace the current matrix with the identity matrix
gl.glLoadIdentity();
// Translates 4 units into the screen.
gl.glTranslatef(0, 0, -4);
// Draw our scene.
root.draw(gl);
}
/*
* (non-Javadoc)
*
* @see
* android.opengl.GLSurfaceView.Renderer#onSurfaceChanged(javax.microedition
* .khronos.opengles.GL10, int, int)
*/
@Override
public void onSurfaceChanged(GL10 gl, int width, int height) {
// Sets the current view port to the new size.
gl.glViewport(0, 0, width, height);
// Select the projection matrix
gl.glMatrixMode(GL10.GL_PROJECTION);
// Reset the projection matrix
gl.glLoadIdentity();
// Calculate the aspect ratio of the window
GLU.gluPerspective(gl, 45.0f, (float) width / (float) height, 0.1f,
100.0f);
// Select the modelview matrix
gl.glMatrixMode(GL10.GL_MODELVIEW);
// Reset the modelview matrix
gl.glLoadIdentity();
}
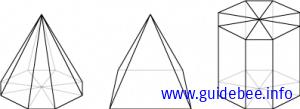
}其它建议
上面我们定义里Mesh, Plane, Cube等基本空间几何形体,对于构造复杂图形(如人物),可以预先创建一些通用的几何形体,如果在组合成较复杂的形体。除了上面的基本形体外,可以创建如Cone,Pryamid, Cylinder等基本形体以备后用。
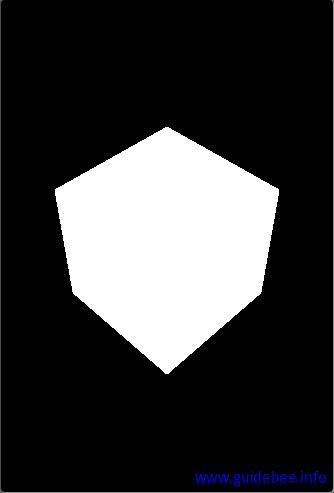
本例示例代码显示结果如下:
代码下载:


 403
403

 被折叠的 条评论
为什么被折叠?
被折叠的 条评论
为什么被折叠?
 到【灌水乐园】发言


