


【0】README
1)本文部分文字描述转自:“Spring In Action(中/英文版)”,旨在review “spring(13)缓存数据” 的相关知识;
2)缓存:缓存可以存储经常会用到的信息,这样每次需要的时候,这些info 都是立即可用的;
3)for complate source code, please visit https://github.com/pacosonTang/SpringInAction/tree/master/spring13;
【1】 启用对缓存的支持
1)intro:spring对 缓存的支持有两种方式:
way1)注解驱动的缓存;way2)XML 声明的缓存
2)使用spring 的缓存抽象时,最为通用的方式就是在方法上添加 @Cacheable 和 @CacheEvit注解;
2.1)在往bean上添加缓存注解的时候,必须要启用 spring 对注解驱动缓存的支持。如果使用 java配置的话,可以在其中的一个配置类上添加 @EnableCaching注解,这样就能启用注解驱动缓存了。(干货——@EnableCaching注解的作用)2.2)java配置启用注解驱动的缓存,代码如下所示:@Configuration @EnableCaching // 启用缓存 public class CachingConfig { @Bean public CacheManager cacheManager() { // 声明缓存管理器 return new ConcurrentMapCacheManager(); } }2.3)xml 配置配置启用注解驱动的缓存,代码如下所示:<?xml version="1.0" encoding="UTF-8"?> <beans xmlns="http://www.springframework.org/schema/beans" xmlns:xsi="http://www.w3.org/2001/XMLSchema-instance" xmlns:cache="http://www.springframework.org/schema/cache" xsi:schemaLocation=" http://www.springframework.org/schema/beans http://www.springframework.org/schema/beans/spring-beans.xsd http://www.springframework.org/schema/cache http://www.springframework.org/schema/cache/spring-cache.xsd"> <cache:annotation-driven /> <bean id="cacheManager" class= "org.springframework.cache.concurrent.ConcurrentMapCacheManager" /> </beans>对以上代码的分析(Analysis):
A1)@EnableCaching and <cache:annotation-driven> 的工作方式是相同的;他们都会创建一个切面并触发 spring 缓存注解的切点;A2) 根据所使用的 注解以及缓存的状态,这个切面会从缓存中获取数据,并将数据添加到缓存中或者从缓存中移除这个值;A3)以上的代码还声明了一个 缓存管理器的bean;(ConcurrentMapCacheManager)
【1.1】配置缓存管理器
1)intro:spring3.1 内置了 5个 缓存管理器实现,如下所示:
- SimpleCacheManager
- NoOpCacheManager
- ConcurrentMapCacheManager
- CompositeCacheManager
- EhCacheCacheManager
Supplement)spring data 提供了两个缓存管理器:
- RedisCacheManager (from Spring Data Redis)
- GemfireCacheManager (from Spring Data GemFire)
Attention)我们必须选择一个缓存管理器,然后要在spring 应用上下文中,以bean的形式对其进行配置;
【1.1.1】 使用 Ehcache 缓存
1)intro to Ehcache:Ehcache 是最为流行的缓存供应商之一;spring 为其提供的缓存管理器 叫做 EhCacheCacheManager;
2)如何在java中对其配置(以java 配置的方式设置 EhCacheCacheManager)
@Configuration
@EnableCaching // 启用缓存
public class CacheConfig {

	/*
	 * @Bean public CacheManager cacheManager() { // 声明缓存管理器 return new
	 * ConcurrentMapCacheManager(); }
	 */

	@Bean
	public EhCacheCacheManager cacheManager(CacheManager cm) {
		return new EhCacheCacheManager(cm);
	}

	@Bean
    public EhCacheManagerFactoryBean ehcache() {
		EhCacheManagerFactoryBean cacheFactory = new EhCacheManagerFactoryBean();
		cacheFactory.setConfigLocation(new ClassPathResource("com/spring/spittr/cache/ehcache.xml"));
		return cacheFactory;
	}
}
对以上代码的分析(Analysis):
我们需要
使用 EhCache的 CacheManager 来进行注入;而spring提供了EhCacheManagerFactoryBean 来生成 EhCache 的 CacheManager;
3)除了在spring中配置 的bean,还需要针对EhCache 的配置。Ehcache 为 XML 定义了 自己的配置模式,需要在一个 XML 文件中配置缓存,该文件需要符合 EhCache 所定义的模式;
3.1)在创建 EhCacheManagerFactoryBean,的过程中,需要告诉它 EhCache 配置文件在什么地方;3.2)在这里,通过调用 setConfigLocation()方法,传入 ClassPathResource,用来指明Ehcache XML 配置文件相对于根路径的位置;(参见上一小节的代码)3.3)下面是一个 ehcache.xml 文件的实例<ehcache> <cache name="spitterCache" maxBytesLocalHeap="50m" timeToLiveSeconds="100"> </cache> </ehcache>
【1.1.2】 使用Redis 缓存
1)intro:Redis 作为 key-value存储,也非常适合 存储缓存;
2)Redis 可以用来为 spring 缓存抽象机制存储缓存条目: spring data Redis 提供了 RedisCacheManager,这是 CacheManager 的一个实现;RedisCacheManager 会与一个 Redis 服务器协作,并通过 RedisTemplate 将缓存条目存储到 Redis中;
3)配置将缓存条目存储在 Redis 服务器的缓存管理器
@Configuration
@EnableCaching
public class CachingConfig {
@Bean
public CacheManager cacheManager(RedisTemplate redisTemplate) {
return new RedisCacheManager(redisTemplate);
}
@Bean
public JedisConnectionFactory redisConnectionFactory() {
JedisConnectionFactory jedisConnectionFactory =
new JedisConnectionFactory();
jedisConnectionFactory.afterPropertiesSet();
return jedisConnectionFactory;
}
@Bean
public RedisTemplate<String, String> redisTemplate(
RedisConnectionFactory redisCF) {
RedisTemplate<String, String> redisTemplate =
new RedisTemplate<String, String>();
redisTemplate.setConnectionFactory(redisCF);
redisTemplate.afterPropertiesSet();
return redisTemplate;
}
}
【1.1.3】使用多个缓存管理器
1)intro to CompositeCacheManager:CompositeCacheManager(复合型缓存管理器) 要通过一个或多个缓存管理器来进行配置,它会迭代这些缓存管理器,以查找之前所缓存的值;
2)以下程序清单 展现了如何创建 CompositeCacheManager bean;
@Bean
public CacheManager cacheManager(
    net.sf.ehcache.CacheManager cm,
    javax.cache.CacheManager jcm) {
        CompositeCacheManager cacheManager = new CompositeCacheManager();
        List<CacheManager> managers = new ArrayList<CacheManager>();
        managers.add(new JCacheCacheManager(jcm));
        managers.add(new EhCacheCacheManager(cm))
        managers.add(new RedisCacheManager(redisTemplate()));
        cacheManager.setCacheManagers(managers);
        return cacheManager;
}
Attention)在配置完缓存管理器并启用缓存后,就可以在 bean 方法上应用缓存规则了;下面看一下如何使用 spring 的缓存注解来定义缓存边界;
【2】 为方法添加注解以支持缓存
0)intro: spring 的缓存抽象在很大程度上是围绕切面创建的 ;在spring中 启用缓存时,会创建一个切面,它触发一个或多个spirng 的缓存注解;
1)下表列出了 spring 所提供的缓存注解:
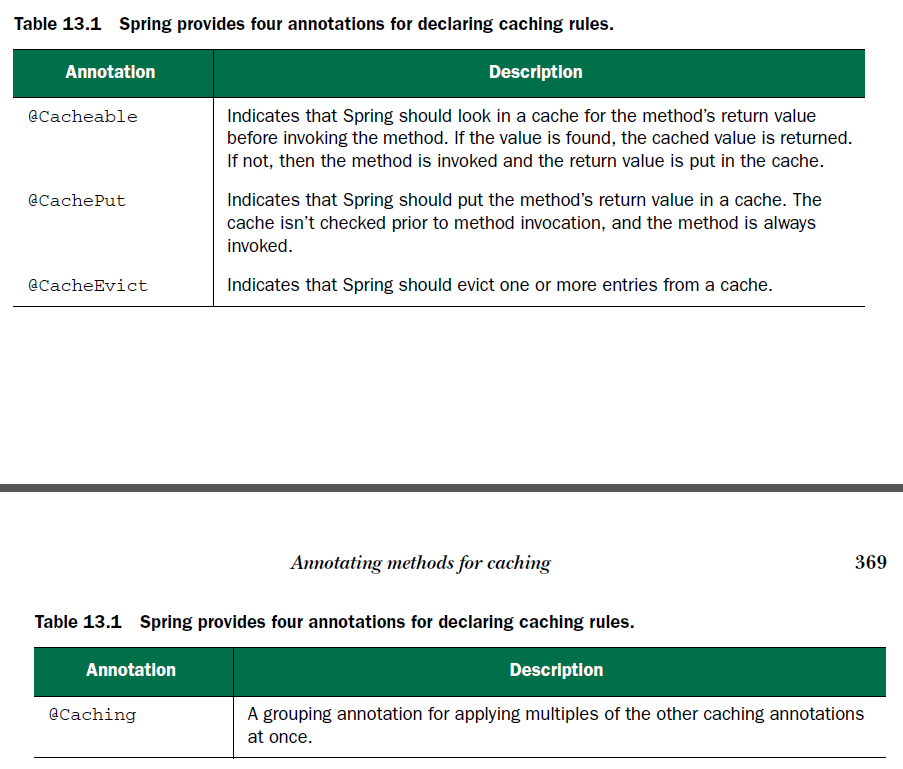
【2.1】填充缓存
1)@Cacheable 和 @CachePut 都可以填充缓存,他们的工作方式略有差异(difference)
d1)@Cacheable:首先在缓存中查找条目,如果找到了匹配的条目,那么就不会对方法进行调用了;如果没有找到匹配条目,方法会被调用并且返回值要放到缓存之中;d2)@CachePut:并不会在缓存中检查匹配的值,目标方法总是会被调用,并将返回值添加到缓存中;(干货——@Cacheable 和 @CachePut 注解的作用)
2)@Cacheable 和 @CachePut共有的属性如下:
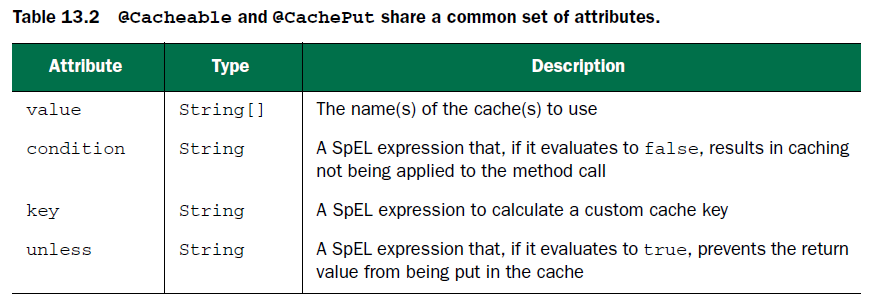
对上表的分析(Analysis):在最简单的case下, 在 @Cacheable 和 @CachePut 的这些属性中,只需要使用 value属性 指定一个或多个缓存即可;
3)看个荔枝
@Cacheable("spittleCache")
public Spittle findOne(long id) {
    try {
        return jdbcTemplate.queryForObject(
        SELECT_SPITTLE_BY_ID,
        new SpittleRowMapper(),
        id);
    } catch (EmptyResultDataAccessException e) {
    return null;
    }
}
对以上代码的分析(Analysis):
A1)当findOne()方法被调用时,缓存切面会拦截调用并在缓存中查找之前以名 spittleCache 存储的返回值;A2)缓存key 是传递到 findOne()方法中的id 参数;
A2.1)如果找到这个值的话:那么方法不会再被调用;A2.2)如果没有找到这个值的话:那么就会调用这个方法,并将返回值放到缓存中,为下一次调用 findOne()方法做准备;
4)以下代码的problem+solution:
4.1)problem:@Cacheable的缓存作用只限于 JdbcSpittleRepository这个实现类中,SpittleRepository的其他实现并没有缓存功能,除非也为其添加上 @Cacheable注解;4.2)solution:可以考虑将注解添加到 SpittleRepository的方法声明上,而不是放在实现类中(放在 顶层的接口中);(干货——应该将缓存注解Cacheable添加到Repository的接口声明中)public interface SpitterRepository { @CachePut("spitterCache") Spitter save(Spitter spitter); @Cacheable("spitterCache") Spitter findByUsername(String username); @Cacheable("spitterCache") String findPassByUsername(String username); }
【2.1.1】 将值放到缓存中
1)intro: @CachePut注解:该注解的方法始终都会被调用,而且他的返回值也会放到缓存中。这提供了一种很便利的机制,能够让跟我们在请求前预先加载缓存;
2)@CachePut注解的荔枝: 当一个client 调用了 save()方法保存 spitter 后,很可能马上就会再次请求这条记录。所以,当save()方法 调用后,立即 将 spitter 塞到 缓存中是很有意义的。这样当其他人通过 findOne() 方法进行查找时,它就已经准备就绪了;(干货——@CachePut注解的作用)
@CachePut("spitterCache")
Spittle save(Spittle spittle);
【2.1.2】自定义缓存key
1)intro:Both @Cacheable and @CachePut 都有一个名为key的属性,这个属性能够替换默认的 key,这通过一个SpEL 表达式计算得到的;
2)为缓存编写SpEL 表达式的时候,spring 暴露了一些很有用的元数据,下表列出了SpEL 中可用的 缓存元数据
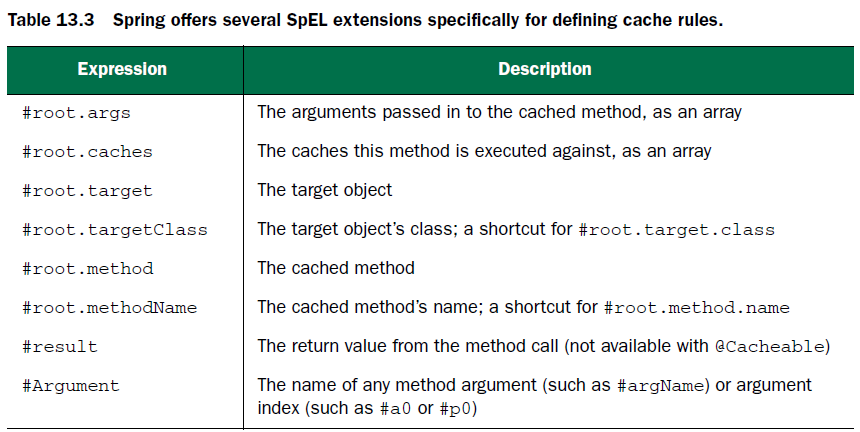
对上表的分析(Analysis):
A1)对于save()方法来说,我们需要的键是 所返回的 Spittle对象 的 id属性;A2)表达式 #result 能够得到返回的 Spittle,可以通过将 key 属性设置为 #result.id 来引用id 属性;代码如下;@CachePut(value="spitterCache", key="#result.id") Spittle save(Spittle spittle);
【2.1.3】条件化缓存(某些case下,我们希望将缓存关闭)
1)intro:@Cacheable and @CachePut 提供了两个属性用以实现条件化缓存: unless and condition;
1.1)unless:如果unless属性的 SpEL 表达式的值为 true,那么缓存方法返回的数据就不会放到缓存中;1.2)condition:如果 condition 属性的 SpEL 表达式的值为 false,那么对于这个方法缓存就会被禁用掉;
2)unless 和 condition 的差别(difference)
d1)unless属性:只能阻止将对象放进缓存,但在这个方法调用的时候,依然会去缓存中进行你查找,如果找到了匹配的值,就会返回找到的值;(干货——unless是不准进,但可以出)d2)condition属性:一旦 condition的表达式结果为false,缓存就会被禁用,不进也不出;(干货——condition是不进也不出)
3)看个荔枝:假设对于 message 属性包含 ”NoCache“ 的 Spittle 对象,我们不想对其进行缓存。为了阻止这样的Spittle 对象被缓存起来,可以这样设置:
@Cacheable(value="spitterCache"
    unless="#result.message.contains('NoCache')")
Spittle findOne(long id);
4)再看个荔枝:为了要对 ID 小于 10 的Spittle 关闭缓存,可以在 @Cacheable 上使用 condition 属性,如下所示:
@Cacheable(value="spitterCache"
    unless="#result.message.contains('NoCache')"
    condition="#id >= 10")
Spittle findOne(long id);A1)如果findOne() 调用时,参数值小于10,那么就不会在缓存中进行查找:返回的 Spittle 也不会放入缓存中,就想这个方法没有添加 @Cacheable 注解一样;A2)如上例所示:unless属性 的表达式能够通过 #result 引用返回值;之所以这么做是因为 unless属性 只有在缓存方法有返回值时 才开始发挥作用;A3)如上例所示:condition属性: 肩负着在方法上禁用缓存的任务,因此它不能等到方法返回时再确定是否该关闭缓存。这因为这它的表达式必须要在进入方法前进行计算,所以在condition属性中不能引用 #result 返回值; (干货——这里道出了 unless属性和 condition属性的有一大区别,即unless属性的结果是 对方法调用后的引用,而condition属性的结果是方法调用前的计算结果)
【2.2】移除缓存条目(使用 @CacheEvict 将缓存数据移除掉)(干货——@CacheEvict 注解的作用)
1)intro:如果带有 @CacheEvict注解的方法被调用的话,那么会有一个 或 更多的条目会在缓存中移除;
2)在什么 case下 需要从缓存中移除内容呢? 当缓存值不再合法时,我们应该确保将其从缓存中移除,这样的话,后续的缓存命中就不会返回旧的 或 已经布存在的值,其中一这样的case 就是数据被删除掉了。这样的话, SpittleRepository.remove()方法就是 使用 @CacheEvict 的绝佳选择:
@CacheEvict("spitterCache")
void remove(long spittleId)
Attention)
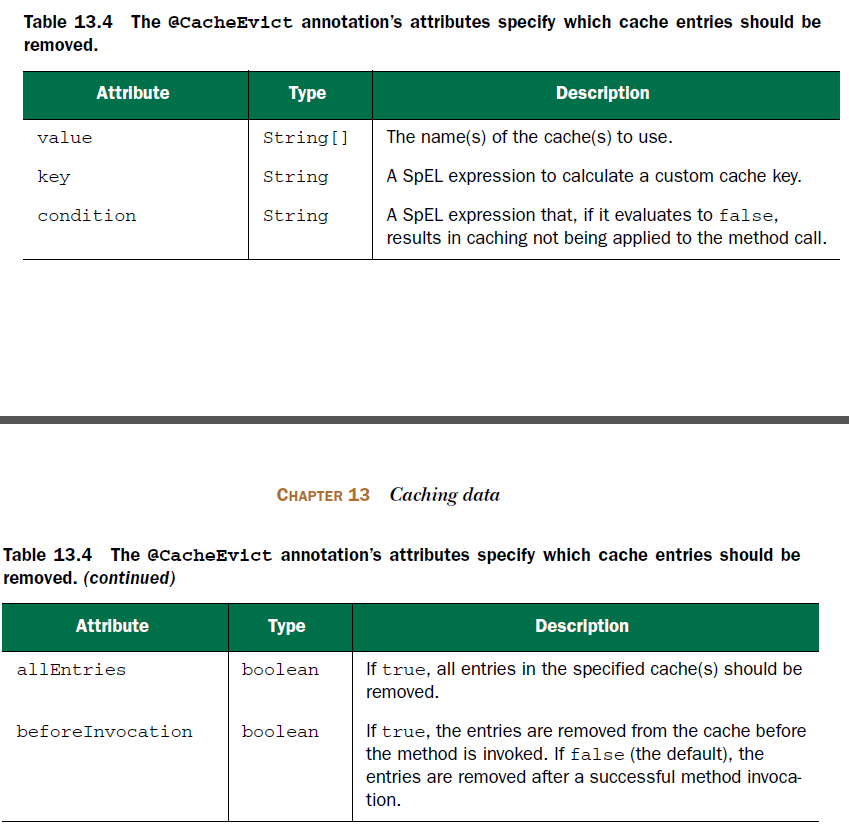
A1)与 @Cacheable 和 @CachePut 不同:@CacheEvict 能够应用在 返回值 为 void 的 方法上,而 @Cacheable 和 @CachePut 需要非 void 的返回值;它将会作为放在缓存中的条目,因为 @CacheEvict 只是将条目从 缓存中移除,因此它可以放在任意的 方法上,甚至void 方法上;A2)对以上代码的分析(Analysis):当remove() 调用时,会从 缓存中删除一个条目,被删除条目的key 与传递进来的spittleId 的值要相等;A3)@CacheEvict有多个属性,如下表所示:
【3】看个荔枝
1) @Cacheable("spitterCache") 和 @CachePut("spitterCache") 注解的测试用例;
public interface SpitterRepository {
	@CachePut("spitterCache")
	Spitter save(Spitter spitter);

	@Cacheable("spitterCache")
	Spitter findByUsername(String username);

	String findPassByUsername(String username);

	int getItemSum();
	List<Spitter> findSpitters(int limit, int offset);
}
<?xml version="1.0" encoding="gbk"?>
<ehcache xmlns:xsi="http://www.w3.org/2001/XMLSchema-instance"
xsi:noNamespaceSchemaLocation="ehcache.xsd">
<diskStore path="java.io.tmpdir" />
<defaultCache maxElementsInMemory="10000" eternal="false"
timeToIdleSeconds="30" timeToLiveSeconds="30" overflowToDisk="false" />
<cache name="spitterCache" maxElementsInMemory="10000"
eternal="false" overflowToDisk="false" timeToIdleSeconds="900"
timeToLiveSeconds="1800" memoryStoreEvictionPolicy="LFU" />
</ehcache>
2)@CacheEvict注解移除缓存对象的测试用例;
public interface SpitterRepository {

	@CachePut("spitterCache")
	Spitter save(Spitter spitter);

	@Cacheable("spitterCache")
	Spitter findByUsername(String username);

	String findPassByUsername(String username);

	int getItemSum();

	List<Spitter> findSpitters(int limit, int offset);

	@CacheEvict("spitterCache") // highlight line.
	int delete(String username);
}
@Override
	public int delete(String username) { //defined in SpitterRepositoryImpl.java
		sql = "delete from t_spitter where username=?";
		int result = jdbc.update(sql, username);
		System.out.println("delete result = " + result);
		return result;
	}
@RequestMapping(value = "/delete", method = RequestMethod.GET)
public String removeSpitter( //defined in SpitterController.java.
@RequestParam String username,
@RequestParam(name="curpage") String curpage) {
spitterRepository.delete(username);
return "redirect:/spitter/paging?curpage=" + curpage;
}
【4】使用XML 声明缓存
1)why + reason:
1.1)why:为什么想要以 XML 的方式声明缓存?1.2)reasons:
reason1)你可能会觉得 在 自己的源码中添加 spring 的注解有点不太方便;reason2)你需要在没有源码的bean上应用 缓存功能;
2)spring 的cache 命名空间提供了使用 XML 声明缓存规则的方法:可以作为 面向注解缓存的替代方案,所以 cache 命名空间会与 spring 的 aop 命名空间结合起来使用,用来声明缓存所应用的切点在哪里;
3) 配置 XML 声明的缓存,首先需要创建spring 配置文件,这个文件要包含 cache 和 aop 命名空间:
<?xml version="1.0" encoding="UTF-8"?>
<beans xmlns="http://www.springframework.org/schema/beans"
xmlns:xsi="http://www.w3.org/2001/XMLSchema-instance"
xmlns:cache="http://www.springframework.org/schema/cache"
xmlns:aop="http://www.springframework.org/schema/aop"
xsi:schemaLocation="http://www.springframework.org/schema/aop
http://www.springframework.org/schema/aop/spring-aop.xsd
http://www.springframework.org/schema/beans
http://www.springframework.org/schema/beans/spring-beans.xsd
http://www.springframework.org/schema/cache
http://www.springframework.org/schema/cache/spring-cache.xsd">
4)cache 命名空间定义了在 spring xml 配置文件中声明缓存的配置元素,下表列出了cache 命名空间所提供的所有元素:

5)下面的代码展现了如何使用这些元素 为 SpittleRepository bean 配置缓存,其作用等同于 本章前面使用缓存注解的方式:
<?xml version="1.0" encoding="UTF-8"?>
<beans xmlns="http://www.springframework.org/schema/beans"
xmlns:xsi="http://www.w3.org/2001/XMLSchema-instance"
xmlns:cache="http://www.springframework.org/schema/cache"
xmlns:aop="http://www.springframework.org/schema/aop"
xsi:schemaLocation="http://www.springframework.org/schema/aop
http://www.springframework.org/schema/aop/spring-aop.xsd
http://www.springframework.org/schema/beans
http://www.springframework.org/schema/beans/spring-beans.xsd
http://www.springframework.org/schema/cache
http://www.springframework.org/schema/cache/spring-cache.xsd">
<aop:config>
<aop:advisor advice-ref="cacheAdvice"
<cache:annotation-driven> Enables annotation-driven caching. Equivalent to
@EnableCaching in Java configuration.
<cache:advice> Defines caching advice. Paired with <aop:advisor> to
apply advice to a pointcut.
<cache:caching> Defines a specific set of caching rules within the caching
advice.
<cache:cacheable> Designates a method as being cacheable. Equivalent to the
@Cacheable annotation.
<cache:cache-put> Designates a method as populating (but not considering) the
cache. Equivalent to the @CachePut annotation.
<cache:cache-evict> Designates a method as evicting one or more entries from the
cache. Equivalent to the @CacheEvict annotation.
Bind cache advice
to a pointcut
pointcut=
"execution(* com.habuma.spittr.db.SpittleRepository.*(..))"/>
</aop:config>
<cache:advice id="cacheAdvice">
<cache:caching>
<cache:cacheable
cache="spittleCache"
method="findRecent" />
<cache:cacheable
cache="spittleCache" method="findOne" />
<cache:cacheable
cache="spittleCache"
method="findBySpitterId" />
<cache:cache-put
cache="spittleCache"
method="save"
key="#result.id" />
<cache:cache-evict
cache="spittleCache"
method="remove" />
</cache:caching>
</cache:advice>
<bean id="cacheManager" class=
"org.springframework.cache.concurrent.ConcurrentMapCacheManager"
/>
</beans>


 2104
2104

 被折叠的 条评论
为什么被折叠?
被折叠的 条评论
为什么被折叠?
 到【灌水乐园】发言


