


Qt的QPainter类中提供了drawEllipse和drawRect函数分别画椭圆与矩形,但是这两个函数有一个共同的问题:所画椭圆的长短轴与x、y轴平行,矩形的长短边也与x、y轴平行,如果想出现与x、y轴相交的效果(斜的),QPainter提供了Rotate()和translate()函数分别对坐标系进行旋转和平移,但是对坐标系变换之后,再次画图便会以新的坐标系为标准进行绘制,如出现椭圆是斜的效果。
我的功能需求是:在二维图形上画椭圆,旋转图像时,椭圆随之在二维图像上正确旋转。
解决方案:1、记下椭圆左上角与右下角的坐标。
        2、使用 QPainterPath的addEllipse()函数生成椭圆,使用toFillPolygon()转换成
          polygon。并保存此polygon的点。
         切记要在初始的时候保存点,因为旋转之后,左上、右下点组成的矩形是平行坐标轴的,所以矩形不是
         想要的,故生成的椭圆也是不正确的,所以要在初始时记下椭圆上的点,旋转时不断更新这些点的
          display坐标。
        3、图像变换时(旋转、缩放等)利用每个点的世界坐标不变原则更新Polygon里的每个点,得到
        display坐标,用drawPolygon()即可得到想要的椭圆。
    QPainterPath ellipsePath;
    QRectF rectPath(LeftUpDisplayPoint, stRightBottomDisplayPoint);
    ellipsePath.addEllipse(rectPath);
    QPolygonF polygon = ellipsePath.toFillPolygon();//Converts the path into a polygon

    m_vecPolygonPath.clear();
    for(int nPolygonPointIndex = 0; nPolygonPointIndex < polygon.count(); nPolygonPointIndex++)
    {
        double dPointX = polygon.at(nPolygonPointIndex).x();
        double dPointY = polygon.at(nPolygonPointIndex).y();
        ControlPoint CurControl;
        CurControl.SetDisplayPosition(QPoint((int)dPointX, (int)dPointY));
        DisplayToWorld(CurControl);
        m_vecPolygonPath.push_back(CurControl);//存储起来
}下面是QPainterPath类的简介,摘抄于http://blog.csdn.net/liang19890820/article/details/51393152#椭圆,对作者表示感谢
QPainterPath 类(绘图路径)提供了一个容器,用于绘图操作,可以创建和重用图形形状。

绘图路径是由许多图形化的构建块组成的对象,例如:矩形、椭圆、直线和曲线。构建块可以加入在封闭的子路径中,例如:矩形或椭圆。封闭的路径的起点和终点是一致的,或者他们可以作为未封闭的子路径独立存在,如:直线和曲线。

QPainterPath 可以被填充、描绘轮廓、裁剪。要为一个指定的绘图路径生成可填充的轮廓,可以使用 QPainterPathStroker 类。与正常绘图相比,QPainterPath 的主要优点在于:复杂的图形只需创建一次,然后只需调用 QPainter::drawPath() 函数即可绘制多次。

QPainterPath 提供了一组函数,可用于获取绘图路径及其元素的信息。除了可以使用 toReversed() 函数来改变元素的顺序外,还有几个函数将 QPainterPath 对象转换成一个多边形表示。
创建 QPainterPath
QPainterPath 对象可以用指定的起点,或者另一个 QPainterPath 对象的副本来构造一个空路径。

一旦创建,可以使用 lineTo()、arcTo()、cubicTo() 和 quadTo() 函数将直线和曲线添加到路径中,直线和曲线从 currentPosition() 处伸展到其传递的参数的所在点的位置。

QPainterPath 对象的 currentPosition() 始终是最后一个添加的子路径的最终位置(或初始起点),使用 moveTo() 函数可以在不增加组件的情况下移动 currentPositon(),moveTo() 函数会隐式地启动一个新的子路径,并关闭前一个。启动新的子路径的另一种方式是调用 closeSubpath() 函数,该函数通过添加一条直线(从 currentPosition() 到起始位置)来关闭当前路径。注意:新路径将 (0, 0) 作为其初始 currentPosition()。

QPainterPath 也提供了一些便利的函数来添加一个封闭的子路径 - addEllipse()、addPath()、 addRect()、addRegion() 和 addText()。addPolygon() 函数添加一个未封闭的子路径。事实上,这些函数都是 moveTo()、lineTo()、cubicTo() 操作的集合。

此外,使用 connectPath() 函数将路径添加至当前路径。但需要注意,该函数将通过添加一条直线,将当前路径的最后一个元素连接到给定的第一个元素。
QPainterPath 信息
QPainterPath 类提供了一组函数,用于返回有关该路径及其元素的信息。

currentPosition() 函数返回被添加的最后一个子路径的终点(或初始起始点)。elementAt() 函数可用于检索各种子路径元素,可以使用 elementCount() 函数检索元素的数量,isEmpty() 函数可以告诉该 QPainterPath 对象是否包含任何元素。

controlPointRect() 函数返回包含此路径中所有点和控制点的矩形。与使用浮点精度返回此画家路径的边界矩形的精确的 boundingRect() 相比,此函数的计算速度要快得多。

最后,QPainterPath 提供了 contains() 函数,用于确定给定点或矩形是否在路径内。以及 intersects() 函数,用于确定给定矩形内的任何点是否也在该路径内。
QPainterPath 转换
出于兼容性原因,可能需要简化绘图路径的表示形式:QPainterPath 提供的 toFillPolygon()、toFillPolygons()和 toSubpathPolygons() 函数,用于将绘图路径转换为多边形。toFillPolygon() 将绘图路径作为单个多边形返回,而后两个函数返回一个多边形列表。

提供了 toFillPolygons() 和 toSubpathPolygons() 函数,因为绘制几个小多边形通常比绘制一个大的多边形更快,即使绘制的总点数相同。两者之间的差异是它们返回的多边形数:toSubpathPolygons() 为每个子路径创建一个多边形,而不管相交的子路径(即重叠的边界矩形),而 toFillPolygons() 函数仅为重叠的子路径创建一个多边形。

toFillPolygon() 和 toFillPolygons() 函数首先将所有子路径转换为多边形,然后使用重卷技术确保可以使用正确的填充规则来填充重叠的子路径。注意:重卷会在多边形中插入额外的线,因此填充多边形的轮廓与路径的轮廓不匹配。
椭圆
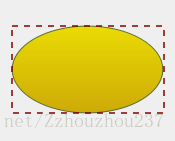
void QPainterPath::addEllipse(const QRectF & boundingRectangle)
在指定的 boundingRectangle 内创建一个椭圆,并将其作为一个封闭的子路径添加至绘图路径中。
椭圆由顺时针曲线组成,起始点和结束点在 0°(3 点钟的位置)。
QLinearGradient myGradient;
QPen myPen;
QRectF boundingRectangle;

QPainterPath myPath;
myPath.addEllipse(boundingRectangle);

QPainter painter(this);
painter.setBrush(myGradient);
painter.setPen(myPen);
painter.drawPath(myPath);
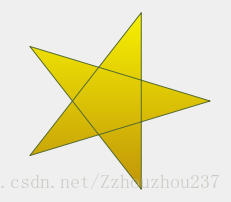
多边形
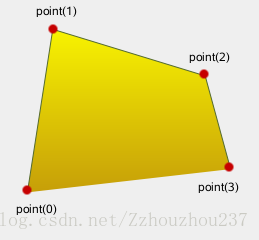
void QPainterPath::addPolygon(const QPolygonF & polygon)
将指定的 polygon 作为子路径(未封闭)添加至绘图路径中。
注意:添加了 polygon 后,当前位置是 polygon 的最后一个点。要画一条线回到起始点,使用 closeSubpath() 函数。
QLinearGradient myGradient;
QPen myPen;
QPolygonF myPolygon;

QPainterPath myPath;
myPath.addPolygon(myPolygon);

QPainter painter(this);
painter.setBrush(myGradient);
painter.setPen(myPen);
painter.drawPath(myPath);
矩形
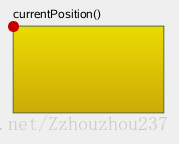
void QPainterPath::addRect(const QRectF & rectangle)
将指定的 rectangle 作为子路径(封闭)添加至绘图路径中。
rectangle 作为顺时针的一组线被添加。添加 rectangle 后,绘图路径的当前位置是 rectangle 的左上角。
QLinearGradient myGradient;
QPen myPen;
QRectF myRectangle;

QPainterPath myPath;
myPath.addRect(myRectangle);

QPainter painter(this);
painter.setBrush(myGradient);
painter.setPen(myPen);
painter.drawPath(myPath);
文本
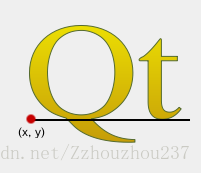
void QPainterPath::addText(const QPointF & point, const QFont & font, const QString & text)
将指定的 text 添加至此路径中,作为由 font 创建的一组封闭子路径。定位子路径,使 text 基线的左端位于指定的 point。
QLinearGradient myGradient;
QPen myPen;
QFont myFont;
QPointF baseline(x, y);

QPainterPath myPath;
myPath.addText(baseline, myFont, tr("Qt"));

QPainter painter(this);
painter.setBrush(myGradient);
painter.setPen(myPen);
painter.drawPath(myPath);
弧形
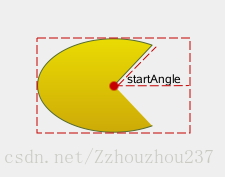
void QPainterPath::arcTo(const QRectF & rectangle, qreal startAngle, qreal sweepLength)
创建一个弧形,占据了指定的 rectangle,以指定 startAngle 开始并逆时针扩展 sweepLength 度。
角度都以度为单位,可以用负角度来指定顺时针弧形。
注意:如果它们尚未连接,此函数将连接弧的起点到当前位置。弧形被加入后,当前位置是弧的最后一点。要画一条线回到起始点,使用 closeSubpath() 函数。
QLinearGradient myGradient;
QPen myPen;

QPointF center, startPoint;

QPainterPath myPath;
myPath.moveTo(center);
myPath.arcTo(boundingRect, startAngle,
             sweepLength);

QPainter painter(this);
painter.setBrush(myGradient);
painter.setPen(myPen);
painter.drawPath(myPath);
贝塞尔曲线
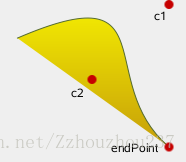
void QPainterPath::cubicTo(const QPointF & c1, const QPointF & c2, const QPointF & endPoint)
使用指定的控制点 c1、c2,在当前位置和指定的 endPoint 之间添加一条贝塞尔曲线。
曲线被添加后,当前位置会被更新为曲线的终点。
QLinearGradient myGradient;
QPen myPen;

QPainterPath myPath;
myPath.cubicTo(c1, c2, endPoint);

QPainter painter(this);
painter.setBrush(myGradient);
painter.setPen(myPen);
painter.drawPath(myPath);
填充规则
Qt 提供了两种填充路径的规则:
Qt::OddEvenFill (默认)

Qt::WindingFill


 973
973

 被折叠的 条评论
为什么被折叠?
被折叠的 条评论
为什么被折叠?
 到【灌水乐园】发言


