


创建 Phone 实体
现在,在.Core项目中创建一个新的实体,Phone Entity
[Table("PbPhones")]
public class Phone : CreationAuditedEntity<long>
{
    public const int MaxNumberLength = 16;

    [ForeignKey("PersonId")]
    public virtual Person Person { get; set; }
    public virtual int PersonId { get; set; }

    [Required]
    public virtual PhoneType Type { get; set; }

    [Required]
    [MaxLength(MaxNumberLength)]
    public virtual string Number { get; set; }
}Phone的数据存储在PbPhones表里,它的主键类型是long。它引用了Person实体作为该电话的所有人。
我们向Person类里添加Phone的集合
[Table("PbPersons")]
public class Person : FullAuditedEntity
{
    public const int MaxNameLength = 32;
    public const int MaxSurnameLength = 32;
    public const int MaxEmailAddressLength = 255;

    [Required]
    [MaxLength(MaxNameLength)]
    public virtual string Name { get; set; }

    [Required]
    [MaxLength(MaxSurnameLength)]
    public virtual string Surname { get; set; }

    [MaxLength(MaxEmailAddressLength)]
    public virtual string EmailAddress { get; set; }

    public virtual ICollection<Phone> Phones { get; set; }
}我们还需要一个PhoneType的枚举:
public enum PhoneType : byte
{
    Mobile,
    Home,
    Business
}
最后,我们还要向DbContext里添加Phone的DbSet
public virtual IDbSet<Phone> Phones { get; set; }数据迁移
我们的实体模型被更改,所以我们需要添加一个新的migration:

它会创建一个数据迁移文件来创建PbPhones表:
public partial class Added_Phone : DbMigration
{
    public override void Up()
    {
        CreateTable(
            "dbo.PbPhones",
            c => new
                {
                    Id = c.Long(nullable: false, identity: true),
                    PersonId = c.Int(nullable: false),
                    Type = c.Byte(nullable: false),
                    Number = c.String(nullable: false, maxLength: 16),
                    CreationTime = c.DateTime(nullable: false),
                    CreatorUserId = c.Long(),
                })
            .PrimaryKey(t => t.Id)
            .ForeignKey("dbo.PbPersons", t => t.PersonId, cascadeDelete: true)
            .Index(t => t.PersonId);

    }

    public override void Down()
    {
        DropForeignKey("dbo.PbPhones", "PersonId", "dbo.PbPersons");
        DropIndex("dbo.PbPhones", new[] { "PersonId" });
        DropTable("dbo.PbPhones");
    }
}
在更新数据库之前,我们可以向数据库添加电话的示例:
public class InitialPeopleCreator
{
    private readonly AbpZeroTemplateDbContext _Context;

    public InitialPeopleCreator(AbpZeroTemplateDbContext context)
    {
        this._Context = context;
    }

    public void Create()
    {
        var alistair = this._Context.Persons.FirstOrDefault(p => p.EmailAddress == "alistair.chow@ali.com");

        if(alistair == null)
        {
            this._Context.Persons.Add(
                new Entities.Person
                {
                    Name = "Alistair",
                    Surname = "Chow",
                    EmailAddress = "alistair.chow@ali.com",
                    Phones = new List<Phone>
                    {
                        new Phone {Type=PhoneType.Home, Number="11221122" },
                        new Phone {Type=PhoneType.Mobile, Number="22332233" }
                    }
                });
        }

        var tencent = this._Context.Persons.FirstOrDefault(p => p.EmailAddress == "tencent.cloud@ali.com");
        if (tencent == null)
        {
            this._Context.Persons.Add(
                new Entities.Person
                {
                    Name = "Tencent",
                    Surname = "Cloud",
                    EmailAddress = "tencent.cloud@ali.com",
                    Phones = new List<Phone>
                    {
                        new Phone {Type=PhoneType.Home, Number="33443344" }
                    }
                });
        }
    }
}
我们向Alistair添加了两个电话,向Tencent添加了一个电话。但是如果我们现在执行Update-Database,由于人员信息已经存在,所以电话不会被插入。那怎么解决?由于还没有部署,我们可以删除数据库(或truncate People表),再重新创建它。
现在,我们们在程序包管理控制台执行 Update-Database命令。你可以在数据库里看到PbPhones表及里面的数据。
修改GetPeople方法
我们需要修改PersonAppService.GetPeople方法,让返回值里包含电话号码
 public ListResultDto<PersonListDto> GetPeople(GetPeopleInput input)
 {
     var persons = this._personRepository
         .GetAll()
         .Include(p => p.Phones)
         .WhereIf(
             !input.Filter.IsNullOrEmpty(),
             p => p.Name.Contains(input.Filter) ||
                 p.Surname.Contains(input.Filter) ||
                 p.EmailAddress.Contains(input.Filter)
         )
         .OrderBy(p => p.Name)
         .ThenBy(p => p.Surname)
         .ToList();

     return new ListResultDto<PersonListDto>(persons.MapTo<List<PersonListDto>>());
}我们只需要在查询里添加Include 扩展方法,其他代码保持一致。
AddPhone 和 DeletePhone 方法
首先定义PhoneInPersonListDto
[AutoMapFrom(typeof(Entities.Phone))]
    public class PhoneInPersonListDto : CreationAuditedEntityDto<long>
    {
        public PhoneType Type { get; set; }
        public string Number { get; set; }
    }
我们要在IPersonAppService接口里添加两个方法:
Task DeletePhone(EntityDto<long> input);
Task<PhoneInPersonListDto> AddPhone(AddPhoneInput input);
我们也可以创建一个IPhoneAppService。但是,我们可以把人看做一个集合,在这里添加电话的相关方法。AddPhoneInput DTO如下所示:
[AutoMapTo(typeof(Phone))]
public class AddPhoneInput
{
    [Range(1, int.MaxValue)]
    public int PersonId { get; set; }

    [Required]
    public PhoneType Type { get; set; }

    [Required]
    [MaxLength(Phone.MaxNumberLength)]
    public string Number { get; set; }
}
现在我们实现接口方法:
private readonly IRepository<Entities.Person> _personRepository;
private readonly IRepository<Entities.Phone, long> _phoneRepository;

public PersonAppService(IRepository<Entities.Person> personRepository, IRepository<Entities.Phone, long> phoneRepository)
{
    this._personRepository = personRepository;
    this._phoneRepository = phoneRepository;
}

public async Task DeletePhone(EntityDto<long> input)
{
    await this._phoneRepository.DeleteAsync(input.Id);
}

public async Task<PhoneInPersonListDto> AddPhone(AddPhoneInput input)
{
    var person = _personRepository.Get(input.PersonId);

    var phone = input.MapTo<Entities.Phone>();
    person.Phones.Add(phone);

    await CurrentUnitOfWork.SaveChangesAsync();

    return phone.MapTo<PhoneInPersonListDto>();
}DeletePhone方法非常简单,只需要通过传入的Id删除对应的Phone。
AddPhone方法首先从数据库中获取Person,再向其添加新的Phone对象,然后进行保存。保存更改会将新添加的电话插入数据库并获取它的ID。因为我们返回的DTO包含了新的电话信息及它的ID。所以,我们在最后一行进行映射。(注意,通常来讲我们一般不会调用CurrentUnitOfWork.SaveChangesAsync。他会在最后的方法中自动调用,当我们需要立即保存实体并获取它的ID时才手动去调用它)
人员列表的编辑模式
最终效果如下:
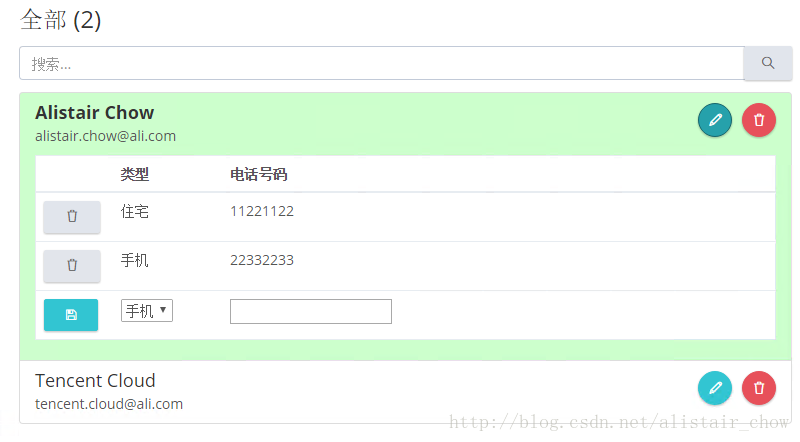
当我们点击绿色的编辑图标,所选中的行将会扩展显示所有的电话信息。然后我们可以对电话进行删除,或者添加新的电话号码。
视图
视图改变如下:
@using Abp.Web.Mvc.Extensions
@using MyCompanyName.AbpZeroTemplate.Web.Navigation
@using MyCompanyName.AbpZeroTemplate.Authorization
@using MyCompanyName.AbpZeroTemplate.Web.Areas.Mpa.Models.PhoneBook
@model MyCompanyName.AbpZeroTemplate.Web.Areas.Mpa.Models.PhoneBook.IndexViewModel

@{
    ViewBag.CurrentPageName = PageNames.App.Tenant.PhoneBook;
}

@section Scripts
{
    @Html.IncludeScript("~/Areas/Mpa/Views/PhoneBook/_CreatePersonModal.js")
    @Html.IncludeScript("~/Areas/Mpa/Views/PhoneBook/Index.js")
}

@section Styles
{
    @Html.IncludeStyle("~/Areas/Mpa/Views/PhoneBook/Index.min.css")
}

<div class="row margin-bottom-5">
    <div class="col-xs-6">
        <div class="page-head">
            <div class="page-title">
                <h1>
                    <span>@L("PhoneBook")</span>
                </h1>
            </div>
        </div>
    </div>

    <div class="col-xs-6 text-right">
    @if (IsGranted(AppPermissions.Pages_Tenant_PhoneBook_CreatePerson))
    {
        <button id="CreateNewPersonButton" class="btn btn-primary blue">
            <i class="fa fa-plus"></i>@L("CreateNewPerson")
        </button>
     }
    </div>
</div>

<div class="portlet light">
    <div class="portlet-title portlet-title-filter">
        <h3>@L("AllPeople") (@Model.Items.Count)</h3>

        <div class="inputs inputs-full-width">
            <div class="portlet-input">
                <form action="@Url.Action("Index")" method="get">
                    <div class="input-group">
                        <input id="FilterPeopleText" name="Filter" value="@Model.Filter" class="form-control" placeholder="@L("SearchWithThreeDot")" type="text" />
                        <span class="input-group-btn">
                            <button id="FilterPeopleButton" class="btn default" type="submit">
                                <i class="icon-magnifier"></i>
                            </button>
                        </span>
                    </div>
                </form>
            </div>
        </div>
    </div>

    <div class="portlet-body">
        <div id="AllPeopleList" class="list-group">
            @foreach (var person in Model.Items)
            {
                <a href="javascript:;" class="list-group-item" data-person-id="@person.Id">
                    <h4 class="list-group-item-heading">
                        @person.Name @person.Surname

                        <span class="person-buttons">
                            <button title="@L("Edit")" class="btn btn-circle btn-icon-only green edit-person">
                                <i class="icon-pencil"></i>
                            </button>

                            @if (IsGranted(AppPermissions.Pages_Tenant_PhoneBook_DeletePerson))
                            {
                                <button title="@L("Delete", person.Name)" class="btn btn-circle btn-icon-only red delete-person" href="javascript:;">
                                    <i class="icon-trash"></i>
                                </button>
                            }
                        </span>
                    </h4>
                    <p class="list-group-item-text">
                        @person.EmailAddress
                    </p>
                    <div class="table-scrollable table-phones">
                        <table class="table table-hover">
                            <thead>
                                <tr>
                                    <th style="width:10%"></th>
                                    <th style="width:15%">@L("Type")</th>
                                    <th style="width:75%">@L("PhoneNumber")</th>
                                </tr>
                            </thead>
                            <tbody>
                                @foreach (var phone in person.Phones)
                                {
                                    @Html.Partial("_PhoneRowInPersonList", new PhoneRowInPersonListViewModel(phone))
                                }
                                <tr>
                                    <td>
                                        <button class="btn btn-sm green button-save-phone">
                                            <i class="fa fa-floppy-o"></i>
                                        </button>
                                    </td>
                                    <td>
                                        <select name="Type">
                                            <option value="0">@L("PhoneType_Mobile")</option>
                                            <option value="1">@L("PhoneType_Home")</option>
                                            <option value="2">@L("PhoneType_Business")</option>
                                        </select>
                                    </td>
                                    <td><input type="text" name="Number" /></td>
                                </tr>
                            </tbody>
                        </table>
                    </div>
                </a>
            }
        </div>
    </div>
</div>
我们针对每一个Person都添加了一个编辑按钮。然后为每个person添加了一个table用来显示该person的所有电话并允许添加电话。电话列表只有当我们点击了编辑按钮后才会显示,它是通过CSS和JS进行的实现(在后面我们会看见)。
这里有一个重要的思想,我们使用部分视图来显示电话信息,这样做是为了让这部分可以重用。因为我们在新建电话的时候会用到相同的部分视图。_PhoneRowInPersonList 如下所示:
@model MyCompanyName.AbpZeroTemplate.Web.Areas.Mpa.Models.PhoneBook.PhoneRowInPersonListViewModel
<tr data-phone-id="@Model.Phone.Id">
    <td>
        <button class="btn btn-sm default button-delete-phone">
            <i class="icon-trash"></i>
        </button>
    </td>
    <td>@Model.GetPhoneTypeAsString()</td>
    <td>@Model.Phone.Number</td>
</tr>
PhoneRowInPersonListViewModel 如下:
public class PhoneRowInPersonListViewModel
{
    public PhoneInPersonListDto Phone { get; set; }
    public PhoneRowInPersonListViewModel(PhoneInPersonListDto phone)
    {
        this.Phone = phone;
    }

    public string GetPhoneTypeAsString()
    {
        return LocalizationHelper.GetString("", "PhoneType_" + Phone.Type);
    }
}
样式
index.less修改如下:
#AllPeopleList {
    .list-group-item-heading {
        span.person-buttons {
            float: right;
        }
    }

    .table-phones{
        display: none;
    }

    .person-editing{
        background-color:#ccffcc;

        h4{
            font-weight:bold;
        }

        .table-phones{
            display:table;
        }
    }
}
脚本
添加以下代码至Index.js:
//Edit person button
$('#AllPeopleList button.edit-person').click(function (e) {
    e.preventDefault();

    var $listItem = $(this).closest('.list-group-item');

    $listItem
    .toggleClass('person-editing')
    .siblings().removeClass('person-editing');
});

//Save phone button
$('#AllPeopleList .button-save-phone').click(function (e) {
    e.preventDefault();

    var $phoneEditorRow = $(this).closest('tr');

    abp.ajax({
        url: abp.appPath + 'Mpa/PhoneBook/AddPhone',
        dataType: 'html',
        data: JSON.stringify({
            personId: $phoneEditorRow.closest('.list-group-item').attr('data-person-id'),
            Type: $phoneEditorRow.find('select[name=Type]').val(),
            Number: $phoneEditorRow.find('input[name=Number]').val()
        })
    }).done(function (result) {
        $(result).insertBefore($phoneEditorRow);
    });
});

//Delete phone button
$('#AllPeopleList').on('click', '.button-delete-phone', function (e) {
    e.preventDefault();

    var $phoneRow = $(this).closest('tr');
    var phoneId = $phoneRow.attr('data-phone-id');

    _personService.deletePerson({
        id:phoneId
    }).done(function () {
        abp.notify.success(app.localize('SuccessfullyDeleted'));
        $phoneRow.remove();
    });
});
当点击修改按钮时,我们通过CSS来控制电话信息的展开和收缩。
在保存按钮的点击事件里,我们 向PhoneBookController的 AddPhone action提交了一个Ajax请求。服务端返回一个插入新号码的HTML,这就是为什么我们使用部分页的原因。
最后,当我们点击删除按钮后会删除该电话信息并在DOM中删除该行。注意这里的事件注册,我们使用了JQuery的On方法,选择器变为激活状态。这意味着,如果我们加入新的元素到页面并且任一元素和选择器匹配,那它的Click事件将被自动绑定。
ADDPHONE ACTION
我们向 PhoneController 添加AddPhone Action:
[HttpPost]
public async Task<PartialViewResult> AddPhone(AddPhoneInput input)
{
    PhoneInPersonListDto phoneInPersonList = await this._personAppService.AddPhone(input);
    var model = new PhoneRowInPersonListViewModel(phoneInPersonList);

    return PartialView("_PhoneRowInPersonList", model);
}使用PersonAppService.AddPhone并且返回_PhoneRowInPersonList 的部分视图。因此,我们直接将返回值插入到表中。示例返回值如下所示:
<tr data-phone-id="5">
    <td>
        <button class="btn btn-sm default button-delete-phone">
            <i class="icon-trash"></i>
        </button>
    </td>
    <td>手机</td>
    <td>33443344</td>
</tr>
如你所见,这可以直接插入到table中,就像我们已经做的那样。


 87
87


 被折叠的 条评论
为什么被折叠?
被折叠的 条评论
为什么被折叠?
 到【灌水乐园】发言


