


转载请标明出处:
http://blog.csdn.net/android_it/article/details/51140609
本文出自:【老甩哥的CSDN博客】
上一篇我们说到的逐帧动画和补间动画,这篇我们着重说下属性动画:
Android 3.0版本开始,系统给我们提供了一种全新的动画模式,属性动画(property animation),它的功能非常强大,弥补了之前补间动画的一些缺陷,几乎是可以完全替代掉补间动画了。
先看下面两幅动画:

上面两幅动画就是通过属性动画做出来的,是不是比较炫呢!不仅有显示,也有交互点击事件。下面我们一步一步的进行讲解属性动画的一些对象和方法:
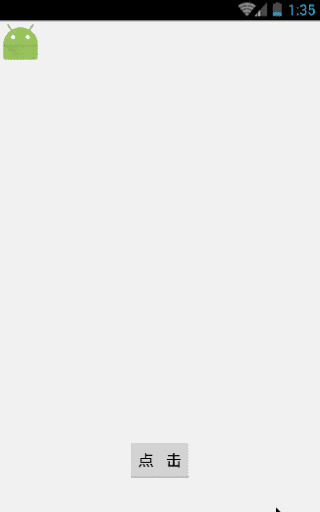
首先创建一个布局activity_property文件:
<?xml version="1.0" encoding="utf-8"?>
<RelativeLayout xmlns:android="http://schemas.android.com/apk/res/android"
    android:layout_width="match_parent"
    android:layout_height="match_parent"
    android:background="#ececec">

    <ImageView
        android:id="@+id/imageProperty"
        android:layout_width="wrap_content"
        android:layout_height="wrap_content"
        android:src="@mipmap/ic_launcher"/>
    <Button
        android:id="@+id/propertyStartBtn"
        android:layout_width="wrap_content"
        android:layout_height="wrap_content"
        android:text="点   击"
        android:layout_alignParentBottom="true"
        android:layout_centerHorizontal="true"
        android:layout_marginBottom="100dp" />
</RelativeLayout>
一:ObjectAnimator对象介绍,在PropretyActivity里面我们来看下属性动画效果
package com.fshsoft.AnimatorDemo;

import android.animation.ObjectAnimator;
import android.app.Activity;
import android.os.Bundle;
import android.view.View;
import android.widget.Button;
import android.widget.ImageView;
import android.widget.Toast;

/**
 * 属性动画
 */
public class PropertyActivity extends Activity implements View.OnClickListener {
    private ImageView imageProperty;
    private Button propertyStartBtn;
    @Override
    protected void onCreate(Bundle savedInstanceState) {
        super.onCreate(savedInstanceState);
        setContentView(R.layout.activity_property);
        imageProperty = (ImageView) findViewById(R.id.imageProperty);
        propertyStartBtn = (Button) findViewById(R.id.propertyStartBtn);
        imageProperty.setOnClickListener(this);
        propertyStartBtn.setOnClickListener(this);
    }

    @Override
    public void onClick(View v) {
        switch (v.getId()){
            case R.id.imageProperty:
                Toast.makeText(this,"图片点击事件",Toast.LENGTH_SHORT).show();
                break;
            case R.id.propertyStartBtn:
                //通过ObjectAnimator对象让动画在x轴移动
                ObjectAnimator.ofFloat(imageProperty,"translationX",0F,400F).setDuration(1000).start();
                break;
            default:
                break;
        }
    }
}
运行效果:
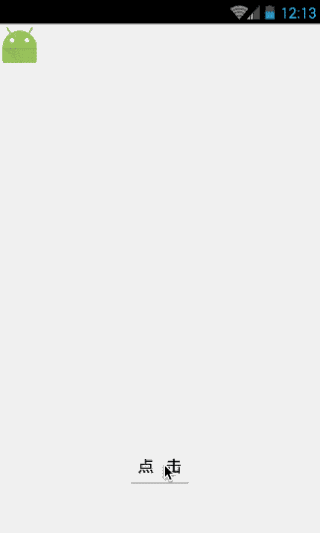
属性动画,只需要上面的一句话就可以实现,图片移动之后,点击图片有相应的事件,可以进行交互的操作。
接下来继续在onClick()里面添加动画:
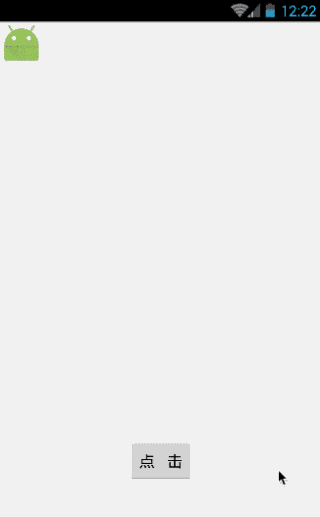
//通过ObjectAnimator对象让动画在x轴移动
ObjectAnimator.ofFloat(imageProperty,"translationX",0F,400F).setDuration(1000).start();
//通过ObjectAnimator对象让动画在Y轴移动
ObjectAnimator.ofFloat(imageProperty,"translationY",0F,400F).setDuration(1000).start();
//通过ObjectAnimator对象让动画旋转360度
ObjectAnimator.ofFloat(imageProperty,"rotation",0F,360F).setDuration(1000).start();
运行效果:
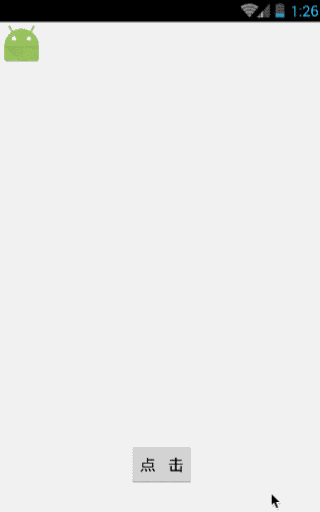
二:我们还可以使用PropertyValuesHolder来实现相同的效果
PropertyValuesHolder p1 = PropertyValuesHolder.ofFloat("translationX",0F,400F);
PropertyValuesHolder p2 = PropertyValuesHolder.ofFloat("translationY",0F,400F);
PropertyValuesHolder p3 = PropertyValuesHolder.ofFloat("rotation",0F,360F);
ObjectAnimator.ofPropertyValuesHolder(imageProperty,p1,p2,p3).setDuration(1000).start();
运行效果是一样的,但是它的好处在于提高效率,优化系统资源。
三:下面我们继续来看AnimatorSet,利用这个对象,我们同样可以实现上面的效果:
ObjectAnimator animator1 =  ObjectAnimator.ofFloat(imageProperty,"translationX",0F,400F);
ObjectAnimator animator2 =  ObjectAnimator.ofFloat(imageProperty,"translationY",0F,400F);
ObjectAnimator animator3 =  ObjectAnimator.ofFloat(imageProperty,"rotation",0F,360F);
AnimatorSet set = new AnimatorSet();
set.playTogether(animator1,animator2,animator3);
set.setDuration(1000);
set.start();
AnimatorSet给我们提供了更多的方法,set.playTogether();三个同时进行展示动画,我们更改一下代码:
//set.playTogether(animator1,animator2,animator3);
set.playSequentially(animator1,animator2,animator3);
set.playSequentially()是按照先后顺序依次展示动画,效果如下:
接下来,我们想让图片同时在x轴和y轴上运动,然后在旋转,该怎么做呢?
//set.playTogether(animator1,animator2,animator3);
//set.playSequentially(animator1,animator2,animator3);
set.play(animator1).with(animator2);
set.play(animator3).after(animator2);
根据字面的意思很显然用了play().with()这个是同时进行的,
然后再根据play().after()做了剩下的操作
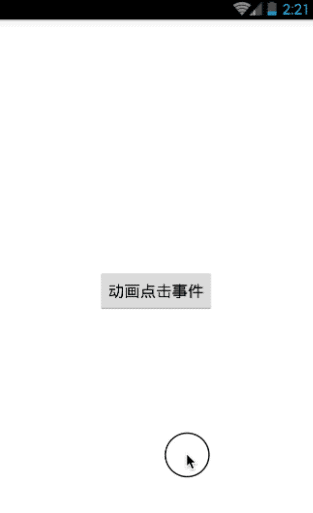
四:属性动画的点击事件介绍
创建一个activity_click.xml布局
<?xml version="1.0" encoding="utf-8"?>
<RelativeLayout xmlns:android="http://schemas.android.com/apk/res/android"
    android:layout_width="match_parent"
    android:layout_height="match_parent">
    <Button
        android:id="@+id/clickBtn"
        android:layout_width="wrap_content"
        android:layout_height="wrap_content"
        android:text="动画点击事件"
        android:layout_centerInParent="true"/>
</RelativeLayout>
然后在ClickActivity里面:我们通过对ObjectAnimator设置监听事件addListener(new Animator.AnimatorListener(){}然后重写四个方法,onAnimationEnd()这个方法里面我写了一个Toast,表示动画结束之后填出对话框信息
package com.fshsoft.AnimatorDemo;

import android.animation.Animator;
import android.animation.ObjectAnimator;
import android.app.Activity;
import android.os.Bundle;
import android.view.View;
import android.widget.Button;
import android.widget.Toast;

public class ClickActivity extends Activity implements View.OnClickListener {
    private Button clickBtn;
    @Override
    protected void onCreate(Bundle savedInstanceState) {
        super.onCreate(savedInstanceState);
        setContentView(R.layout.activity_click);
        clickBtn = (Button) findViewById(R.id.clickBtn);
        clickBtn.setOnClickListener(this);
    }

    @Override
    public void onClick(View v) {
        //设置透明度动画效果
        ObjectAnimator animator = ObjectAnimator.ofFloat(clickBtn,"alpha",0F,1F);
        animator.setDuration(1000);
        animator.addListener(new Animator.AnimatorListener() {
            @Override
            public void onAnimationStart(Animator animation) {

            }

            @Override
            public void onAnimationEnd(Animator animation) {
                Toast.makeText(ClickActivity.this,"动画结束显示信息",Toast.LENGTH_SHORT).show();
            }

            @Override
            public void onAnimationCancel(Animator animation) {

            }

            @Override
            public void onAnimationRepeat(Animator animation) {

            }
        });
        animator.start();
    }
}
运行如下:
一般情况下我们使用onAnimationEnd()这个比较多,就是动画结束之后弹出Toast,所以我们谷歌给我们提供了AnimatorListenerAdapter(),选择性的添加重写的方法,同样可以实现相同的效果
  animator.addListener(new AnimatorListenerAdapter() {
            @Override
            public void onAnimationEnd(Animator animation) {
                super.onAnimationEnd(animation);
                Toast.makeText(ClickActivity.this,"动画结束显示信息",Toast.LENGTH_SHORT).show();
            }
        });
五:ValueAnimator的介绍
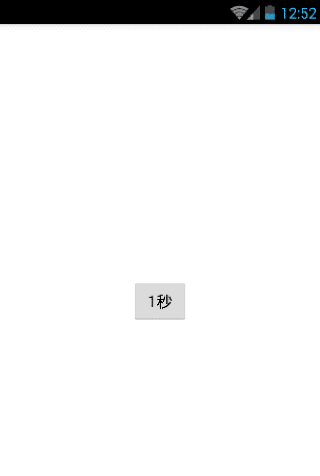
首先我们先看个倒计时的例子:
继续用代码展示:很简单的一个布局activity_demo2.xml
<?xml version="1.0" encoding="utf-8"?>
<RelativeLayout xmlns:android="http://schemas.android.com/apk/res/android"
    android:layout_width="match_parent"
    android:layout_height="match_parent">
    <Button
        android:id="@+id/demo2StartBtn"
        android:layout_width="wrap_content"
        android:layout_height="wrap_content"
        android:layout_centerHorizontal="true"
        android:layout_centerVertical="true"
        android:text="计时器动画" />
</RelativeLayout>
Demo2Activity代码展示:通过ValueAnimator.ofInt(0,60);得到ValueAnimator对象,然后添加addUpdateListener监听事件
package com.fshsoft.AnimatorDemo;

import android.animation.ValueAnimator;
import android.app.Activity;
import android.os.Bundle;
import android.view.View;
import android.widget.Button;

/**
 * 倒计时60秒动画效果
 */
public class Demo2Activity extends Activity implements View.OnClickListener {
    private Button demo2StartBtn;
    @Override
    protected void onCreate(Bundle savedInstanceState) {
        super.onCreate(savedInstanceState);
        setContentView(R.layout.activity_demo2);
        demo2StartBtn = (Button) findViewById(R.id.demo2StartBtn);
        demo2StartBtn.setOnClickListener(this);
    }

    @Override
    public void onClick(View v) {
        //倒计时60秒动画效果
        ValueAnimator animator = ValueAnimator.ofInt(0,60);
        animator.setDuration(60000);
        animator.addUpdateListener(new ValueAnimator.AnimatorUpdateListener() {
            @Override
            public void onAnimationUpdate(ValueAnimator animation) {
                Integer value = (Integer) animation.getAnimatedValue();
                demo2StartBtn.setText(value+"秒");
            }
        });
        animator.start();
    }
}
运行效果:
通过上面我们可以看到ValueAnimator.ofInt()方法;除此还有ValueAnimator.ofFloat()方法和 ValueAnimator.ofObject()方法;
前面两个很简单,我们主要再看下 ValueAnimator.ofObject()方法;
ValueAnimator.ofObject()是用于对任意对象进行动画操作的。但是相比于浮点型或整型数据,对象的动画操作明显要更复杂一些,因为系统将完全无法知道如何从初始对象过度到结束对象,因此这个时候我们就需要实现一个自己的TypeEvaluator来告知系统如何进行过度,现在我们来看一下系统里面的FloatEvaluator的代码实现:
public class FloatEvaluator implements TypeEvaluator {
    public Object evaluate(float fraction, Object startValue, Object endValue) {
        float startFloat = ((Number) startValue).floatValue();
        return startFloat + fraction * (((Number) endValue).floatValue() - startFloat);
    }
}
根据上面的源码,FloatEvaluator实现了TypeEvaluator接口,然后重写evaluate()方法。evaluate()方法当中传入了三个参数,第一个参数fraction表示动画的完成度的,我们应该根据它来计算当前动画的值应该是多少,第二第三个参数分别表示动画的初始值和结束值。那么上述代码的逻辑就比较清晰了,用结束值减去初始值,算出它们之间的差值,然后乘以fraction这个系数,再加上初始值,那么就得到当前动画的值了。乘热打铁,我们就写个自定义的PointEvaluator:
package com.fshsoft.AnimatorDemo;

import android.animation.TypeEvaluator;

public class PointEvaluator implements TypeEvaluator<Point> {
    @Override
    public Point evaluate(float fraction, Point startValue, Point endValue) {
        float x = startValue.getX() + fraction * (endValue.getX() - startValue.getX());
        float y = startValue.getY() + fraction * (endValue.getY() - startValue.getY());
        Point point = new Point(x, y);
        return point;
    }
}
从上面我们看到TypeEvaluator后面加个point泛型,这样子我们在重写的方法里面就不要强制转换了
下面来先定义一个Point类,如下所示:
package com.fshsoft.AnimatorDemo;

public class Point {
    private float x;
    private float y;

    public Point(float x, float y) {
        this.x = x;
        this.y = y;
    }

    public float getX() {
        return x;
    }

    public float getY() {
        return y;
    }
}
Point类非常简单,只有x和y两个变量用于记录坐标的位置,并提供了构造方法来设置坐标,以及get方法来获取坐标。
最后通过:接下来我们就可以对Point对象进行动画操作了,比如说我们有两个Point对象,现在需要将Point1通过动画平滑到Point2,就可以这样写:
Point point1 = new Point(0, 0);
Point point2 = new Point(400, 400);
ValueAnimator anim = ValueAnimator.ofObject(new PointEvaluator(), point1, point2);
anim.setDuration(1000);
anim.start();
这就是自定义TypeEvaluator的全部用法。既然学了这些,我们就会迫不及待的去自定义一个View了!
首先让AnimView继承自View,我直接展示代码:
package com.fshsoft.AnimatorDemo;

import android.animation.ValueAnimator;
import android.content.Context;
import android.graphics.Canvas;
import android.graphics.Color;
import android.graphics.Paint;
import android.util.AttributeSet;
import android.view.View;

public class AnimView extends View{

    public static final float RADIUS = 60f;
    private Point currentPoint;
    private Paint mPaint;

    public AnimView(Context context, AttributeSet attrs) {
        super(context, attrs);
        mPaint = new Paint(Paint.ANTI_ALIAS_FLAG);
        mPaint.setColor(Color.RED);
    }

    @Override
    protected void onDraw(Canvas canvas) {
        super.onDraw(canvas);
        if(currentPoint==null){
            currentPoint = new Point(RADIUS,RADIUS);
            drawCircle(canvas);
            startAnimator();
        }else {
            drawCircle(canvas);
        }
    }

    private void drawCircle(Canvas canvas) {
        float x = currentPoint.getX();
        float y = currentPoint.getY();
        canvas.drawCircle(x, y, RADIUS, mPaint);
    }

    private void startAnimator() {
        Point startPoint = new Point(RADIUS, RADIUS);
        Point endPoint = new Point(getWidth() - RADIUS, getHeight() - RADIUS);
        ValueAnimator anim = ValueAnimator.ofObject(new PointEvaluator(), startPoint, endPoint);
        anim.addUpdateListener(new ValueAnimator.AnimatorUpdateListener() {
            @Override
            public void onAnimationUpdate(ValueAnimator animation) {
                currentPoint = (Point) animation.getAnimatedValue();
                invalidate();
            }
        });
        anim.setDuration(3000);
        anim.start();
    }
}
<?xml version="1.0" encoding="utf-8"?>
<RelativeLayout xmlns:android="http://schemas.android.com/apk/res/android"
    android:layout_width="match_parent"
    android:layout_height="match_parent">

    <com.fshsoft.AnimatorDemo.AnimView
        android:layout_width="wrap_content"
        android:layout_height="wrap_content"
        android:id="@+id/anim_view"/>
</RelativeLayout>
运行效果:
通过上面的学习,我们是不是已经掌握了属性动画呢?现在你能做出文章最上面的两幅动画了吗?
如果可以的话,你们可以自己手动试试!
如有不足之处,欢迎大家留言指正!谢谢!


 109
109

 被折叠的 条评论
为什么被折叠?
被折叠的 条评论
为什么被折叠?
 到【灌水乐园】发言


