


 本文详细介绍如何使用Maven从零开始搭建SpringMVC+Mybatis项目,涵盖项目初始化、数据库操作及测试验证等关键步骤。
技术发展日新月异,许多曾经拥有霸主地位的流行技术短短几年间已被新兴技术所取代。
在Java的世界中,框架之争可能比语言本身的改变更让人关注。近几年,SpringMVC凭借简单轻便、开发效率高、与Spring框架无缝整合等特点,逐渐击败前辈Struts/Struts2,成为最常用的Web框架。而Mybatis相对于Hibernate,同样具有开发简单、效率高的优势,而且对SQL的可控性更好,有利于性能调优,逐渐也积累了挑战Hibernate的实力和人气。
当前SpringMVC+Mybatis已经成为最流行的框架组合之一。
好的框架可以帮我们简化开发,但实际的工作中还有大量的时间是花在编译、测试、打包、部署等构建工作上,即使IDE变得越来越强大,但这些工作仍然需要我们一步一步去操作,而不能变成自动化的流水线作业。每天、每个项目重复这些步骤是毫无意义的,所以我们需要构建工具的帮助。构建工具的可选择性并不是很多,Maven是目前是主流的选择,它可以帮助开发者自动化构建、标准化结构、管理依赖等,极大的提高代码以外的工作效率。
Maven、SpringMVC、Mybatis的组合优雅而强大,但对于初学者来说,把三者整合在一起并不是一件简单的事。本文对这一复杂过程做拆解,从最基础的步骤开始,一步步搭建起一个支持增、删、改、分页查询的Web项目。
本文以Eclipse为开发工具,并需要安装好Maven及Maven Integration for Eclipse插件,数据库使用MySQL。
如果没有安装过Maven可以参考:
http://blog.csdn.net/autfish/article/details/51008788
下面正式开始。
打开Eclipse,依次点击 File -> New -> Maven Project
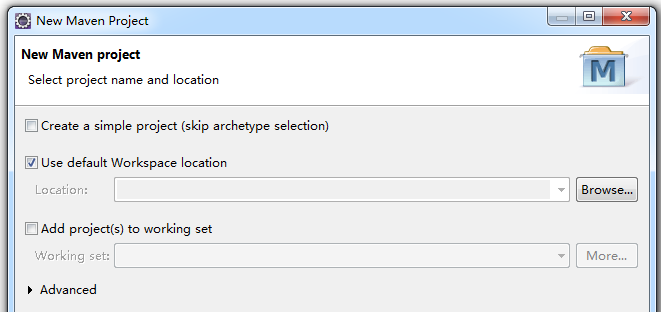
这一步不做任何修改,直接下一步
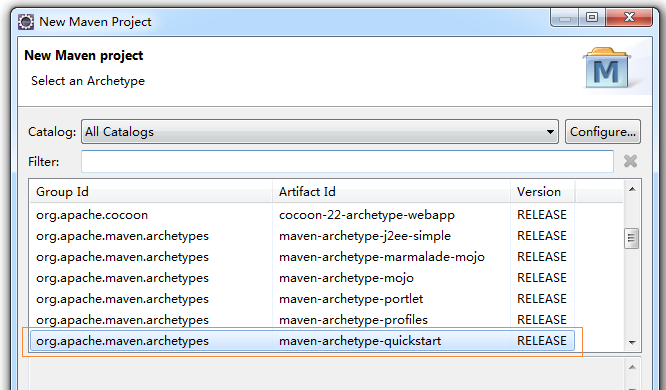
接下来是选择Archetype。Maven提倡约定优于配置,对于源代码目录结构、配置文件位置、测试用户目录等内容都有既定的规则。遵循这些规则的好处就是不同开发者建立的项目结构是一致的,减少了在加入新项目时额外的熟悉和学习成本。
Maven内置的多种archetype可以针对不同类型的项目帮助开发者迅速勾勒出项目的骨架,例如Web项目可以选择maven-archetype-webapp,自动建立的目录中包括webapp等。这里从最基础的开始,选择maven-archetype-quickstart,其他选项保持不变,点击下一步。
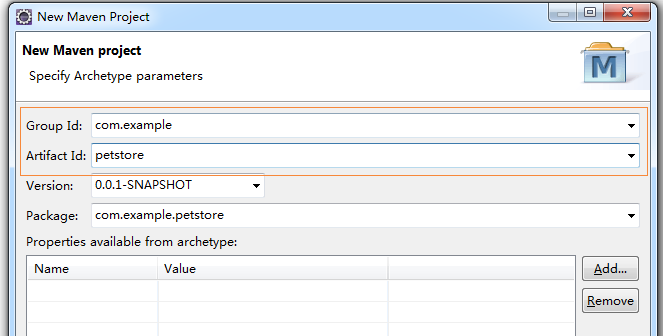
这一步中填写项目的基本信息。Group Id和Artifact Id用于标注项目或模块的坐标,Maven的一大功能是管理依赖(jar包),Maven的中央仓库中有成千上万的的开源项目,在仓库中找到所需的项目文件就需要给每个项目分配一个唯一的标识。Group Id用于定义当前的项目,每个项目下按功能可能划分多个模块,Artifact Id定义具体的模块。例如Spring项目的Group Id是org.springframework,其下面划分了Artifact Id为spring-core、spring-context、spring-jdbc等多个模块。
输入Group Id和Artifact Id后点击完成。完成后生成的项目结构如下:

默认生成了src/main和src/test两个文件夹,根据约定,main放置项目源代码,test目录放置测试用例。默认还生成了两个演示文件(App.java和AppTest.java)可以直接删除。
本例中我们使用Mybatis操作MySQL数据库,并使用Spring集成,这些都需要添加依赖,即jar包。借助Maven,开发者不再需要去各个网站下载文件,而只需要配置pom.xml即可。打开pom.xml,默认代码如下:
<project xmlns="http://maven.apache.org/POM/4.0.0" xmlns:xsi="http://www.w3.org/2001/XMLSchema-instance"
	xsi:schemaLocation="http://maven.apache.org/POM/4.0.0 http://maven.apache.org/xsd/maven-4.0.0.xsd">
	<modelVersion>4.0.0</modelVersion>

	<groupId>com.example</groupId>
	<artifactId>petstore</artifactId>
	<version>0.0.1-SNAPSHOT</version>
	<packaging>jar</packaging>

	<name>petstore</name>
	<url>http://maven.apache.org</url>

	<properties>
		<project.build.sourceEncoding>UTF-8</project.build.sourceEncoding>
	</properties>

	<dependencies>
		<dependency>
			<groupId>junit</groupId>
			<artifactId>junit</artifactId>
			<version>3.8.1</version>
			<scope>test</scope>
		</dependency>
	</dependencies>
</project>...
<properties>
<project.build.sourceEncoding>UTF-8</project.build.sourceEncoding>
<springframework.version>4.2.6.RELEASE</springframework.version>
</properties>
<dependencies>
<dependency>
<groupId>junit</groupId>
<artifactId>junit</artifactId>
<version>4.12</version>
<scope>test</scope>
</dependency>
<dependency>
<groupId>org.springframework</groupId>
<artifactId>spring-test</artifactId>
<version>${springframework.version}</version>
<scope>test</scope>
</dependency>
<dependency>
<groupId>org.springframework</groupId>
<artifactId>spring-core</artifactId>
<version>${springframework.version}</version>
</dependency>
<dependency>
<groupId>org.springframework</groupId>
<artifactId>spring-context</artifactId>
<version>${springframework.version}</version>
</dependency>
<dependency>
<groupId>org.springframework</groupId>
<artifactId>spring-beans</artifactId>
<version>${springframework.version}</version>
</dependency>
<dependency>
<groupId>org.springframework</groupId>
<artifactId>spring-jdbc</artifactId>
<version>${springframework.version}</version>
</dependency>
<dependency>
<groupId>c3p0</groupId>
<artifactId>c3p0</artifactId>
<version>0.9.1.2</version>
</dependency>
<dependency>
<groupId>org.mybatis</groupId>
<artifactId>mybatis</artifactId>
<version>3.4.1</version>
</dependency>
<dependency>
<groupId>org.mybatis</groupId>
<artifactId>mybatis-spring</artifactId>
<version>1.3.0</version>
</dependency>
<dependency>
<groupId>mysql</groupId>
<artifactId>mysql-connector-java</artifactId>
<version>5.1.18</version>
</dependency>
</dependencies>
</project>注意这里使用了一个小技巧,spring有多个模块且使用相同的版本号,所以设置了一个<springframework.version>属性常量,如果需要修改版本只需要修改此处常量值即可。
至此Maven配置完成,下面开始Mybatis部分。
本例中要实现的功能很简单,基于关系型数据库对某种商品做插入和查询的管理,商品仅有名称和价格两个属性。首先准备好数据库。
建库:
CREATE SCHEMA `petstore` DEFAULT CHARACTER SET utf8 COLLATE utf8_bin ;CREATE TABLE `petstore`.`t_product` (
`p_id` INT NOT NULL AUTO_INCREMENT,
`p_name` VARCHAR(45) NOT NULL,
`p_price` FLOAT NOT NULL,
PRIMARY KEY (`p_id`))
ENGINE = InnoDB
DEFAULT CHARACTER SET = utf8;Product.java - 映射实体类
ProductMapper.java - 接口,定义可调用的方法
Product.xml - 实际执行的SQL映射文件
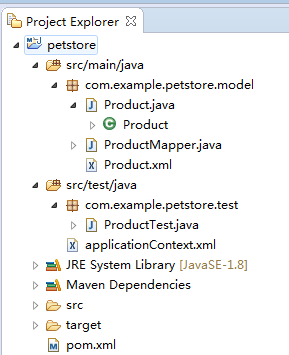
添加代码文件后的目录结构如下:

三个文件的代码如下:
Product.java
package com.example.petstore.model;

public class Product {

	private int id;
	private String name;
	private float price;

	public int getId() {
		return id;
	}
	public void setId(int id) {
		this.id = id;
	}
	public String getName() {
		return name;
	}
	public void setName(String name) {
		this.name = name;
	}
	public float getPrice() {
		return price;
	}
	public void setPrice(float price) {
		this.price = price;
	}
}package com.example.petstore.model;
public interface ProductMapper {
void addProduct(Product product);
Product selectById(int id);
}
<?xml version="1.0" encoding="UTF-8"?>
<!DOCTYPE mapper PUBLIC "-//mybatis.org//DTD Mapper 3.0//EN" "http://mybatis.org/dtd/mybatis-3-mapper.dtd">
<mapper namespace="com.example.petstore.model.ProductMapper">

	<resultMap type="com.example.petstore.model.Product" id="productMap">
		<id column="p_id" property="id" />
		<result column="p_name" property="name" />
		<result column="p_price" property="price" />
	</resultMap>

	<insert id="addProduct" parameterType="com.example.petstore.model.Product" useGeneratedKeys="true" keyProperty="id">
		insert into t_product(p_name,p_price) values(#{name},#{price})
	</insert>

	<select id="selectById" parameterType="int" resultType="com.example.petstore.model.Product" resultMap="productMap">
		select * from t_product where p_id=#{id}
	</select>
</mapper>代码中并没有生成ProductMapper的实现类,而是在运行期间动态创建代理类来完成实例化。
到这里Mybatis代码就开发完成了,但是我们还想知道这些代码是否可以正常工作,需要编写一些测试用例。
如果仅使用Mybatis(而不使用Spring),那么还要添加Mybatis配置文件设置数据库连接等,但这里不打算这么做,而是用Spring接管,所以接下来的代码是Spring核心配置文件applicationContext.xml。注意这里是用于测试,所以文件将添加在src/test/java目录。
applicationContext.xml
<?xml version="1.0" encoding="UTF-8"?>
<beans xmlns="http://www.springframework.org/schema/beans"
    xmlns:xsi="http://www.w3.org/2001/XMLSchema-instance" xmlns:aop="http://www.springframework.org/schema/aop"
    xmlns:tx="http://www.springframework.org/schema/tx" xmlns:jdbc="http://www.springframework.org/schema/jdbc"
    xmlns:context="http://www.springframework.org/schema/context"
    xsi:schemaLocation="
     http://www.springframework.org/schema/context http://www.springframework.org/schema/context/spring-context-3.0.xsd
     http://www.springframework.org/schema/beans http://www.springframework.org/schema/beans/spring-beans-3.0.xsd
     http://www.springframework.org/schema/jdbc http://www.springframework.org/schema/jdbc/spring-jdbc-3.0.xsd
     http://www.springframework.org/schema/tx http://www.springframework.org/schema/tx/spring-tx-3.0.xsd
     http://www.springframework.org/schema/aop http://www.springframework.org/schema/aop/spring-aop-3.0.xsd">

	<bean id="dataSource" class="com.mchange.v2.c3p0.ComboPooledDataSource"
		destroy-method="close">
		<property name="driverClass" value="com.mysql.jdbc.Driver" />
		<property name="jdbcUrl" value="jdbc:mysql://localhost:3306/petstore?useUnicode=true&characterEncoding=UTF8" />
		<property name="user" value="root" />
		<property name="password" value="root123456" />
		<property name="minPoolSize" value="2" />
		<property name="maxPoolSize" value="10" />
	</bean>

	<bean id="sqlSessionFactory" class="org.mybatis.spring.SqlSessionFactoryBean">
		<property name="dataSource" ref="dataSource" />
		<property name="mapperLocations" value="classpath*:com/example/petstore/model/*.xml" />
	</bean>

	<bean class="org.mybatis.spring.mapper.MapperScannerConfigurer">
		<property name="basePackage" value="com.example.petstore.model" />
	</bean>
</beans>
其中,数据库的连接串及用户名、密码是我的测试机的设置,你需要按你的环境进行修改。
然后是测试用例,在src/test/java下添加类com.example.petstore.test.ProductTest.javapackage com.example.petstore.test;
import static org.junit.Assert.*;
import org.junit.Test;
import org.junit.runner.RunWith;
import org.springframework.beans.factory.annotation.Autowired;
import org.springframework.test.context.ContextConfiguration;
import org.springframework.test.context.junit4.SpringJUnit4ClassRunner;
import com.example.petstore.model.Product;
import com.example.petstore.model.ProductMapper;
@RunWith(SpringJUnit4ClassRunner.class)
@ContextConfiguration(locations = "classpath:applicationContext.xml")
public class ProductTest {
@Autowired
private ProductMapper productMapper;
@Test
public void insertAndSelect() {
Product product1 = new Product();
product1.setName("tom");
product1.setPrice(99.9f);
productMapper.addProduct(product1);
assertTrue(product1.getId() > 0);
Product product2 = productMapper.selectById(product1.getId());
assertTrue(product2.getId() == product1.getId());
assertTrue(product2.getName().equals(product1.getName()));
}
}
运行一下看看,在ProductTest.java上点右键 -> Run As -> Junit Test

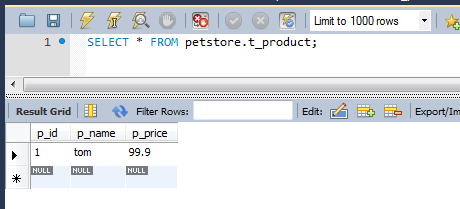
测试通过,来看一下数据库里的内容:
总结
上述示例中完成了通过Maven创建简单项目、对数据库表的插入和读取操作,尽管没什么实用性,但也能够了解到了Mybatis的基本用法及与Spring的集成方式。
项目以jar包形式打包发布,这样做有利于代码复用,但是显然无法再增加Web部分的内容。传统的做法是另建一个Web项目并引用此项目,但我们接下来将使用Maven的聚合和继承功能构建包括一个数据库持久层模块和一个基于SpringMVC的Web模块的聚合项目,这些内容在下一节中介绍。
从头开始基于Maven搭建SpringMVC+Mybatis项目(1)
从头开始基于Maven搭建SpringMVC+Mybatis项目(2)
从头开始基于Maven搭建SpringMVC+Mybatis项目(3)
从头开始基于Maven搭建SpringMVC+Mybatis项目(4)


 939
939

 被折叠的 条评论
为什么被折叠?
被折叠的 条评论
为什么被折叠?
 到【灌水乐园】发言


