


include标签使用
项目中总会有很多布局是可以重复利用的,当我们一个布局反复的写很多次无疑是很傻的,也非常不利于管理,容易造成代码混乱。在xml中include标签就是为了xml布局文件的复用打造的。
<?xml version="1.0" encoding="utf-8"?>
<LinearLayout xmlns:android="http://schemas.android.com/apk/res/android"
android:layout_width="match_parent"
android:layout_height="match_parent"
android:background="#1c1c1c"
android:orientation="vertical">
<TextView
android:layout_width="wrap_content"
android:layout_height="wrap_content"
android:text="TextView1"
android:layout_margin="8dp"
android:textColor="#ffff00" />
<Button
android:layout_width="wrap_content"
android:layout_height="wrap_content"
android:text="Button" />
<TextView
android:layout_width="wrap_content"
android:layout_height="wrap_content"
android:layout_margin="8dp"
android:text="TextView2"
android:textColor="#ffff00" />
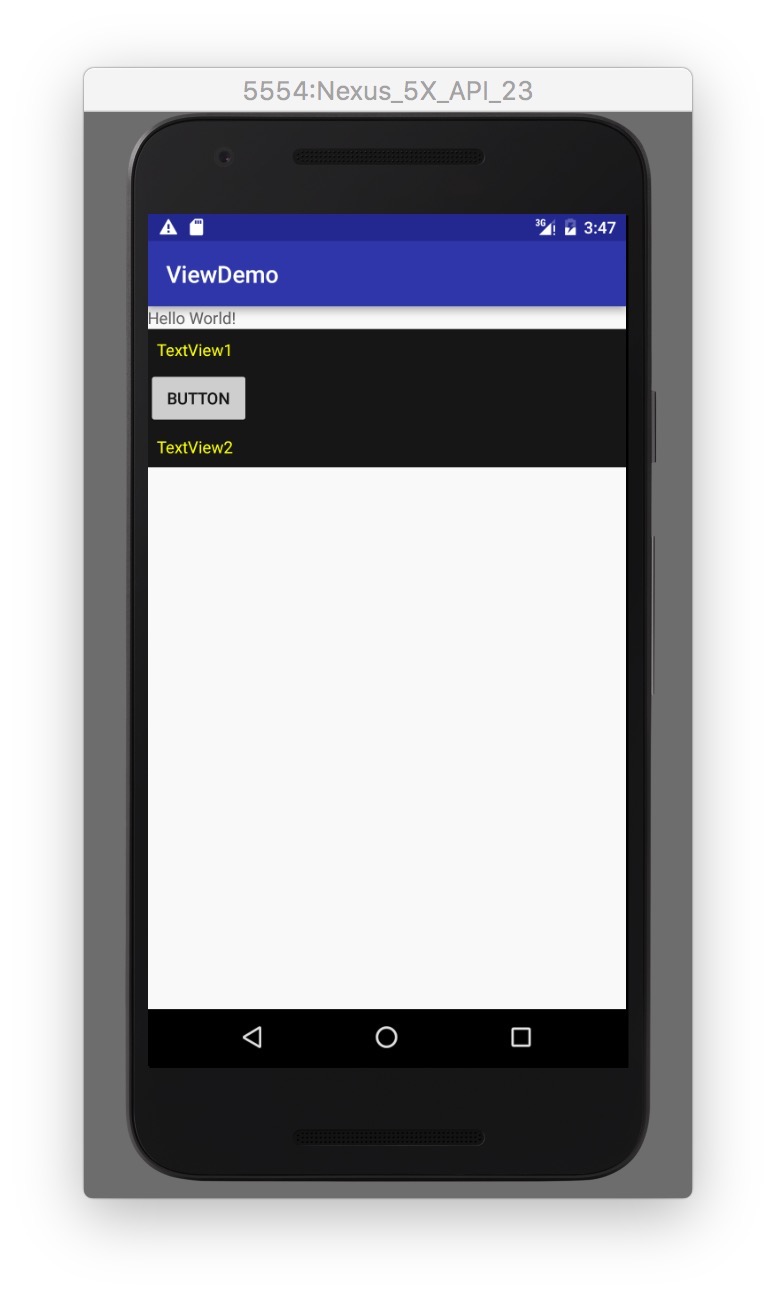
</LinearLayout>这是一段简单的xml代码,如果我们需要在多个布局中复用这个布局,只需要使用include标签即可。
<?xml version="1.0" encoding="utf-8"?>
<LinearLayout xmlns:android="http://schemas.android.com/apk/res/android"
    xmlns:tools="http://schemas.android.com/tools"
    android:layout_width="match_parent"
    android:layout_height="match_parent"
    android:orientation="vertical"
    tools:context="com.example.caoxiao.viewdemo.MainActivity">

    <TextView
        android:layout_width="wrap_content"
        android:layout_height="wrap_content"
        android:text="Hello World!" />

    <include
        layout="@layout/title"
        android:layout_width="match_parent"
        android:layout_height="56dp"></include>

</LinearLayout>
效果如图
include标签只支持android:layout_开头的属性,比如android:layout_width和android:layout_height。需要注意的是如果指定android:layout开头的属性,就必须指定android:layout_height和android:layout_width,否则其他属性无法生效。指定后的属性会覆盖引用的布局文件中的属性。下面是例子。
<include
        layout="@layout/title"
        android:layout_width="match_parent"
        android:layout_height="56dp"></include>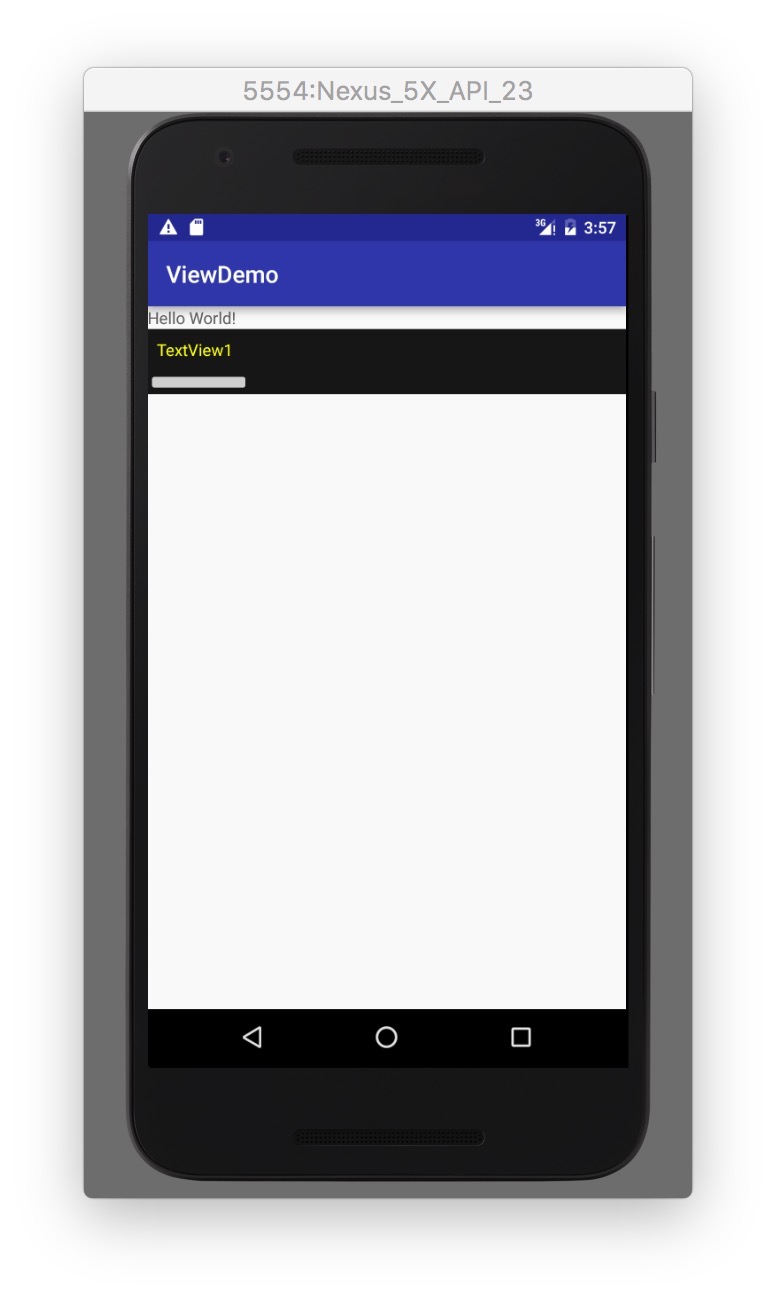
merge标签使用
Layout层次越多,measure过程越复杂,View的绘制就会越慢。当我们回顾上面的例子会发现,引用的include布局中多了一层没有必要的LinearLayout布局嵌套。我们可以使用hierarchyviewer工具来分析布局嵌套的性能问题。hierarchyviewer是android sdk 提供的工具,可以在sdk/tools中找到它并双击打开。

我们可以看到在红框内的LinearLayout下还有三个控件,因为两个布局都是LinearLayout而且都是android:orientation=”vertical”竖直方向排列的,所以include嵌套的LinearLayout是多余的一层。我们使用merge标签代替include标签。
<?xml version="1.0" encoding="utf-8"?>
<merge xmlns:android="http://schemas.android.com/apk/res/android"
    android:layout_width="match_parent"
    android:layout_height="match_parent"
    android:background="#1c1c1c"
    android:orientation="vertical">

    <TextView
        android:layout_width="wrap_content"
        android:layout_height="wrap_content"
        android:text="TextView1"
        android:layout_margin="8dp"
        android:textColor="#ffff00" />

    <Button
        android:layout_width="wrap_content"
        android:layout_height="wrap_content"
        android:text="Button" />

    <TextView
        android:layout_width="wrap_content"
        android:layout_height="wrap_content"
        android:layout_margin="8dp"
        android:text="TextView2"
        android:textColor="#ffff00" />

</merge>
重新运行后,在hierarchyviewer中可以看到

有效的减少了多余的一层布局,加快了UI渲染速度。
ViewStub使用
有时候有的布局我们只有在特殊情况下才去加载显示,例如网络错误后显示的控件。即使我们设置android:visibility=”gone”也依旧会解析这些元素。ViewStub相当于一个占位符,资源消耗很低,这时候就派上用场了。
<?xml version="1.0" encoding="utf-8"?>
<LinearLayout xmlns:android="http://schemas.android.com/apk/res/android"
    xmlns:tools="http://schemas.android.com/tools"
    android:layout_width="match_parent"
    android:layout_height="match_parent"
    android:orientation="vertical"
    tools:context="com.example.caoxiao.viewdemo.MainActivity">

    <TextView
        android:layout_width="wrap_content"
        android:layout_height="wrap_content"
        android:text="Hello World!" />

    <Button
        android:id="@+id/button"
        android:layout_width="wrap_content"
        android:layout_height="wrap_content"
        android:text="showViewStub"/>

    <ViewStub
        android:id="@+id/viewStub"
        android:layout="@layout/title"
        android:layout_width="match_parent"
        android:layout_height="wrap_content"></ViewStub>

</LinearLayout>
private Button button;
@Override
protected void onCreate(Bundle savedInstanceState) {
super.onCreate(savedInstanceState);
setContentView(R.layout.activity_main);
button = (Button) findViewById(R.id.button);
button.setOnClickListener(this);
}
@Override
public void onClick(View view) {
ViewStub viewStub = (ViewStub) findViewById(R.id.viewStub);
if (viewStub != null) {
View inflatedView = viewStub.inflate();
TextView tv1 = (TextView) inflatedView.findViewById(R.id.tv1);
String tv1Text = tv1.getText().toString();
if (!TextUtils.isEmpty(tv1Text)) {
Log.i("tv1Text", tv1Text);
}
}
}运行结果:I/tv1Text: helloViewStub
需要注意的是ViewStub嵌套的layout不能是merge的,否则会抛异常android.view.InflateException。也可以通过viewStub.setVisibility(View.VISIBLE);代替inflate。


 3047
3047

 被折叠的 条评论
为什么被折叠?
被折叠的 条评论
为什么被折叠?
 到【灌水乐园】发言


