


ProgressBar
作用:当应在后台执行时,前台界面不会有任何信息,这时用户根本不知道程序是否在执行,以及执
行进度等,因些需要使用进度条来提示程序执行的进度.在Android中进度条使用ProgressBar表
示.用于身用户显示某个耗时操作完成的百分比。
常用属性:
1. android:max 设置进度条的最大值
2. android:progress 用于指定进度条的已完成的进度值
3. android:progressDrawable 用于设置进度条的轨道绘制形式
对应get与set方法
Max:最大进度
setProgress()设置当前的进度,必须手动在代码中设置
做了UI处理,可以直接在UI子线程中处理
示例图如下:

public class MainActivity extends Activity {
@Override
protected void onCreate(Bundle savedInstanceState) {
super.onCreate(savedInstanceState);
setContentView(R.layout.activity_main);
final ProgressBar pb = (ProgressBar) findViewById(R.id.pb1);
final TextView tv = (TextView) findViewById(R.id.tv);
pb.setMax(200);
pb.setProgress(0);
new Thread() {
public void run() {
// 模拟耗时任务
int index = 0;
while (index++ < 200) {
try {
Thread.sleep((int) (Math.random() * 200));
} catch (InterruptedException e) {
e.printStackTrace();
}
// 修改值
// 做了UI的处理,所以直接可以再子线程中修改UI
pb.setProgress(index);
// 需要使用UI线程
runOnUiThread(new Runnable() {
@Override
public void run() {
tv.setText(pb.getProgress() + "/" + pb.getMax());
}
});
}
};
}.start();
}
}
//xml的配置
<RelativeLayout xmlns:android="http://schemas.android.com/apk/res/android"
xmlns:tools="http://schemas.android.com/tools"
android:layout_width="match_parent"
android:layout_height="match_parent"
tools:context="com.xykj.id05_10_10.MainActivity" >
<ProgressBar
android:id="@+id/pb1"
style="?android:attr/progressBarStyleHorizontal"
android:layout_width="match_parent"
android:layout_height="wrap_content"
android:layout_centerInParent="true"
android:layout_margin="10dp"/>
<TextView
android:id="@+id/tv"
android:layout_width="wrap_content"
android:layout_height="wrap_content"
android:layout_alignRight="@id/pb1"
android:layout_below="@id/pb1"
android:padding="10dp"
android:text="0/200" />
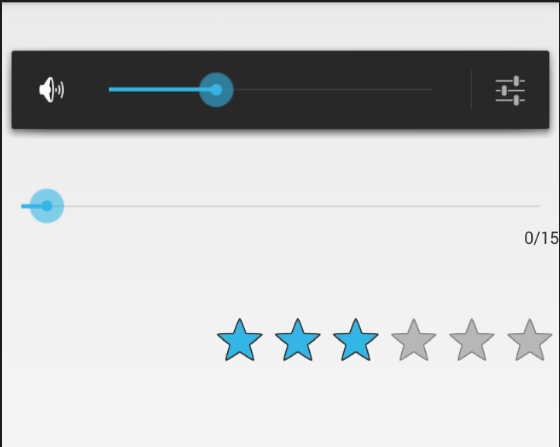
</RelativeLayout>SeekBar 拖动条
跟ProgressBar一样,只是多了一个监听的方法
setOnSeekBarChangeListener
重写三个方法
    onStopTrackingTouch(SeekBar seekBar)
    拖拽完成后的方法
    onStartTrackingTouch(SeekBar seekBar)
    开始拖拽时,也就是用户刚好点上去的方法
    onProgressChanged(SeekBar seekBar, int progress,boolean fromUser)
    每次进度改变都会调用,fromUser是用来判断是否是用户改变的进度
获取系统服务
XXXManager manager = (XXXManager)Context.getSystemService(服务名称);
示例图如下
/**
 * 需要用他调节音量大小
 *
 * @author Administrator
 *
 */

/**
 * 所有操作系统的 都需要Service系统服务
 *
 * @author Administrator
 *
 */

public class MainActivity extends Activity {
    SeekBar seekBar;
    TextView tv;
    AudioManager manager;

    @Override
    protected void onCreate(Bundle savedInstanceState) {
        super.onCreate(savedInstanceState);
        setContentView(R.layout.activity_main);
        seekBar = (SeekBar) findViewById(R.id.seekBar1);
        tv = (TextView) findViewById(R.id.tv);
        seekBar.setOnSeekBarChangeListener(new OnSeekBarChangeListener() {

            @Override
            public void onStopTrackingTouch(SeekBar seekBar) {
                // 拖拽完毕
            }

            @Override
            public void onStartTrackingTouch(SeekBar seekBar) {
                // 开始拖拽时 用户刚好点上去
            }

            @Override
            public void onProgressChanged(SeekBar seekBar, int progress,
                    boolean fromUser) {
                // 每次进度改变都会调用
                // 是否是用户改变的呢???
                // if (fromUser) {
                tv.setText(progress + "/" + seekBar.getMax());
                // }
                // 拖动进度条,我需要改变音量
                // flags用来 需不需要声音 是否需要ui
                manager.setStreamVolume(AudioManager.STREAM_MUSIC, progress,
                        AudioManager.FLAG_SHOW_UI
                                | AudioManager.FLAG_PLAY_SOUND);

            }
        });
        // seekBar.setMax(200);
        // seekBar.setProgress(50);

        // 获取系统服务
        // 获取音频管理器
        manager = (AudioManager) getSystemService(Context.AUDIO_SERVICE);
        // 获取他的最大值 0-15
        int max = manager.getStreamMaxVolume(AudioManager.STREAM_MUSIC);
        seekBar.setMax(max);
        // 本来就有一个声量值
        int volumn = manager.getStreamVolume(AudioManager.STREAM_MUSIC);
        Log.e("TAG", volumn + "   ");
        seekBar.setProgress(volumn);
    }

    @Override
    public boolean onKeyUp(int keyCode, KeyEvent event) {
        if (keyCode == KeyEvent.KEYCODE_VOLUME_UP) {
            // ++
            seekBar.setProgress(seekBar.getProgress() + 1);
        } else if (keyCode == KeyEvent.KEYCODE_VOLUME_DOWN) {
            seekBar.setProgress(seekBar.getProgress() - 1);
        }
        return super.onKeyUp(keyCode, event);
    }
}


//xml中的配置
<RelativeLayout xmlns:android="http://schemas.android.com/apk/res/android"
    xmlns:tools="http://schemas.android.com/tools"
    android:layout_width="match_parent"
    android:layout_height="match_parent"
    tools:context="com.xykj.id05_10_10seekbar.MainActivity" >


    <SeekBar
        android:id="@+id/seekBar1"
        android:layout_width="match_parent"
        android:layout_height="wrap_content"
        android:layout_alignParentLeft="true"
        android:layout_below="@+id/textView1"
        android:layout_marginTop="152dp" />

    <TextView
        android:layout_width="wrap_content"
        android:layout_height="wrap_content"
        android:id="@+id/tv"
        android:layout_below="@id/seekBar1"
        android:layout_alignRight="@id/seekBar1"
        android:text="0/15"
        />

   <RatingBar
        android:id="@+id/ratingBar1"
        android:layout_width="wrap_content"
        android:layout_height="wrap_content"
        android:layout_alignParentRight="true"
        android:layout_below="@+id/tv"
        android:layout_marginTop="51dp"
        android:numStars="6"
        android:rating="3" />
</RelativeLayout>
RatingBar
同上SeekBar,就是图像不一样
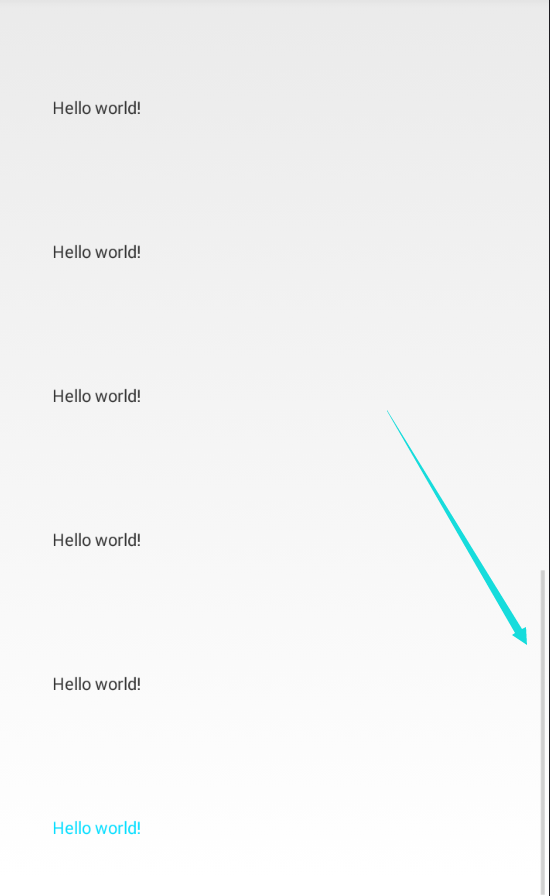
ScrollView
只能镶嵌一个View,一般镶嵌布局
滑动事件 view.fullScroll(ScrollView.FOCUS_DOWN); 必须放在post或者
onWindowFocusChange中
示例图如下
ublic class MainActivity extends Activity {

    ScrollView view;

    @Override
    protected void onCreate(Bundle savedInstanceState) {
        super.onCreate(savedInstanceState);
        setContentView(R.layout.activity_main);
        view = (ScrollView) findViewById(R.id.view);
        // 滑动到指定位置
        // 这个方法必须等待view完全显示
        // post 延迟操作
        int width = view.getWidth();
        Log.e("TAG", width + "  ");
        final long startTime = System.currentTimeMillis();
        // view在这里还并没有在完成
        view.post(new Runnable() {

            @Override
            public void run() {
                int width = view.getWidth();
                Log.e("TAG", width + "  "
                        + (System.currentTimeMillis() - startTime));
                view.fullScroll(ScrollView.FOCUS_DOWN);
            }
        });
    }
    //
    // @Override
    // public void onWindowFocusChanged(boolean hasFocus) {
    // super.onWindowFocusChanged(hasFocus);
    // view.fullScroll(ScrollView.FOCUS_DOWN);
    // }

}

//xml注意,必须把屏幕占满
<ScrollView xmlns:android="http://schemas.android.com/apk/res/android"
    xmlns:tools="http://schemas.android.com/tools"
    android:layout_width="match_parent"
    android:layout_height="match_parent"
    android:id="@+id/sv"
    tools:context="com.example.id05_10_11scrollveiw.MainActivity" >

    <LinearLayout
        android:layout_width="wrap_content"
        android:layout_height="wrap_content"
        android:orientation="vertical" >

        <TextView
            android:layout_width="wrap_content"
            android:layout_height="wrap_content"
            android:layout_margin="50dp"
            android:text="@string/hello_world" />

        <TextView
            android:layout_width="wrap_content"
            android:layout_height="wrap_content"
            android:layout_margin="50dp"
            android:text="@string/hello_world" />

        <TextView
            android:layout_width="wrap_content"
            android:layout_height="wrap_content"
            android:layout_margin="50dp"
            android:text="@string/hello_world" />

        <TextView
            android:layout_width="wrap_content"
            android:layout_height="wrap_content"
            android:layout_margin="50dp"
            android:text="@string/hello_world" />

        <TextView
            android:layout_width="wrap_content"
            android:layout_height="wrap_content"
            android:layout_margin="50dp"
            android:text="@string/hello_world" />

        <TextView
            android:layout_width="wrap_content"
            android:layout_height="wrap_content"
            android:layout_margin="50dp"
            android:text="@string/hello_world" />

        <TextView
            android:layout_width="wrap_content"
            android:layout_height="wrap_content"
            android:layout_margin="50dp"
            android:text="@string/hello_world" />

        <TextView
            android:layout_width="wrap_content"
            android:layout_height="wrap_content"
            android:layout_margin="50dp"
            android:text="@string/hello_world" />

        <TextView
            android:layout_width="wrap_content"
            android:layout_height="wrap_content"
            android:layout_margin="50dp"
            android:text="@string/hello_world" />

        <TextView
            android:layout_width="wrap_content"
            android:layout_height="wrap_content"
            android:layout_margin="50dp"
            android:text="@string/hello_world" />

        <TextView
            android:layout_width="wrap_content"
            android:layout_height="wrap_content"
            android:layout_margin="50dp"
            android:text="@string/hello_world" />

        <TextView
            android:layout_width="wrap_content"
            android:layout_height="wrap_content"
            android:layout_margin="50dp"
            android:text="@string/hello_world" />

        <TextView
            android:layout_width="wrap_content"
            android:layout_height="wrap_content"
            android:layout_margin="50dp"
            android:text="@string/hello_world" />

        <TextView
            android:layout_width="wrap_content"
            android:layout_height="wrap_content"
            android:layout_margin="50dp"
            android:text="@string/hello_world" />

        <TextView
            android:layout_width="wrap_content"
            android:layout_height="wrap_content"
            android:layout_margin="50dp"
            android:text="@string/hello_world" />

        <TextView
            android:layout_width="wrap_content"
            android:layout_height="wrap_content"
            android:layout_margin="50dp"
            android:text="@string/hello_world" />

        <TextView
            android:layout_width="wrap_content"
            android:layout_height="wrap_content"
            android:layout_margin="50dp"
            android:text="@string/hello_world"
            android:textColor="@android:color/holo_blue_bright" />
    </LinearLayout>

</ScrollView>
HorizontalScrollView 水平滚动视图
HorizontalScrollView和ScrollView差不多,只是滚动方式为横向
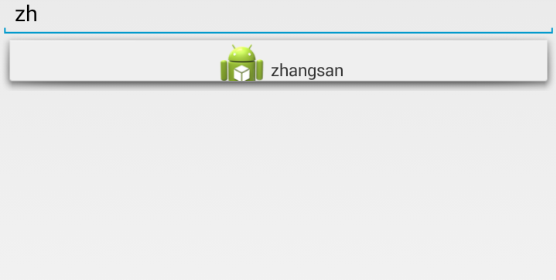
AutoCompleteTextView自动完成文本框
AutoCompleteTextView继承与EditText,拥有EditText的所有属性和方法。
常用属性:
1. android:completionHint 用于弹出的下拉菜单指定提示标题
2. android:completionThreshold 用于指定用户至少输入几个字符才会显示提示
3. android:dropDownHeight 用于指定下拉菜单的高度
4. android:dropDownHorizontalOffset 用于指定下拉腰间与文本之间的水平偏移.下拉
腰间默认与文本左对齐
5. android:dropDownVerticalOffset 用于指定下拉腰间与文本之间的垂直领衔.下拉
菜单默认紧跟文本框
6. android:dropDownWidth 用于指定下拉菜单的宽度
7. android:popupBackground 用于为下拉菜单设置背景
示例图如下:
public class MainActivity extends Activity {

    // 数据源
    String[] data = { "zhangsan", "lisi", "wangwu", "zhaoliu", "tianqi",
            "wangba", "xiaojiujiu", "李四", "李五", "李六" };

    AutoCompleteTextView actv;

    @Override
    protected void onCreate(Bundle savedInstanceState) {
        super.onCreate(savedInstanceState);
        setContentView(R.layout.activity_main);
        // 显示
        actv = (AutoCompleteTextView) findViewById(R.id.actv);
        // 适配器
        ArrayAdapter<String> adapter = new ArrayAdapter<String>(this,
                R.layout.item_actv, R.id.tv, data);
        // 所有需要适配器的view
        actv.setAdapter(adapter);
    }

}

//主xml
<RelativeLayout xmlns:android="http://schemas.android.com/apk/res/android"
    xmlns:tools="http://schemas.android.com/tools"
    android:layout_width="match_parent"
    android:layout_height="match_parent"
    tools:context="com.example.lesson7_autocompletetextview.MainActivity" >

    <AutoCompleteTextView
        android:id="@+id/actv"
        android:layout_width="match_parent"
        android:layout_height="wrap_content"
        android:completionThreshold="1"
        android:dropDownHeight="50dp"
        android:hint="输入手机号" />

</RelativeLayout>

//显示样式的xml
<?xml version="1.0" encoding="utf-8"?>
<LinearLayout xmlns:android="http://schemas.android.com/apk/res/android"
    android:layout_width="match_parent"
    android:layout_height="match_parent"
    android:gravity="center"
    android:orientation="horizontal" >

    <ImageView
        android:layout_width="wrap_content"
        android:layout_height="wrap_content"
        android:src="@drawable/ic_launcher" />

    <TextView
        android:id="@+id/tv"
        android:layout_width="wrap_content"
        android:layout_height="wrap_content" >
    </TextView>

</LinearLa
MultiAutoCompleteTextView 自动完成文本框
AutoCompleteTextView和MultiAutoCompleteTextView都需要通过适配器将数据绑定到组件上
MultiAutoCompleteTextView必须制定分隔符
setTokenizer(new MultiAutoCompleteTextView.CommaTokenizer())
示例图如下:

public class MainActivity extends Activity {

    MultiAutoCompleteTextView mactv;

    // 数据源
    String[] data = { "zhangsan", "lisi", "wangwu", "zhaoliu", "tianqi",
            "wangba", "xiaojiujiu", "李四" };
    ArrayAdapter<String> adapter;

    @Override
    protected void onCreate(Bundle savedInstanceState) {
        super.onCreate(savedInstanceState);
        setContentView(R.layout.activity_main);
        mactv = (MultiAutoCompleteTextView) findViewById(R.id.mactv);
        adapter = new ArrayAdapter<String>(this,
                android.R.layout.simple_list_item_1, data);
        mactv.setAdapter(adapter);
        // CommaTokenizer实现好了的 以逗号分隔
        mactv.setTokenizer(new MultiAutoCompleteTextView.CommaTokenizer());
    }

}

//xml中的配置
<RelativeLayout xmlns:android="http://schemas.android.com/apk/res/android"
    xmlns:tools="http://schemas.android.com/tools"
    android:layout_width="match_parent"
    android:layout_height="match_parent"
    android:paddingBottom="@dimen/activity_vertical_margin"
    android:paddingLeft="@dimen/activity_horizontal_margin"
    android:paddingRight="@dimen/activity_horizontal_margin"
    android:paddingTop="@dimen/activity_vertical_margin"
    tools:context="com.example.lesson7_multiautocompletetextview.MainActivity" >

    <MultiAutoCompleteTextView
        android:id="@+id/mactv"
        android:layout_width="match_parent"
        android:layout_height="wrap_content" />

</RelativeLayout>


 107
107

 被折叠的 条评论
为什么被折叠?
被折叠的 条评论
为什么被折叠?
 到【灌水乐园】发言


